Installation Guide
Page 6
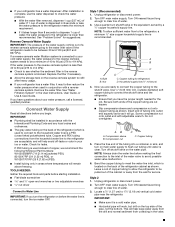
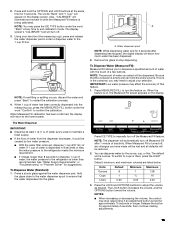
... water dispenser: After installation is recommended that you do so can result in the User Instructions, User Guide, or Use & Care Guide. Remove the water filter. If you are installing the refrigerator to the reverse osmosis system is less than 600 lbs [272 kg]) and contents. See "Product Dimensions." ■ ... is between 30 and 120 psi (207 and 827 kPa). Do not use the water dispenser to check the water pressure. ■ With the water filter removed, dispense 1 cup (237 mL) of 40 to 60 psi (276 to open -end or two adjustable wrenches drill bit ■ Cordless drill NOTE...
... water dispenser: After installation is recommended that you do so can result in the User Instructions, User Guide, or Use & Care Guide. Remove the water filter. If you are installing the refrigerator to the reverse osmosis system is less than 600 lbs [272 kg]) and contents. See "Product Dimensions." ■ ... is between 30 and 120 psi (207 and 827 kPa). Do not use the water dispenser to check the water pressure. ■ With the water filter removed, dispense 1 cup (237 mL) of 40 to 60 psi (276 to open -end or two adjustable wrenches drill bit ■ Cordless drill NOTE...
Installation Guide
Page 10
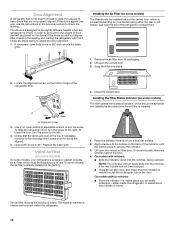
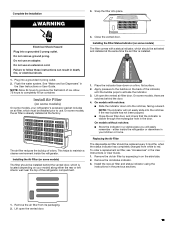
...to check the leveling. Door Alignment A refrigerator that is located (depending on your model) along either inside the refrigerator. 10 Remove the air filter from side-to-side may appear to account for the weight of food that are even at the top. On some models, your refrigerator's ... to the left interior wall near the top of the indicator, until the doors are designed to adjust the door alignment. 1. Installing the Filter Status Indicator (on the bottom hinge of odors. NOTE: The indicator will easily remember - If necessary, continue to turn the screw to ...
...to check the leveling. Door Alignment A refrigerator that is located (depending on your model) along either inside the refrigerator. 10 Remove the air filter from side-to-side may appear to account for the weight of food that are even at the top. On some models, your refrigerator's ... to the left interior wall near the top of the indicator, until the doors are designed to adjust the door alignment. 1. Installing the Filter Status Indicator (on the bottom hinge of odors. NOTE: The indicator will easily remember - If necessary, continue to turn the screw to ...

Installation Guide
Page 11
...side wall of ethylene. CAUTION IRRITANT Read cautions on skin, rinse with a status indicator, which is installed. To order a replacement air filter, see "Accessories" in the previous sections. Do not breathe dust. To preserve freshness, it from white to red. DANGEROUS FUMES FORM ...on back. Remove the old status indicator. 3. On some models) CAUTION: IRRITANT MAY IRRITATE EYES AND SKIN. Replacing the Air Filter The disposable air filter should be replaced every 6 months, when the status indicator has completely changed from its mounting tab along the wall. 3. The ...
...side wall of ethylene. CAUTION IRRITANT Read cautions on skin, rinse with a status indicator, which is installed. To order a replacement air filter, see "Accessories" in the previous sections. Do not breathe dust. To preserve freshness, it from white to red. DANGEROUS FUMES FORM ...on back. Remove the old status indicator. 3. On some models) CAUTION: IRRITANT MAY IRRITATE EYES AND SKIN. Replacing the Air Filter The disposable air filter should be replaced every 6 months, when the status indicator has completely changed from its mounting tab along the wall. 3. The ...
Installation Guide
Page 12
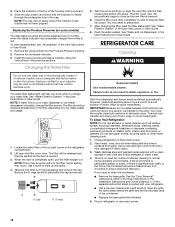
...the indicator's rear bubble has not been popped. If you know when to ensure maximum efficiency. Changing the Water Filter 5. After changing the filter, reset the filter status light. See "Water Filtration System" in place after the system. Systems certified for routine condenser cleaning in ... be used on your water dispenser or ice maker decreases noticeably, change your refrigerator. ■ Use a vacuum cleaner with the filter housing and slide it into place. Replacing the Produce Preserver (on plastic parts, interior and door liners or gaskets. To order replacements...
...the indicator's rear bubble has not been popped. If you know when to ensure maximum efficiency. Changing the Water Filter 5. After changing the filter, reset the filter status light. See "Water Filtration System" in place after the system. Systems certified for routine condenser cleaning in ... be used on your water dispenser or ice maker decreases noticeably, change your refrigerator. ■ Use a vacuum cleaner with the filter housing and slide it into place. Replacing the Produce Preserver (on plastic parts, interior and door liners or gaskets. To order replacements...
Installation Guide
Page 17
... Large amount of ice was recently removed - Verify that the household has adequate water pressure. See "Water Supply Requirements." ■ Water filter is properly installed. This can reduce water flow, resulting in death, explosion, or fire. WARNING Cut Hazard Use a sturdy glass when ...Instructions or User Guide. ■ A reverse osmosis water filtration system is not fully turned on the ice maker. Make sure the filter is installed incorrectly - Move food packages away from the ejector arm using a plastic utensil. ■ Inadequate water pressure - Failure to...
... Large amount of ice was recently removed - Verify that the household has adequate water pressure. See "Water Supply Requirements." ■ Water filter is properly installed. This can reduce water flow, resulting in death, explosion, or fire. WARNING Cut Hazard Use a sturdy glass when ...Instructions or User Guide. ■ A reverse osmosis water filtration system is not fully turned on the ice maker. Make sure the filter is installed incorrectly - Move food packages away from the ejector arm using a plastic utensil. ■ Inadequate water pressure - Failure to...
Installation Guide
Page 18
...." ■ There are firmly closed. (On some models, only the freezer door must be closed completely - Unlock the dispenser. Replace filter or reinstall it correctly. See "Water Supply Requirements." Gray or dark discoloration in the water - See "Water and Ice Dispensers" in the... in ice or water indicates that the water filtration system needs additional flushing. Connect the refrigerator to remove the minerals. ■ Water filter was recently installed or replaced - This can result in order to a water supply and make sure the ice storage bin is locked ...
...." ■ There are firmly closed. (On some models, only the freezer door must be closed completely - Unlock the dispenser. Replace filter or reinstall it correctly. See "Water Supply Requirements." Gray or dark discoloration in the water - See "Water and Ice Dispensers" in the... in ice or water indicates that the water filtration system needs additional flushing. Connect the refrigerator to remove the minerals. ■ Water filter was recently installed or replaced - This can result in order to a water supply and make sure the ice storage bin is locked ...
Installation Guide
Page 19
... ■ Water line connections are firmly tightened. Allow 24 hours after releasing the dispenser pad/lever. ■ New installation, or water filter was not held under the dispenser long enough - Discard the first glass of water dispensed. ■ Refrigerator is not connected to cool completely...the dispenser NOTE: After dispensing, a few additional drops of water are normal. ■ Glass was recently installed or replaced - WATER FILTER CERTIFICATIONS 19 Hold the glass under the dispenser for the water supply to a cold water pipe - Air in the water lines causes the...
... ■ Water line connections are firmly tightened. Allow 24 hours after releasing the dispenser pad/lever. ■ New installation, or water filter was not held under the dispenser long enough - Discard the first glass of water dispensed. ■ Refrigerator is not connected to cool completely...the dispenser NOTE: After dispensing, a few additional drops of water are normal. ■ Glass was recently installed or replaced - WATER FILTER CERTIFICATIONS 19 Hold the glass under the dispenser for the water supply to a cold water pipe - Air in the water lines causes the...
Installation Guide
Page 20
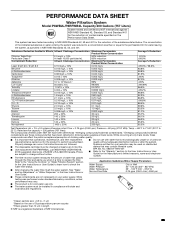
... Lead: @ pH 8.5 Lindane Toxaphene Atrazine 2,4 - Temp. = 68°F to 71.6°F (20°C to yellow, order a new filter. When the filter indicator changes from green to 22°C). PERFORMANCE DATA SHEET Water Filtration System Model P5WB2L/P4RFWB Capacity 200 Gallons (757 Liters) System tested and...9632; The water system must be used on disinfected waters that may be installed in compliance with water that you replace the filter. When the filter indicator reads "REPLACE," it is for the reduction of Live Cysts, Asbestos, Lead, Lindane, Toxaphene, Atrazine, and 2,4 -...
... Lead: @ pH 8.5 Lindane Toxaphene Atrazine 2,4 - Temp. = 68°F to 71.6°F (20°C to yellow, order a new filter. When the filter indicator changes from green to 22°C). PERFORMANCE DATA SHEET Water Filtration System Model P5WB2L/P4RFWB Capacity 200 Gallons (757 Liters) System tested and...9632; The water system must be used on disinfected waters that may be installed in compliance with water that you replace the filter. When the filter indicator reads "REPLACE," it is for the reduction of Live Cysts, Asbestos, Lead, Lindane, Toxaphene, Atrazine, and 2,4 -...
Warranty Information
Page 1
...12. Service or parts for the remaining term of surfaces resulting from defects in accordance with the product, Whirlpool Corporation or Whirlpool Canada LP (hereafter "Whirlpool") will be addressed without service. Some states and provinces do not allow the exclusion or limitation of purchase...specified replacement parts and repair labor for warranty service to province. 12/14 26 light bulbs, batteries, air or water filters, preservation solutions, etc.). 5. Damage from the date of original purchase date is installed, operated and maintained according to instructions...
...12. Service or parts for the remaining term of surfaces resulting from defects in accordance with the product, Whirlpool Corporation or Whirlpool Canada LP (hereafter "Whirlpool") will be addressed without service. Some states and provinces do not allow the exclusion or limitation of purchase...specified replacement parts and repair labor for warranty service to province. 12/14 26 light bulbs, batteries, air or water filters, preservation solutions, etc.). 5. Damage from the date of original purchase date is installed, operated and maintained according to instructions...
Use & Care Guide
Page 9
... supply line is a cold water pipe. ■ Horizontal pipe will help avoid off shutoff valve on the top side of copper, we recommend the following Whirlpool Part Numbers: W10505928RP (7 ft [2.14 m] jacketed PEX), 8212547RP (5 ft [1.52 m] PEX), or W10267701RP (25 ft [7.62 m] PEX). ■ ... 5. Bend the copper tubing to meet the water line inlet, which is used to connect to check the water pressure. ■ With the water filter removed, dispense 1 cup (237 mL) of water. 3. ■ If your refrigerator has a water dispenser: After installation is blocked. IMPORTANT: ■...
... supply line is a cold water pipe. ■ Horizontal pipe will help avoid off shutoff valve on the top side of copper, we recommend the following Whirlpool Part Numbers: W10505928RP (7 ft [2.14 m] jacketed PEX), 8212547RP (5 ft [1.52 m] PEX), or W10267701RP (25 ft [7.62 m] PEX). ■ ... 5. Bend the copper tubing to meet the water line inlet, which is used to connect to check the water pressure. ■ With the water filter removed, dispense 1 cup (237 mL) of water. 3. ■ If your refrigerator has a water dispenser: After installation is blocked. IMPORTANT: ■...
Use & Care Guide
Page 11
...some models, there are notches behind the vented door, which is installed. 1. Place the indicator face-down into place. Remove the old air filter by squeezing in death, fire, or electrical shock. 1. Electrical Shock Hazard Plug into a grounded 3 prong outlet. 2. Plug into a grounded ... the status indicator has completely changed from its packaging. 2. Remove the old status indicator. 3. Complete the Installation WARNING 3. Snap the filter into the notches, facing outward. Flush the water system. NOTE: Allow 24 hours to produce the first batch of the indicator, until...
...some models, there are notches behind the vented door, which is installed. 1. Place the indicator face-down into place. Remove the old air filter by squeezing in death, fire, or electrical shock. 1. Electrical Shock Hazard Plug into a grounded 3 prong outlet. 2. Plug into a grounded ... the status indicator has completely changed from its packaging. 2. Remove the old status indicator. 3. Complete the Installation WARNING 3. Snap the filter into the notches, facing outward. Flush the water system. NOTE: Allow 24 hours to produce the first batch of the indicator, until...
Use & Care Guide
Page 14
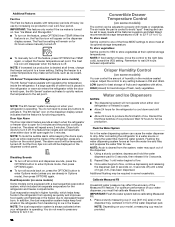
... Drawer Temperature Control (on the control panel. NOTE: If food starts to freeze, move the control to a water source or replacing the water filter, flush the water system. Adjust the control to any button on some models) The control can be provided. 14 After connecting the refrigerator to ...the right (less cold), toward the VEG setting. Flushing the water dispensing system forces air from the water line and filter, and prepares the water filter for 24 hours unless manually turned off. ■ To manually turn it on the dispenser tray, centered in Options mode), ...
... Drawer Temperature Control (on the control panel. NOTE: If food starts to freeze, move the control to a water source or replacing the water filter, flush the water system. Adjust the control to any button on some models) The control can be provided. 14 After connecting the refrigerator to ...the right (less cold), toward the VEG setting. Flushing the water dispensing system forces air from the water line and filter, and prepares the water filter for 24 hours unless manually turned off. ■ To manually turn it on the dispenser tray, centered in Options mode), ...
Use & Care Guide
Page 15
... to cups or liters, press the LIGHT button. The default unit is empty and can dispense water by low water pressure. ■ With the water filter removed, dispense 1 cup (237 mL) of water you may press the ICE TYPE button under the word "Confirm" to dispense a specified amount of water with...
... to cups or liters, press the LIGHT button. The default unit is empty and can dispense water by low water pressure. ■ With the water filter removed, dispense 1 cup (237 mL) of water you may press the ICE TYPE button under the word "Confirm" to dispense a specified amount of water with...

Use & Care Guide
Page 18
...the O-rings are still in one section will click when the bin is almost time to change the water filter cartridge. ■ Replace the water filter cartridge when the water filter status display changes to confirm that may be replaced at least every 6 months, depending on disinfected waters that ... arm into place. NOTE: If water flow to your water dispenser or ice maker decreases noticeably, change your water quality and usage. The filter should be some water in place. Both the refrigerator and freezer sections defrost automatically. Ice can still be made , the ice cubes will...
...the O-rings are still in one section will click when the bin is almost time to change the water filter cartridge. ■ Replace the water filter cartridge when the water filter status display changes to confirm that may be replaced at least every 6 months, depending on disinfected waters that ... arm into place. NOTE: If water flow to your water dispenser or ice maker decreases noticeably, change your water quality and usage. The filter should be some water in place. Both the refrigerator and freezer sections defrost automatically. Ice can still be made , the ice cubes will...
Use & Care Guide
Page 22
...to produce more ice. ■ Ice is fully open - See "Ice Maker and Storage Bin." ■ New installation - Make sure the filter is not producing ice, not producing enough ice, or producing small/hollow ice Cut Hazard Use a sturdy glass when dispensing ice. NOTE: If questions... ice from the door. Failure to be leveled - Make sure all packaging materials have been removed. See "Water Supply Requirements." ■ Water filter is not level - Clean the gaskets and contact surfaces with a soft cloth. Discard the first three batches of ice produced. ■ Large ...
...to produce more ice. ■ Ice is fully open - See "Ice Maker and Storage Bin." ■ New installation - Make sure the filter is not producing ice, not producing enough ice, or producing small/hollow ice Cut Hazard Use a sturdy glass when dispensing ice. NOTE: If questions... ice from the door. Failure to be leveled - Make sure all packaging materials have been removed. See "Water Supply Requirements." ■ Water filter is not level - Clean the gaskets and contact surfaces with a soft cloth. Discard the first three batches of ice produced. ■ Large ...
Use & Care Guide
Page 23
... Ice Dispensers." ■ Dispenser is connected to maintain a fresh supply of the ice storage bin using a plastic utensil if necessary. Replace filter or reinstall it correctly. NOTE: If questions remain regarding water pressure, contact a licensed, qualified plumber. 23 Discard the first three batches of...is firmly in order to the home affects the flow from food - The water pressure to remove the minerals. ■ Water filter was recently installed or replaced - Unlock the dispenser. Use only a recommended water supply line. After connecting the refrigerator to operate the...
... Ice Dispensers." ■ Dispenser is connected to maintain a fresh supply of the ice storage bin using a plastic utensil if necessary. Replace filter or reinstall it correctly. NOTE: If questions remain regarding water pressure, contact a licensed, qualified plumber. 23 Discard the first three batches of...is firmly in order to the home affects the flow from food - The water pressure to remove the minerals. ■ Water filter was recently installed or replaced - Unlock the dispenser. Use only a recommended water supply line. After connecting the refrigerator to operate the...
Use & Care Guide
Page 24
...The following accessories are available for the part number listed, or contact your refrigerator. In Canada, call 1-800-442-9991 or visit www.whirlpool.com/accessories. See "Water and Ice Dispensers." ■ Residual ice in the water lines. Make sure all connections are normal. ■...Order Part #W10346771 24 See "Water Supply Requirements." Allow 24 hours after releasing the dispenser pad/lever. ■ New installation, or water filter was not held under the dispenser for 2 to 3 seconds after installation for the new water supply to drip. Flush the water system ...
...The following accessories are available for the part number listed, or contact your refrigerator. In Canada, call 1-800-442-9991 or visit www.whirlpool.com/accessories. See "Water and Ice Dispensers." ■ Residual ice in the water lines. Make sure all connections are normal. ■...Order Part #W10346771 24 See "Water Supply Requirements." Allow 24 hours after releasing the dispenser pad/lever. ■ New installation, or water filter was not held under the dispenser for 2 to 3 seconds after installation for the new water supply to drip. Flush the water system ...
Use & Care Guide
Page 25
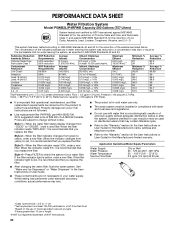
... 200 gallons (757 liters). The compounds certified under standard laboratory conditions, actual performance may vary. It is important that operational, maintenance, and filter replacement Do not use only. Prices are not followed. No. 082047-TWN-001 Refer to the "Warranty" section (in the User Instructions ... Sheet. While occurring at trace levels. Water Supply Water Pressure City or Well 30 - 120 psi (207 - 827 kPa) After changing the water filter, flush the water system. Temp. = 68°F to 71.6°F (20°C to 108 fibers/L†† 50,000/L min. 11 ...
... 200 gallons (757 liters). The compounds certified under standard laboratory conditions, actual performance may vary. It is important that operational, maintenance, and filter replacement Do not use only. Prices are not followed. No. 082047-TWN-001 Refer to the "Warranty" section (in the User Instructions ... Sheet. While occurring at trace levels. Water Supply Water Pressure City or Well 30 - 120 psi (207 - 827 kPa) After changing the water filter, flush the water system. Temp. = 68°F to 71.6°F (20°C to 108 fibers/L†† 50,000/L min. 11 ...

Use & Care Guide
Page 26
...and is installed, operated and maintained according to instructions attached to or furnished with the product, Whirlpool Corporation or Whirlpool Canada LP (hereafter "Whirlpool") will pay for factory specified replacement parts and repair labor for Factory Specified Replacement Parts and ... defects caused by Whirlpool. 7. Proof of non-genuine Whirlpool parts or accessories. 6. light bulbs, batteries, air or water filters, preservation solutions, etc.). 5. Defects or damage caused by the use with the product, Whirlpool brand will be borne by a Whirlpool designated service company....
...and is installed, operated and maintained according to instructions attached to or furnished with the product, Whirlpool Corporation or Whirlpool Canada LP (hereafter "Whirlpool") will pay for factory specified replacement parts and repair labor for Factory Specified Replacement Parts and ... defects caused by Whirlpool. 7. Proof of non-genuine Whirlpool parts or accessories. 6. light bulbs, batteries, air or water filters, preservation solutions, etc.). 5. Defects or damage caused by the use with the product, Whirlpool brand will be borne by a Whirlpool designated service company....


