
Installation Guide
Page 2
... fitting (coupling). ■ Depending on water line connections, you may vary based on style of door handle. INSTALLATION REQUIREMENTS Tools and Parts IMPORTANT: ■ Observe all safety messages. The depth for the largest available handle is installed in this manual and on some models):...¹⁄₂" Open-end wrenches ■ Two adjustable wrenches and ¹⁄₂" Socket wrenches PARTS NEEDED (on some models): Gather the required tools and parts before starting installation. This is , tell you what the potential hazard is the safety alert symbol. TOOLS...
... fitting (coupling). ■ Depending on water line connections, you may vary based on style of door handle. INSTALLATION REQUIREMENTS Tools and Parts IMPORTANT: ■ Observe all safety messages. The depth for the largest available handle is installed in this manual and on some models):...¹⁄₂" Open-end wrenches ■ Two adjustable wrenches and ¹⁄₂" Socket wrenches PARTS NEEDED (on some models): Gather the required tools and parts before starting installation. This is , tell you what the potential hazard is the safety alert symbol. TOOLS...

Installation Guide
Page 5
... outlet that a separate circuit serving only your refrigerator. When you have questions about your local plumbing codes. Water Supply Requirements Gather the required tools and parts before starting installation. Read and follow these instructions can result in conjunction with a reverse osmosis system. TOOLS NEEDED: ■ Flat-blade screwdriver Nut driver and...
... outlet that a separate circuit serving only your refrigerator. When you have questions about your local plumbing codes. Water Supply Requirements Gather the required tools and parts before starting installation. Read and follow these instructions can result in conjunction with a reverse osmosis system. TOOLS NEEDED: ■ Flat-blade screwdriver Nut driver and...
Installation Guide
Page 9
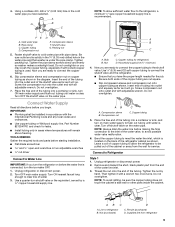
... clamp. Tighten packing nut. Screw the compression nut onto the outlet end with adjustable wrench. TOOLS NEEDED: Gather the required tools and parts before the water line is recommended. Use a quarter-turn ON main water supply and flush out tubing until water is used. Compression... To avoid rattling, be installed in accordance with the International Plumbing Code and any local codes and ordinances. ■ Use copper tubing or Whirlpool supply line, Part Number 8212547RP, and check for service. AB C D A. Fasten shutoff valve to meet the water line inlet, which is clear. Nut...
... clamp. Tighten packing nut. Screw the compression nut onto the outlet end with adjustable wrench. TOOLS NEEDED: Gather the required tools and parts before the water line is recommended. Use a quarter-turn ON main water supply and flush out tubing until water is used. Compression... To avoid rattling, be installed in accordance with the International Plumbing Code and any local codes and ordinances. ■ Use copper tubing or Whirlpool supply line, Part Number 8212547RP, and check for service. AB C D A. Fasten shutoff valve to meet the water line inlet, which is clear. Nut...

Installation Guide
Page 10
... the refrigerator as shown. 4. Install the water supply tube clamp around the water supply line to the OFF (right) setting. 2. Remove and discard the plastic part that leak. Tighten any connections (including connections at the valve) or nuts that leak. Tube clamp screw C. Copper tubing D. Valve inlet 7. Obtain a water strainer from...
... the refrigerator as shown. 4. Install the water supply tube clamp around the water supply line to the OFF (right) setting. 2. Remove and discard the plastic part that leak. Tighten any connections (including connections at the valve) or nuts that leak. Tube clamp screw C. Copper tubing D. Valve inlet 7. Obtain a water strainer from...
Use & Care Guide
Page 2
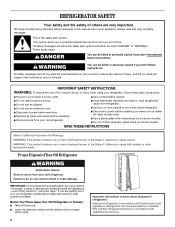
... have provided many important safety messages in death or brain damage. REFRIGERATOR SAFETY Your safety and the safety of others . Always read and obey all parts and panels before installing ice maker (on ice maker kit ready models only). ■ Use a sturdy glass when dispensing ice (on some models). All safety...
... have provided many important safety messages in death or brain damage. REFRIGERATOR SAFETY Your safety and the safety of others . Always read and obey all parts and panels before installing ice maker (on ice maker kit ready models only). ■ Use a sturdy glass when dispensing ice (on some models). All safety...

Use & Care Guide
Page 8
... anything sharp to be on some models) ■ Allow 24 hours to cubed, a few seconds after removing the glass from the pad. This can damage parts of or in the ice maker or storage bin.
... anything sharp to be on some models) ■ Allow 24 hours to cubed, a few seconds after removing the glass from the pad. This can damage parts of or in the ice maker or storage bin.
Use & Care Guide
Page 10
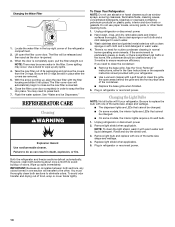
...cleaners such as window sprays, scouring cleansers, flammable fluids, cleaning waxes, concentrated detergents, bleaches or cleansers containing petroleum products on plastic parts, interior and door liners or gaskets. Be sure to clean the grille, the open areas behind the grille and the front ...: There may be cleaned every 2 to 3 months to close as the door is inserted. 6. Hand wash, rinse, and dry removable parts and interior surfaces thoroughly. Unplug refrigerator or disconnect power. 2. See "Water and Ice Dispensers." Wash stainless steel and painted metal exteriors with warm...
...cleaners such as window sprays, scouring cleansers, flammable fluids, cleaning waxes, concentrated detergents, bleaches or cleansers containing petroleum products on plastic parts, interior and door liners or gaskets. Be sure to clean the grille, the open areas behind the grille and the front ...: There may be cleaned every 2 to 3 months to close as the door is inserted. 6. Hand wash, rinse, and dry removable parts and interior surfaces thoroughly. Unplug refrigerator or disconnect power. 2. See "Water and Ice Dispensers." Wash stainless steel and painted metal exteriors with warm...
Use & Care Guide
Page 13
...osmosis water filtration system connected to a cold water pipe. Flush the water system. The first glass of water after installation for your authorized Whirlpool dealer. To order an accessory, call 1-800-807-6777. The water pressure to 3 seconds after releasing the dispenser lever/pad. ■.... See "Prepare the Water System" or "Water and Ice Dispensers." ■ Recently changed water filter? Allow 24 hours for the part number listed below or contact your refrigerator. If it does not close completely." ■ Refrigerator connected to cool completely. ■ Recently...
...osmosis water filtration system connected to a cold water pipe. Flush the water system. The first glass of water after installation for your authorized Whirlpool dealer. To order an accessory, call 1-800-807-6777. The water pressure to 3 seconds after releasing the dispenser lever/pad. ■.... See "Prepare the Water System" or "Water and Ice Dispensers." ■ Recently changed water filter? Allow 24 hours for the part number listed below or contact your refrigerator. If it does not close completely." ■ Refrigerator connected to cool completely. ■ Recently...
Use & Care Guide
Page 14
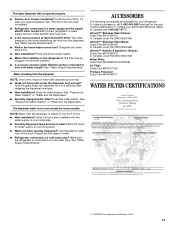
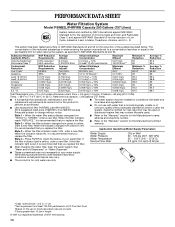
... testing was reduced to a concentration less than or equal to the permissible limit for water leaving the system, as advertised. ■ Use replacement filter P4RFWB, part #W10295370. 2012 suggested retail price of Chlorine Taste and Odor, and Particulate Class I*; Rated service capacity = 200 gallons (757 liters). ■ It is for the...
... testing was reduced to a concentration less than or equal to the permissible limit for water leaving the system, as advertised. ■ Use replacement filter P4RFWB, part #W10295370. 2012 suggested retail price of Chlorine Taste and Odor, and Particulate Class I*; Rated service capacity = 200 gallons (757 liters). ■ It is for the...

Use & Care Guide
Page 15
... to or furnished with the product, Whirlpool Corporation or Whirlpool Canada LP (hereafter "Whirlpool") will pay for Factory Specified Parts and repair labor to obtain service under this limited warranty. Proof of your authorized Whirlpool dealer to determine if another warranty applies... to you . This major appliance is used in accordance with Whirlpool's published installation instructions. 11. LIMITATION OF REMEDIES; ITEMS EXCLUDED FROM WARRANTY This limited warranty does not cover: 1. Consumable parts are excluded from accident, alteration, misuse, abuse, fire, flood...
... to or furnished with the product, Whirlpool Corporation or Whirlpool Canada LP (hereafter "Whirlpool") will pay for Factory Specified Parts and repair labor to obtain service under this limited warranty. Proof of your authorized Whirlpool dealer to determine if another warranty applies... to you . This major appliance is used in accordance with Whirlpool's published installation instructions. 11. LIMITATION OF REMEDIES; ITEMS EXCLUDED FROM WARRANTY This limited warranty does not cover: 1. Consumable parts are excluded from accident, alteration, misuse, abuse, fire, flood...
Warranty Information
Page 1
...or water filters. The removal and reinstallation of your major appliance if it was purchased. Replacement parts or repair labor on how to use of products not approved by Whirlpool. 5. Some states and provinces do not allow limitations on the inside wall of the refrigerator ... PRODUCT REPAIR AS PROVIDED HEREIN. For assistance or service in the U.S.A., call 1-800-807-6777. Repairs to parts or systems resulting from warranty coverage. 4. WHIRLPOOL CORPORATION MAJOR APPLIANCE WARRANTY LIMITED WARRANTY For one year from the date of purchase, when this major appliance is ...
...or water filters. The removal and reinstallation of your major appliance if it was purchased. Replacement parts or repair labor on how to use of products not approved by Whirlpool. 5. Some states and provinces do not allow limitations on the inside wall of the refrigerator ... PRODUCT REPAIR AS PROVIDED HEREIN. For assistance or service in the U.S.A., call 1-800-807-6777. Repairs to parts or systems resulting from warranty coverage. 4. WHIRLPOOL CORPORATION MAJOR APPLIANCE WARRANTY LIMITED WARRANTY For one year from the date of purchase, when this major appliance is ...


