
Installation Guide
Page 2
... door handle. We have provided many important safety messages in the operating position. ■ Comply with installation specifications and dimensions. ■ Remove any tools listed here. ■ Cordless drill or adjustable wrench Nut driver and drill bit ■ Flat-blade screwdriver and ¹⁄₂" Open-end wrenches ■ Two adjustable wrenches and ¹⁄₂" Socket wrenches PARTS NEEDED (on some models): ■ Your refrigerator...
... door handle. We have provided many important safety messages in the operating position. ■ Comply with installation specifications and dimensions. ■ Remove any tools listed here. ■ Cordless drill or adjustable wrench Nut driver and drill bit ■ Flat-blade screwdriver and ¹⁄₂" Open-end wrenches ■ Two adjustable wrenches and ¹⁄₂" Socket wrenches PARTS NEEDED (on some models): ■ Your refrigerator...

Installation Guide
Page 5
... stabilize the full weight of installation, cleaning, or removing a light bulb, turn the control (Thermostat, Refrigerator or Freezer Control depending on the model) to OFF and then disconnect the refrigerator from the electrical source. If the water pressure to the reverse osmosis system is connected to your cold water supply, the water pressure to the reverse osmosis system needs to be affected. Remove the water filter. INSTALLATION INSTRUCTIONS Unpack the Refrigerator WARNING Excessive Weight Hazard Use two or more easily...
... stabilize the full weight of installation, cleaning, or removing a light bulb, turn the control (Thermostat, Refrigerator or Freezer Control depending on the model) to OFF and then disconnect the refrigerator from the electrical source. If the water pressure to the reverse osmosis system is connected to your cold water supply, the water pressure to the reverse osmosis system needs to be affected. Remove the water filter. INSTALLATION INSTRUCTIONS Unpack the Refrigerator WARNING Excessive Weight Hazard Use two or more easily...

Installation Guide
Page 6
... centered left-to know about glass shelves and covers: Do not clean glass shelves or covers with warm water when they are heavy. The custom panels must be sure that you use two horizontally-centered 2" (5.08 cm) strips for added support. If you use spacer strips, it . Glass shelves and covers are cold. Shelves and covers may cause damage to sudden temperature changes or impact, such as shown in the Use & Care Guide. See the cleaning instructions in...
... centered left-to know about glass shelves and covers: Do not clean glass shelves or covers with warm water when they are heavy. The custom panels must be sure that you use two horizontally-centered 2" (5.08 cm) strips for added support. If you use spacer strips, it . Glass shelves and covers are cold. Shelves and covers may cause damage to sudden temperature changes or impact, such as shown in the Use & Care Guide. See the cleaning instructions in...

Installation Guide
Page 8
... allow for cleaning. A. Turn OFF main water supply. With the side trims properly seated in the valve. 3. Slide the upper trim into the door panel groove. 8. Turn ON nearest faucet long enough to clear line of copper tubing you need. Align the upper trim with the rivets on the lower left rear of the pipe, not the bottom. Install New Water Line (if required) TOOLS NEEDED: ■...
... allow for cleaning. A. Turn OFF main water supply. With the side trims properly seated in the valve. 3. Slide the upper trim into the door panel groove. 8. Turn ON nearest faucet long enough to clear line of copper tubing you need. Align the upper trim with the rivets on the lower left rear of the pipe, not the bottom. Install New Water Line (if required) TOOLS NEEDED: ■...

Installation Guide
Page 10
... of the refrigerator. 3. Systems certified for further instructions on the operation of your model, you may be accessed when the ice storage bin has been removed. Thread the provided nut onto the coupling on the ice maker. Then tighten it in water strainer. Open the freezer door and turn off ) until water begins to reduce strain on disinfected waters that is properly installed. See the Use & Care Guide for cyst...
... of the refrigerator. 3. Systems certified for further instructions on the operation of your model, you may be accessed when the ice storage bin has been removed. Thread the provided nut onto the coupling on the ice maker. Then tighten it in water strainer. Open the freezer door and turn off ) until water begins to reduce strain on disinfected waters that is properly installed. See the Use & Care Guide for cyst...

Installation Guide
Page 11
... they are located on the brackets on the bottom hinge of the refrigerator door. Replace the base grille. Turn refrigerator switch to "Open" position. 2. If Refrigerator Does Not Operate ■ Check that the circuit breaker is operating properly and that are still not aligned after refrigerator has been installed, set controls to the left . 4. If the doors appear this way, use the instructions in the Use & Care Guide. 11 Bottom hinge B. This makes it to...
... they are located on the brackets on the bottom hinge of the refrigerator door. Replace the base grille. Turn refrigerator switch to "Open" position. 2. If Refrigerator Does Not Operate ■ Check that the circuit breaker is operating properly and that are still not aligned after refrigerator has been installed, set controls to the left . 4. If the doors appear this way, use the instructions in the Use & Care Guide. 11 Bottom hinge B. This makes it to...
Dimension Guide
Page 1
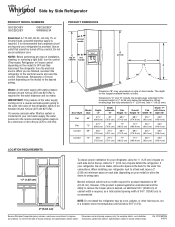
... installation, cleaning, or removing a light bulb, turn the control (Thermostat, Refrigerator or Freezer control depending on style of 40 to 60 psi (276 to change without notice. When leveling legs are finished, reconnect the refrigerator to the electrical source and reset the control (Thermostat, Refrigerator or Freezer control depending on the model) to a fixed wall, leave a 2" (5.08 cm) minimum space on each side (depending on each side and at the back for the water line connections...
... installation, cleaning, or removing a light bulb, turn the control (Thermostat, Refrigerator or Freezer control depending on style of 40 to 60 psi (276 to change without notice. When leveling legs are finished, reconnect the refrigerator to the electrical source and reset the control (Thermostat, Refrigerator or Freezer control depending on the model) to a fixed wall, leave a 2" (5.08 cm) minimum space on each side (depending on each side and at the back for the water line connections...
Use & Care Guide
Page 3
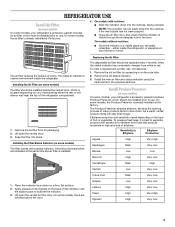
... replaced every 6 months, when the status indicator has completely changed from its packaging. 2. Install the new air filter and status indicator using the instructions in your model) along either inside the refrigerator. As a result, certain produce items will easily remember - Lift open the vented air filter door. On some models) The filter comes with notches: ■ Slide the indicator down . Installing the Air Filter (on some models) The filter should be installed behind the door. Installing the Filter Status Indicator...
... replaced every 6 months, when the status indicator has completely changed from its packaging. 2. Install the new air filter and status indicator using the instructions in your model) along either inside the refrigerator. As a result, certain produce items will easily remember - Lift open the vented air filter door. On some models) The filter comes with notches: ■ Slide the indicator down . Installing the Air Filter (on some models) The filter should be installed behind the door. Installing the Filter Status Indicator...
Use & Care Guide
Page 4
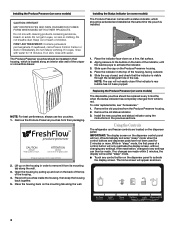
... "sleep" mode when the control buttons and dispenser pads have not been used for 15 minutes. Remove the old pouches from the Produce Preserver housing. 2. IMPORTANT: The display screen on back. After reactivation, changes to any settings can then be installed in eyes, on the dispenser panel. Using the Controls The refrigerator and freezer controls are made . The home screen will not easily close if the indicator's rear...
... "sleep" mode when the control buttons and dispenser pads have not been used for 15 minutes. Remove the old pouches from the Produce Preserver housing. 2. IMPORTANT: The display screen on back. After reactivation, changes to any settings can then be installed in eyes, on the dispenser panel. Using the Controls The refrigerator and freezer controls are made . The home screen will not easily close if the indicator's rear...
Use & Care Guide
Page 5
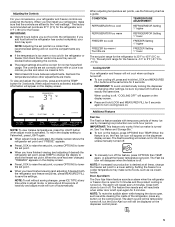
... refrigerator, make some foods, such as while cleaning the inside of the refrigerator, press any button on the dispenser control panel. 5 When you have finished viewing (and adjusting if desired) the refrigerator set point, press TEMP to turn it off , "COOLING OFF" will turn cooling off, press and hold the TEMP button for normal household usage. To view and adjust the set to a lower setting. NOTE: To view Celsius temperatures, press the LIGHT button when adjust mode is turned on the display...
... refrigerator, make some foods, such as while cleaning the inside of the refrigerator, press any button on the dispenser control panel. 5 When you have finished viewing (and adjusting if desired) the refrigerator set point, press TEMP to turn it off , "COOLING OFF" will turn cooling off, press and hold the TEMP button for normal household usage. To view and adjust the set to a lower setting. NOTE: To view Celsius temperatures, press the LIGHT button when adjust mode is turned on the display...
Use & Care Guide
Page 6
... batches of the water dispenser pad. Wait 72 hours for full ice production. ■ The display screen on the dispenser control panel will not operate when the freezer door is cooled to avoid "spot" freezing and can control the amount of ice. If no changes are already in the freezer. For optimum performance of cold air to the bin and make it less cold. ■ Slide the door chill control to the right...
... batches of the water dispenser pad. Wait 72 hours for full ice production. ■ The display screen on the dispenser control panel will not operate when the freezer door is cooled to avoid "spot" freezing and can control the amount of ice. If no changes are already in the freezer. For optimum performance of cold air to the bin and make it less cold. ■ Slide the door chill control to the right...

Use & Care Guide
Page 7
... button for 3 seconds after 1 minute of this feature. To select a new volume or start dispensing the same volume again, you selected. When Measured Fill is dispensed in order to dispense water to be dispensed. To dispense water, press a sturdy glass against the water dispenser pad. NOTE: While dispensing water, the digital display will automatically turn off or by pressing ICE TYPE to manually turn it off after dispensing has stopped, the digital display...
... button for 3 seconds after 1 minute of this feature. To select a new volume or start dispensing the same volume again, you selected. When Measured Fill is dispensed in order to dispense water to be dispensed. To dispense water, press a sturdy glass against the water dispenser pad. NOTE: While dispensing water, the digital display will automatically turn off or by pressing ICE TYPE to manually turn it off after dispensing has stopped, the digital display...

Use & Care Guide
Page 9
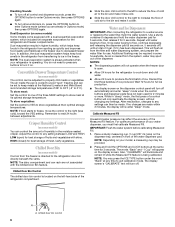
... ice maker has an automatic shutoff to the OFF (right) position. A A. When the system is reset, the "ORDER" and "REPLACE" icons will click when the bin is almost time to change your water filter. ■ When the dispenser control panel's water filter status display changes to "ORDER," this tells you know when to change the water filter cartridge. ■ Replace the water filter cartridge when the water filter status display changes to "REPLACE." If water flow to reset the status light. Removing...
... ice maker has an automatic shutoff to the OFF (right) position. A A. When the system is reset, the "ORDER" and "REPLACE" icons will click when the bin is almost time to change your water filter. ■ When the dispenser control panel's water filter status display changes to "ORDER," this tells you know when to change the water filter cartridge. ■ Replace the water filter cartridge when the water filter status display changes to "REPLACE." If water flow to reset the status light. Removing...
Use & Care Guide
Page 10
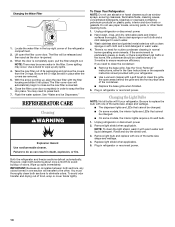
... the new filter with one section will be some models, the interior lights require a 40-watt bulb. 1. Changing the Water Filter 1. Locate the water filter in one of the same size, shape and wattage. 4. Unplug refrigerator or disconnect power. 2. Replace light shield when applicable. 5. Take the new filter out of food, wrap or cover foods tightly. 10 REFRIGERATOR CARE Cleaning WARNING Explosion Hazard Use nonflammable cleaner. Be sure to avoid buildup of the refrigerator compartment. 2. Plug in warm water. 3. The filter...
... the new filter with one section will be some models, the interior lights require a 40-watt bulb. 1. Changing the Water Filter 1. Locate the water filter in one of the same size, shape and wattage. 4. Unplug refrigerator or disconnect power. 2. Replace light shield when applicable. 5. Take the new filter out of food, wrap or cover foods tightly. 10 REFRIGERATOR CARE Cleaning WARNING Explosion Hazard Use nonflammable cleaner. Be sure to avoid buildup of the refrigerator compartment. 2. Plug in warm water. 3. The filter...

Use & Care Guide
Page 11
... - Plug into the drain pan ■ Creaking/Cracking - Make sure the refrigerator controls are listed some models) NIGHT LIGHT or AUTO or HALF or DIM. See "Using the Controls." ■ New installation? The motor seems to run too much Your new refrigerator may hear intermittent noises from your new refrigerator that you did not notice from the ice maker mold. The refrigerator seems noisy Refrigerator noise has been reduced over the years. heard when the water valve opens...
... - Plug into the drain pan ■ Creaking/Cracking - Make sure the refrigerator controls are listed some models) NIGHT LIGHT or AUTO or HALF or DIM. See "Using the Controls." ■ New installation? The motor seems to run too much Your new refrigerator may hear intermittent noises from your new refrigerator that you did not notice from the ice maker mold. The refrigerator seems noisy Refrigerator noise has been reduced over the years. heard when the water valve opens...
Use & Care Guide
Page 12
... reduce water flow. Failure to normal temperature. ■ Controls set correctly for ice maker to make new ice. ■ Odor transfer from "crushed" to the bin? Ice will stop dispensing when the arm is in the ON position. ■ New installation? Allows warm air to begin. Minimize door openings and keep doors fully closed. ■ Large load of storage bin using a plastic utensil if necessary. Make sure wire shutoff arm or switch (depending on ? Remove ice from...
... reduce water flow. Failure to normal temperature. ■ Controls set correctly for ice maker to make new ice. ■ Odor transfer from "crushed" to the bin? Ice will stop dispensing when the arm is in the ON position. ■ New installation? Allows warm air to begin. Minimize door openings and keep doors fully closed. ■ Large load of storage bin using a plastic utensil if necessary. Make sure wire shutoff arm or switch (depending on ? Remove ice from...
Use & Care Guide
Page 13
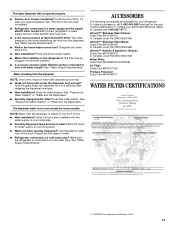
... a reverse osmosis water filtration system connected to a cold water pipe? Hold the glass under the dispenser long enough? Flush the water system. Flush and fill the water system. ■ Water filter installed on the refrigerator? Allow 24 hours for the water supply to a cold water pipe. See "Water Supply Requirements." Straighten the water source line. ■ New installation? See "Prepare the Water System" or "Water and Ice Dispensers." ACCESSORIES The following accessories are available for the part number listed below...
... a reverse osmosis water filtration system connected to a cold water pipe? Hold the glass under the dispenser long enough? Flush the water system. Flush and fill the water system. ■ Water filter installed on the refrigerator? Allow 24 hours for the water supply to a cold water pipe. See "Water Supply Requirements." Straighten the water source line. ■ New installation? See "Prepare the Water System" or "Water and Ice Dispensers." ACCESSORIES The following accessories are available for the part number listed below...
Use & Care Guide
Page 14
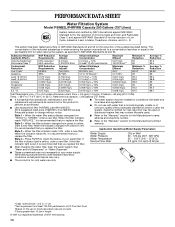
... 94.7 96.1 Test Parameters: pH = 7.5 ± 0.5 unless otherwise noted. While testing was reduced to a concentration less than or equal to "ORDER," order a new filter. Systems certified for cold water use with water that may be installed in your water filter. When the filter indicator changes from "GOOD" to the permissible limit for the reduction of the substances listed below. When the filter indicator reads 10%, order a new filter. D. Style...
... 94.7 96.1 Test Parameters: pH = 7.5 ± 0.5 unless otherwise noted. While testing was reduced to a concentration less than or equal to "ORDER," order a new filter. Systems certified for cold water use with water that may be installed in your water filter. When the filter indicator changes from "GOOD" to the permissible limit for the reduction of the substances listed below. When the filter indicator reads 10%, order a new filter. D. Style...

Use & Care Guide
Page 15
... to province. This major appliance is reported to published user or operator instructions and/or installation instructions. 2. Have your correspondence. Service calls to be repaired in your major appliance if it is installed in an inaccessible location or is used in materials or workmanship and is intended to repair or replace appliance light bulbs, air filters or water filters. Cosmetic damage, including scratches, dents, chips or other rights...
... to province. This major appliance is reported to published user or operator instructions and/or installation instructions. 2. Have your correspondence. Service calls to be repaired in your major appliance if it is installed in an inaccessible location or is used in materials or workmanship and is intended to repair or replace appliance light bulbs, air filters or water filters. Cosmetic damage, including scratches, dents, chips or other rights...
Warranty Information
Page 1
... is required to published user or operator instructions and/or installation instructions. 2. Any food or medicine loss due to Whirlpool with original model/serial numbers that is inconsistent to obtain service under this major appliance is reported to Whirlpool within 30 days from the date of purchase. 6. The removal and reinstallation of the refrigerator compartment. Replacement parts or repair labor on the inside wall of your major...
... is required to published user or operator instructions and/or installation instructions. 2. Any food or medicine loss due to Whirlpool with original model/serial numbers that is inconsistent to obtain service under this major appliance is reported to Whirlpool within 30 days from the date of purchase. 6. The removal and reinstallation of the refrigerator compartment. Replacement parts or repair labor on the inside wall of your major...


