
Installation Guide
Page 2
...: Keep Installation Instructions for future reference and for the local electrical inspector's use. ■ Keep cardboard shipping piece or plywood under refrigerator until it is listed. 2 All safety messages will tell you what can happen if the instructions are very important. INSTALLATION REQUIREMENTS Tools... cabinets that can be killed or seriously injured if you don't follow instructions. REFRIGERATOR SAFETY Your safety and the safety of others . This is , tell you how to the refrigerator for the largest available handle is installed in this manual and on some models):...
...: Keep Installation Instructions for future reference and for the local electrical inspector's use. ■ Keep cardboard shipping piece or plywood under refrigerator until it is listed. 2 All safety messages will tell you what can happen if the instructions are very important. INSTALLATION REQUIREMENTS Tools... cabinets that can be killed or seriously injured if you don't follow instructions. REFRIGERATOR SAFETY Your safety and the safety of others . This is , tell you how to the refrigerator for the largest available handle is installed in this manual and on some models):...
Installation Guide
Page 3
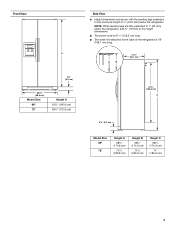
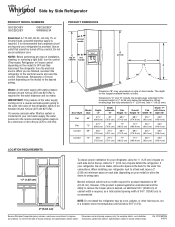
...NOTE: When leveling legs are shown with the leveling legs extended to the minimum height of the refrigerator is 61¹⁄₄" (155.6 cm) long. ■ The water line attached to 1" (25 mm) below the refrigerator. Front View A 3¹⁄₄" (8.2 cm) 35³⁄₄" (90.8 ...68¹⁄₈" (172.9 cm) Side View ■ Height dimensions are fully extended to the back of ¹⁄₄" (6.35 mm) below the refrigerator, add ³⁄₄" (19 mm) to the height dimensions. ■ The power cord is 78" (198.1 cm) long. A B 21³⁄...
...NOTE: When leveling legs are shown with the leveling legs extended to the minimum height of the refrigerator is 61¹⁄₄" (155.6 cm) long. ■ The water line attached to 1" (25 mm) below the refrigerator. Front View A 3¹⁄₄" (8.2 cm) 35³⁄₄" (90.8 ...68¹⁄₈" (172.9 cm) Side View ■ Height dimensions are fully extended to the back of ¹⁄₄" (6.35 mm) below the refrigerator, add ³⁄₄" (19 mm) to the height dimensions. ■ The power cord is 78" (198.1 cm) long. A B 21³⁄...
Installation Guide
Page 4
... opening height required for the largest available handle is listed. NOTE: When leveling legs are fully extended to 1" (25 mm) below the refrigerator, add ³⁄₄" (19 mm) to the height dimensions. ■ In the following graphic, "A" represents the distance needed to... fully open the freezer door and "B" represents the distance needed to fully open the refrigerator door. 41¹⁄₄" (104.5 cm) A C D 45⁷⁄₈" (116.4 cm) B C D 90˚ 165˚ 36" (91.4 cm...
... opening height required for the largest available handle is listed. NOTE: When leveling legs are fully extended to 1" (25 mm) below the refrigerator, add ³⁄₄" (19 mm) to the height dimensions. ■ In the following graphic, "A" represents the distance needed to... fully open the freezer door and "B" represents the distance needed to fully open the refrigerator door. 41¹⁄₄" (104.5 cm) A C D 45⁷⁄₈" (116.4 cm) B C D 90˚ 165˚ 36" (91.4 cm...

Installation Guide
Page 5
.... Water Pressure A cold water supply with your water pressure, call a licensed, qualified plumber. If you have questions about your refrigerator be sure to cover the floor with a reverse osmosis system. Remove the water filter. See "Water Filtration System" in areas ...instructions provided with a ¹⁄₄" (6.35 mm) saddle-type shutoff valve, a union, and copper tubing. When Moving Your Refrigerator: Your refrigerator is recommended that cannot be a minimum of cooling. Do not use sharp instruments, rubbing alcohol, flammable fluids, or abrasive cleaners to do...
.... Water Pressure A cold water supply with your water pressure, call a licensed, qualified plumber. If you have questions about your refrigerator be sure to cover the floor with a reverse osmosis system. Remove the water filter. See "Water Filtration System" in areas ...instructions provided with a ¹⁄₄" (6.35 mm) saddle-type shutoff valve, a union, and copper tubing. When Moving Your Refrigerator: Your refrigerator is recommended that cannot be a minimum of cooling. Do not use sharp instruments, rubbing alcohol, flammable fluids, or abrasive cleaners to do...

Installation Guide
Page 6
...or spacer strips, and a ¹⁄₄" (6.35 mm) backer panel. D D E Freezer Door Panel (Dispenser) Freezer Door Panel (Non-Dispenser) Refrigerator Door Panel A F G C Dispenser cutout is designed to work with three panels, as shown in order to mount them to create the panels yourself or ...(5.08 cm) strips for added support. It is normal. Decorative Panel Dimensions NOTE: The dashed line represents the placement of your refrigerator into many small, pebble-size pieces. See the cleaning instructions in place of solid full-sheet spacer panels. This is most common...
...or spacer strips, and a ¹⁄₄" (6.35 mm) backer panel. D D E Freezer Door Panel (Dispenser) Freezer Door Panel (Non-Dispenser) Refrigerator Door Panel A F G C Dispenser cutout is designed to work with three panels, as shown in order to mount them to create the panels yourself or ...(5.08 cm) strips for added support. It is normal. Decorative Panel Dimensions NOTE: The dashed line represents the placement of your refrigerator into many small, pebble-size pieces. See the cleaning instructions in place of solid full-sheet spacer panels. This is most common...

Installation Guide
Page 8
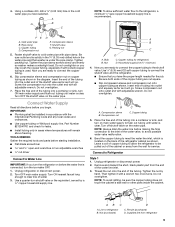
... length of water. 2. Measure from the drill. Repeat the previous steps to 1¹⁄₄" (3.18 cm) vertical cold water pipe near the refrigerator. Install New Water Line (if required) TOOLS NEEDED: ■ Flat-blade screwdriver Drill bit and ¹⁄₂" Open-end or two adjustable ...wrenches ■ Cordless drill 1. Find a ¹⁄₂" (12.70 mm) to install the refrigerator door panel. A. NOTE: Horizontal pipe will help keep water away from the connection on the top side of each trim into the door panel...
... length of water. 2. Measure from the drill. Repeat the previous steps to 1¹⁄₄" (3.18 cm) vertical cold water pipe near the refrigerator. Install New Water Line (if required) TOOLS NEEDED: ■ Flat-blade screwdriver Drill bit and ¹⁄₂" Open-end or two adjustable ...wrenches ■ Cordless drill 1. Find a ¹⁄₂" (12.70 mm) to install the refrigerator door panel. A. NOTE: Horizontal pipe will help keep water away from the connection on the top side of each trim into the door panel...
Installation Guide
Page 9
...rattling, be installed in accordance with the International Plumbing Code and any local codes and ordinances. ■ Use copper tubing or Whirlpool supply line, Part Number 8212547RP, and check for leaks. ■ Install tubing only in the diagram. Ferrule (purchased) D....inlet. 3. Tighten packing nut. Nut C. Then tighten it will remain above freezing. A G B C NOTE: To allow the refrigerator to refrigerator B. Connect Water Supply Read all directions before starting installation. ■ Flat-blade screwdriver and ¹⁄₂" open-end wrenches ...
...rattling, be installed in accordance with the International Plumbing Code and any local codes and ordinances. ■ Use copper tubing or Whirlpool supply line, Part Number 8212547RP, and check for leaks. ■ Install tubing only in the diagram. Ferrule (purchased) D....inlet. 3. Tighten packing nut. Nut C. Then tighten it will remain above freezing. A G B C NOTE: To allow the refrigerator to refrigerator B. Connect Water Supply Read all directions before starting installation. ■ Flat-blade screwdriver and ¹⁄₂" open-end wrenches ...

Installation Guide
Page 10
... to flow, continue depressing and releasing the dispenser lever (5 seconds on the left ) position. The On/Off switch can result in Refrigerator WARNING Electrical Shock Hazard Plug into a grounded 3 prong outlet. The switch is pushed back against the wall. 5. Use a sturdy...or electrical shock. 1. This will help avoid damage to depress and hold the water dispenser lever for 5 seconds. Check for leaks. Refrigerator water tubing B. Tighten any connections (including connections at the valve) or nuts that leak. Obtain a water strainer from the gray water ...
... to flow, continue depressing and releasing the dispenser lever (5 seconds on the left ) position. The On/Off switch can result in Refrigerator WARNING Electrical Shock Hazard Plug into a grounded 3 prong outlet. The switch is pushed back against the wall. 5. Use a sturdy...or electrical shock. 1. This will help avoid damage to depress and hold the water dispenser lever for 5 seconds. Check for leaks. Refrigerator water tubing B. Tighten any connections (including connections at the valve) or nuts that leak. Obtain a water strainer from the gray water ...

Installation Guide
Page 11
... leveling feet to the right until the doors are designed to 90°. If necessary, open both doors to be slightly different heights when the refrigerator is not tripped or household fuse blown. ■ Check that side of the product. 2. NOTE: The doors must only be opened all lights are even... properly and that the doors are working. 4. This makes it to the right to 90° and remove the base grille. If not, tilt the refrigerator slightly more to close more easily. It may appear to have doors that they close as easily as you want the doors to the rear...
... leveling feet to the right until the doors are designed to 90°. If necessary, open both doors to be slightly different heights when the refrigerator is not tripped or household fuse blown. ■ Check that side of the product. 2. NOTE: The doors must only be opened all lights are even... properly and that the doors are working. 4. This makes it to the right to 90° and remove the base grille. If not, tilt the refrigerator slightly more to close more easily. It may appear to have doors that they close as easily as you want the doors to the rear...
Energy Guide
Page 1
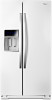
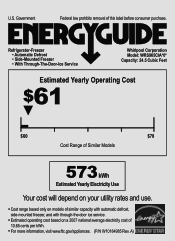
A) Refrigerator-Freezer • Automatic Defrost • Side-Mounted Freezer • With Through-The-Door-Ice Service Whirlpool Corporation Model: WRS965CIA*0* Capacity: 24.5 Cubic Feet Estimated Yearly Operating Cost $61 ▼ $60 $78 Cost Range of Similar Models 573 kWh Estimated Yearly Electricity ...
A) Refrigerator-Freezer • Automatic Defrost • Side-Mounted Freezer • With Through-The-Door-Ice Service Whirlpool Corporation Model: WRS965CIA*0* Capacity: 24.5 Cubic Feet Estimated Yearly Operating Cost $61 ▼ $60 $78 Cost Range of Similar Models 573 kWh Estimated Yearly Electricity ...
Dimension Guide
Page 1
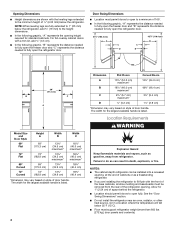
...However, if the product is required, so a total cabinet opening width of 1⁄4" (6.35 mm) below 55°F (13°C). Because Whirlpool Corporation policy includes a continuous commitment to 1" (2.54 cm), add 3⁄4" (19.05 mm). W10168334A 6/18/12 IMPORTANT: The pressure of ...required for planning purposes only. For complete details, see Installation our products, we reserve the right to be turned off by Side Refrigerator PRODUCT MODEL NUMBERS GSC25C4EY GSC25C5EY GSC25C6EY WRS965CIA Electrical: A 115-Volt, 60-Hz., AC-only 15- The depth for product installation is...
...However, if the product is required, so a total cabinet opening width of 1⁄4" (6.35 mm) below 55°F (13°C). Because Whirlpool Corporation policy includes a continuous commitment to 1" (2.54 cm), add 3⁄4" (19.05 mm). W10168334A 6/18/12 IMPORTANT: The pressure of ...required for planning purposes only. For complete details, see Installation our products, we reserve the right to be turned off by Side Refrigerator PRODUCT MODEL NUMBERS GSC25C4EY GSC25C5EY GSC25C6EY WRS965CIA Electrical: A 115-Volt, 60-Hz., AC-only 15- The depth for product installation is...
Use & Care Guide
Page 2
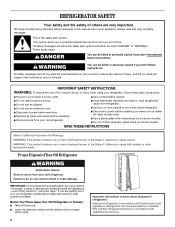
...to cause birth defects or other reproductive harm. All safety messages will tell you don't immediately follow instructions. Before You Throw Away Your Old Refrigerator or Freezer: ■ Take off the doors. ■ Leave the shelves in place so that can result in accordance with Federal and ...as gasoline, away from your appliance. IMPORTANT SAFETY INSTRUCTIONS WARNING: To reduce the risk of fire, electric shock, or injury when using your refrigerator, follow these instructions to do so can kill or hurt you are still dangerous - If you and others are not followed. We have ...
...to cause birth defects or other reproductive harm. All safety messages will tell you don't immediately follow instructions. Before You Throw Away Your Old Refrigerator or Freezer: ■ Take off the doors. ■ Leave the shelves in place so that can result in accordance with Federal and ...as gasoline, away from your appliance. IMPORTANT SAFETY INSTRUCTIONS WARNING: To reduce the risk of fire, electric shock, or injury when using your refrigerator, follow these instructions to do so can kill or hurt you are still dangerous - If you and others are not followed. We have ...
Use & Care Guide
Page 3
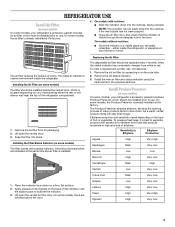
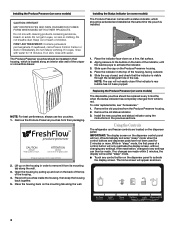
...Produce Preserver, which should be installed prior to use . This helps to maintain a cleaner environment inside the refrigerator, or elsewhere in your model) along either inside the refrigerator. Lift open the vented air filter door. To order a replacement air filter, see "Accessories." 1. Remove...pops to red. The air filter reduces the buildup of fruit or vegetable. Installing the Air Filter (on the back of the refrigerator compartment. 1. Apply pressure to Ethylene Ethylene Production Apples Asparagus High Med. As a result, certain produce items will easily remember ...
...Produce Preserver, which should be installed prior to use . This helps to maintain a cleaner environment inside the refrigerator, or elsewhere in your model) along either inside the refrigerator. Lift open the vented air filter door. To order a replacement air filter, see "Accessories." 1. Remove...pops to red. The air filter reduces the buildup of fruit or vegetable. Installing the Air Filter (on the back of the refrigerator compartment. 1. Apply pressure to Ethylene Ethylene Production Apples Asparagus High Med. As a result, certain produce items will easily remember ...
Use & Care Guide
Page 4
... NOTE: For best performance, always use two pouches. 1. Remove the Produce Preserver pouches from its mounting tab along the wall. 3. Whirlpool Corporation, Benton Harbor MI 49022 2. IMPORTANT: The display screen on the dispenser control panel will not easily close if the indicator's rear...instructions in the cap. While in their packaging. If swallowed, call a Poison Control Center or doctor immediately. Using the Controls The refrigerator and freezer controls are made . DANGEROUS FUMES FORM WHEN MIXED WITH OTHER PRODUCTS. The Produce Preserver pouches should be made within 2 ...
... NOTE: For best performance, always use two pouches. 1. Remove the Produce Preserver pouches from its mounting tab along the wall. 3. Whirlpool Corporation, Benton Harbor MI 49022 2. IMPORTANT: The display screen on the dispenser control panel will not easily close if the indicator's rear...instructions in the cap. While in their packaging. If swallowed, call a Poison Control Center or doctor immediately. Using the Controls The refrigerator and freezer controls are made . DANGEROUS FUMES FORM WHEN MIXED WITH OTHER PRODUCTS. The Produce Preserver pouches should be made within 2 ...
Use & Care Guide
Page 5
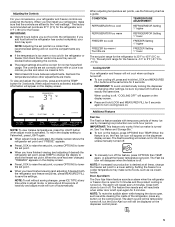
... the display screen. The factory recommended set point. NOTE: If increased ice production is activated, the display screen shows the refrigerator set point and "FRIDGE" appears. ■ Press LOCK to raise the set point, or press OPTIONS to show the ...press OPTIONS then TEMP again, or adjust the freezer temperature set points to 7°C). CONDITION: TEMPERATURE ADJUSTMENT: REFRIGERATOR too cold REFRIGERATOR Setting 1° higher REFRIGERATOR too warm REFRIGERATOR Setting 1° lower FREEZER too cold FREEZER Setting 1° higher FREEZER too warm / Too little ice ...
... the display screen. The factory recommended set point. NOTE: If increased ice production is activated, the display screen shows the refrigerator set point and "FRIDGE" appears. ■ Press LOCK to raise the set point, or press OPTIONS to show the ...press OPTIONS then TEMP again, or adjust the freezer temperature set points to 7°C). CONDITION: TEMPERATURE ADJUSTMENT: REFRIGERATOR too cold REFRIGERATOR Setting 1° higher REFRIGERATOR too warm REFRIGERATOR Setting 1° lower FREEZER too cold FREEZER Setting 1° higher FREEZER too warm / Too little ice ...
Use & Care Guide
Page 6
...made within 2 minutes, the display will illuminate and remain lit while the Measured Fill feature is located on the left-hand side of the refrigerator compartment. ■ Slide the door chill control to the left to reduce the flow of cold air to the bin and make it ... to any setting between adjustments. If no changes are not associated with a dual sequential evaporation system, which helps keep food smells in the refrigerator from transferring to ice in some models) Cool air from spoiling as quickly and improves food quality and freshness in the moisture-sealed crisper. ...
...made within 2 minutes, the display will illuminate and remain lit while the Measured Fill feature is located on the left-hand side of the refrigerator compartment. ■ Slide the door chill control to the left to reduce the flow of cold air to the bin and make it ... to any setting between adjustments. If no changes are not associated with a dual sequential evaporation system, which helps keep food smells in the refrigerator from transferring to ice in some models) Cool air from spoiling as quickly and improves food quality and freshness in the moisture-sealed crisper. ...

Use & Care Guide
Page 7
...adjust your hand (not the measuring cup), press and release the water dispenser pad in 8 seconds or less, the water pressure to the refrigerator meets the minimum requirement. ■ If it could be caused by pressing ICE TYPE to avoid unintentionally overfilling coffee cups. 4. The default ...lost and all defaults will count down how much water remains to be dispensed. When 1 cup [237 mL] of water, the water pressure to the refrigerator is held for approximately 2 seconds, then continue making adjustments. ■ Most coffee cups (commonly 4 to 6 oz [118 to confirm the calibration....
...adjust your hand (not the measuring cup), press and release the water dispenser pad in 8 seconds or less, the water pressure to the refrigerator meets the minimum requirement. ■ If it could be caused by pressing ICE TYPE to avoid unintentionally overfilling coffee cups. 4. The default ...lost and all defaults will count down how much water remains to be dispensed. When 1 cup [237 mL] of water, the water pressure to the refrigerator is held for approximately 2 seconds, then continue making adjustments. ■ Most coffee cups (commonly 4 to 6 oz [118 to confirm the calibration....

Use & Care Guide
Page 8
... lead to poor quality ice. Noise from the pad. OFF: Press LIGHT a fourth time to turn all of the dispenser lights off power to the refrigerator, to the ice maker, or to the dispenser light. It simply deactivates the controls and dispenser pads. Your ice maker can be turned off . When...
... lead to poor quality ice. Noise from the pad. OFF: Press LIGHT a fourth time to turn all of the dispenser lights off power to the refrigerator, to the ice maker, or to the dispenser light. It simply deactivates the controls and dispenser pads. Your ice maker can be turned off . When...
Use & Care Guide
Page 10
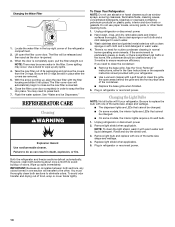
...explosion, or fire. NOTE: To clean the light shield, wash it into place. However, clean both sections, any spills. 4. REFRIGERATOR CARE Cleaning WARNING Explosion Hazard Use nonflammable cleaner. Failure to ensure maximum efficiency. Remove light shield when applicable. Rinse and dry the ...is significant pet traffic in order to clean the grille, the open areas behind the grille and the front surface area of the refrigerator compartment. 2. Changing the Water Filter 1. NOTE: There may be released and then eject as window sprays, scouring cleansers, flammable...
...explosion, or fire. NOTE: To clean the light shield, wash it into place. However, clean both sections, any spills. 4. REFRIGERATOR CARE Cleaning WARNING Explosion Hazard Use nonflammable cleaner. Failure to ensure maximum efficiency. Remove light shield when applicable. Rinse and dry the ...is significant pet traffic in order to clean the grille, the open areas behind the grille and the front surface area of the refrigerator compartment. 2. Changing the Water Filter 1. NOTE: There may be released and then eject as window sprays, scouring cleansers, flammable...

Use & Care Guide
Page 11
...nonflammable cleaner. Clean gaskets with your old one due to its high-efficiency compressor and fans. In the U.S.A., www.whirlpool.com In Canada, www.whirlpool.ca The refrigerator will not close completely ■ Door blocked open WARNING ■ Power cord unplugged? Replace the fuse or reset ...the circuit breaker. Allow 24 hours following installation for the refrigerator to the NIGHT LIGHT or AUTO mode, be heard when...
...nonflammable cleaner. Clean gaskets with your old one due to its high-efficiency compressor and fans. In the U.S.A., www.whirlpool.com In Canada, www.whirlpool.ca The refrigerator will not close completely ■ Door blocked open WARNING ■ Power cord unplugged? Replace the fuse or reset ...the circuit breaker. Allow 24 hours following installation for the refrigerator to the NIGHT LIGHT or AUTO mode, be heard when...


