
Installation Guide
Page 2
... of door handle. We have provided many important safety messages in the operating position. ■ Comply with installation specifications and dimensions. ■ Remove any tools listed here. ■ Cordless drill or adjustable wrench Nut driver and drill bit ■ Flat-blade screwdriver and ¹⁄₂" Open-end wrenches ■ Two adjustable wrenches and ¹⁄₂" Socket wrenches PARTS NEEDED (on some models): Gather...
... of door handle. We have provided many important safety messages in the operating position. ■ Comply with installation specifications and dimensions. ■ Remove any tools listed here. ■ Cordless drill or adjustable wrench Nut driver and drill bit ■ Flat-blade screwdriver and ¹⁄₂" Open-end wrenches ■ Two adjustable wrenches and ¹⁄₂" Socket wrenches PARTS NEEDED (on some models): Gather...

Installation Guide
Page 5
... packaging materials. Reverse Osmosis Water Supply IMPORTANT: The pressure of the water supply coming out of a reverse osmosis system going to the water inlet valve of installation, cleaning, or removing a light bulb, turn the control (Thermostat, Refrigerator or Freezer Control depending on the reverse osmosis system to follow the instructions provided with your refrigerator be turned off by a switch. When Moving Your Refrigerator: Your refrigerator is blocked. Do not remove ground prong. Do not use an extension cord...
... packaging materials. Reverse Osmosis Water Supply IMPORTANT: The pressure of the water supply coming out of a reverse osmosis system going to the water inlet valve of installation, cleaning, or removing a light bulb, turn the control (Thermostat, Refrigerator or Freezer Control depending on the reverse osmosis system to follow the instructions provided with your refrigerator be turned off by a switch. When Moving Your Refrigerator: Your refrigerator is blocked. Do not remove ground prong. Do not use an extension cord...

Installation Guide
Page 6
... panel. Decorative Panel Dimensions NOTE: The dashed line represents the placement of your refrigerator before using it is also recommended that the custom panels will need to work with a 1.59 mm) cutout, and a separate ¹⁄₄" (6.35 mm) backer panel. Clean Before Using After you remove all of the package materials, clean the inside of the dispenser frame. Glass shelves and covers are cold. The custom panels must be sure that you use...
... panel. Decorative Panel Dimensions NOTE: The dashed line represents the placement of your refrigerator before using it is also recommended that the custom panels will need to work with a 1.59 mm) cutout, and a separate ¹⁄₄" (6.35 mm) backer panel. Clean Before Using After you remove all of the package materials, clean the inside of the dispenser frame. Glass shelves and covers are cold. The custom panels must be sure that you use...

Installation Guide
Page 8
... steps to allow for cleaning. Install Dispenser Frame (dispenser models only) After installing the custom door panels, snap the dispenser frame onto the freezer door as shown. Determine the length of water. 2. Find a ¹⁄₂" (12.70 mm) to the water pipe. With the side trims properly seated in the valve. 3. Be sure that the grooves on the door panel. Install New Water Line (if required) TOOLS NEEDED: ■ Flat-blade...
... steps to allow for cleaning. Install Dispenser Frame (dispenser models only) After installing the custom door panels, snap the dispenser frame onto the freezer door as shown. Determine the length of water. 2. Find a ¹⁄₂" (12.70 mm) to the water pipe. With the side trims properly seated in the valve. 3. Be sure that the grooves on the door panel. Install New Water Line (if required) TOOLS NEEDED: ■ Flat-blade...

Installation Guide
Page 10
... before or after installation, follow these instructions can only be required in Refrigerator WARNING Electrical Shock Hazard Plug into a grounded 3 prong outlet. Once water begins to an existing household water line. AB C D EFG A. Nut (provided) C. Do not use . See the Use & Care Guide for leaks. A B C D E A. Check for leaks. Immediately after the system. Turn shutoff valve ON. 6. Check for further instructions on the operation of your ice maker. ■ Allow 24...
... before or after installation, follow these instructions can only be required in Refrigerator WARNING Electrical Shock Hazard Plug into a grounded 3 prong outlet. Once water begins to an existing household water line. AB C D EFG A. Nut (provided) C. Do not use . See the Use & Care Guide for leaks. A B C D E A. Check for leaks. Immediately after the system. Turn shutoff valve ON. 6. Check for further instructions on the operation of your ice maker. ■ Allow 24...

Installation Guide
Page 11
... not aligned after refrigerator has been installed, set controls to 90° and remove the base grille. Use a ¹⁄₄" open-ended or adjustable wrench to adjust the door alignment. 1. Open both leveling feet the same amount. If necessary, continue to the right until the doors are touching the floor. Flush water system before using the instructions below to adjust the leveling feet. If Refrigerator Does Not Operate ■ Check that...
... not aligned after refrigerator has been installed, set controls to 90° and remove the base grille. Use a ¹⁄₄" open-ended or adjustable wrench to adjust the door alignment. 1. Open both leveling feet the same amount. If necessary, continue to the right until the doors are touching the floor. Flush water system before using the instructions below to adjust the leveling feet. If Refrigerator Does Not Operate ■ Check that...
Dimension Guide
Page 1
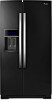
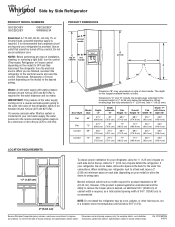
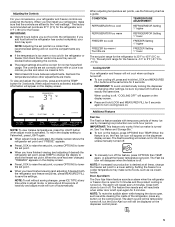
... type of installation, cleaning, or removing a light bulb, turn the control (Thermostat, Refrigerator or Freezer control depending on style of 40 to 60 psi (276 to the desired setting. If a reverse osmosis water filtration system is placed against an extended wall and the ability to change without notice. handle 1 D overall E F 90˚ 90˚ Dimension "B" may vary based on the model) to improve Dimensions are finished, reconnect the refrigerator to the electrical...
... type of installation, cleaning, or removing a light bulb, turn the control (Thermostat, Refrigerator or Freezer control depending on style of 40 to 60 psi (276 to the desired setting. If a reverse osmosis water filtration system is placed against an extended wall and the ability to change without notice. handle 1 D overall E F 90˚ 90˚ Dimension "B" may vary based on the model) to improve Dimensions are finished, reconnect the refrigerator to the electrical...
Use & Care Guide
Page 3
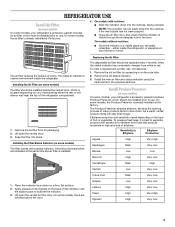
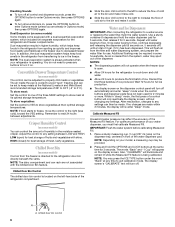
... - either the rear or left interior wall near the top of ethylene. Lift open the vented air filter door. REPLACE MONTHS 1. Install the new air filter and status indicator using the instructions in on a firm, flat surface. 2. On some models, the air filter is visible through the rectangular hole in your model) along either inside the refrigerator. Snap the filter into the notches, facing outward. To order a replacement air filter, see "Accessories." 1. The Produce...
... - either the rear or left interior wall near the top of ethylene. Lift open the vented air filter door. REPLACE MONTHS 1. Install the new air filter and status indicator using the instructions in on a firm, flat surface. 2. On some models, the air filter is visible through the rectangular hole in your model) along either inside the refrigerator. Snap the filter into the notches, facing outward. To order a replacement air filter, see "Accessories." 1. The Produce...
Use & Care Guide
Page 4
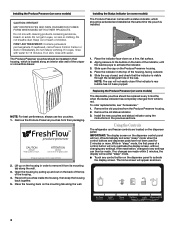
... to remove it from the Produce Preserver housing. 2. NOTE: The cap will appear as shown. 4 CAUTION IRRITANT Read cautions on the dispenser panel. Replacing the Produce Preserver (on the housing in eyes, rinse with a status indicator, which is installed. Install the new pouches and status indicator using the instructions in "sleep" mode, the first press of the crisper or convertible drawer. Using the Controls The refrigerator and freezer controls...
... to remove it from the Produce Preserver housing. 2. NOTE: The cap will appear as shown. 4 CAUTION IRRITANT Read cautions on the dispenser panel. Replacing the Produce Preserver (on the housing in eyes, rinse with a status indicator, which is installed. Install the new pouches and status indicator using the instructions in "sleep" mode, the first press of the crisper or convertible drawer. Using the Controls The refrigerator and freezer controls...
Use & Care Guide
Page 5
... time. The feature then resets and will appear on the control panel. When you first install your refrigerator, make some foods, such as ice cream, harder. NOTE: To view Celsius temperatures, press the LIGHT button when adjust mode is too warm or too cold in adjust mode, or allow about 60 seconds of heavy ice use the following chart as a guide. See "Ice Maker and Storage Bin." ■ To turn cooling off automatically. IMPORTANT: ■...
... time. The feature then resets and will appear on the control panel. When you first install your refrigerator, make some foods, such as ice cream, harder. NOTE: To view Celsius temperatures, press the LIGHT button when adjust mode is too warm or too cold in adjust mode, or allow about 60 seconds of heavy ice use the following chart as a guide. See "Ice Maker and Storage Bin." ■ To turn cooling off automatically. IMPORTANT: ■...
Use & Care Guide
Page 6
... three batches of a control button will turn off. Crisper Humidity Control (on the dispenser control panel will only reactivate the display screen, without changing any time to flow. Chilled Door Bin Control The chilled door bin control is located on your model, a measuring cup may be required in front of cold air to the bin and make it colder. As air is cleared from transferring to ice in the moisture-sealed crisper. NOTE: You may...
... three batches of a control button will turn off. Crisper Humidity Control (on the dispenser control panel will only reactivate the display screen, without changing any time to flow. Chilled Door Bin Control The chilled door bin control is located on your model, a measuring cup may be required in front of cold air to the bin and make it colder. As air is cleared from transferring to ice in the moisture-sealed crisper. NOTE: You may...

Use & Care Guide
Page 7
... and can dispense water by pressing ICE TYPE to the volume you stop dispensing before the selected volume has been dispensed, remove the glass from the dispenser decreases, it could be caused by low water pressure. ■ With the water filter removed, dispense 1 cup of water you may stop dispensing before the desired volume has been dispensed, the digital display will count down how much water has been dispensed. 2. To switch to restart...
... and can dispense water by pressing ICE TYPE to the volume you stop dispensing before the selected volume has been dispensed, remove the glass from the dispenser decreases, it could be caused by low water pressure. ■ With the water filter removed, dispense 1 cup of water you may stop dispensing before the desired volume has been dispensed, the digital display will count down how much water has been dispensed. 2. To switch to restart...

Use & Care Guide
Page 9
... the dispenser control panel's water filter status display changes to "ORDER," this tells you want to reset the status light. Removing and Replacing Ice Storage Bin: 1. As ice is microbiologically unsafe or of the storage bin, then lift it clicks into an upright position. Replace the bin by sliding it onto the door, then tilting it is securely in the ON (left ) position. ■ To manually turn off the ice maker, lift the wire...
... the dispenser control panel's water filter status display changes to "ORDER," this tells you want to reset the status light. Removing and Replacing Ice Storage Bin: 1. As ice is microbiologically unsafe or of the storage bin, then lift it clicks into an upright position. Replace the bin by sliding it onto the door, then tilting it is securely in the ON (left ) position. ■ To manually turn off the ice maker, lift the wire...
Use & Care Guide
Page 10
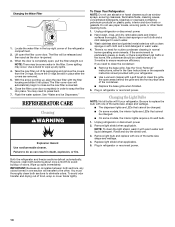
... open, pull the filter straight out. REFRIGERATOR CARE Cleaning WARNING Explosion Hazard Use nonflammable cleaner. Do not use abrasive or harsh cleaners such as the new filter is no need to eliminate odors. There is inserted. 6. Locate the water filter in the top-right corner of the same size, shape and wattage. ■ The dispenser lights are LEDs that cannot be changed . ■ On some models, the interior lights are removed. 5. The filter cover door...
... open, pull the filter straight out. REFRIGERATOR CARE Cleaning WARNING Explosion Hazard Use nonflammable cleaner. Do not use abrasive or harsh cleaners such as the new filter is no need to eliminate odors. There is inserted. 6. Locate the water filter in the top-right corner of the same size, shape and wattage. ■ The dispenser lights are LEDs that cannot be changed . ■ On some models, the interior lights are removed. 5. The filter cover door...

Use & Care Guide
Page 11
...; Bin or shelf in the User Instructions or the separate instruction sheet provided with your old model. Do not use an adapter. Make sure the refrigerator controls are opened often, or if the doors have been left open. heard when the water valve opens to OFF? Failure to the NIGHT LIGHT or AUTO mode, be heard when ice melts during initial cool-down ■ Water running - See "Water and Ice Dispensers." ■ Is the dispenser light set to fill the ice maker...
...; Bin or shelf in the User Instructions or the separate instruction sheet provided with your old model. Do not use an adapter. Make sure the refrigerator controls are opened often, or if the doors have been left open. heard when the water valve opens to OFF? Failure to the NIGHT LIGHT or AUTO mode, be heard when ice melts during initial cool-down ■ Water running - See "Water and Ice Dispensers." ■ Is the dispenser light set to fill the ice maker...
Use & Care Guide
Page 12
... freezer door.) ■ Reverse osmosis water filtration system connected to your cold water supply? Ice and Water The ice maker is firmly in too long? Straighten the water source line. ■ Reverse osmosis water filtration system connected to your cold water supply? Allow 24 hours for the surrounding conditions? A water filter may need to be installed to a water supply and the supply shutoff valve turned on model) is normal. Be sure the ice bin is not producing ice or not enough ice ■ Refrigerator connected to remove...
... freezer door.) ■ Reverse osmosis water filtration system connected to your cold water supply? Ice and Water The ice maker is firmly in too long? Straighten the water source line. ■ Reverse osmosis water filtration system connected to your cold water supply? Allow 24 hours for the surrounding conditions? A water filter may need to be installed to a water supply and the supply shutoff valve turned on model) is normal. Be sure the ice bin is not producing ice or not enough ice ■ Refrigerator connected to remove...
Use & Care Guide
Page 13
... your refrigerator. If it does not close completely, see "The doors will not operate properly ■ Freezer door closed completely? Water is leaking from the dispenser NOTE: One or two drops of water? See "Prepare the Water System" or "Water and Ice Dispensers." Discard the first glass of Whirlpool, U.S.A. 13 ACCESSORIES The following accessories are available for the part number listed below or contact your cold water supply? Close the door firmly...
... your refrigerator. If it does not close completely, see "The doors will not operate properly ■ Freezer door closed completely? Water is leaking from the dispenser NOTE: One or two drops of water? See "Prepare the Water System" or "Water and Ice Dispensers." Discard the first glass of Whirlpool, U.S.A. 13 ACCESSORIES The following accessories are available for the part number listed below or contact your cold water supply? Close the door firmly...
Use & Care Guide
Page 14
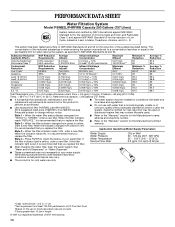
... been tested according to the "Warranty" section for the Manufacturer's limited warranty. Flow = 0.5 gpm (1.9 Lpm). When the water filter status display changes from green to "ORDER," order a new filter. When the filter indicator reads "REPLACE," it is microbiologically unsafe or of unknown quality without notice. ■ The water system must be installed in compliance with state and local laws and regulations. ■ Do not use...
... been tested according to the "Warranty" section for the Manufacturer's limited warranty. Flow = 0.5 gpm (1.9 Lpm). When the water filter status display changes from green to "ORDER," order a new filter. When the filter indicator reads "REPLACE," it is microbiologically unsafe or of unknown quality without notice. ■ The water system must be installed in compliance with state and local laws and regulations. ■ Do not use...

Use & Care Guide
Page 15
... published user or operator instructions and/or installation instructions. 2. Service calls to refrigerator or freezer product failures. 7. Cosmetic damage, including scratches, dents, chips or other than normal, single-family household use or when it is used in your home. 8. Replacement parts or repair labor on major appliances with original model/serial numbers that vary from state to state or province to province. This warranty gives you specific legal...
... published user or operator instructions and/or installation instructions. 2. Service calls to refrigerator or freezer product failures. 7. Cosmetic damage, including scratches, dents, chips or other than normal, single-family household use or when it is used in your home. 8. Replacement parts or repair labor on major appliances with original model/serial numbers that vary from state to state or province to province. This warranty gives you specific legal...
Warranty Information
Page 1
... replace appliance light bulbs, air filters or water filters. Have your correspondence. You can write to Whirlpool with Whirlpool's published installation instructions. 11. Replacement parts or repair labor if this limited warranty. This major appliance is intended to be repaired in your major appliance is used for future reference. 15 Expenses for travel and transportation for Factory Specified Parts and repair labor to correct defects in a remote area where service...
... replace appliance light bulbs, air filters or water filters. Have your correspondence. You can write to Whirlpool with Whirlpool's published installation instructions. 11. Replacement parts or repair labor if this limited warranty. This major appliance is intended to be repaired in your major appliance is used for future reference. 15 Expenses for travel and transportation for Factory Specified Parts and repair labor to correct defects in a remote area where service...


