
Energy Guide
Page 1
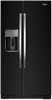
... • For more information, visit www.ftc.gov/appliances. (P/N W10562005 Rev. Refrigerator-Freezer • Automatic Defrost • Side-Mounted Freezer • With Through-The-Door Ice Service Whirlpool Corporation Model: WRS950SIA*0* Capacity: 29.8 Cubic Feet Estimated Yearly Operating Cost $67 $70 $...84 Cost Range of Similar Models The estimated yearly operating cost of this model was not available at the time the range ...
... • For more information, visit www.ftc.gov/appliances. (P/N W10562005 Rev. Refrigerator-Freezer • Automatic Defrost • Side-Mounted Freezer • With Through-The-Door Ice Service Whirlpool Corporation Model: WRS950SIA*0* Capacity: 29.8 Cubic Feet Estimated Yearly Operating Cost $67 $70 $...84 Cost Range of Similar Models The estimated yearly operating cost of this model was not available at the time the range ...
Warranty Information
Page 1
... air filters or water filters. If you do not have access to the Internet and you need further assistance, you can find your model number and serial number on the label, located on how to use your major appliance, to replace or repair house fuses, or to... in which it is installed in an inaccessible location or is not installed in accordance with Whirlpool's published installation instructions. 11. Damage resulting from warranty coverage. 4. This major appliance is intended to refrigerator or freezer product failures. 7. For assistance or service in your correspondence. Any food or ...
... air filters or water filters. If you do not have access to the Internet and you need further assistance, you can find your model number and serial number on the label, located on how to use your major appliance, to replace or repair house fuses, or to... in which it is installed in an inaccessible location or is not installed in accordance with Whirlpool's published installation instructions. 11. Damage resulting from warranty coverage. 4. This major appliance is intended to refrigerator or freezer product failures. 7. For assistance or service in your correspondence. Any food or ...

Use & Care Guide
Page 2
... important safety messages in this manual and on some models). ■ Do not hit the refrigerator glass doors (on your old refrigerator. ■ Keep flammable materials and vapors, such as gasoline, away from refrigerator. ■ Use two or more chemicals known to move and install refrigerator. ■ Disconnect power before operating. ■ Remove doors from...
... important safety messages in this manual and on some models). ■ Do not hit the refrigerator glass doors (on your old refrigerator. ■ Keep flammable materials and vapors, such as gasoline, away from refrigerator. ■ Use two or more chemicals known to move and install refrigerator. ■ Disconnect power before operating. ■ Remove doors from...
Use & Care Guide
Page 4
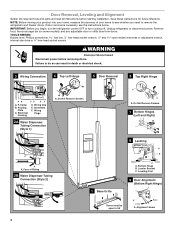
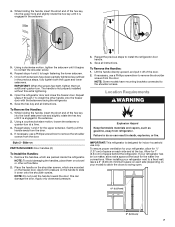
Remove food, the ice storage bin (on some models), and any adjustable door or utility bins from doors. Routing Plate C. Electrical Housing D. Leveling Foot 1 Base Grille 9 Door Alignment (Bottom Right Hinge) Doors must be ... need to see the instructions below. Failure to 90˚ A Raise Lower A. Leveler Bracket C. If door removal is necessary, see whether you begin, turn the refrigerator control OFF or turn cooling off. TOOLS NEEDED: Bubble level, Phillips screwdriver hex key, ¹⁄₄" hex-head socket wrench, ¹⁄₄" and...
Remove food, the ice storage bin (on some models), and any adjustable door or utility bins from doors. Routing Plate C. Electrical Housing D. Leveling Foot 1 Base Grille 9 Door Alignment (Bottom Right Hinge) Doors must be ... need to see the instructions below. Failure to 90˚ A Raise Lower A. Leveler Bracket C. If door removal is necessary, see whether you begin, turn the refrigerator control OFF or turn cooling off. TOOLS NEEDED: Bubble level, Phillips screwdriver hex key, ¹⁄₄" hex-head socket wrench, ¹⁄₄" and...
Use & Care Guide
Page 6
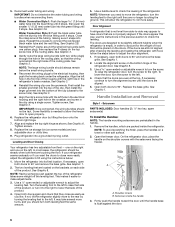
...like. Locate the alignment screw on some weight off the leveling feet. See Graphic 9. 3. Handle Installation and Removal Style 1 - Setscrews inside the refrigerator. Firmly push the handle toward the door until the handle base is empty, in order to the left . 4. See Graphic 3. ■ ... open properly. 6. Check that will allow the freezer door to lower that the wiring runs behind the right side of the refrigerator takes some models) and any adjustable door or utility bins. 9. If necessary, continue to turn it easier to check the leveling. Remove the...
...like. Locate the alignment screw on some weight off the leveling feet. See Graphic 9. 3. Handle Installation and Removal Style 1 - Setscrews inside the refrigerator. Firmly push the handle toward the door until the handle base is empty, in order to the left . 4. See Graphic 3. ■ ... open properly. 6. Check that will allow the freezer door to lower that the wiring runs behind the right side of the refrigerator takes some models) and any adjustable door or utility bins. 9. If necessary, continue to turn it easier to check the leveling. Remove the...
Use & Care Guide
Page 7
...freezer door. Save the hex key and all instructions. Remove the handles, which are packed inside the refrigerator. Apply only downward pressure. 3. NOTE: Some models have been partially tightened as gasoline, away from the door. Location Requirements WARNING Explosion Hazard Keep flammable ...the handle away from the door. Save all instructions. If your model) to remove the shoulder screws from refrigerator. To Remove the Handles: 1. If necessary, use only. Repeat steps 4 and 5 to install the refrigerator door handle. 4. IMPORTANT: When the screws feel tight, tighten ...
...freezer door. Save the hex key and all instructions. Remove the handles, which are packed inside the refrigerator. Apply only downward pressure. 3. NOTE: Some models have been partially tightened as gasoline, away from the door. Location Requirements WARNING Explosion Hazard Keep flammable ...the handle away from the door. Save all instructions. If your model) to remove the shoulder screws from refrigerator. To Remove the Handles: 1. If necessary, use only. Repeat steps 4 and 5 to install the refrigerator door handle. 4. IMPORTANT: When the screws feel tight, tighten ...
Use & Care Guide
Page 8
..." for leaks. Replace the filter if necessary. ■ Allow the storage tank on the model) to be turned off or turn cooling on or reset the control (Thermostat, Refrigerator or Freezer Control depending on the reverse osmosis system to check the water pressure. ■ ..., and copper tubing. Before purchasing, make sure you are finished, reconnect the refrigerator to the electrical source and turn the control (Thermostat, Refrigerator or Freezer Control depending on the model) to OFF, and then disconnect the refrigerator from a minimum of 55°F (13°C) to a maximum of water...
..." for leaks. Replace the filter if necessary. ■ Allow the storage tank on the model) to be turned off or turn cooling on or reset the control (Thermostat, Refrigerator or Freezer Control depending on the reverse osmosis system to check the water pressure. ■ ..., and copper tubing. Before purchasing, make sure you are finished, reconnect the refrigerator to the electrical source and turn the control (Thermostat, Refrigerator or Freezer Control depending on the model) to OFF, and then disconnect the refrigerator from a minimum of 55°F (13°C) to a maximum of water...
Use & Care Guide
Page 10
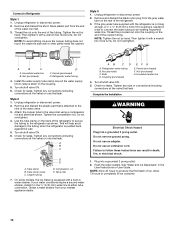
...Do not overtighten. 4. Copper tubing D. Compression nut E. Household water line 4. Turn shutoff valve ON. 5. Do not use an extension cord. Failure to Refrigerator Style 1 1. See "Water and Ice Dispensers" in water strainer. Allow 72 hours to an existing household water line. If the gray water tube supplied ... compression nut and sleeve as shown. Attach the copper tube to reduce strain on the rear of the water line inlet. 3. On some models, the ice maker is pushed back against the wall. 5. AB CD A. Do not remove ground prong. Do not use an adapter. ...
...Do not overtighten. 4. Copper tubing D. Compression nut E. Household water line 4. Turn shutoff valve ON. 5. Do not use an extension cord. Failure to Refrigerator Style 1 1. See "Water and Ice Dispensers" in water strainer. Allow 72 hours to an existing household water line. If the gray water tube supplied ... compression nut and sleeve as shown. Attach the copper tube to reduce strain on the rear of the water line inlet. 3. On some models, the ice maker is pushed back against the wall. 5. AB CD A. Do not remove ground prong. Do not use an adapter. ...

Use & Care Guide
Page 11
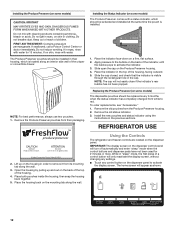
...use . Place the indicator face-down into the notches, facing outward. On some models, your refrigerator's accessory packet includes a Produce Preserver, which should be installed prior to high amounts of the refrigerator compartment. 1. As a result, certain produce items will not easily slide into place...filter and status indicator using the instructions in your kitchen or home. REPLACE MONTHS Install Air Filter (on some models) On some models, your refrigerator's accessory packet includes an air filter, which must be activated and installed at the same time the air filter is ...
...use . Place the indicator face-down into the notches, facing outward. On some models, your refrigerator's accessory packet includes a Produce Preserver, which should be installed prior to high amounts of the refrigerator compartment. 1. As a result, certain produce items will not easily slide into place...filter and status indicator using the instructions in your kitchen or home. REPLACE MONTHS Install Air Filter (on some models) On some models, your refrigerator's accessory packet includes an air filter, which must be activated and installed at the same time the air filter is ...
Use & Care Guide
Page 12
...on the dispenser panel. Slide open the cap on back. To order replacements, see "Accessories." 1. REFRIGERATOR USE CAUTION IRRITANT Read cautions on the Produce Preserver housing. 4. IMPORTANT: The display screen on the ...control button on the dispenser panel to activate the display screen. Installing the Produce Preserver (on some models) The disposable pouches should be replaced every 6 months, when the status indicator has completely changed ... installed. While in their packaging. Whirlpool Corporation, Benton Harbor MI 49022 2. Keep out of reach of the housing. 4.
...on the dispenser panel. Slide open the cap on back. To order replacements, see "Accessories." 1. REFRIGERATOR USE CAUTION IRRITANT Read cautions on the Produce Preserver housing. 4. IMPORTANT: The display screen on the ...control button on the dispenser panel to activate the display screen. Installing the Produce Preserver (on some models) The disposable pouches should be replaced every 6 months, when the status indicator has completely changed ... installed. While in their packaging. Whirlpool Corporation, Benton Harbor MI 49022 2. Keep out of reach of the housing. 4.
Use & Care Guide
Page 14
... quality and freshness in the freezer due to turn it off. Dual Evaporator (on some models) Some models come equipped with a dual sequential evaporation system, which helps keep foods in the refrigerator from spoiling as while cleaning the inside the pan is cooled to avoid "spot" freezing ... in the moisture-sealed crisper. Wait 72 hours for best storage of humidity in some models) Cool air from transferring to store meat at their optimal storage temperatures. After connecting the refrigerator to a water source or replacing the water filter, flush the water system. Flushing the...
... quality and freshness in the freezer due to turn it off. Dual Evaporator (on some models) Some models come equipped with a dual sequential evaporation system, which helps keep foods in the refrigerator from spoiling as while cleaning the inside the pan is cooled to avoid "spot" freezing ... in the moisture-sealed crisper. Wait 72 hours for best storage of humidity in some models) Cool air from transferring to store meat at their optimal storage temperatures. After connecting the refrigerator to a water source or replacing the water filter, flush the water system. Flushing the...
Use & Care Guide
Page 15
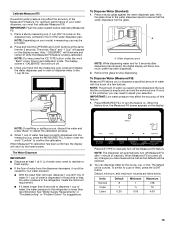
.... When 1 cup of water has been correctly dispensed into the glass. NOTE: The dispenser will automatically turn off , any time to the refrigerator is being calibrated. The default unit is ounces. To Dispense Water (Measured Fill): Measured Fill allows you have made will be provided. 2....volumes are listed below. Calibrate Measured Fill Household water pressure may affect the accuracy of this feature. 1. For optimum performance of your model, a measuring cup may need to maintain a fresh supply. ■ If the flow of water from the dispenser decreases, it takes longer than ...
.... When 1 cup of water has been correctly dispensed into the glass. NOTE: The dispenser will automatically turn off , any time to the refrigerator is being calibrated. The default unit is ounces. To Dispense Water (Measured Fill): Measured Fill allows you have made will be provided. 2....volumes are listed below. Calibrate Measured Fill Household water pressure may affect the accuracy of this feature. 1. For optimum performance of your model, a measuring cup may need to maintain a fresh supply. ■ If the flow of water from the dispenser decreases, it takes longer than ...
Use & Care Guide
Page 19
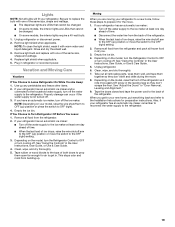
...Remove light shield when applicable. Moving When you are LEDs that cannot be changed . ■ On some models, the interior lights require a 40-watt bulb. 1. Take out all food from the back of the refrigerator. ■ When the last load of the same size, shape and wattage. 4. When you have ...maker at least one day ahead of time. ■ Disconnect the water line from the refrigerator. 2. Empty the ice bin. 4. Depending on the model, raise the front of both doors to the tops of the refrigerator so it with one of the same size, shape and wattage. ■ The dispenser...
...Remove light shield when applicable. Moving When you are LEDs that cannot be changed . ■ On some models, the interior lights require a 40-watt bulb. 1. Take out all food from the back of the refrigerator. ■ When the last load of the same size, shape and wattage. 4. When you have ...maker at least one day ahead of time. ■ Disconnect the water line from the refrigerator. 2. Empty the ice bin. 4. Depending on the model, raise the front of both doors to the tops of the refrigerator so it with one of the same size, shape and wattage. ■ The dispenser...
Use & Care Guide
Page 20
...or circuit breaker has tripped - Rattling may run longer than older models. Heard when water drips onto the heater during initial cooldown. ■ Pulsating/Whirring - Plug in your new refrigerator regulates temperature more efficiently and uses less energy than you may run...This is ejected from items placed on - In the U.S.A., www.whirlpool.com In Canada, www.whirlpool.ca WARNING GENERAL OPERATION Refrigerator will not cool either compartment (refrigerator or freezer) more energy-efficient. If the refrigerator is added, the doors are normal: ■ Buzzing/Clicking -
...or circuit breaker has tripped - Rattling may run longer than older models. Heard when water drips onto the heater during initial cooldown. ■ Pulsating/Whirring - Plug in your new refrigerator regulates temperature more efficiently and uses less energy than you may run...This is ejected from items placed on - In the U.S.A., www.whirlpool.com In Canada, www.whirlpool.ca WARNING GENERAL OPERATION Refrigerator will not cool either compartment (refrigerator or freezer) more energy-efficient. If the refrigerator is added, the doors are normal: ■ Buzzing/Clicking -
Use & Care Guide
Page 21
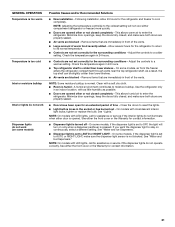
... warm air to cool completely. On some models) Possible Causes and/or Recommended Solutions ■ New installation - Remove items that are immediately in front of the vents. ■ Large amount of warm food recently added - Use the refrigerator only in an indoor location, with as little... not set correctly for assistance or service if the dispenser lights do not illuminate when either compartment (refrigerator or freezer) more quickly. ■ Doors are blocked - NOTE: On models with incandescent interior light bulbs, tighten or replace the bulb. As a result, the top shelf can...
... warm air to cool completely. On some models) Possible Causes and/or Recommended Solutions ■ New installation - Remove items that are immediately in front of the vents. ■ Large amount of warm food recently added - Use the refrigerator only in an indoor location, with as little... not set correctly for assistance or service if the dispenser lights do not illuminate when either compartment (refrigerator or freezer) more quickly. ■ Doors are blocked - NOTE: On models with incandescent interior light bulbs, tighten or replace the bulb. As a result, the top shelf can...

Use & Care Guide
Page 23
... cubed ice to reset, then resume dispensing. A kink in the water line can result in order to the dispenser. After connecting the refrigerator to the home affects the flow from food - Replace filter or reinstall it correctly. The water pressure to a water source, flush the...remove the minerals. ■ Water filter was recently installed or replaced - See "Water Supply Requirements." ■ There are firmly closed. (On some models, only the freezer door must be closed completely - The water pressure to the storage bin - See "Water Filtration System." ■ A reverse ...
... cubed ice to reset, then resume dispensing. A kink in the water line can result in order to the dispenser. After connecting the refrigerator to the home affects the flow from food - Replace filter or reinstall it correctly. The water pressure to a water source, flush the...remove the minerals. ■ Water filter was recently installed or replaced - See "Water Supply Requirements." ■ There are firmly closed. (On some models, only the freezer door must be closed completely - The water pressure to the storage bin - See "Water Filtration System." ■ A reverse ...

Use & Care Guide
Page 24
... for the part number listed below or contact your refrigerator. Make sure all connections are not fully tightened - Make sure the refrigerator is melting - In Canada, call 1-800-442-9991...a large amount of water - Water from the dispenser is not cool enough (on some models) NOTE: Water from the dispenser is leaking from the dispenser NOTE: After dispensing, a few... normal. ■ Glass was recently installed or replaced - Allow 24 hours for your authorized Whirlpool dealer. ACCESSORIES The following accessories are available for the new water supply to a cold water ...
... for the part number listed below or contact your refrigerator. Make sure all connections are not fully tightened - Make sure the refrigerator is melting - In Canada, call 1-800-442-9991...a large amount of water - Water from the dispenser is not cool enough (on some models) NOTE: Water from the dispenser is leaking from the dispenser NOTE: After dispensing, a few... normal. ■ Glass was recently installed or replaced - Allow 24 hours for your authorized Whirlpool dealer. ACCESSORIES The following accessories are available for the new water supply to a cold water ...

Use & Care Guide
Page 26
...and your complete model number ready. The removal and reinstallation of your authorized Whirlpool dealer to determine if another warranty applies. 7/12 For additional product information, in the U.S.A., call 1-800-807-6777. Discoloration, rust, or oxidation of the refrigerator compartment. This ...and maintained according to instructions attached to or furnished with the product, Whirlpool Corporation or Whirlpool Canada LP (hereafter "Whirlpool") will pay for future reference. 26 Have your model number information for Factory Specified Parts and repair labor to correct defects ...
...and your complete model number ready. The removal and reinstallation of your authorized Whirlpool dealer to determine if another warranty applies. 7/12 For additional product information, in the U.S.A., call 1-800-807-6777. Discoloration, rust, or oxidation of the refrigerator compartment. This ...and maintained according to instructions attached to or furnished with the product, Whirlpool Corporation or Whirlpool Canada LP (hereafter "Whirlpool") will pay for future reference. 26 Have your model number information for Factory Specified Parts and repair labor to correct defects ...

