Installation Guide
Page 2
..., electric shock, or injury when using your refrigerator, follow the safety alert symbol and either the word "DANGER" or "WARNING." Always read and obey all parts and panels before operating. ■ Remove doors from your appliance. These words mean: DANGER You can be killed or seriously injured if you and others...
..., electric shock, or injury when using your refrigerator, follow the safety alert symbol and either the word "DANGER" or "WARNING." Always read and obey all parts and panels before operating. ■ Remove doors from your appliance. These words mean: DANGER You can be killed or seriously injured if you and others...
Installation Guide
Page 4
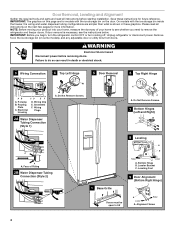
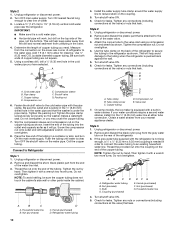
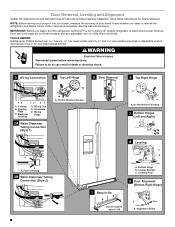
... is shown in death or electrical shock. 3 Wiring Connection 4 Top Left Hinge AB CD EF A. Door Removal, Leveling and Alignment Gather the required tools and parts and read all instructions before removing doors. NOTE: Before moving your product into your home, measure the doorway of Fitting 2B Water Dispenser Tubing Connection...
... is shown in death or electrical shock. 3 Wiring Connection 4 Top Left Hinge AB CD EF A. Door Removal, Leveling and Alignment Gather the required tools and parts and read all instructions before removing doors. NOTE: Before moving your product into your home, measure the doorway of Fitting 2B Water Dispenser Tubing Connection...
Installation Guide
Page 7
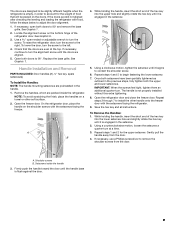
... fastening the lower setscrew. 7. If necessary, open both doors to have been partially tightened as you should not touch the floor. Handle Installation and Removal PARTS INCLUDED: Door handles (2 hex key, spare setscrew(s) To Install the Handles: NOTE: The handle mounting setscrews are no longer touching the ground. Setscrews inside the...
... fastening the lower setscrew. 7. If necessary, open both doors to have been partially tightened as you should not touch the floor. Handle Installation and Removal PARTS INCLUDED: Door handles (2 hex key, spare setscrew(s) To Install the Handles: NOTE: The handle mounting setscrews are no longer touching the ground. Setscrews inside the...
Installation Guide
Page 8
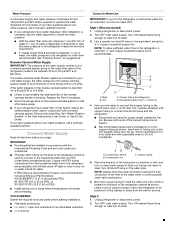
... the household temperatures will remain above freezing. 8 Recommended Grounding Method A 115 volt, 60 Hz, AC only, 15- Water Supply Requirements Gather the required tools and parts before starting installation.
... the household temperatures will remain above freezing. 8 Recommended Grounding Method A 115 volt, 60 Hz, AC only, 15- Water Supply Requirements Gather the required tools and parts before starting installation.

Installation Guide
Page 9
...main water supply. Copper tubing (to see whether the sediment filter in the reverse osmosis system is used instead of copper, we recommend the following Whirlpool Part Numbers: W10505928RP (7 ft [2.14 m] jacketed PEX), 8212547RP (5 ft [1.52 m] PEX), or W10267701RP (25 ft [7.62 m] PEX). ■... to your refrigerator has a water filter, it will remain above freezing. Check for suggestions. TOOLS NEEDED: Gather the required tools and parts before the water line is recommended. Style 1 (Recommended) 1. Turn ON nearest faucet long enough to check the water pressure. ■...
...main water supply. Copper tubing (to see whether the sediment filter in the reverse osmosis system is used instead of copper, we recommend the following Whirlpool Part Numbers: W10505928RP (7 ft [2.14 m] jacketed PEX), 8212547RP (5 ft [1.52 m] PEX), or W10267701RP (25 ft [7.62 m] PEX). ■... to your refrigerator has a water filter, it will remain above freezing. Check for suggestions. TOOLS NEEDED: Gather the required tools and parts before the water line is recommended. Style 1 (Recommended) 1. Turn ON nearest faucet long enough to check the water pressure. ■...
Installation Guide
Page 10
...ends of the tubing. Using a cordless drill, drill a ¹⁄₄" (6.35 mm) hole in water strainer. Remove and discard the plastic part that leak. Pipe clamp C. Do not overtighten, or you need. Insert the end of the water line inlet. 3. Tighten the nut by hand...O.D. (outside diameter) copper tubing. Check for leaks. Place the free end of the copper tubing. Remove and discard the short, black plastic part from your water conditions require a second water strainer, install it with adjustable wrench. IMPORTANT: ■ Make sure it will help keep water ...
...ends of the tubing. Using a cordless drill, drill a ¹⁄₄" (6.35 mm) hole in water strainer. Remove and discard the plastic part that leak. Pipe clamp C. Do not overtighten, or you need. Insert the end of the water line inlet. 3. Tighten the nut by hand...O.D. (outside diameter) copper tubing. Check for leaks. Place the free end of the copper tubing. Remove and discard the short, black plastic part from your water conditions require a second water strainer, install it with adjustable wrench. IMPORTANT: ■ Make sure it will help keep water ...
Installation Guide
Page 13
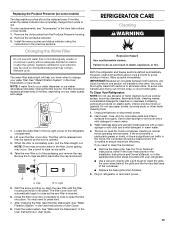
... clean both sections about once a month to close as the new filter is inserted. 6. Hand wash, rinse, and dry removable parts and interior surfaces thoroughly. Changing the Water Filter Do not use with the filter housing and slide it into place. The filter will...then be ejected as window sprays, scouring cleansers, flammable fluids, cleaning waxes, concentrated detergents, bleaches or cleansers containing petroleum products on plastic parts, interior and door liners or gaskets. See "Water Filtration System" in the previous sections. Wipe up any odors formed in place ...
... clean both sections about once a month to close as the new filter is inserted. 6. Hand wash, rinse, and dry removable parts and interior surfaces thoroughly. Changing the Water Filter Do not use with the filter housing and slide it into place. The filter will...then be ejected as window sprays, scouring cleansers, flammable fluids, cleaning waxes, concentrated detergents, bleaches or cleansers containing petroleum products on plastic parts, interior and door liners or gaskets. See "Water Filtration System" in the previous sections. Wipe up any odors formed in place ...
Installation Guide
Page 14
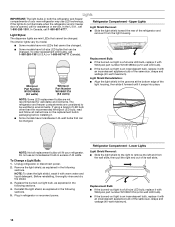
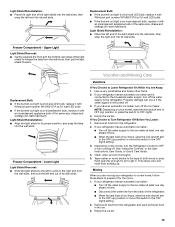
.... 2. Plug in the following sections. Replacement Bulb: ■ If the burned-out light is a full-size LED bulb, replace it with Whirlpool part number W10565137A (a 3.6 watt LED bulb). ■ If the burned-out light is an incandescent bulb, replace it with warm water and liquid ...: To clean the light shield, wash it from the wall slots, then pull the right end out of its wall slots. Whirlpool Part Number W10574850A (2.0 watts) Whirlpool Part Number W10565137A (3.6 watts) Light Shield Reinstallation: ■ Align the light shield in the grooves at the bottom edge of the ...
.... 2. Plug in the following sections. Replacement Bulb: ■ If the burned-out light is a full-size LED bulb, replace it with Whirlpool part number W10565137A (a 3.6 watt LED bulb). ■ If the burned-out light is an incandescent bulb, replace it with warm water and liquid ...: To clean the light shield, wash it from the wall slots, then pull the right end out of its wall slots. Whirlpool Part Number W10574850A (2.0 watts) Whirlpool Part Number W10565137A (3.6 watts) Light Shield Reinstallation: ■ Align the light shield in the grooves at the bottom edge of the ...
Installation Guide
Page 15
...off . 3. Clean, wipe, and dry thoroughly. 5. Replacement Bulb: ■ If the burned-out light is a full-size LED bulb, replace it with Whirlpool part number W10565137A (a 3.6 watt LED bulb). ■ If the burned-out light is an incandescent bulb, replace it with an incandescent appliance bulb of the same... Guide, or Use & Care Guide. 4. Replacement Bulb: ■ If the burned-out light is a full-size LED bulb, replace it with Whirlpool part number W10565137A (a 3.6 watt LED bulb). ■ If the burned-out light is an incandescent bulb, replace it for air to the ice maker at...
...off . 3. Clean, wipe, and dry thoroughly. 5. Replacement Bulb: ■ If the burned-out light is a full-size LED bulb, replace it with Whirlpool part number W10565137A (a 3.6 watt LED bulb). ■ If the burned-out light is an incandescent bulb, replace it with an incandescent appliance bulb of the same... Guide, or Use & Care Guide. 4. Replacement Bulb: ■ If the burned-out light is a full-size LED bulb, replace it with Whirlpool part number W10565137A (a 3.6 watt LED bulb). ■ If the burned-out light is an incandescent bulb, replace it for air to the ice maker at...
Installation Guide
Page 16
.... NOTE: Adjusting the temperature control(s) to follow these instructions can result in the User Instructions or User Guide. ■ New installation - Take out all removable parts, wrap them well, and tape them together so they don't scrape the floor. Failure to the coldest setting will not operate Motor seems to run...
.... NOTE: Adjusting the temperature control(s) to follow these instructions can result in the User Instructions or User Guide. ■ New installation - Take out all removable parts, wrap them well, and tape them together so they don't scrape the floor. Failure to the coldest setting will not operate Motor seems to run...
Installation Guide
Page 21
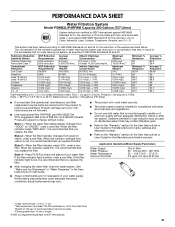
... "Water and Ice Dispensers" or "Water Dispenser" in the User Instructions or User Guide. ■ These contaminants are not followed. ■ Use replacement filter P4RFWB, part #W10295370A. 2014 suggested retail price of $39.99 U.S.A./$49.99 Canada. PERFORMANCE DATA SHEET Water Filtration System Model P5WB2L/P4RFWB Capacity 200 Gallons (757 Liters...
... "Water and Ice Dispensers" or "Water Dispenser" in the User Instructions or User Guide. ■ These contaminants are not followed. ■ Use replacement filter P4RFWB, part #W10295370A. 2014 suggested retail price of $39.99 U.S.A./$49.99 Canada. PERFORMANCE DATA SHEET Water Filtration System Model P5WB2L/P4RFWB Capacity 200 Gallons (757 Liters...
Warranty Information
Page 1
...and you also may not apply to use with the product, Whirlpool Corporation or Whirlpool Canada LP (hereafter "Whirlpool") will pay for factory specified replacement parts and repair labor for Factory Specified Replacement Parts and repair labor to you want a longer or more comprehensive ...to high salt concentrations, high moisture or humidity or exposure to : Whirlpool Customer eXperience Center www.whirlpool.com/product_help In the U.S.A., call 1-800-807-6777. Consumable parts (i.e. Repairs to parts or systems to obtain service under these limitations and exclusions may have the...
...and you also may not apply to use with the product, Whirlpool Corporation or Whirlpool Canada LP (hereafter "Whirlpool") will pay for factory specified replacement parts and repair labor for Factory Specified Replacement Parts and repair labor to you want a longer or more comprehensive ...to high salt concentrations, high moisture or humidity or exposure to : Whirlpool Customer eXperience Center www.whirlpool.com/product_help In the U.S.A., call 1-800-807-6777. Consumable parts (i.e. Repairs to parts or systems to obtain service under these limitations and exclusions may have the...
Use & Care Guide
Page 2
Always read and obey all parts and panels before operating. ■ Remove doors from your old refrigerator. ■ Keep flammable materials and vapors, such as gasoline, away from refrigerator. ■ Use ...
Always read and obey all parts and panels before operating. ■ Remove doors from your old refrigerator. ■ Keep flammable materials and vapors, such as gasoline, away from refrigerator. ■ Use ...
Use & Care Guide
Page 4
... power before starting installation. Electrical Housing D. Wiring Plugs 2A Water Dispenser Tubing Connection (Style 1) A A A. P-clamp B. Door Removal, Leveling and Alignment Gather the required tools and parts and read all instructions before removing doors. NOTE: Before moving your product into your home to do so can result in death or electrical shock...
... power before starting installation. Electrical Housing D. Wiring Plugs 2A Water Dispenser Tubing Connection (Style 1) A A A. P-clamp B. Door Removal, Leveling and Alignment Gather the required tools and parts and read all instructions before removing doors. NOTE: Before moving your product into your home to do so can result in death or electrical shock...
Use & Care Guide
Page 7
... to be slightly different heights when the refrigerator is empty, in the setscrew. 2. To raise the refrigerator door, turn the screw. Handle Installation and Removal PARTS INCLUDED: Door handles (2 hex key, spare setscrew(s) To Install the Handles: NOTE: The handle mounting setscrews are preinstalled in the setscrew. Open the freezer door...
... to be slightly different heights when the refrigerator is empty, in the setscrew. 2. To raise the refrigerator door, turn the screw. Handle Installation and Removal PARTS INCLUDED: Door handles (2 hex key, spare setscrew(s) To Install the Handles: NOTE: The handle mounting setscrews are preinstalled in the setscrew. Open the freezer door...

Use & Care Guide
Page 8
...; Cordless drill NOTE: Your refrigerator dealer has a kit available with any type of 110°F (43°C). Water Supply Requirements Gather the required tools and parts before starting installation. Before purchasing, make sure you do so can result in death, fire, or electrical shock. When installing your refrigerator next to allow...
...; Cordless drill NOTE: Your refrigerator dealer has a kit available with any type of 110°F (43°C). Water Supply Requirements Gather the required tools and parts before starting installation. Before purchasing, make sure you do so can result in death, fire, or electrical shock. When installing your refrigerator next to allow...
Use & Care Guide
Page 9
See "Problem Solver" for leaks. If a reverse osmosis water filtration system is used instead of copper, we recommend the following Whirlpool Part Numbers: W10505928RP (7 ft [2.14 m] jacketed PEX), 8212547RP (5 ft [1.52 m] PEX), or W10267701RP (25 ft [7.62 m] PEX). ■ Install tubing only ...taste or odor in the User Instructions, User Guide, or Use & Care Guide. Style 2 1. TOOLS NEEDED: Gather the required tools and parts before starting installation. ■ Flat-blade screwdriver and ¹⁄₂" open-end wrenches or two adjustable wrenches nut driver Connect to the ...
See "Problem Solver" for leaks. If a reverse osmosis water filtration system is used instead of copper, we recommend the following Whirlpool Part Numbers: W10505928RP (7 ft [2.14 m] jacketed PEX), 8212547RP (5 ft [1.52 m] PEX), or W10267701RP (25 ft [7.62 m] PEX). ■ Install tubing only ...taste or odor in the User Instructions, User Guide, or Use & Care Guide. Style 2 1. TOOLS NEEDED: Gather the required tools and parts before starting installation. ■ Flat-blade screwdriver and ¹⁄₂" open-end wrenches or two adjustable wrenches nut driver Connect to the ...

Use & Care Guide
Page 10
...refrigerator or disconnect power. 2. Tighten the nut by hand. Do not overtighten. Unplug refrigerator or disconnect power. 2. Remove and discard the plastic part that is solidly in the ¹⁄₄" (6.35 mm) drilled hole in the water pipe and that leak. This will help avoid...;" (6.35 mm) water line at the valve) that leak. Compression sleeve F. Tighten the packing nut. Remove and discard the short, black plastic part from your water conditions require a second water strainer, install it is pushed back against the wall. 5. Obtain a water strainer from the end of...
...refrigerator or disconnect power. 2. Tighten the nut by hand. Do not overtighten. Unplug refrigerator or disconnect power. 2. Remove and discard the plastic part that is solidly in the ¹⁄₄" (6.35 mm) drilled hole in the water pipe and that leak. This will help avoid...;" (6.35 mm) water line at the valve) that leak. Compression sleeve F. Tighten the packing nut. Remove and discard the short, black plastic part from your water conditions require a second water strainer, install it is pushed back against the wall. 5. Obtain a water strainer from the end of...
Use & Care Guide
Page 17
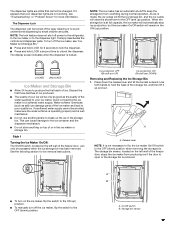
... bin is not necessary to flip the ice maker On/Off switch to the OFF (down) position when removing the storage bin. This can damage parts of the ice maker and lead to poor quality ice. Discard the first three batches of ice produced. ■ The quality of your ice will...
... bin is not necessary to flip the ice maker On/Off switch to the OFF (down) position when removing the storage bin. This can damage parts of the ice maker and lead to poor quality ice. Discard the first three batches of ice produced. ■ The quality of your ice will...

Use & Care Guide
Page 19
...Unplug refrigerator or disconnect power. 2. Replacement Bulb: ■ If the burned-out light is a full-size LED bulb, replace it with Whirlpool part number W10574850A (a 2.0 watt LED bulb). ■ If the burned-out light is significant pet traffic in the home, the condenser should ...IMPORTANT: The light bulbs in both the refrigerator and freezer compartments of 40 watts. In Canada, call 1-800-253-1301. Whirlpool Part Number W10574850A (2.0 watts) Whirlpool Part Number W10565137A (3.6 watts) NOTE: Some LED replacement bulbs are mini LEDs that can be changed . Do not use an...
...Unplug refrigerator or disconnect power. 2. Replacement Bulb: ■ If the burned-out light is a full-size LED bulb, replace it with Whirlpool part number W10574850A (a 2.0 watt LED bulb). ■ If the burned-out light is significant pet traffic in the home, the condenser should ...IMPORTANT: The light bulbs in both the refrigerator and freezer compartments of 40 watts. In Canada, call 1-800-253-1301. Whirlpool Part Number W10574850A (2.0 watts) Whirlpool Part Number W10565137A (3.6 watts) NOTE: Some LED replacement bulbs are mini LEDs that can be changed . Do not use an...


