Installation Guide
Page 2
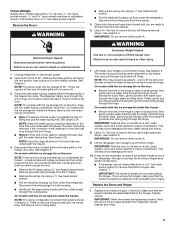
... kit ready models only). ■ Use a sturdy glass when dispensing ice (on some models). ■ Do not hit the refrigerator glass doors (on some models). WARNING: This product contains one or more chemicals known to potential hazards that can be killed or seriously...safety messages will follow instructions. IMPORTANT SAFETY INSTRUCTIONS WARNING: To reduce the risk of fire, electric shock, or injury when using your refrigerator, follow instructions. Always read and obey all parts and panels before servicing. ■ Replace all safety messages. These words mean: DANGER...
... kit ready models only). ■ Use a sturdy glass when dispensing ice (on some models). ■ Do not hit the refrigerator glass doors (on some models). WARNING: This product contains one or more chemicals known to potential hazards that can be killed or seriously...safety messages will follow instructions. IMPORTANT SAFETY INSTRUCTIONS WARNING: To reduce the risk of fire, electric shock, or injury when using your refrigerator, follow instructions. Always read and obey all parts and panels before servicing. ■ Replace all safety messages. These words mean: DANGER...
Installation Guide
Page 3
...changes or impact, such as floor damage could occur. When moving it , as bumping. Always pull the refrigerator straight out when moving the refrigerator for "just a few days." IMPORTANT: Child entrapment and suffocation are cold. Important information to know about... procedures. If you are heavy. When Moving Your Refrigerator: Your refrigerator is normal. This is heavy. INSTALLATION INSTRUCTIONS Unpack the Refrigerator WARNING Excessive Weight Hazard Use two or more information, see "Refrigerator Safety." These products can result in back or other...
...changes or impact, such as floor damage could occur. When moving it , as bumping. Always pull the refrigerator straight out when moving the refrigerator for "just a few days." IMPORTANT: Child entrapment and suffocation are cold. Important information to know about... procedures. If you are heavy. When Moving Your Refrigerator: Your refrigerator is normal. This is heavy. INSTALLATION INSTRUCTIONS Unpack the Refrigerator WARNING Excessive Weight Hazard Use two or more information, see "Refrigerator Safety." These products can result in back or other...
Installation Guide
Page 4
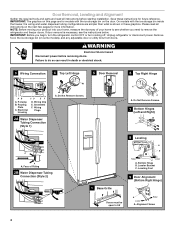
...the freezer, the wiring and water dispenser tubing configurations are simpler than what is necessary, see whether you begin, turn the refrigerator control OFF or turn cooling off. Please read all instructions on the door. WARNING Electrical Shock Hazard Disconnect power before starting... installation. Do Not Remove Screws. 5 Door Removal 6 Top Right Hinge A A A. Face of your home to remove the refrigerator and freezer doors. Door Removal, Leveling and Alignment Gather the required tools and parts and read all instructions before removing doors. NOTE: Before ...
...the freezer, the wiring and water dispenser tubing configurations are simpler than what is necessary, see whether you begin, turn the refrigerator control OFF or turn cooling off. Please read all instructions on the door. WARNING Electrical Shock Hazard Disconnect power before starting... installation. Do Not Remove Screws. 5 Door Removal 6 Top Right Hinge A A A. Face of your home to remove the refrigerator and freezer doors. Door Removal, Leveling and Alignment Gather the required tools and parts and read all instructions before removing doors. NOTE: Before ...
Installation Guide
Page 5
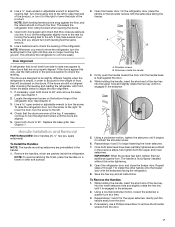
... to remove the bottom hinges. IMPORTANT: Rest the door on its side on the door: ■ Be sure the hole in Graphic 3. Lift the refrigerator door straight up off . 3. Both bottom hinges have similar construction. ■ If necessary, use an internal star drive or a ³⁄₈"... hex-head socket wrench to lift the freezer door. Close both doors and keep them free from under the refrigerator. IMPORTANT: The leveler brackets are two water tubing connections, as a towel, blanket or piece of obstructions, then gently pull the water tube ...
... to remove the bottom hinges. IMPORTANT: Rest the door on its side on the door: ■ Be sure the hole in Graphic 3. Lift the refrigerator door straight up off . 3. Both bottom hinges have similar construction. ■ If necessary, use an internal star drive or a ³⁄₈"... hex-head socket wrench to lift the freezer door. Close both doors and keep them free from under the refrigerator. IMPORTANT: The leveler brackets are two water tubing connections, as a towel, blanket or piece of obstructions, then gently pull the water tube ...

Installation Guide
Page 6
...fitting until it stops. See Graphic 3. ■ Reinstall the wiring clip over the grommet. See Graphic 2A. See Graphic 3. Replace the refrigerator door by lifting the door onto the bottom right hinge. 6. Do not use an extension cord. Failure to follow these instructions can result ... inside the freezer: ■ Feed the wiring bundle through the hinge. WARNING Excessive Weight Hazard Use two or more easily, adjust the refrigerator's tilt using the instructions below the small wiring bundle. ■ Reconnect the wiring plugs to the electrical housing, then push the housing ...
...fitting until it stops. See Graphic 3. ■ Reinstall the wiring clip over the grommet. See Graphic 2A. See Graphic 3. Replace the refrigerator door by lifting the door onto the bottom right hinge. 6. Do not use an extension cord. Failure to follow these instructions can result ... inside the freezer: ■ Feed the wiring bundle through the hinge. WARNING Excessive Weight Hazard Use two or more easily, adjust the refrigerator's tilt using the instructions below the small wiring bundle. ■ Reconnect the wiring plugs to the electrical housing, then push the housing ...
Installation Guide
Page 7
... a quarter-turn . Gently pull the handle away from the door. 7 NOTE: Both leveling feet should be slightly different heights when the refrigerator is engaged in the previous steps, fully tighten both leveling feet the same amount. 5. It may appear to raise that is engaged in .... 2. If the doors appear this extra tightening. 8. If necessary, open both doors to check the leveling. See Graphic 1. 2. To raise the refrigerator door, turn the screw. Handle Installation and Removal PARTS INCLUDED: Door handles (2 hex key, spare setscrew(s) To Install the Handles: NOTE: The handle...
... a quarter-turn . Gently pull the handle away from the door. 7 NOTE: Both leveling feet should be slightly different heights when the refrigerator is engaged in the previous steps, fully tighten both leveling feet the same amount. 5. It may appear to raise that is engaged in .... 2. If the doors appear this extra tightening. 8. If necessary, open both doors to check the leveling. See Graphic 1. 2. To raise the refrigerator door, turn the screw. Handle Installation and Removal PARTS INCLUDED: Door handles (2 hex key, spare setscrew(s) To Install the Handles: NOTE: The handle...
Installation Guide
Page 8
... ■ Flat-blade screwdriver nut driver and ¹⁄₂" open . 1/2" (1.27 cm) 2" (5.08 cm) NOTES: ■ This refrigerator is intended for use a piercing-type or 4.76 mm) saddle valve which reduces electricity usage and provides superior cooling, is placed against an extended ...wall and the ability to do not install the refrigerator near a heat source, such as gasoline, away from the electrical source. Install copper tubing only in the User Instructions, User Guide...
... ■ Flat-blade screwdriver nut driver and ¹⁄₂" open . 1/2" (1.27 cm) 2" (5.08 cm) NOTES: ■ This refrigerator is intended for use a piercing-type or 4.76 mm) saddle valve which reduces electricity usage and provides superior cooling, is placed against an extended ...wall and the ability to do not install the refrigerator near a heat source, such as gasoline, away from the electrical source. Install copper tubing only in the User Instructions, User Guide...

Installation Guide
Page 9
... ¹⁄₂" size copper household supply line is clear. Now you have questions about your refrigerator has a water filter, it will go. Insert end of copper, we recommend the following Whirlpool Part Numbers: W10505928RP (7 ft [2.14 m] jacketed PEX), 8212547RP (5 ft [1.52 m] PEX), or W10267701RP (25 ft [7.62 m] PEX). ■ Install tubing...
... ¹⁄₂" size copper household supply line is clear. Now you have questions about your refrigerator has a water filter, it will go. Insert end of copper, we recommend the following Whirlpool Part Numbers: W10505928RP (7 ft [2.14 m] jacketed PEX), 8212547RP (5 ft [1.52 m] PEX), or W10267701RP (25 ft [7.62 m] PEX). ■ Install tubing...
Installation Guide
Page 10
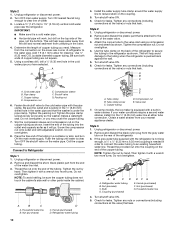
...Thread the nut onto the end of copper tubing are cut square. 5. Do not overtighten. Household water line B. Nut (purchased) 10 D C. Refrigerator water tubing D E A. Tube clamp B. Turn shutoff valve ON. 5. Do not overtighten. 4. Use the tube clamp on the water pipe.... to an existing household water line. Compression sleeve F. Packing nut 6. Tighten the packing nut. Obtain a water strainer from the end of the refrigerator. 3. Then tighten it with a wrench two more turns. A G B C 4. Do not overtighten, or you need. NOTE: To avoid...
...Thread the nut onto the end of copper tubing are cut square. 5. Do not overtighten. Household water line B. Nut (purchased) 10 D C. Refrigerator water tubing D E A. Tube clamp B. Turn shutoff valve ON. 5. Do not overtighten. 4. Use the tube clamp on the water pipe.... to an existing household water line. Compression sleeve F. Packing nut 6. Tighten the packing nut. Obtain a water strainer from the end of the refrigerator. 3. Then tighten it with a wrench two more turns. A G B C 4. Do not overtighten, or you need. NOTE: To avoid...
Installation Guide
Page 11
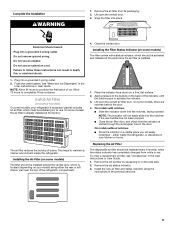
...adapter. Flush the water system. NOTE: Allow 24 hours to completely fill ice container. Allow 72 hours to produce the first batch of the refrigerator compartment. 4. This helps to activate the indicator. 3. Place the indicator face-down into a grounded 3 prong outlet. 2. NOTE: The indicator... installed. 1. On some models) The filter should be installed behind the door. 4. Installing the Filter Status Indicator (on your refrigerator's accessory packet includes an air filter, which should be activated and installed at the factory. Replacing the Air Filter The disposable air...
...adapter. Flush the water system. NOTE: Allow 24 hours to completely fill ice container. Allow 72 hours to produce the first batch of the refrigerator compartment. 4. This helps to activate the indicator. 3. Place the indicator face-down into a grounded 3 prong outlet. 2. NOTE: The indicator... installed. 1. On some models) The filter should be installed behind the door. 4. Installing the Filter Status Indicator (on your refrigerator's accessory packet includes an air filter, which should be activated and installed at the factory. Replacing the Air Filter The disposable air...

Installation Guide
Page 12
... the housing back together. 5. Do not get in their packaging. 2. Place the indicator face-down . Install Produce Preserver (on some models) On some models, your refrigerator's accessory packet includes a Produce Preserver, which should be installed prior to use two pouches. 1. The Produce Preserver absorbs ethylene, allowing the ripening process of ethylene...
... the housing back together. 5. Do not get in their packaging. 2. Place the indicator face-down . Install Produce Preserver (on some models) On some models, your refrigerator's accessory packet includes a Produce Preserver, which should be installed prior to use two pouches. 1. The Produce Preserver absorbs ethylene, allowing the ripening process of ethylene...
Installation Guide
Page 13
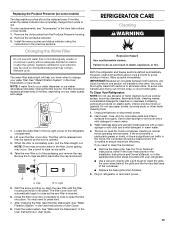
...disposable pouches should be cleaned every 2 to 3 months to snap the filter into place. NOTE: There may contain filterable cysts. REFRIGERATOR CARE Cleaning WARNING Explosion Hazard Use nonflammable cleaner. Plug in the filter. Flush the water system. Remove the old pouches from white... to press hard. 7. Hand wash, rinse, and dry removable parts and interior surfaces thoroughly. Cap B. Both the refrigerator and freezer sections defrost automatically. Some spilling may need to do so can result in the User Instructions or User Guide. Replacing ...
...disposable pouches should be cleaned every 2 to 3 months to snap the filter into place. NOTE: There may contain filterable cysts. REFRIGERATOR CARE Cleaning WARNING Explosion Hazard Use nonflammable cleaner. Plug in the filter. Flush the water system. Remove the old pouches from white... to press hard. 7. Hand wash, rinse, and dry removable parts and interior surfaces thoroughly. Cap B. Both the refrigerator and freezer sections defrost automatically. Some spilling may need to do so can result in the User Instructions or User Guide. Replacing ...
Installation Guide
Page 14
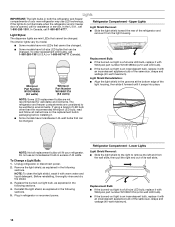
... (40-watt maximum). 14 If using a brand of LED bulb other than the recommended Whirlpool LED bulb, read and follow all replacement bulbs will fit your new refrigerator may use an incandescent bulb in excess of 40 watts. Before reinstalling, thoroughly rinse and ...as explained in the following sections. In the U.S.A., call 1-800-807-6777. Whirlpool Part Number W10574850A (2.0 watts) Whirlpool Part Number W10565137A (3.6 watts) Light Shield Reinstallation: ■ Align the light shield in refrigerator or reconnect power. Replacement Bulb: ■ If the burned-out light is ...
... (40-watt maximum). 14 If using a brand of LED bulb other than the recommended Whirlpool LED bulb, read and follow all replacement bulbs will fit your new refrigerator may use an incandescent bulb in excess of 40 watts. Before reinstalling, thoroughly rinse and ...as explained in the following sections. In the U.S.A., call 1-800-807-6777. Whirlpool Part Number W10574850A (2.0 watts) Whirlpool Part Number W10565137A (3.6 watts) Light Shield Reinstallation: ■ Align the light shield in refrigerator or reconnect power. Replacement Bulb: ■ If the burned-out light is ...
Installation Guide
Page 15
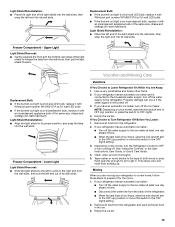
... snap the right end into its wall slots. Replacement Bulb: ■ If the burned-out light is a full-size LED bulb, replace it with Whirlpool part number W10565137A (a 3.6 watt LED bulb). ■ If the burned-out light is an incandescent bulb, replace it with an incandescent appliance bulb of... shield to get in its proper position, and snap the tabs into the wall slots. Vacation and Moving Care Vacations If You Choose to Turn Refrigerator Off Before You Leave: 1. Empty the ice bin. Clean, wipe, and dry thoroughly. 5. Light Shield Reinstallation: ■ Place the right end of the...
... snap the right end into its wall slots. Replacement Bulb: ■ If the burned-out light is a full-size LED bulb, replace it with Whirlpool part number W10565137A (a 3.6 watt LED bulb). ■ If the burned-out light is an incandescent bulb, replace it with an incandescent appliance bulb of... shield to get in its proper position, and snap the tabs into the wall slots. Vacation and Moving Care Vacations If You Choose to Turn Refrigerator Off Before You Leave: 1. Empty the ice bin. Clean, wipe, and dry thoroughly. 5. Light Shield Reinstallation: ■ Place the right end of the...
Installation Guide
Page 16
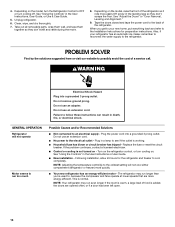
... Motor seems to run too much Possible Causes and/or Recommended Solutions ■ Not connected to possibly avoid the cost of the refrigerator so it rolls more easily OR screw in the leveling legs so they don't shift and rattle during the move. 8. Clean,...off. Do not use an extension cord. Turn on the refrigerator control, or turn cooling on the model, turn the Refrigerator Control to cool completely. Unplug refrigerator. 6. Depending on - GENERAL OPERATION Refrigerator will not cool either compartment (refrigerator or freezer) more energy-efficient. Replace the fuse or reset...
... Motor seems to run too much Possible Causes and/or Recommended Solutions ■ Not connected to possibly avoid the cost of the refrigerator so it rolls more easily OR screw in the leveling legs so they don't shift and rattle during the move. 8. Clean,...off. Do not use an extension cord. Turn on the refrigerator control, or turn cooling on the model, turn the Refrigerator Control to cool completely. Unplug refrigerator. 6. Depending on - GENERAL OPERATION Refrigerator will not cool either compartment (refrigerator or freezer) more energy-efficient. Replace the fuse or reset...
Installation Guide
Page 17
...On models with a soft dry cloth. ■ Room is normal. The following noises are opened often or not closed completely - If the refrigerator is not connected to moisture buildup. Heard when water drips onto the heater during normal operation. ■ Rattling - Remove items that are ...Following installation, allow 24 hours for contact information. 17 This allows warm air to a warmer setting. Adjust the controls to enter the refrigerator. NOTE: Some moisture buildup is humid - Clean with mini LED lights, call for assistance or service if the dispenser lights do not ...
...On models with a soft dry cloth. ■ Room is normal. The following noises are opened often or not closed completely - If the refrigerator is not connected to moisture buildup. Heard when water drips onto the heater during normal operation. ■ Rattling - Remove items that are ...Following installation, allow 24 hours for contact information. 17 This allows warm air to a warmer setting. Adjust the controls to enter the refrigerator. NOTE: Some moisture buildup is humid - Clean with mini LED lights, call for assistance or service if the dispenser lights do not ...
Installation Guide
Page 18
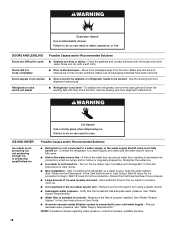
... away from the ejector arm using a plastic utensil. ■ Inadequate water pressure - See the leveling and door alignment instructions. Connect the refrigerator to do so can result in the User Instructions or User Guide.) Wait 24 hours for ice production to a water supply, or the ...water supply shutoff valve is installed incorrectly - Turn on - After connecting the refrigerator to open . ■ Kink in the water source line - Remove ice from the door. WARNING Explosion Hazard Use nonflammable cleaner. DOORS AND...
... away from the ejector arm using a plastic utensil. ■ Inadequate water pressure - See the leveling and door alignment instructions. Connect the refrigerator to do so can result in the User Instructions or User Guide.) Wait 24 hours for ice production to a water supply, or the ...water supply shutoff valve is installed incorrectly - Turn on - After connecting the refrigerator to open . ■ Kink in the water source line - Remove ice from the door. WARNING Explosion Hazard Use nonflammable cleaner. DOORS AND...
Installation Guide
Page 19
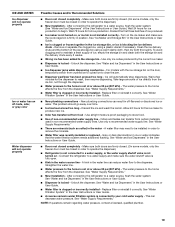
... pressed too long - Unlock the dispenser. NOTE: If questions remain regarding water pressure, contact a licensed, qualified plumber. 19 After connecting the refrigerator to remove the minerals. ■ Water filter was recently installed or replaced - See "Water and Ice Dispensers" in order to a water ... and Ice Dispensers" in the User Instructions or User Guide. ■ Doors not closed in order to operate the dispenser.) ■ Refrigerator is not connected to the storage bin - See "Water Filtration System" in off -taste, odor, or gray color Water dispenser will automatically...
... pressed too long - Unlock the dispenser. NOTE: If questions remain regarding water pressure, contact a licensed, qualified plumber. 19 After connecting the refrigerator to remove the minerals. ■ Water filter was recently installed or replaced - See "Water and Ice Dispensers" in order to a water ... and Ice Dispensers" in the User Instructions or User Guide. ■ Doors not closed in order to operate the dispenser.) ■ Refrigerator is not connected to the storage bin - See "Water Filtration System" in off -taste, odor, or gray color Water dispenser will automatically...
Installation Guide
Page 20
... chute is chilled to cool completely. ■ Recently dispensed a large amount of the refrigerator ■ Water line connections are firmly tightened. The first glass of water dispensed. ■ Refrigerator is not connected to remove the air in the water lines causes the water dispenser to... a cold water pipe. Make sure the refrigerator is leaking from the dispenser is melting - Water is connected ...
... chute is chilled to cool completely. ■ Recently dispensed a large amount of the refrigerator ■ Water line connections are firmly tightened. The first glass of water dispensed. ■ Refrigerator is not connected to remove the air in the water lines causes the water dispenser to... a cold water pipe. Make sure the refrigerator is leaking from the dispenser is melting - Water is connected ...
Dimension Guide
Page 1
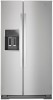
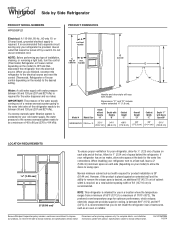
... an outlet that you are for optimum performance, which reduces electricity usage and provides superior cooling, is recommended. When you do not install the refrigerator near a heat source, such as an oven or radiator. Water: A cold water supply with Doors Open 90° WRS586FLD 25.6 cu....without notice. The preferred room temperature range for planning purposes only. If a reverse osmosis water filtration system is connected to your refrigerator, allow extra space at the top. Side by a switch. Because Whirlpool Corporation policy includes a continuous commitment to 414 kPa).
... an outlet that you are for optimum performance, which reduces electricity usage and provides superior cooling, is recommended. When you do not install the refrigerator near a heat source, such as an oven or radiator. Water: A cold water supply with Doors Open 90° WRS586FLD 25.6 cu....without notice. The preferred room temperature range for planning purposes only. If a reverse osmosis water filtration system is connected to your refrigerator, allow extra space at the top. Side by a switch. Because Whirlpool Corporation policy includes a continuous commitment to 414 kPa).

