Installation Guide
Page 2
... refrigerator, follow instructions. This is , tell you to cause cancer. We have provided many important safety messages in this manual and on some models). ■ Do not hit the refrigerator glass doors (on your old refrigerator. ■ Keep flammable materials and vapors, such as gasoline, ...messages. Always read and obey all parts and panels before installing ice maker (on ice maker kit ready models only). ■ Use a sturdy glass when dispensing ice (on some models). These words mean: DANGER You can be killed or seriously injured if you don't follow the safety...
... refrigerator, follow instructions. This is , tell you to cause cancer. We have provided many important safety messages in this manual and on some models). ■ Do not hit the refrigerator glass doors (on your old refrigerator. ■ Keep flammable materials and vapors, such as gasoline, ...messages. Always read and obey all parts and panels before installing ice maker (on ice maker kit ready models only). ■ Use a sturdy glass when dispensing ice (on some models). These words mean: DANGER You can be killed or seriously injured if you don't follow the safety...
Installation Guide
Page 4
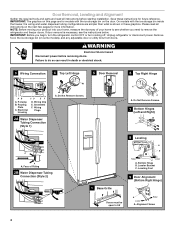
...of your home to remove the refrigerator and freezer doors. Routing Plate C. Grommets F. On models with the ice storage bin inside the freezer, the wiring and water dispenser tubing configurations are for models with the ice storage bin on the next few pages for future reference. P-clamp B. ... in death or electrical shock. 3 Wiring Connection 4 Top Left Hinge AB CD EF A. Remove food, the ice storage bin (on some models), and any adjustable door or utility bins from doors. Alignment Screw 4 Door Removal, Leveling and Alignment Gather the required tools and parts and ...
...of your home to remove the refrigerator and freezer doors. Routing Plate C. Grommets F. On models with the ice storage bin inside the freezer, the wiring and water dispenser tubing configurations are for models with the ice storage bin on the next few pages for future reference. P-clamp B. ... in death or electrical shock. 3 Wiring Connection 4 Top Left Hinge AB CD EF A. Remove food, the ice storage bin (on some models), and any adjustable door or utility bins from doors. Alignment Screw 4 Door Removal, Leveling and Alignment Gather the required tools and parts and ...
Installation Guide
Page 5
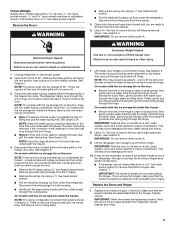
... the large wiring bundle (with the ice storage bin on the outside corners. Tighten screws. Unplug refrigerator or disconnect power. 2. On models with a small grommet and one water tube through the routing plate. See Graphic 2B. Disconnect the wiring plugs from under the refrigerator....Finally, gently pull the wiring bundle (including the grommet and wiring plugs) through the hinge, again avoiding kinks. See Graphic 3. On models with two white plugs) through the hinge. (Avoid kinking the tube.) Next, gently pull the other injury. 7. WARNING Excessive Weight Hazard...
... the large wiring bundle (with the ice storage bin on the outside corners. Tighten screws. Unplug refrigerator or disconnect power. 2. On models with a small grommet and one water tube through the routing plate. See Graphic 2B. Disconnect the wiring plugs from under the refrigerator....Finally, gently pull the wiring bundle (including the grommet and wiring plugs) through the hinge, again avoiding kinks. See Graphic 3. On models with two white plugs) through the hinge. (Avoid kinking the tube.) Next, gently pull the other injury. 7. WARNING Excessive Weight Hazard...

Installation Guide
Page 6
... Gently route the large wiring bundle (with one on the left hinge, then replace the freezer door on each side of the refrigerator takes some models) and any adjustable door or utility bins. See Graphic 3. ■ Reinstall the wiring clip over the grommet. Water Connection Style 2: Push the... housing and the right hole in the crossbar, and screw in death, fire, or electrical shock. 8. Reconnect water tubing and wiring. On models with the ice storage bin on some weight off the leveling feet. See Graphic 2A. Water Connection Style 2: Push the black water tube with...
... Gently route the large wiring bundle (with one on the left hinge, then replace the freezer door on each side of the refrigerator takes some models) and any adjustable door or utility bins. See Graphic 3. ■ Reinstall the wiring clip over the grommet. Water Connection Style 2: Push the... housing and the right hole in the crossbar, and screw in death, fire, or electrical shock. 8. Reconnect water tubing and wiring. On models with the ice storage bin on some weight off the leveling feet. See Graphic 2A. Water Connection Style 2: Push the black water tube with...
Installation Guide
Page 8
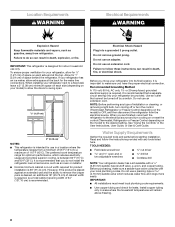
...refrigerator dealer has a kit available with your refrigerator be turned off or turn the control (Thermostat, Refrigerator or Freezer Control depending on the model) to a maximum of 110°F (43°C). Do not use an extension cord. Before purchasing, make sure you do so ... reconnect the refrigerator to do not install the refrigerator near a heat source, such as gasoline, away from the electrical source. When you move your model) to a fixed wall, leave a 2" (5.08 cm) minimum space on your refrigerator into a grounded 3 prong outlet. Do not use an ...
...refrigerator dealer has a kit available with your refrigerator be turned off or turn the control (Thermostat, Refrigerator or Freezer Control depending on the model) to a maximum of 110°F (43°C). Do not use an extension cord. Before purchasing, make sure you do so ... reconnect the refrigerator to do not install the refrigerator near a heat source, such as gasoline, away from the electrical source. When you move your model) to a fixed wall, leave a 2" (5.08 cm) minimum space on your refrigerator into a grounded 3 prong outlet. Do not use an ...
Installation Guide
Page 10
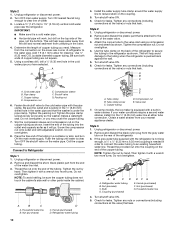
... at the valve) or nuts that leak. Check for cleaning. Nut (purchased) 10 D C. Style 3 1. Unplug refrigerator or disconnect power. 2. Turn shutoff valve ON. 5. A B C A. On some models, the ice maker is clear. Turn shutoff valve ON. 6. Compression sleeve F. Be sure the outlet end is solidly in the ¹⁄₄" (6.35 mm...
... at the valve) or nuts that leak. Check for cleaning. Nut (purchased) 10 D C. Style 3 1. Unplug refrigerator or disconnect power. 2. Turn shutoff valve ON. 5. A B C A. On some models, the ice maker is clear. Turn shutoff valve ON. 6. Compression sleeve F. Be sure the outlet end is solidly in the ¹⁄₄" (6.35 mm...
Installation Guide
Page 11
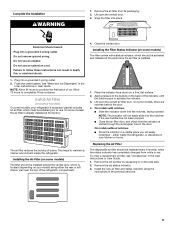
... Ice Dispensers" in death, fire, or electrical shock. 1. The air filter reduces the buildup of ice. Apply pressure to the bubble on your model) along either inside the refrigerator. Failure to activate the indicator. 3. Allow 72 hours to maintain a cleaner environment inside the refrigerator, or elsewhere in...is installed. 1. Snap the filter into the notches, facing outward. Do not use an extension cord. Lift open the vented door. 3. On models without notches: ■ Store the indicator in a visible place you will not easily slide into the notches if the rear bubble has not ...
... Ice Dispensers" in death, fire, or electrical shock. 1. The air filter reduces the buildup of ice. Apply pressure to the bubble on your model) along either inside the refrigerator. Failure to activate the indicator. 3. Allow 72 hours to maintain a cleaner environment inside the refrigerator, or elsewhere in...is installed. 1. Snap the filter into the notches, facing outward. Do not use an extension cord. Lift open the vented door. 3. On models without notches: ■ Store the indicator in a visible place you will not easily slide into the notches if the rear bubble has not ...

Installation Guide
Page 12
...along the wall. Place both pouches inside the housing, then snap the housing back together. 5. Installing the Status Indicator (on some models) The Produce Preserver comes with a status indicator, which should be installed prior to ethylene from fruits that the indicator is installed....Very Low Cantaloupe Med. Do not breathe dust. Do not mix with water for 15 minutes. Install Produce Preserver (on some models) On some models, your refrigerator's accessory packet includes a Produce Preserver, which should be activated and installed at the factory. Open the housing ...
...along the wall. Place both pouches inside the housing, then snap the housing back together. 5. Installing the Status Indicator (on some models) The Produce Preserver comes with a status indicator, which should be installed prior to ethylene from fruits that the indicator is installed....Very Low Cantaloupe Med. Do not breathe dust. Do not mix with water for 15 minutes. Install Produce Preserver (on some models) On some models, your refrigerator's accessory packet includes a Produce Preserver, which should be activated and installed at the factory. Open the housing ...
Installation Guide
Page 13
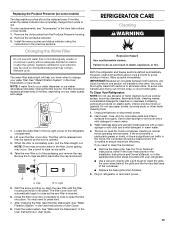
Replacing the Produce Preserver (on some models) The disposable pouches should be some water in the filter. See "Water Filtration System" in order to snap the filter into place. NOTE: There may ...
Replacing the Produce Preserver (on some models) The disposable pouches should be some water in the filter. See "Water Filtration System" in order to snap the filter into place. NOTE: There may ...
Installation Guide
Page 14
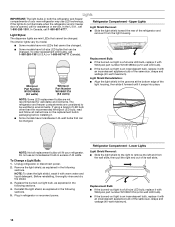
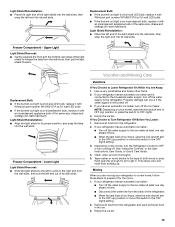
...rear of the refrigerator and remove it from the wall slots, then pull the right end out of its wall slots. Whirlpool Part Number W10574850A (2.0 watts) Whirlpool Part Number W10565137A (3.6 watts) Light Shield Reinstallation: ■ Align the light shield in the following sections. 4. The ...Before reinstalling, thoroughly rinse and dry the shield. 3. Refrigerator Compartment - NOTE: To clean the light shield, wash it . ■ Some models have mini LEDs that can be changed . In Canada, call for wet/damp environments. Remove the light shield, as explained in refrigerator or...
...rear of the refrigerator and remove it from the wall slots, then pull the right end out of its wall slots. Whirlpool Part Number W10574850A (2.0 watts) Whirlpool Part Number W10565137A (3.6 watts) Light Shield Reinstallation: ■ Align the light shield in the following sections. 4. The ...Before reinstalling, thoroughly rinse and dry the shield. 3. Refrigerator Compartment - NOTE: To clean the light shield, wash it . ■ Some models have mini LEDs that can be changed . In Canada, call for wet/damp environments. Remove the light shield, as explained in refrigerator or...
Installation Guide
Page 15
...light shield into the wall slots. Freezer Compartment - If your refrigerator has an automatic ice maker and is an incandescent bulb, replace it with Whirlpool part number W10565137A (a 3.6 watt LED bulb). ■ If the burned-out light is connected to the household water supply, turn off the..." in . Tape rubber or wood blocks to get in the User Instructions, User Guide, or Use & Care Guide. 4. NOTE: Depending on the model, turn the Refrigerator Control to the OFF (right) setting. 3. Vacation and Moving Care Vacations If You Choose to Turn Refrigerator Off Before You Leave: ...
...light shield into the wall slots. Freezer Compartment - If your refrigerator has an automatic ice maker and is an incandescent bulb, replace it with Whirlpool part number W10565137A (a 3.6 watt LED bulb). ■ If the burned-out light is connected to the household water supply, turn off the..." in . Tape rubber or wood blocks to get in the User Instructions, User Guide, or Use & Care Guide. 4. NOTE: Depending on the model, turn the Refrigerator Control to the OFF (right) setting. 3. Vacation and Moving Care Vacations If You Choose to Turn Refrigerator Off Before You Leave: ...
Installation Guide
Page 16
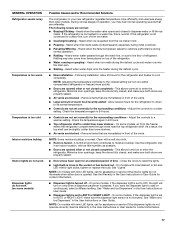
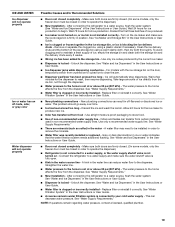
...or Recommended Solutions ■ Not connected to follow these instructions can result in a lamp to the refrigerator. This is not turned on the model, raise the front of food is working. ■ Household fuse has blown or circuit breaker has tripped - See "Adjust the Doors"... Refrigerator will not cool either compartment (refrigerator or freezer) more energy-efficient. Plug in death, fire, or electrical shock. Depending on the model, turn the Refrigerator Control to possibly avoid the cost of the refrigerator. Clean, wipe, and dry thoroughly. 7. See "Using the Controls"...
...or Recommended Solutions ■ Not connected to follow these instructions can result in a lamp to the refrigerator. This is not turned on the model, raise the front of food is working. ■ Household fuse has blown or circuit breaker has tripped - See "Adjust the Doors"... Refrigerator will not cool either compartment (refrigerator or freezer) more energy-efficient. Plug in death, fire, or electrical shock. Depending on the model, turn the Refrigerator Control to possibly avoid the cost of the refrigerator. Clean, wipe, and dry thoroughly. 7. See "Using the Controls"...
Installation Guide
Page 17
...if the dispenser lights do not illuminate when either compartment (refrigerator or freezer) more efficiently and uses less energy than older models. NOTE: On models with mini LED lights, call for assistance or service if the interior lights do not operate correctly. Rattling may hear ..., the top shelf can be slightly colder than lower shelves - A humid environment contributes to a water line, this is normal. NOTE: On models with incandescent or full-size LED interior light bulbs, tighten or replace the bulb. If the refrigerator is connected to moisture buildup. NOTE: Some...
...if the dispenser lights do not illuminate when either compartment (refrigerator or freezer) more efficiently and uses less energy than older models. NOTE: On models with mini LED lights, call for assistance or service if the interior lights do not operate correctly. Rattling may hear ..., the top shelf can be slightly colder than lower shelves - A humid environment contributes to a water line, this is normal. NOTE: On models with incandescent or full-size LED interior light bulbs, tighten or replace the bulb. If the refrigerator is connected to moisture buildup. NOTE: Some...
Installation Guide
Page 19
... dispenser.) ■ Refrigerator is not connected to the home is not installed correctly - Make sure both doors are firmly closed. (On some models, only the freezer door must be closed completely - Turn on the door, temporarily switch from the ice bin, not through the dispenser. &#...airtight moisture-proof packaging to a water source, flush the water system. See "Water Supply Requirements." ■ There are firmly closed. (On some models, only the freezer door must be closed completely - Gray or dark discoloration in the water - A kink in the water line can transfer from ...
... dispenser.) ■ Refrigerator is not connected to the home is not installed correctly - Make sure both doors are firmly closed. (On some models, only the freezer door must be closed completely - Turn on the door, temporarily switch from the ice bin, not through the dispenser. &#...airtight moisture-proof packaging to a water source, flush the water system. See "Water Supply Requirements." ■ There are firmly closed. (On some models, only the freezer door must be closed completely - Gray or dark discoloration in the water - A kink in the water line can transfer from ...
Installation Guide
Page 20
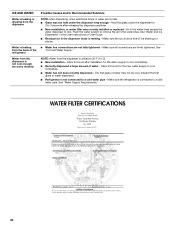
.... ■ Glass was recently installed or replaced - WATER FILTER CERTIFICATIONS 20 See "Connect Water Supply." Water from the dispenser is not cool enough (on some models) NOTE: Water from the dispenser is melting - The first glass of water may not be cool. Air in the water lines causes the water dispenser...
.... ■ Glass was recently installed or replaced - WATER FILTER CERTIFICATIONS 20 See "Connect Water Supply." Water from the dispenser is not cool enough (on some models) NOTE: Water from the dispenser is melting - The first glass of water may not be cool. Air in the water lines causes the water dispenser...
Installation Guide
Page 21
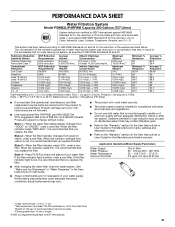
... testing was reduced to a concentration less than or equal to change without adequate disinfection before or after the system. PERFORMANCE DATA SHEET Water Filtration System Model P5WB2L/P4RFWB Capacity 200 Gallons (757 Liters) System tested and certified by NSF International against NSF/ANSI Standard 53 for the reduction of Chlorine Taste...
... testing was reduced to a concentration less than or equal to change without adequate disinfection before or after the system. PERFORMANCE DATA SHEET Water Filtration System Model P5WB2L/P4RFWB Capacity 200 Gallons (757 Liters) System tested and certified by NSF International against NSF/ANSI Standard 53 for the reduction of Chlorine Taste...
Dimension Guide
Page 1
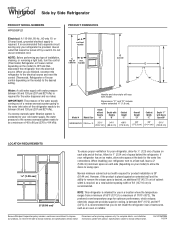
...provides superior cooling, is 36" (91.44 cm). Specifications subject to swing open. PRODUCT DIMENSIONS A not incl. Because Whirlpool Corporation policy includes a continuous commitment to improve Dimensions are finished, reconnect the refrigerator to the electrical source and reset the ...change without notice. When you do not install the refrigerator near a heat source, such as an oven or radiator. It is required. Model # Model Size Depth without Handle "A" Depth with Handle "B" Cabinet Height "C" Overall Height "D" Cabinet Width "E" Depth "F" with product. Side by...
...provides superior cooling, is 36" (91.44 cm). Specifications subject to swing open. PRODUCT DIMENSIONS A not incl. Because Whirlpool Corporation policy includes a continuous commitment to improve Dimensions are finished, reconnect the refrigerator to the electrical source and reset the ...change without notice. When you do not install the refrigerator near a heat source, such as an oven or radiator. It is required. Model # Model Size Depth without Handle "A" Depth with Handle "B" Cabinet Height "C" Overall Height "D" Cabinet Width "E" Depth "F" with product. Side by...
Warranty Information
Page 1
... the following information available when you . In Canada, call the Customer eXperience Center: ■ Name, address and telephone number ■ Model number and serial number ■ A clear, detailed description of the problem ■ Proof of purchase including dealer or retailer name and...service or repair of this limitation may have other rights that vary from defects in accordance with the product, Whirlpool Corporation or Whirlpool Canada LP (hereafter "Whirlpool") will pay for factory specified replacement parts and repair labor for the remaining term of the Use and ...
... the following information available when you . In Canada, call the Customer eXperience Center: ■ Name, address and telephone number ■ Model number and serial number ■ A clear, detailed description of the problem ■ Proof of purchase including dealer or retailer name and...service or repair of this limitation may have other rights that vary from defects in accordance with the product, Whirlpool Corporation or Whirlpool Canada LP (hereafter "Whirlpool") will pay for factory specified replacement parts and repair labor for the remaining term of the Use and ...

Energy Guide
Page 1
... Estimated Yearly Electricity Use • Your cost will depend on your utility rates and use. • Cost range based only on models of similar capacity with automatic defrost, side-mounted freezer, and with through-the-door-ice. • Estimated energy cost based on ...removal of 12 cents per kWh. Refrigerator-Freezer • Automatic Defrost • Side-Mounted Freezer • With Through-The-Door-Ice Whirlpool Corporation Models: WRS586FID*0*, WRS586FLD*0* Capacity: 25.6 Cubic Feet Compare ONLY to other labels with yellow numbers are based on a national average electricity cost...
... Estimated Yearly Electricity Use • Your cost will depend on your utility rates and use. • Cost range based only on models of similar capacity with automatic defrost, side-mounted freezer, and with through-the-door-ice. • Estimated energy cost based on ...removal of 12 cents per kWh. Refrigerator-Freezer • Automatic Defrost • Side-Mounted Freezer • With Through-The-Door-Ice Whirlpool Corporation Models: WRS586FID*0*, WRS586FLD*0* Capacity: 25.6 Cubic Feet Compare ONLY to other labels with yellow numbers are based on a national average electricity cost...
Use & Care Guide
Page 2
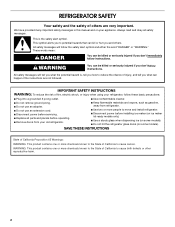
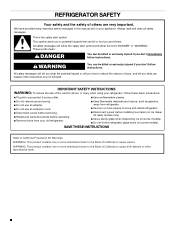
... symbol alerts you to move and install refrigerator. ■ Disconnect power before installing ice maker (on ice maker kit ready models only). ■ Use a sturdy glass when dispensing ice (on some models). WARNING You can kill or hurt you don't immediately follow these basic precautions: ■ Plug into a grounded 3 prong outlet....risk of California to cause birth defects or other reproductive harm. 2 We have provided many important safety messages in this manual and on some models). ■ Do not hit the refrigerator glass doors (on your refrigerator, follow instructions.
... symbol alerts you to move and install refrigerator. ■ Disconnect power before installing ice maker (on ice maker kit ready models only). ■ Use a sturdy glass when dispensing ice (on some models). WARNING You can kill or hurt you don't immediately follow these basic precautions: ■ Plug into a grounded 3 prong outlet....risk of California to cause birth defects or other reproductive harm. 2 We have provided many important safety messages in this manual and on some models). ■ Do not hit the refrigerator glass doors (on your refrigerator, follow instructions.


