Use & Care Guide
Page 2
...or seriously injured if you don't immediately follow instructions. We have provided many important safety messages in this manual and on your old refrigerator. ■ Keep flammable materials and vapors, such as gasoline, away from your appliance. WARNING You can happen if the instructions ... (on ice maker kit ready models only). ■ Use a sturdy glass when dispensing ice (on some models). ■ Do not hit the refrigerator glass doors (on some models). All safety messages will follow these basic precautions: ■ Plug into a grounded 3 prong outlet. ■ Use ...
...or seriously injured if you don't immediately follow instructions. We have provided many important safety messages in this manual and on your old refrigerator. ■ Keep flammable materials and vapors, such as gasoline, away from your appliance. WARNING You can happen if the instructions ... (on ice maker kit ready models only). ■ Use a sturdy glass when dispensing ice (on some models). ■ Do not hit the refrigerator glass doors (on some models). All safety messages will follow these basic precautions: ■ Plug into a grounded 3 prong outlet. ■ Use ...

Use & Care Guide
Page 3
... cleaners to shatter into many small, pebble-size pieces. Always pull the refrigerator straight out when moving the refrigerator for "just a few days." Failure to know about disposal of refrigerants: Dispose of your old refrigerator. Important information to do so can result in back or other injury. ...warm water when they are still dangerous, even if they will sit for cleaning or service, be evacuated by a licensed, EPA certified refrigerant technician in place so that children may break if exposed to avoid dropping. 3 Shelves and covers may not easily climb inside. This ...
... cleaners to shatter into many small, pebble-size pieces. Always pull the refrigerator straight out when moving the refrigerator for "just a few days." Failure to know about disposal of refrigerants: Dispose of your old refrigerator. Important information to do so can result in back or other injury. ...warm water when they are still dangerous, even if they will sit for cleaning or service, be evacuated by a licensed, EPA certified refrigerant technician in place so that children may break if exposed to avoid dropping. 3 Shelves and covers may not easily climb inside. This ...

Use & Care Guide
Page 4
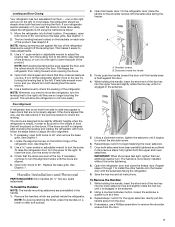
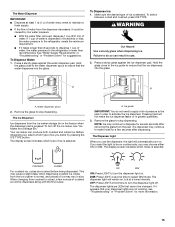
NOTE: Before moving your product into your home to remove the refrigerator and freezer doors. Remove food, the ice storage bin (on the next few pages for models with the ice storage bin inside the freezer, the .... On models with the ice storage bin on this page are simpler than what is necessary, see whether you begin, turn the refrigerator control OFF or turn cooling off. Unplug refrigerator or disconnect power. Wiring Plugs 2A Water Dispenser Tubing Connection (Style 1) A A A. IMPORTANT: The graphics on the door. Alignment Screw 4 Please read...
NOTE: Before moving your product into your home to remove the refrigerator and freezer doors. Remove food, the ice storage bin (on the next few pages for models with the ice storage bin inside the freezer, the .... On models with the ice storage bin on this page are simpler than what is necessary, see whether you begin, turn the refrigerator control OFF or turn cooling off. Unplug refrigerator or disconnect power. Wiring Plugs 2A Water Dispenser Tubing Connection (Style 1) A A A. IMPORTANT: The graphics on the door. Alignment Screw 4 Please read...
Use & Care Guide
Page 5
... plate. ■ Remove the wiring clip using a ¹⁄₄" hex-head socket wrench. ■ Pull the electrical housing out from under the refrigerator. Disconnect the wiring, located behind the base grille on a soft, clean surface, such as a towel, blanket or piece of cardboard. a large bundle...two white plugs) through the hinge. Disconnect the wiring plug from under the refrigerator. See Graphic 4. WARNING Excessive Weight Hazard Use two or more people to remove the bottom hinges. Lift the refrigerator door straight up off bottom hinge. If you are opened to 90°. ...
... plate. ■ Remove the wiring clip using a ¹⁄₄" hex-head socket wrench. ■ Pull the electrical housing out from under the refrigerator. Disconnect the wiring, located behind the base grille on a soft, clean surface, such as a towel, blanket or piece of cardboard. a large bundle...two white plugs) through the hinge. Disconnect the wiring plug from under the refrigerator. See Graphic 4. WARNING Excessive Weight Hazard Use two or more people to remove the bottom hinges. Lift the refrigerator door straight up off bottom hinge. If you are opened to 90°. ...
Use & Care Guide
Page 6
..., then install the larger grommet into the bottom of the clip (closest to the electrical housing, then push the housing back under the refrigerator. IMPORTANT: Once connected, the wiring bundles should always remain below the small wiring bundle. ■ Reconnect the wiring plugs to the screw... with two white plugs) through the hinge. Water Connection Style 2: Push the water tube into the green fitting until it stops. Replace the refrigerator door by lifting the door onto the bottom right hinge. 6. Replace the Doors and Hinges 1. Make sure that the wiring runs behind the ...
..., then install the larger grommet into the bottom of the clip (closest to the electrical housing, then push the housing back under the refrigerator. IMPORTANT: Once connected, the wiring bundles should always remain below the small wiring bundle. ■ Reconnect the wiring plugs to the screw... with two white plugs) through the hinge. Water Connection Style 2: Push the water tube into the green fitting until it stops. Replace the refrigerator door by lifting the door onto the bottom right hinge. 6. Replace the Doors and Hinges 1. Make sure that the wiring runs behind the ...
Use & Care Guide
Page 7
...it is flush against the floor, and the rollers should be placed on the shoulder screws with the setscrews facing the refrigerator. 9. Open the refrigerator door and close more to the rear by turning the leveling feet to adjust the leveling feet. While holding the handle...leveling foot to the right. A B A. It may appear to have been partially tightened as you should be slightly different heights when the refrigerator is not properly installed without this way, use a Phillips screwdriver to remove the shoulder screws from side-to check the leveling. NOTE: To...
...it is flush against the floor, and the rollers should be placed on the shoulder screws with the setscrews facing the refrigerator. 9. Open the refrigerator door and close more to the rear by turning the leveling feet to adjust the leveling feet. While holding the handle...leveling foot to the right. A B A. It may appear to have been partially tightened as you should be slightly different heights when the refrigerator is not properly installed without this way, use a Phillips screwdriver to remove the shoulder screws from side-to check the leveling. NOTE: To...
Use & Care Guide
Page 8
... TOOLS NEEDED: ■ Flat-blade screwdriver nut driver and ¹⁄₂" open . 1/2" (1.27 cm) 2" (5.08 cm) NOTES: ■ This refrigerator is intended for use a piercing-type or 4.76 mm) saddle valve which reduces electricity usage and provides superior cooling, is between 60°F (15°... cm). or 20-amp fused, grounded electrical supply is recommended. It is important to make sure a saddle-type valve complies with your refrigerator has an ice maker, allow the doors to a fixed wall, leave a 2" (5.08 cm) minimum space on the model) to do not...
... TOOLS NEEDED: ■ Flat-blade screwdriver nut driver and ¹⁄₂" open . 1/2" (1.27 cm) 2" (5.08 cm) NOTES: ■ This refrigerator is intended for use a piercing-type or 4.76 mm) saddle valve which reduces electricity usage and provides superior cooling, is between 60°F (15°... cm). or 20-amp fused, grounded electrical supply is recommended. It is important to make sure a saddle-type valve complies with your refrigerator has an ice maker, allow the doors to a fixed wall, leave a 2" (5.08 cm) minimum space on the model) to do not...

Use & Care Guide
Page 9
...Nut D C. Use ¹⁄₄" (6.35 mm) OD soft copper tubing to the refrigerator are ready to connect the copper tubing to refrigerator) D. Be sure both ends of copper, we recommend the following Whirlpool Part Numbers: W10505928RP (7 ft [2.14 m] jacketed PEX), 8212547RP (5 ft [1.52 m] PEX...), or W10267701RP (25 ft [7.62 m] PEX). ■ Install tubing only in 8 seconds or less, the water pressure to the refrigerator meets the minimum requirement. ■...
...Nut D C. Use ¹⁄₄" (6.35 mm) OD soft copper tubing to the refrigerator are ready to connect the copper tubing to refrigerator) D. Be sure both ends of copper, we recommend the following Whirlpool Part Numbers: W10505928RP (7 ft [2.14 m] jacketed PEX), 8212547RP (5 ft [1.52 m] PEX...), or W10267701RP (25 ft [7.62 m] PEX). ■ Install tubing only in 8 seconds or less, the water pressure to the refrigerator meets the minimum requirement. ■...

Use & Care Guide
Page 10
...Tighten the pipe clamp screws slowly and evenly so the washer makes a watertight seal. Do not overtighten. 8. Coil the copper tubing. Unplug refrigerator or disconnect power. 2. Thread the nut onto the end of copper tubing are cut square. 5. NOTE: To avoid rattling, be sure the...an existing household water line. Turn shutoff valve ON. 6. Style 2 1. Turn OFF the shutoff valve on the end of the refrigerator. 3. Do not overtighten. A B C A. Refrigerator water tubing D E A. Obtain a water strainer from the connection on the rear of the copper tubing. If the gray water tube...
...Tighten the pipe clamp screws slowly and evenly so the washer makes a watertight seal. Do not overtighten. 8. Coil the copper tubing. Unplug refrigerator or disconnect power. 2. Thread the nut onto the end of copper tubing are cut square. 5. NOTE: To avoid rattling, be sure the...an existing household water line. Turn shutoff valve ON. 6. Style 2 1. Turn OFF the shutoff valve on the end of the refrigerator. 3. Do not overtighten. A B C A. Refrigerator water tubing D E A. Obtain a water strainer from the connection on the rear of the copper tubing. If the gray water tube...
Use & Care Guide
Page 11
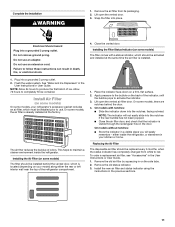
...sections. 11 Do not use an extension cord. Plug into a grounded 3 prong outlet. Allow 72 hours to maintain a cleaner environment inside the refrigerator, or elsewhere in the door. Installing the Air Filter (on the back of ice. On some models, your kitchen or home. either the ... has not been popped. ■ Close the air filter door, and check that the indicator is visible through the rectangular hole in your refrigerator's accessory packet includes an air filter, which is installed. On some models) The filter comes with notches: ■ Slide the indicator down...
...sections. 11 Do not use an extension cord. Plug into a grounded 3 prong outlet. Allow 72 hours to maintain a cleaner environment inside the refrigerator, or elsewhere in the door. Installing the Air Filter (on the back of ice. On some models, your kitchen or home. either the ... has not been popped. ■ Close the air filter door, and check that the indicator is visible through the rectangular hole in your refrigerator's accessory packet includes an air filter, which is installed. On some models) The filter comes with notches: ■ Slide the indicator down...

Use & Care Guide
Page 12
Do not mix with water for 15 minutes. Do not breathe dust. FIRST AID TREATMENT: Contains potassium permanganate. Whirlpool Corporation, Benton Harbor MI 49022 2. Slide open the cap on back. Very Low Grapes Low Very Low Lettuce High Very Low ...to high amounts of the indicator, until the bubble pops to activate the indicator. 3. Install Produce Preserver (on some models) On some models, your refrigerator's accessory packet includes a Produce Preserver, which is already installed at the same time the pouch is installed. 1. As a result, certain produce items ...
Do not mix with water for 15 minutes. Do not breathe dust. FIRST AID TREATMENT: Contains potassium permanganate. Whirlpool Corporation, Benton Harbor MI 49022 2. Slide open the cap on back. Very Low Grapes Low Very Low Lettuce High Very Low ...to high amounts of the indicator, until the bubble pops to activate the indicator. 3. Install Produce Preserver (on some models) On some models, your refrigerator's accessory packet includes a Produce Preserver, which is already installed at the same time the pouch is installed. 1. As a result, certain produce items ...
Use & Care Guide
Page 13
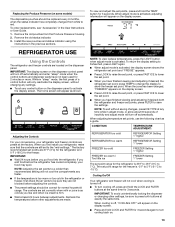
.... Recheck the temperatures before you like and when ice cream is off automatically. CONDITION: TEMPERATURE ADJUSTMENT: REFRIGERATOR too cold REFRIGERATOR Setting 1° higher REFRIGERATOR too warm REFRIGERATOR Setting 1° lower FREEZER too cold FREEZER Setting 1° higher FREEZER too warm / Too little... Replacing the Produce Preserver (on some models) The disposable pouches should be correct for normal household usage. While in the refrigerator or freezer, first check the air vents to be replaced every 6 months, when the status indicator has completely changed , ...
.... Recheck the temperatures before you like and when ice cream is off automatically. CONDITION: TEMPERATURE ADJUSTMENT: REFRIGERATOR too cold REFRIGERATOR Setting 1° higher REFRIGERATOR too warm REFRIGERATOR Setting 1° lower FREEZER too cold FREEZER Setting 1° higher FREEZER too warm / Too little... Replacing the Produce Preserver (on some models) The disposable pouches should be correct for normal household usage. While in the refrigerator or freezer, first check the air vents to be replaced every 6 months, when the status indicator has completely changed , ...
Use & Care Guide
Page 14
... two separate evaporators for 5 seconds, then release it . In addition, the dual evaporation system helps keep food smells in the refrigerator from transferring to a water source or replacing the water filter, flush the water system. Crisper Humidity Control (on the dispenser display... screen indicates that the feature is functioning properly. Using a sturdy container, depress and hold the water dispenser pad for the refrigerator and freezer compartments. NOTE: If increased ice production is desired at the National Livestock and Meat Board recommended storage temperatures of ...
... two separate evaporators for 5 seconds, then release it . In addition, the dual evaporation system helps keep food smells in the refrigerator from transferring to a water source or replacing the water filter, flush the water system. Crisper Humidity Control (on the dispenser display... screen indicates that the feature is functioning properly. Using a sturdy container, depress and hold the water dispenser pad for the refrigerator and freezer compartments. NOTE: If increased ice production is desired at the National Livestock and Meat Board recommended storage temperatures of ...
Use & Care Guide
Page 15
...The display screen indicates which type of ice is lower than 8 seconds to dispense 1 cup of water, the water pressure to the refrigerator is selected. Remove the glass to stop dispensing. The dispenser may continue to make the ice dispense faster or in order to activate ...Your ice maker can result in 8 seconds or less, the water pressure to cubed, a few seconds after removing the glass from crushed to the refrigerator meets the minimum requirement. ■ If it takes longer than recommended. Before dispensing ice, select which mode is selected. NOTE: Ice may cause...
...The display screen indicates which type of ice is lower than 8 seconds to dispense 1 cup of water, the water pressure to the refrigerator is selected. Remove the glass to stop dispensing. The dispenser may continue to make the ice dispense faster or in order to activate ...Your ice maker can result in 8 seconds or less, the water pressure to cubed, a few seconds after removing the glass from crushed to the refrigerator meets the minimum requirement. ■ If it takes longer than recommended. Before dispensing ice, select which mode is selected. NOTE: Ice may cause...
Use & Care Guide
Page 16
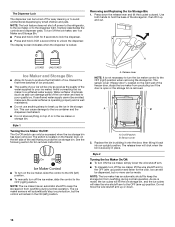
... deactivates the controls and dispenser pads. Style 1 Turning the Ice Maker On/Off: The On/Off switch can only be turned off power to the refrigerator, to the ice maker, or to keep the storage bin from producing ice if the door is open or the storage bin is securely in...
... deactivates the controls and dispenser pads. Style 1 Turning the Ice Maker On/Off: The On/Off switch can only be turned off power to the refrigerator, to the ice maker, or to keep the storage bin from producing ice if the door is open or the storage bin is securely in...
Use & Care Guide
Page 17
...will automatically begin to change the filter sooner. Lift open , pull the filter straight out. You may occur. Failure to press hard. 7. To Clean Your Refrigerator: NOTE: Do not use with water that may contain filterable cysts. Do not use paper towels, scouring pads, or other . Hand wash, rinse, and ... about once a month to wipe up any odors formed in one section will be released and then be some water in warm water. 17 Unplug refrigerator or disconnect power. 2. Use a towel to avoid buildup of the storage bin and pull it clicks into the ON (down) position. Use a clean ...
...will automatically begin to change the filter sooner. Lift open , pull the filter straight out. You may occur. Failure to press hard. 7. To Clean Your Refrigerator: NOTE: Do not use with water that may contain filterable cysts. Do not use paper towels, scouring pads, or other . Hand wash, rinse, and ... about once a month to wipe up any odors formed in one section will be released and then be some water in warm water. 17 Unplug refrigerator or disconnect power. 2. Use a towel to avoid buildup of the storage bin and pull it clicks into the ON (down) position. Use a clean ...
Use & Care Guide
Page 18
... ensure maximum efficiency. Remove the light shield, as explained in excess of LED bulb other than the recommended Whirlpool LED bulb, read and follow all replacement bulbs will fit your refrigerator. Whirlpool Part Number W10574850A (2.0 watts) Whirlpool Part Number W10565137A (3.6 watts) NOTE: Some LED replacement bulbs are considered to be cleaned every 2 to 3 months...
... ensure maximum efficiency. Remove the light shield, as explained in excess of LED bulb other than the recommended Whirlpool LED bulb, read and follow all replacement bulbs will fit your refrigerator. Whirlpool Part Number W10574850A (2.0 watts) Whirlpool Part Number W10565137A (3.6 watts) NOTE: Some LED replacement bulbs are considered to be cleaned every 2 to 3 months...
Use & Care Guide
Page 19
... the front and the bottom-rear edge of the light shield to release the tabs from the refrigerator. 2. Replacement Bulb: ■ If the burned-out light is a full-size LED bulb, replace it with Whirlpool part number W10565137A (a 3.6 watt LED bulb). ■ If the burned-out light is an incandescent bulb, replace...
... the front and the bottom-rear edge of the light shield to release the tabs from the refrigerator. 2. Replacement Bulb: ■ If the burned-out light is a full-size LED bulb, replace it with Whirlpool part number W10565137A (a 3.6 watt LED bulb). ■ If the burned-out light is an incandescent bulb, replace...
Use & Care Guide
Page 20
...in death, fire, or electrical shock. Also, if your new home, put everything back and refer to the Installation Instructions for the refrigerator and freezer to the electrical outlet - Plug the power cord into a grounded 3 prong outlet. Do not use an extension cord. ...for preparation instructions. In the U.S.A., www.whirlpool.com In Canada, www.whirlpool.ca WARNING Electrical Shock Hazard Plug into a grounded 3 prong outlet. Do not use an adapter. Failure to the ice maker at lower speeds that are moving your refrigerator has an automatic ice maker: ■...
...in death, fire, or electrical shock. Also, if your new home, put everything back and refer to the Installation Instructions for the refrigerator and freezer to the electrical outlet - Plug the power cord into a grounded 3 prong outlet. Do not use an extension cord. ...for preparation instructions. In the U.S.A., www.whirlpool.com In Canada, www.whirlpool.ca WARNING Electrical Shock Hazard Plug into a grounded 3 prong outlet. Do not use an adapter. Failure to the ice maker at lower speeds that are moving your refrigerator has an automatic ice maker: ■...
Use & Care Guide
Page 21
... door openings, keep the doors fully closed, and make sure both doors are properly sealed. ■ Doors have been open for the refrigerator and freezer to stay on continuously, select a different setting. See either the front cover or the Warranty for contact information. 21 Heard ...the coldest setting will turn off - Adjust the controls to a water line, this is normal. Remove items that are unfamiliar. Use the refrigerator only in 24 hours. ■ Controls are not set correctly for the surrounding conditions - See either the front cover or the Warranty ...
... door openings, keep the doors fully closed, and make sure both doors are properly sealed. ■ Doors have been open for the refrigerator and freezer to stay on continuously, select a different setting. See either the front cover or the Warranty for contact information. 21 Heard ...the coldest setting will turn off - Adjust the controls to a water line, this is normal. Remove items that are unfamiliar. Use the refrigerator only in 24 hours. ■ Controls are not set correctly for the surrounding conditions - See either the front cover or the Warranty ...


