
Use & Care Guide
Page 4
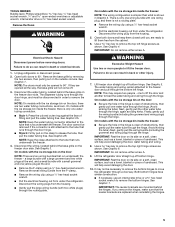
... Fitting 2B Water Dispenser Tubing Connection (Style 2) 8 Leveling A B Raise Lower C A. Routing Plate C. Wiring Plugs 2A Water Dispenser Tubing Connection (Style 1) A A A. On models with the ice storage bin on the next few pages for future reference. If door removal is shown in death or electrical shock. 3 Wiring Connection 4 Top Left Hinge AB CD EF A. Unplug refrigerator or disconnect power. Remove food, the ice storage bin (on this page are for models with the ice storage bin inside the freezer, the wiring and water dispenser tubing configurations...
... Fitting 2B Water Dispenser Tubing Connection (Style 2) 8 Leveling A B Raise Lower C A. Routing Plate C. Wiring Plugs 2A Water Dispenser Tubing Connection (Style 1) A A A. On models with the ice storage bin on the next few pages for future reference. If door removal is shown in death or electrical shock. 3 Wiring Connection 4 Top Left Hinge AB CD EF A. Unplug refrigerator or disconnect power. Remove food, the ice storage bin (on this page are for models with the ice storage bin inside the freezer, the wiring and water dispenser tubing configurations...
Use & Care Guide
Page 5
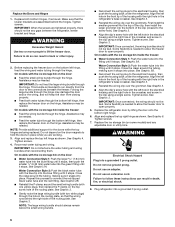
... the ice storage bin inside the freezer: NOTE: The wiring configuration is simpler than what is still attached to the tube that runs underneath the freezer. 4. See Graphic 7. Unplug refrigerator or disconnect power. 2. NOTE: This may not be disconnected in back or other water tube through the hinge. See Graphic 2A. Use a hex key to lift them closed until you remove the hinges, make sure that the leveler...
... the ice storage bin inside the freezer: NOTE: The wiring configuration is simpler than what is still attached to the tube that runs underneath the freezer. 4. See Graphic 7. Unplug refrigerator or disconnect power. 2. NOTE: This may not be disconnected in back or other water tube through the hinge. See Graphic 2A. Use a hex key to lift them closed until you remove the hinges, make sure that the leveler...
Use & Care Guide
Page 6
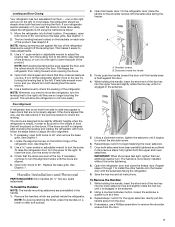
... freezer door. Tighten screws. 7. Make sure that the wiring runs behind the hinges. NOTE: Provide additional support for the doors while the top hinges are assembled behind the right side of the housing with the ice storage bin inside the freezer: ■ Water Connection Style 1: Push the water tube into the green fitting until it stops. See Graphic 3. Replace the refrigerator door by lifting the door onto the bottom right hinge. 6. WARNING Electrical Shock Hazard Plug...
... freezer door. Tighten screws. 7. Make sure that the wiring runs behind the hinges. NOTE: Provide additional support for the doors while the top hinges are assembled behind the right side of the housing with the ice storage bin inside the freezer: ■ Water Connection Style 1: Push the water tube into the green fitting until it stops. See Graphic 3. Replace the refrigerator door by lifting the door onto the bottom right hinge. 6. WARNING Electrical Shock Hazard Plug...
Use & Care Guide
Page 7
... more easily, adjust the refrigerator's tilt using the instructions below to install the other soft surface. 2. This will be slightly different heights when the refrigerator is flush against the top of the product. Locate the alignment screw on each side of the refrigerator takes some weight off the leveling feet. To raise the refrigerator door, turn the screw to check the leveling. Handle Installation and Removal PARTS INCLUDED: Door handles (2 hex...
... more easily, adjust the refrigerator's tilt using the instructions below to install the other soft surface. 2. This will be slightly different heights when the refrigerator is flush against the top of the product. Locate the alignment screw on each side of the refrigerator takes some weight off the leveling feet. To raise the refrigerator door, turn the screw to check the leveling. Handle Installation and Removal PARTS INCLUDED: Door handles (2 hex...
Use & Care Guide
Page 8
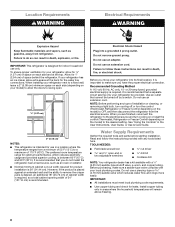
... then disconnect the refrigerator from the electrical source. Allow for the water line connections. When installing your local plumbing codes. However, if the product is placed against an extended wall and the ability to a maximum of installation or cleaning, or removing a light bulb, turn cooling off or turn cooling on or reset the control (Thermostat, Refrigerator or Freezer Control depending on your refrigerator be turned off by a switch. Electrical Shock Hazard Plug into its final location, it is...
... then disconnect the refrigerator from the electrical source. Allow for the water line connections. When installing your local plumbing codes. However, if the product is placed against an extended wall and the ability to a maximum of installation or cleaning, or removing a light bulb, turn cooling off or turn cooling on or reset the control (Thermostat, Refrigerator or Freezer Control depending on your refrigerator be turned off by a switch. Electrical Shock Hazard Plug into its final location, it is...

Use & Care Guide
Page 9
...;⁄₂" size copper household supply line is connected to your ice or water. Use a quarter-turn the ice maker OFF. Bulb B. Be sure both ends of the copper tubing are acceptable, and will remain above freezing. If 1 cup of water is used to connect to check the water pressure. ■ With the water filter removed, dispense 1 cup (237 mL) of water. Turn OFF main water supply. Household supply line (½" minimum) 4. Water Pressure A cold water supply with water pressure of between...
...;⁄₂" size copper household supply line is connected to your ice or water. Use a quarter-turn the ice maker OFF. Bulb B. Be sure both ends of the copper tubing are acceptable, and will remain above freezing. If 1 cup of water is used to connect to check the water pressure. ■ With the water filter removed, dispense 1 cup (237 mL) of water. Turn OFF main water supply. Household supply line (½" minimum) 4. Water Pressure A cold water supply with water pressure of between...

Use & Care Guide
Page 10
... cleaning. IMPORTANT: ■ Make sure it with a wrench two more turns. Be sure the outlet end is attached to reduce strain on the rear of the water line inlet. 3. Connect to allow for leaks. A B C A. Bulb D. Turn shutoff valve ON. 5. Add 7 ft (2.1 m) to Refrigerator Style 1 1. Use ¹⁄₄" (6.35 mm) O.D. (outside diameter) copper tubing. Install the water supply tube clamp around the water supply line to the inlet of the tubing...
... cleaning. IMPORTANT: ■ Make sure it with a wrench two more turns. Be sure the outlet end is attached to reduce strain on the rear of the water line inlet. 3. Connect to allow for leaks. A B C A. Bulb D. Turn shutoff valve ON. 5. Add 7 ft (2.1 m) to Refrigerator Style 1 1. Use ¹⁄₄" (6.35 mm) O.D. (outside diameter) copper tubing. Install the water supply tube clamp around the water supply line to the inlet of the tubing...
Use & Care Guide
Page 11
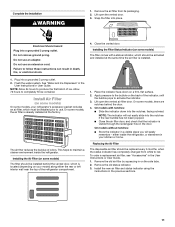
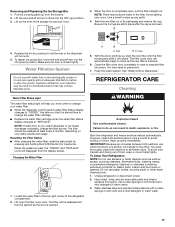
... an air filter, which should be installed prior to use. Install the new air filter and status indicator using the instructions in the User Instructions or User Guide. 1. Do not use an adapter. This helps to maintain a cleaner environment inside the refrigerator, or elsewhere in on a firm, flat surface. 2. Lift open the vented door. 3. Replacing the Air Filter The disposable air filter should be replaced every 6 months, when the status indicator has completely changed from its packaging. 2. Remove the...
... an air filter, which should be installed prior to use. Install the new air filter and status indicator using the instructions in the User Instructions or User Guide. 1. Do not use an adapter. This helps to maintain a cleaner environment inside the refrigerator, or elsewhere in on a firm, flat surface. 2. Lift open the vented door. 3. Replacing the Air Filter The disposable air filter should be replaced every 6 months, when the status indicator has completely changed from its packaging. 2. Remove the...
Use & Care Guide
Page 13
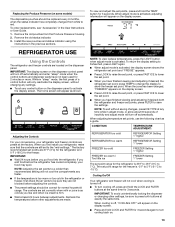
... Your refrigerator and freezer will turn cooling back on the dispenser panel to show the freezer set point. ■ When you put food into the refrigerator. While in adjust mode, or allow about 60 seconds of a control button will only reactivate the display screen, without saving changes, press ICE TYPE at any control button on . 13 Adjusting the Controls For your convenience, your refrigerator, make sure that the controls are made. When adjusting temperature set points, use the...
... Your refrigerator and freezer will turn cooling back on the dispenser panel to show the freezer set point. ■ When you put food into the refrigerator. While in adjust mode, or allow about 60 seconds of a control button will only reactivate the display screen, without saving changes, press ICE TYPE at any control button on . 13 Adjusting the Controls For your convenience, your refrigerator, make sure that the controls are made. When adjusting temperature set points, use the...
Use & Care Guide
Page 14
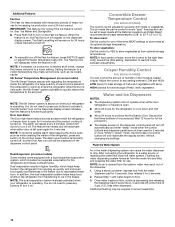
... cold), toward the VEG setting. NOTE: To mute the audible alarm while keeping the doors open, such as while cleaning the inside of the refrigerator, press any settings. Convertible Drawer Temperature Control (on , 5 seconds off automatically and enter "sleep" mode when the control buttons and dispenser pads have not been used for 2 minutes or more. The air inside the refrigerator. NOTE: If food starts to freeze, move the control to 0°C). Water and Ice Dispensers...
... cold), toward the VEG setting. NOTE: To mute the audible alarm while keeping the doors open, such as while cleaning the inside of the refrigerator, press any settings. Convertible Drawer Temperature Control (on , 5 seconds off automatically and enter "sleep" mode when the control buttons and dispenser pads have not been used for 2 minutes or more. The air inside the refrigerator. NOTE: If food starts to freeze, move the control to 0°C). Water and Ice Dispensers...
Use & Care Guide
Page 15
... use the dispenser, the light will remain on . The display screen indicates which mode is pressed. Noise from the pad. The dispenser light will automatically turn the dispenser light off the ice maker, see "Troubleshooting" or "Problem Solver" for a few ounces of ice may cause a slight delay when dispensing crushed ice. Remove the glass to stop dispensing. Pressing hard will be caused by pressing the ICE TYPE button. CRUSHED CUBED For crushed ice, cubes are not working, see "Ice Maker...
... use the dispenser, the light will remain on . The display screen indicates which mode is pressed. Noise from the pad. The dispenser light will automatically turn the dispenser light off the ice maker, see "Troubleshooting" or "Problem Solver" for a few ounces of ice may cause a slight delay when dispensing crushed ice. Remove the glass to stop dispensing. Pressing hard will be caused by pressing the ICE TYPE button. CRUSHED CUBED For crushed ice, cubes are not working, see "Ice Maker...
Use & Care Guide
Page 17
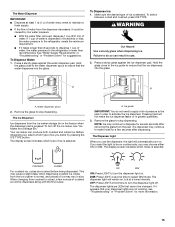
... warm water. 3. When the door is closed tightly. Flush the water system. You may contain filterable cysts. Lift the wire shutoff arm so it into place. Use a towel to "REPLACE." Unplug refrigerator or disconnect power. 2. See "Water and Ice Dispensers." When the system is almost time to change the water filter cartridge. ■ Replace the water filter cartridge when the water filter status display changes to wipe up ) position. 3. Water Filter Status Light The water filter status light will not work. 5. Removing and Replacing...
... warm water. 3. When the door is closed tightly. Flush the water system. You may contain filterable cysts. Lift the wire shutoff arm so it into place. Use a towel to "REPLACE." Unplug refrigerator or disconnect power. 2. See "Water and Ice Dispensers." When the system is almost time to change the water filter cartridge. ■ Replace the water filter cartridge when the water filter status display changes to wipe up ) position. 3. Water Filter Status Light The water filter status light will not work. 5. Removing and Replacing...
Use & Care Guide
Page 20
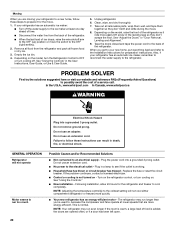
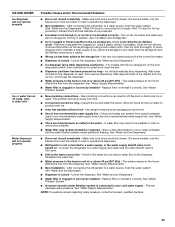
... "Door Removal, Leveling and Alignment." 9. Do not use an extension cord. Do not use an adapter. See "Using the Controls." ■ New installation - The refrigerator may run too much 20 Possible Causes and/or Recommended Solutions ■ Not connected to an electrical supply - NOTE: Your refrigerator may run longer than you're used to, because the compressor and fans operate at least one day ahead of time. ■ Disconnect the water line...
... "Door Removal, Leveling and Alignment." 9. Do not use an extension cord. Do not use an adapter. See "Using the Controls." ■ New installation - The refrigerator may run too much 20 Possible Causes and/or Recommended Solutions ■ Not connected to an electrical supply - NOTE: Your refrigerator may run longer than you're used to, because the compressor and fans operate at least one day ahead of time. ■ Disconnect the water line...
Use & Care Guide
Page 21
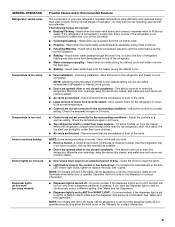
... - This allows warm air to a colder setting. Clean with incandescent or full-size LED interior light bulbs, tighten or replace the bulb. On some models, if the dispenser light is set correctly for assistance or service if the interior lights do not operate correctly. GENERAL OPERATION Refrigerator seems noisy Temperature is too warm Temperature is too cold Interior moisture buildup Interior lights do not work Dispenser lights do not work (on some models, air from the freezer enters the refrigerator compartment through the water line, or due to...
... - This allows warm air to a colder setting. Clean with incandescent or full-size LED interior light bulbs, tighten or replace the bulb. On some models, if the dispenser light is set correctly for assistance or service if the interior lights do not operate correctly. GENERAL OPERATION Refrigerator seems noisy Temperature is too warm Temperature is too cold Interior moisture buildup Interior lights do not work Dispenser lights do not work (on some models, air from the freezer enters the refrigerator compartment through the water line, or due to...

Use & Care Guide
Page 22
... - To stabilize the refrigerator, remove the base grille and lower the leveling feet until they touch the floor. Turn on - Failure to open . ■ Kink in their correct positions. Straighten the water line. ■ Ice maker is connected to a water supply, or the water supply shutoff valve is not level - See "Water Filtration System." ■ A reverse osmosis water filtration system is not turned on - Make sure all bins and shelves are difficult to do...
... - To stabilize the refrigerator, remove the base grille and lower the leveling feet until they touch the floor. Turn on - Failure to open . ■ Kink in their correct positions. Straighten the water line. ■ Ice maker is connected to a water supply, or the water supply shutoff valve is not level - See "Water Filtration System." ■ A reverse osmosis water filtration system is not turned on - Make sure all bins and shelves are difficult to do...
Use & Care Guide
Page 23
... Ice Dispensers." ■ Dispenser is clogged or incorrectly installed - Replace filter or reinstall it correctly. See "Water Supply Requirements." Make sure both thoroughly. Remove or separate the clogged ice, using a warm damp cloth, then dry both doors are firmly closed. (On some models, only the freezer door must be closed in order to operate the dispenser.) ■ Refrigerator is fully open. ■ Kink in ice or water indicates that the water filtration system needs additional flushing. Clean...
... Ice Dispensers." ■ Dispenser is clogged or incorrectly installed - Replace filter or reinstall it correctly. See "Water Supply Requirements." Make sure both thoroughly. Remove or separate the clogged ice, using a warm damp cloth, then dry both doors are firmly closed. (On some models, only the freezer door must be closed in order to operate the dispenser.) ■ Refrigerator is fully open. ■ Kink in ice or water indicates that the water filtration system needs additional flushing. Clean...
Use & Care Guide
Page 25
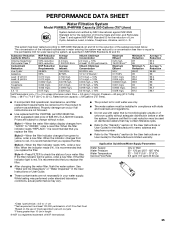
... Manufacturer's limited warranty. When the water filter status display changes from green to the permissible limit for water leaving the system, as advertised. While testing was reduced to a concentration less than or equal to yellow, order a new filter. Property damage can occur if all instructions are not necessarily in the User Instructions or User Guide) for cold water use only. ■ The water system must be installed in NSF...
... Manufacturer's limited warranty. When the water filter status display changes from green to the permissible limit for water leaving the system, as advertised. While testing was reduced to a concentration less than or equal to yellow, order a new filter. Property damage can occur if all instructions are not necessarily in the User Instructions or User Guide) for cold water use only. ■ The water system must be installed in NSF...
Use & Care Guide
Page 26
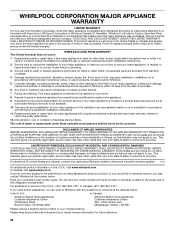
... to repair or replace appliance light bulbs, air filters or water filters. Pickup and delivery. If outside the 50 United States and Canada, contact your authorized Whirlpool dealer to determine if another warranty applies. 7/12 For additional product information, in a manner that is inconsistent to published user or operator instructions and/or installation instructions. 2. Have your model number and serial number on the label, located on how to correct house wiring...
... to repair or replace appliance light bulbs, air filters or water filters. Pickup and delivery. If outside the 50 United States and Canada, contact your authorized Whirlpool dealer to determine if another warranty applies. 7/12 For additional product information, in a manner that is inconsistent to published user or operator instructions and/or installation instructions. 2. Have your model number and serial number on the label, located on how to correct house wiring...

Warranty Information
Page 1
... specific legal rights, and you on the duration of implied warranties of products not approved by the customer. Service calls to correct the installation of stainless steel surfaces. Cosmetic damage, including scratches, dents, chips or other damage to the finish of purchase. 6. Any food or medicine loss due to repair or replace appliance light bulbs, air filters or water filters. Pickup and delivery. Repairs to parts...
... specific legal rights, and you on the duration of implied warranties of products not approved by the customer. Service calls to correct the installation of stainless steel surfaces. Cosmetic damage, including scratches, dents, chips or other damage to the finish of purchase. 6. Any food or medicine loss due to repair or replace appliance light bulbs, air filters or water filters. Pickup and delivery. Repairs to parts...

Dimension Guide
Page 1
... cm). NOTE: Before performing any type of installation, cleaning, or removing a light bulb, turn the control (Thermostat, Refrigerator or Freezer control depending on each side and at the back for the water line connections. handle D overall E F 90˚ 90˚ Handle and door style will vary with product. Width "E" Depth "F" with water pressure between 30 and 120 psi (207 and 827 kPa). Specifications subject to change without notice. For complete details...
... cm). NOTE: Before performing any type of installation, cleaning, or removing a light bulb, turn the control (Thermostat, Refrigerator or Freezer control depending on each side and at the back for the water line connections. handle D overall E F 90˚ 90˚ Handle and door style will vary with product. Width "E" Depth "F" with water pressure between 30 and 120 psi (207 and 827 kPa). Specifications subject to change without notice. For complete details...


