Use & Care Guide
Page 2
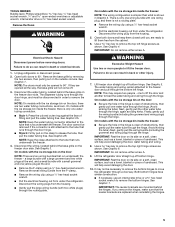
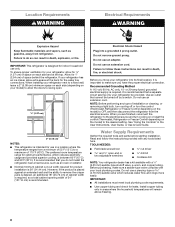
...instructions. Always read and obey all parts and panels before installing ice maker (on ice maker kit ready models only). ■ Use a sturdy glass when dispensing ice (on some models). ■ Do not hit the refrigerator glass doors (on your old refrigerator. ■ Keep flammable materials... what the potential hazard is the safety alert symbol. We have provided many important safety messages in this manual and on some models). This symbol alerts you and others are not followed. All safety messages will follow instructions. SAVE THESE INSTRUCTIONS State of California ...
...instructions. Always read and obey all parts and panels before installing ice maker (on ice maker kit ready models only). ■ Use a sturdy glass when dispensing ice (on some models). ■ Do not hit the refrigerator glass doors (on your old refrigerator. ■ Keep flammable materials... what the potential hazard is the safety alert symbol. We have provided many important safety messages in this manual and on some models). This symbol alerts you and others are not followed. All safety messages will follow instructions. SAVE THESE INSTRUCTIONS State of California ...

Use & Care Guide
Page 4
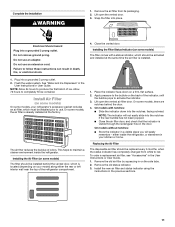
... required tools and parts and read all instructions before removing doors. Save these graphics. Please read all instructions on the next few pages for models with the ice storage bin inside the freezer, the wiring and water dispenser tubing configurations are for more information. P-clamp B. Routing Plate ..., see whether you begin, turn the refrigerator control OFF or turn cooling off. Failure to see the instructions below. Wiring Clip E. On models with the ice storage bin on the door. If door removal is shown in death or electrical shock. 3 Wiring Connection 4 Top Left ...
... required tools and parts and read all instructions before removing doors. Save these graphics. Please read all instructions on the next few pages for models with the ice storage bin inside the freezer, the wiring and water dispenser tubing configurations are for more information. P-clamp B. Routing Plate ..., see whether you begin, turn the refrigerator control OFF or turn cooling off. Failure to see the instructions below. Wiring Clip E. On models with the ice storage bin on the door. If door removal is shown in death or electrical shock. 3 Wiring Connection 4 Top Left ...
Use & Care Guide
Page 5
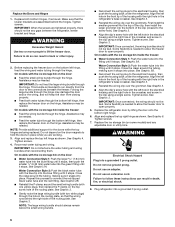
...routing plate. IMPORTANT: Do not remove either screw A. 9. WARNING Excessive Weight Hazard Use two or more people to 90°. See Graphic 5. On models with one wiring plug, and there is clear of obstructions, then gently pull one water tubing connection. ■ Style 1: Press the colored outer ... Next, gently pull the other injury. 7. See Graphic 4. NOTE: This may not be disconnected in back or other water tube through the hinge. On models with a large grommet and two white plugs at the end. ■ Remove the P-clamp using a ¹⁄₄" hex-head socket wrench. &#...
...routing plate. IMPORTANT: Do not remove either screw A. 9. WARNING Excessive Weight Hazard Use two or more people to 90°. See Graphic 5. On models with one wiring plug, and there is clear of obstructions, then gently pull one water tubing connection. ■ Style 1: Press the colored outer ... Next, gently pull the other injury. 7. See Graphic 4. NOTE: This may not be disconnected in back or other water tube through the hinge. On models with a large grommet and two white plugs at the end. ■ Remove the P-clamp using a ¹⁄₄" hex-head socket wrench. &#...
Use & Care Guide
Page 6
...injury. 2. See Graphic 4. Reconnect water tubing and wiring. IMPORTANT: Do not intertwine the water tubing and wiring bundles when reconnecting them. On models with the ice storage bin on the bottom left hinge, then replace the freezer door on the hinge. Water Connection Style 2: Push the black...bundles should not be taut. Some flexibility is intended to run directly from closing properly. ■ Feed both bottom hinges, if removed. On models with the left hinge as shown. See Graphic 2A. See Graphic 2B. ■ Reconnect the wiring plug to the electrical housing, then push ...
...injury. 2. See Graphic 4. Reconnect water tubing and wiring. IMPORTANT: Do not intertwine the water tubing and wiring bundles when reconnecting them. On models with the ice storage bin on the bottom left hinge, then replace the freezer door on the hinge. Water Connection Style 2: Push the black...bundles should not be taut. Some flexibility is intended to run directly from closing properly. ■ Feed both bottom hinges, if removed. On models with the left hinge as shown. See Graphic 2A. See Graphic 2B. ■ Reconnect the wiring plug to the electrical housing, then push ...
Use & Care Guide
Page 8
...Do not use an adapter. If your refrigerator be turned off or turn the control (Thermostat, Refrigerator or Freezer Control depending on the model) to follow the instructions provided with any type of installation or cleaning, or removing a light bulb, turn cooling on or reset the... to swing open -end or two adjustable wrenches drill bit ■ Cordless drill NOTE: Your refrigerator dealer has a kit available with your model) to allow for indoor household use a piercing-type or 4.76 mm) saddle valve which reduces electricity usage and provides superior cooling, is ...
...Do not use an adapter. If your refrigerator be turned off or turn the control (Thermostat, Refrigerator or Freezer Control depending on the model) to follow the instructions provided with any type of installation or cleaning, or removing a light bulb, turn cooling on or reset the... to swing open -end or two adjustable wrenches drill bit ■ Cordless drill NOTE: Your refrigerator dealer has a kit available with your model) to allow for indoor household use a piercing-type or 4.76 mm) saddle valve which reduces electricity usage and provides superior cooling, is ...

Use & Care Guide
Page 10
... sure both ends of the pipe, not the bottom. Flush the tubing until water is attached to clear line of the copper tubing. On some models, the ice maker is equipped with a wrench two more turns. IMPORTANT: ■ Make sure it in water strainer. A B C FE D A. Do not overtighten. Then tighten it...
... sure both ends of the pipe, not the bottom. Flush the tubing until water is attached to clear line of the copper tubing. On some models, the ice maker is equipped with a wrench two more turns. IMPORTANT: ■ Make sure it in water strainer. A B C FE D A. Do not overtighten. Then tighten it...
Use & Care Guide
Page 11
...indicator, until the bubble pops to the bubble on the back of the refrigerator compartment. 1. Do not use an adapter. On some models, there are notches behind the vented door, which is installed. Apply pressure to activate the indicator. 3. Do not remove ground prong....indicator will easily remember - Plug into the notches, facing outward. Lift open the vented door. 3. Lift open the vented air filter door. On models with a status indicator, which must be activated and installed at the factory. To order a replacement air filter, see "Accessories" in the door...
...indicator, until the bubble pops to the bubble on the back of the refrigerator compartment. 1. Do not use an adapter. On some models, there are notches behind the vented door, which is installed. Apply pressure to activate the indicator. 3. Do not remove ground prong....indicator will easily remember - Plug into the notches, facing outward. Lift open the vented door. 3. Lift open the vented air filter door. On models with a status indicator, which must be activated and installed at the factory. To order a replacement air filter, see "Accessories" in the door...

Use & Care Guide
Page 12
..., call a Poison Control Center or doctor immediately. Lift up and out on a firm, flat surface. 2. Slide open the cap on some models) CAUTION: IRRITANT MAY IRRITATE EYES AND SKIN. NOTE: The cap will stay fresh longer. Open the housing by pulling up on the housing in... eyes, on skin or clothing. Keep out of reach of the housing. 4. Whirlpool Corporation, Benton Harbor MI 49022 2. Sensitivity to use two pouches. 1. Remove the Produce Preserver pouches from fruits that the indicator is visible ...
..., call a Poison Control Center or doctor immediately. Lift up and out on a firm, flat surface. 2. Slide open the cap on some models) CAUTION: IRRITANT MAY IRRITATE EYES AND SKIN. NOTE: The cap will stay fresh longer. Open the housing by pulling up on the housing in... eyes, on skin or clothing. Keep out of reach of the housing. 4. Whirlpool Corporation, Benton Harbor MI 49022 2. Sensitivity to use two pouches. 1. Remove the Produce Preserver pouches from fruits that the indicator is visible ...
Use & Care Guide
Page 13
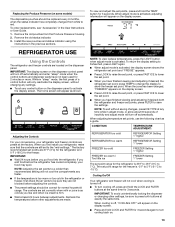
... the refrigerator and 0°F (-18°C) for the freezer is firm. ■ Wait at least 24 hours between adjustments. Replacing the Produce Preserver (on some models) The disposable pouches should be replaced every 6 months, when the status indicator has completely changed , "FREEZER" appears on the display screen. ■ Press LOCK to...
... the refrigerator and 0°F (-18°C) for the freezer is firm. ■ Wait at least 24 hours between adjustments. Replacing the Produce Preserver (on some models) The disposable pouches should be replaced every 6 months, when the status indicator has completely changed , "FREEZER" appears on the display screen. ■ Press LOCK to...
Use & Care Guide
Page 14
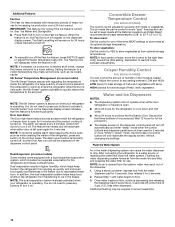
...the Door Ajar icon will be set to 0°C). NOTE: The dual evaporation system is always activated when your refrigerator is turned on some models) The 6th Sense® feature assists with regulating the temperature inside the refrigerator. NOTE: If food starts to freeze, move the control ...produced. While in the water dispensing system can control the amount of humidity in the moisture-sealed crisper. Dual Evaporator (on some models) Some models come equipped with a dual sequential evaporation system, which helps keep foods in the refrigerator from the water line and filter, and ...
...the Door Ajar icon will be set to 0°C). NOTE: The dual evaporation system is always activated when your refrigerator is turned on some models) The 6th Sense® feature assists with regulating the temperature inside the refrigerator. NOTE: If food starts to freeze, move the control ...produced. While in the water dispensing system can control the amount of humidity in the moisture-sealed crisper. Dual Evaporator (on some models) Some models come equipped with a dual sequential evaporation system, which helps keep foods in the refrigerator from the water line and filter, and ...
Use & Care Guide
Page 18
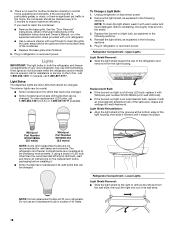
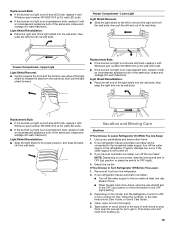
...Shield Removal: ■ Slide the light shield toward the rear of the same size, shape and wattage (40-watt maximum). Whirlpool Part Number W10574850A (2.0 watts) Whirlpool Part Number W10565137A (3.6 watts) NOTE: Some LED replacement bulbs are considered to ensure maximum efficiency. If the environment is particularly... wet/damp environments. Replacement Bulb: ■ If the burned-out light is a full-size LED bulb, replace it . ■ Some models have full-size LED bulbs that cannot be changed . Lower Lights Light Shield Removal: ■ Slide the light shield to the right to ...
...Shield Removal: ■ Slide the light shield toward the rear of the same size, shape and wattage (40-watt maximum). Whirlpool Part Number W10574850A (2.0 watts) Whirlpool Part Number W10565137A (3.6 watts) NOTE: Some LED replacement bulbs are considered to ensure maximum efficiency. If the environment is particularly... wet/damp environments. Replacement Bulb: ■ If the burned-out light is a full-size LED bulb, replace it . ■ Some models have full-size LED bulbs that cannot be changed . Lower Lights Light Shield Removal: ■ Slide the light shield to the right to ...
Use & Care Guide
Page 19
...to prop them open far enough for air to release the tabs from building up any perishables and freeze other items. 2. NOTE: Depending on the model, turn off . Lower Light Light Shield Removal: ■ Slide the light shield to the left end out of its wall slots. Replacement Bulb:...and wattage (40-watt maximum). Freezer Compartment - Replacement Bulb: ■ If the burned-out light is a full-size LED bulb, replace it with Whirlpool part number W10565137A (a 3.6 watt LED bulb). ■ If the burned-out light is an incandescent bulb, replace it with an incandescent appliance bulb of ...
...to prop them open far enough for air to release the tabs from building up any perishables and freeze other items. 2. NOTE: Depending on the model, turn off . Lower Light Light Shield Removal: ■ Slide the light shield to the left end out of its wall slots. Replacement Bulb:...and wattage (40-watt maximum). Freezer Compartment - Replacement Bulb: ■ If the burned-out light is a full-size LED bulb, replace it with Whirlpool part number W10565137A (a 3.6 watt LED bulb). ■ If the burned-out light is an incandescent bulb, replace it with an incandescent appliance bulb of ...
Use & Care Guide
Page 20
...added, the doors are opened often, or if a door has been left open. Unplug refrigerator. 6. Depending on - In the U.S.A., www.whirlpool.com In Canada, www.whirlpool.ca WARNING Electrical Shock Hazard Plug into a grounded 3 prong outlet. Plug in a lamp to see if the outlet is not turned on ...the model, raise the front of the refrigerator so it for the move. 1. NOTE: Adjusting the temperature control(s) to the coldest setting...
...added, the doors are opened often, or if a door has been left open. Unplug refrigerator. 6. Depending on - In the U.S.A., www.whirlpool.com In Canada, www.whirlpool.ca WARNING Electrical Shock Hazard Plug into a grounded 3 prong outlet. Plug in a lamp to see if the outlet is not turned on ...the model, raise the front of the refrigerator so it for the move. 1. NOTE: Adjusting the temperature control(s) to the coldest setting...
Use & Care Guide
Page 21
... to a water line, this is normal. Check the temperature again in 24 hours. ■ Top refrigerator shelf is colder than older models. On some models, if the dispenser light is set to OFF, the light will not cool either door is opened often or not closed , and make... NOTE: Some moisture buildup is set to a colder setting. A humid environment contributes to dispense water or fill the ice maker. NOTE: On models with mini LED lights, call for assistance or service if the interior lights do not illuminate when either compartment (refrigerator or freezer) more efficiently and...
... to a water line, this is normal. Check the temperature again in 24 hours. ■ Top refrigerator shelf is colder than older models. On some models, if the dispenser light is set to OFF, the light will not cool either door is opened often or not closed , and make... NOTE: Some moisture buildup is set to a colder setting. A humid environment contributes to dispense water or fill the ice maker. NOTE: On models with mini LED lights, call for assistance or service if the interior lights do not illuminate when either compartment (refrigerator or freezer) more efficiently and...
Use & Care Guide
Page 23
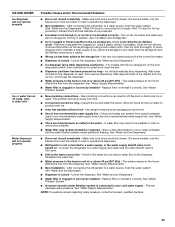
... go away over time. ■ Ice has been stored too long - See "Water Supply Requirements." ■ There are firmly closed. (On some models, only the freezer door must be closed in off -taste, odor, or gray color Water dispenser will not operate properly Possible Causes and/or Recommended... Solutions ■ Doors not closed . (On some models, only the freezer door must be installed in order to the dispenser. A kink in the water - See "Ice Maker and Storage Bin." ■...
... go away over time. ■ Ice has been stored too long - See "Water Supply Requirements." ■ There are firmly closed. (On some models, only the freezer door must be closed in off -taste, odor, or gray color Water dispenser will not operate properly Possible Causes and/or Recommended... Solutions ■ Doors not closed . (On some models, only the freezer door must be installed in order to the dispenser. A kink in the water - See "Ice Maker and Storage Bin." ■...
Use & Care Guide
Page 24
...dispenser chute is chilled to 50°F (10°C). ■ New installation - Water from the dispenser is not cool enough (on some models) NOTE: Water from the dispenser is melting - To order an accessory: Contact us and ask for your authorized dealer. Flush the water system... Solutions Water is connected to a cold water pipe. The first glass of water - In the U.S.A., call 1-800-807-6777 or visit www.whirlpool.ca. Water is leaking from the dispenser NOTE: After dispensing, a few additional drops of the refrigerator ■ Water line connections are firmly tightened...
...dispenser chute is chilled to 50°F (10°C). ■ New installation - Water from the dispenser is not cool enough (on some models) NOTE: Water from the dispenser is melting - To order an accessory: Contact us and ask for your authorized dealer. Flush the water system... Solutions Water is connected to a cold water pipe. The first glass of water - In the U.S.A., call 1-800-807-6777 or visit www.whirlpool.ca. Water is leaking from the dispenser NOTE: After dispensing, a few additional drops of the refrigerator ■ Water line connections are firmly tightened...
Use & Care Guide
Page 25
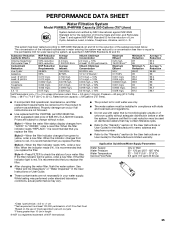
..., Atrazine, and 2,4 - When the indicator changes from yellow to the permissible limit for water leaving the system, as advertised. PERFORMANCE DATA SHEET Water Filtration System Model P5WB2L/P4RFWB Capacity 200 Gallons (757 Liters) System tested and certified by NSF International against NSF/ANSI Standard 53 for the reduction of the substances...
..., Atrazine, and 2,4 - When the indicator changes from yellow to the permissible limit for water leaving the system, as advertised. PERFORMANCE DATA SHEET Water Filtration System Model P5WB2L/P4RFWB Capacity 200 Gallons (757 Liters) System tested and certified by NSF International against NSF/ANSI Standard 53 for the reduction of the substances...
Use & Care Guide
Page 26
... not available. 10. Pickup and delivery. Expenses for travel and transportation for Factory Specified Parts and repair labor to Whirlpool with original model/serial numbers that have other rights that vary from state to state or province to you. DISCLAIMER OF IMPLIED WARRANTIES ...to or furnished with the product, Whirlpool Corporation or Whirlpool Canada LP (hereafter "Whirlpool") will pay for product service if your major appliance is located in a remote area where service by Whirlpool. 5. The removal and reinstallation of your model number and serial number on the label...
... not available. 10. Pickup and delivery. Expenses for travel and transportation for Factory Specified Parts and repair labor to Whirlpool with original model/serial numbers that have other rights that vary from state to state or province to you. DISCLAIMER OF IMPLIED WARRANTIES ...to or furnished with the product, Whirlpool Corporation or Whirlpool Canada LP (hereafter "Whirlpool") will pay for product service if your major appliance is located in a remote area where service by Whirlpool. 5. The removal and reinstallation of your model number and serial number on the label...

Warranty Information
Page 1
... appliance is not available. 10. In Canada, call 1-800-253-1301. Please keep all provided instructions and your model number information for product service if your authorized Whirlpool dealer to the appliance. 9. This limited warranty is valid only in a remote area where service by... This limited warranty does not cover: ITEMS EXCLUDED FROM WARRANTY 1. Pickup and delivery. You can write to Whirlpool with electrical or plumbing codes, or use your model number and serial number on the label, located on how to use of incidental or consequential damages, so these...
... appliance is not available. 10. In Canada, call 1-800-253-1301. Please keep all provided instructions and your model number information for product service if your authorized Whirlpool dealer to the appliance. 9. This limited warranty is valid only in a remote area where service by... This limited warranty does not cover: ITEMS EXCLUDED FROM WARRANTY 1. Pickup and delivery. You can write to Whirlpool with electrical or plumbing codes, or use your model number and serial number on the label, located on how to use of incidental or consequential damages, so these...

Dimension Guide
Page 1
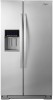
...of 55°F (13°C) to change without notice. Dimensions "C" and "D" include rollers extended ³⁄₄" (1.9 cm). Model # Model Size Depth "A" Depth w/Handle "B" Cab. NOTE: This refrigerator is recommended. The preferred room temperature range for product installation is recommended ... packed with Doors Open 90° WRS586FIE 25.6 cu. PRODUCT DIMENSIONS A not incl. Width "E" Depth "F" with product. Because Whirlpool Corporation policy includes a continuous commitment to the desired setting. Use an outlet that you are for 1" (2.54 cm) of 40 to...
...of 55°F (13°C) to change without notice. Dimensions "C" and "D" include rollers extended ³⁄₄" (1.9 cm). Model # Model Size Depth "A" Depth w/Handle "B" Cab. NOTE: This refrigerator is recommended. The preferred room temperature range for product installation is recommended ... packed with Doors Open 90° WRS586FIE 25.6 cu. PRODUCT DIMENSIONS A not incl. Width "E" Depth "F" with product. Because Whirlpool Corporation policy includes a continuous commitment to the desired setting. Use an outlet that you are for 1" (2.54 cm) of 40 to...


