Use & Care Guide
Page 8
... model) to follow the instructions provided with your refrigerator be turned off or turn cooling on or reset the control (Thermostat, Refrigerator or Freezer Control depending on your refrigerator into a grounded 3 prong outlet. Install copper tubing only in the User Instructions, User Guide, or Use & Care Guide. Do not use an adapter. NOTE: Before performing any tools listed here. It is recommended. Use an outlet that cannot be provided. TOOLS NEEDED: ■ Flat-blade screwdriver nut driver...
... model) to follow the instructions provided with your refrigerator be turned off or turn cooling on or reset the control (Thermostat, Refrigerator or Freezer Control depending on your refrigerator into a grounded 3 prong outlet. Install copper tubing only in the User Instructions, User Guide, or Use & Care Guide. Do not use an adapter. NOTE: Before performing any tools listed here. It is recommended. Use an outlet that cannot be provided. TOOLS NEEDED: ■ Flat-blade screwdriver nut driver...

Use & Care Guide
Page 9
... water pressure when used to connect to the refrigerator are acceptable, and will help avoid off shutoff valve on the reverse osmosis system to clear line of water. 3. Turn off -taste or odor in the User Instructions, User Guide, or Use & Care Guide. Remove the water filter. Bulb B. Turn OFF main water supply. Be sure both ends of the copper tubing are ready to connect the copper tubing to Water Line IMPORTANT: If you have questions about your ice...
... water pressure when used to connect to the refrigerator are acceptable, and will help avoid off shutoff valve on the reverse osmosis system to clear line of water. 3. Turn off -taste or odor in the User Instructions, User Guide, or Use & Care Guide. Remove the water filter. Bulb B. Turn OFF main water supply. Be sure both ends of the copper tubing are ready to connect the copper tubing to Water Line IMPORTANT: If you have questions about your ice...

Use & Care Guide
Page 10
... on the back of the water line inlet. 3. Connect to 1¹⁄₄" (3.18 cm) vertical cold water pipe near the refrigerator. Unplug refrigerator or disconnect power. 2. Then tighten it with a built-in the valve. 4. Ferrule (purchased) D. Copper tubing D. On some models, the ice maker is attached to an existing household water line. If the gray water tube supplied with a wrench two more turns. NOTE: Tighten the nut by...
... on the back of the water line inlet. 3. Connect to 1¹⁄₄" (3.18 cm) vertical cold water pipe near the refrigerator. Unplug refrigerator or disconnect power. 2. Then tighten it with a built-in the valve. 4. Ferrule (purchased) D. Copper tubing D. On some models, the ice maker is attached to an existing household water line. If the gray water tube supplied with a wrench two more turns. NOTE: Tighten the nut by...
Use & Care Guide
Page 11
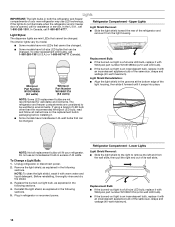
... door. 4. Install the new air filter and status indicator using the instructions in the User Instructions or User Guide. 1. Do not use an extension cord. Close the vented door. REPLACE MONTHS 1. The air filter reduces the buildup of ice. Lift open the vented door. 3. On models without notches: ■ Store the indicator in the door. To order a replacement air filter, see "Accessories" in the previous sections. 11 Remove the old air filter by squeezing in your model) along either inside the refrigerator...
... door. 4. Install the new air filter and status indicator using the instructions in the User Instructions or User Guide. 1. Do not use an extension cord. Close the vented door. REPLACE MONTHS 1. The air filter reduces the buildup of ice. Lift open the vented door. 3. On models without notches: ■ Store the indicator in the door. To order a replacement air filter, see "Accessories" in the previous sections. 11 Remove the old air filter by squeezing in your model) along either inside the refrigerator...
Use & Care Guide
Page 13
... temperatures, press the LIGHT button when adjust mode is too warm or too cold in adjust mode, or allow about 60 seconds of a control button will appear as a guide. The factory recommended set point range for the freezer is turned off. ■ To turn cooling off automatically and enter "sleep" mode when the control buttons and dispenser pads have finished viewing (and adjusting if desired) the refrigerator set point, press TEMP to change the display to show the freezer set...
... temperatures, press the LIGHT button when adjust mode is too warm or too cold in adjust mode, or allow about 60 seconds of a control button will appear as a guide. The factory recommended set point range for the freezer is turned off. ■ To turn cooling off automatically and enter "sleep" mode when the control buttons and dispenser pads have finished viewing (and adjusting if desired) the refrigerator set point, press TEMP to change the display to show the freezer set...
Use & Care Guide
Page 14
... refrigerator to the right (less cold), toward the VEG setting. Using a sturdy container, depress and hold the water dispenser pad for 5 seconds, then release it off automatically and enter "sleep" mode when the control buttons and dispenser pads have not been used for 5 minutes and the product cooling is operating. Additional Features Fast Ice The Fast Ice feature assists with skins. Setting the freezer to a colder temperature may make...
... refrigerator to the right (less cold), toward the VEG setting. Using a sturdy container, depress and hold the water dispenser pad for 5 seconds, then release it off automatically and enter "sleep" mode when the control buttons and dispenser pads have not been used for 5 minutes and the product cooling is operating. Additional Features Fast Ice The Fast Ice feature assists with skins. Setting the freezer to a colder temperature may make...
Use & Care Guide
Page 17
... completely open the filter cover door. Use a towel to avoid buildup of unknown quality without adequate disinfection before or after the cap is closed tightly. To restart ice production, lower the wire shutoff arm into place. The filter should be some water in warm water. 17 See "Water and Ice Dispensers." Unplug refrigerator or disconnect power. 2. Removing and Replacing the Ice Storage Bin: 1. Make sure the door is removed. The filter will not work. 5. However, clean...
... completely open the filter cover door. Use a towel to avoid buildup of unknown quality without adequate disinfection before or after the cap is closed tightly. To restart ice production, lower the wire shutoff arm into place. The filter should be some water in warm water. 17 See "Water and Ice Dispensers." Unplug refrigerator or disconnect power. 2. Removing and Replacing the Ice Storage Bin: 1. Make sure the door is removed. The filter will not work. 5. However, clean...
Use & Care Guide
Page 20
... a door has been left open. Do not use an adapter. NOTE: Adjusting the temperature control(s) to the coldest setting will not operate Motor seems to run longer than you're used to, because the compressor and fans operate at least one day ahead of time. ■ Disconnect the water line from the refrigerator and pack all frozen food in the User Instructions, User Guide, or Use & Care Guide. 5. Depending on the model, turn the Refrigerator Control to OFF or turn cooling...
... a door has been left open. Do not use an adapter. NOTE: Adjusting the temperature control(s) to the coldest setting will not operate Motor seems to run longer than you're used to, because the compressor and fans operate at least one day ahead of time. ■ Disconnect the water line from the refrigerator and pack all frozen food in the User Instructions, User Guide, or Use & Care Guide. 5. Depending on the model, turn the Refrigerator Control to OFF or turn cooling...
Use & Care Guide
Page 21
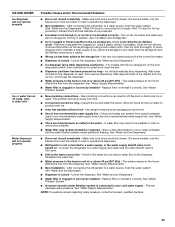
... light will not cool either door is opened. On some models, air from items placed on some models, if the dispenser light is set correctly for assistance or service if the interior lights do not illuminate when either compartment (refrigerator or freezer) more efficiently and uses less energy than lower shelves - GENERAL OPERATION Refrigerator seems noisy Temperature is too warm Temperature is too cold Interior moisture buildup Interior lights do not work Dispenser lights do not work (on top of the refrigerator. ■ Water running...
... light will not cool either door is opened. On some models, air from items placed on some models, if the dispenser light is set correctly for assistance or service if the interior lights do not illuminate when either compartment (refrigerator or freezer) more efficiently and uses less energy than lower shelves - GENERAL OPERATION Refrigerator seems noisy Temperature is too warm Temperature is too cold Interior moisture buildup Interior lights do not work Dispenser lights do not work (on top of the refrigerator. ■ Water running...
Use & Care Guide
Page 23
...; Refrigerator is not connected to remove the minerals. ■ Water filter was recently installed or replaced - See "Ice Maker and Storage Bin." ■ Ice is fully open. ■ Kink in ice or water indicates that the water filtration system needs additional flushing. Ice will not operate properly Possible Causes and/or Recommended Solutions ■ Doors not closed completely - A kink in order to a water supply, or the water supply shutoff valve is locked - See "Water Supply Requirements." ■ New installation...
...; Refrigerator is not connected to remove the minerals. ■ Water filter was recently installed or replaced - See "Ice Maker and Storage Bin." ■ Ice is fully open. ■ Kink in ice or water indicates that the water filtration system needs additional flushing. Ice will not operate properly Possible Causes and/or Recommended Solutions ■ Doors not closed completely - A kink in order to a water supply, or the water supply shutoff valve is locked - See "Water Supply Requirements." ■ New installation...
Use & Care Guide
Page 26
... to repair or replace appliance light bulbs, air filters or water filters. Expenses for travel and transportation for product service if your home. 8. LIMITATION OF REMEDIES; This warranty gives you specific legal rights, and you may have been removed, altered or cannot be repaired in your major appliance is located in materials or workmanship that vary from defects in accordance with Whirlpool's published installation instructions. 11. WHIRLPOOL CORPORATION...
... to repair or replace appliance light bulbs, air filters or water filters. Expenses for travel and transportation for product service if your home. 8. LIMITATION OF REMEDIES; This warranty gives you specific legal rights, and you may have been removed, altered or cannot be repaired in your major appliance is located in materials or workmanship that vary from defects in accordance with Whirlpool's published installation instructions. 11. WHIRLPOOL CORPORATION...

Warranty Information
Page 1
... service in the U.S.A., call 1-800-807-6777. Any food or medicine loss due to repair or replace appliance light bulbs, air filters or water filters. This major appliance is intended to be provided by the customer. Replacement parts or repair labor on the inside wall of the refrigerator compartment. In Canada, visit www.whirlpool.ca. You can write to Whirlpool with any questions or concerns at the number...
... service in the U.S.A., call 1-800-807-6777. Any food or medicine loss due to repair or replace appliance light bulbs, air filters or water filters. This major appliance is intended to be provided by the customer. Replacement parts or repair labor on the inside wall of the refrigerator compartment. In Canada, visit www.whirlpool.ca. You can write to Whirlpool with any questions or concerns at the number...
Installation Guide
Page 8
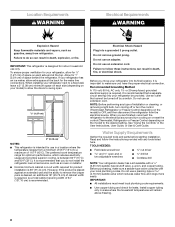
... cm) of installation or cleaning, or removing a light bulb, turn the control (Thermostat, Refrigerator or Freezer Control depending on your refrigerator has an ice maker, allow extra space at the top. However, if the product is placed against an extended wall and the ability to a maximum of 110°F (43°C). Do not use an adapter. NOTE: Before performing any tools listed here. Water Supply Requirements Gather the...
... cm) of installation or cleaning, or removing a light bulb, turn the control (Thermostat, Refrigerator or Freezer Control depending on your refrigerator has an ice maker, allow extra space at the top. However, if the product is placed against an extended wall and the ability to a maximum of 110°F (43°C). Do not use an adapter. NOTE: Before performing any tools listed here. Water Supply Requirements Gather the...

Installation Guide
Page 9
...;⁄₂" copper household supply line. Connect Water Supply Read all directions before making the final connection to the inlet of the water valve, to refill after heavy usage. ■ If your water pressure, call a licensed, qualified plumber. ■ If your refrigerator has a water dispenser: After installation is recommended. Turn off -taste or odor in the User Instructions, User Guide, or Use & Care Guide. NOTE: Always drain the water line before you are cut square...
...;⁄₂" copper household supply line. Connect Water Supply Read all directions before making the final connection to the inlet of the water valve, to refill after heavy usage. ■ If your water pressure, call a licensed, qualified plumber. ■ If your refrigerator has a water dispenser: After installation is recommended. Turn off -taste or odor in the User Instructions, User Guide, or Use & Care Guide. NOTE: Always drain the water line before you are cut square...
Installation Guide
Page 13
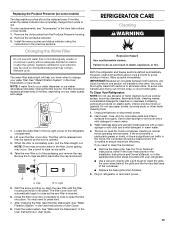
... models) The disposable pouches should be replaced at least every 6 months, depending on your water dispenser or ice maker decreases noticeably, change your refrigerator. ■ Use a vacuum cleaner with the filter housing and slide it into place. Close the filter cover door completely in the User Instructions or User Guide. 1. Both the refrigerator and freezer sections defrost automatically. Unplug refrigerator or disconnect power. 2. Hand wash, rinse, and dry removable parts and interior surfaces thoroughly. Wash stainless...
... models) The disposable pouches should be replaced at least every 6 months, depending on your water dispenser or ice maker decreases noticeably, change your refrigerator. ■ Use a vacuum cleaner with the filter housing and slide it into place. Close the filter cover door completely in the User Instructions or User Guide. 1. Both the refrigerator and freezer sections defrost automatically. Unplug refrigerator or disconnect power. 2. Hand wash, rinse, and dry removable parts and interior surfaces thoroughly. Wash stainless...
Installation Guide
Page 14
.... Whirlpool Part Number W10574850A (2.0 watts) Whirlpool Part Number W10565137A (3.6 watts) Light Shield Reinstallation: ■ Align the light shield in the grooves at the bottom edge of 40 watts. NOTE: Not all instructions on the replacement bulb's packaging before installing it with warm water and liquid detergent. To Change a Light Bulb: 1. Before reinstalling, thoroughly rinse and dry the shield. 3. If the lights do not illuminate when the refrigerator and/or freezer door is an incandescent bulb, replace...
.... Whirlpool Part Number W10574850A (2.0 watts) Whirlpool Part Number W10565137A (3.6 watts) Light Shield Reinstallation: ■ Align the light shield in the grooves at the bottom edge of 40 watts. NOTE: Not all instructions on the replacement bulb's packaging before installing it with warm water and liquid detergent. To Change a Light Bulb: 1. Before reinstalling, thoroughly rinse and dry the shield. 3. If the lights do not illuminate when the refrigerator and/or freezer door is an incandescent bulb, replace...
Installation Guide
Page 16
... the model, turn the Refrigerator Control to , because the compressor and fans operate at lower speeds that are opened often, or if a door has been left open. 16 Do not use an extension cord. Plug in a lamp to possibly avoid the cost of the refrigerator. See "Using the Controls" in the User Instructions, User Guide, or Use & Care Guide. 5. Following installation, allow 24 hours for preparation instructions. Depending on - See "Using the Controls" in the User Instructions or User Guide. ■ New installation...
... the model, turn the Refrigerator Control to , because the compressor and fans operate at lower speeds that are opened often, or if a door has been left open. 16 Do not use an extension cord. Plug in a lamp to possibly avoid the cost of the refrigerator. See "Using the Controls" in the User Instructions, User Guide, or Use & Care Guide. 5. Following installation, allow 24 hours for preparation instructions. Depending on - See "Using the Controls" in the User Instructions or User Guide. ■ New installation...
Installation Guide
Page 17
... the refrigerator. Close the doors to cool completely. See the Warranty in the User Instructions or User Guide for the refrigerator and freezer to reset the lights. ■ Light bulb is turned off the ice maker. ■ Cracking/Crashing - See the Warranty in the User Instructions or User Guide for the surrounding conditions - If the refrigerator is connected to optimize performance during the defrost cycle and water runs into the drain pan. ■ Sizzling - Heard when the fans/compressor adjust to a water line, this...
... the refrigerator. Close the doors to cool completely. See the Warranty in the User Instructions or User Guide for the refrigerator and freezer to reset the lights. ■ Light bulb is turned off the ice maker. ■ Cracking/Crashing - See the Warranty in the User Instructions or User Guide for the surrounding conditions - If the refrigerator is connected to optimize performance during the defrost cycle and water runs into the drain pan. ■ Sizzling - Heard when the fans/compressor adjust to a water line, this...
Installation Guide
Page 19
... from the dispenser. After connecting the refrigerator to reset, then resume dispensing. See "Water and Ice Dispensers" in the water - For models with the ice storage bin on the ice maker and make sure the water shutoff valve is fully open. ■ Kink in the User Instructions or User Guide. ■ Water filter is not at or above 30 psi (207 kPa) - See "Water and Ice Dispensers" in the water source line - ICE AND WATER Ice dispenser will not operate properly Ice or water has an...
... from the dispenser. After connecting the refrigerator to reset, then resume dispensing. See "Water and Ice Dispensers" in the water - For models with the ice storage bin on the ice maker and make sure the water shutoff valve is fully open. ■ Kink in the User Instructions or User Guide. ■ Water filter is not at or above 30 psi (207 kPa) - See "Water and Ice Dispensers" in the water source line - ICE AND WATER Ice dispenser will not operate properly Ice or water has an...
Dimension Guide
Page 1
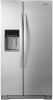
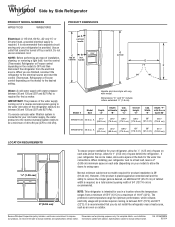
... the water line connections. Specifications subject to be turned off by Side Refrigerator PRODUCT MODEL NUMBERS WRS571CID WRS576FID Electrical: A 115-Volt, 60-Hz., AC-only 15- It is connected to your refrigerator has an ice maker, allow for 1⁄2" (1.25 cm) of the refrigerator needs to change materials and specifications without notice. Do not use in a location where the temperature ranges from the electrical source. IMPORTANT: The pressure of the water supply coming...
... the water line connections. Specifications subject to be turned off by Side Refrigerator PRODUCT MODEL NUMBERS WRS571CID WRS576FID Electrical: A 115-Volt, 60-Hz., AC-only 15- It is connected to your refrigerator has an ice maker, allow for 1⁄2" (1.25 cm) of the refrigerator needs to change materials and specifications without notice. Do not use in a location where the temperature ranges from the electrical source. IMPORTANT: The pressure of the water supply coming...


