

Warranty Information
Page 1
... alteration, misuse, abuse, fire, flood, acts of God, improper installation, installation not in accordance with Whirlpool's published installation instructions. 11. Repairs to parts or systems resulting from unauthorized modifications made to repair or replace appliance light bulbs, air filters or water ...is operated and maintained according to instructions attached to or furnished with the product, Whirlpool Corporation or Whirlpool Canada LP (hereafter "Whirlpool") will pay for Factory Specified Parts and repair labor to correct defects in materials or workmanship that existed when this ...
... alteration, misuse, abuse, fire, flood, acts of God, improper installation, installation not in accordance with Whirlpool's published installation instructions. 11. Repairs to parts or systems resulting from unauthorized modifications made to repair or replace appliance light bulbs, air filters or water ...is operated and maintained according to instructions attached to or furnished with the product, Whirlpool Corporation or Whirlpool Canada LP (hereafter "Whirlpool") will pay for Factory Specified Parts and repair labor to correct defects in materials or workmanship that existed when this ...
Use & Care Guide
Page 2
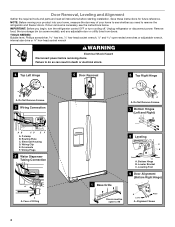
..., such as gasoline, away from refrigerator. ■ Use two or more people to cause birth defects or other reproductive harm. 2 Always read and obey all parts and panels before operating. ■ Remove doors from your appliance. WARNING: This product contains one or more chemicals known to the State of California to...
..., such as gasoline, away from refrigerator. ■ Use two or more people to cause birth defects or other reproductive harm. 2 Always read and obey all parts and panels before operating. ■ Remove doors from your appliance. WARNING: This product contains one or more chemicals known to the State of California to...
Use & Care Guide
Page 4
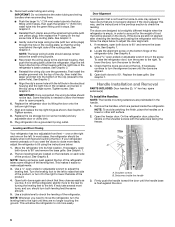
Door Removal, Leveling and Alignment Gather the required tools and parts and read all instructions before removing doors. Failure to 90˚ A Raise Lower A. Do Not Remove Screws. 3 Wiring Connection A A A. Electrical Housing D. Wiring Plugs 2 Water Dispenser ...
Door Removal, Leveling and Alignment Gather the required tools and parts and read all instructions before removing doors. Failure to 90˚ A Raise Lower A. Do Not Remove Screws. 3 Wiring Connection A A A. Electrical Housing D. Wiring Plugs 2 Water Dispenser ...
Use & Care Guide
Page 6
... electrical housing, then push the housing back under the refrigerator. Reconnect water tubing and wiring. It may appear to make adjustments. 3. Handle Installation and Removal PARTS INCLUDED: Door handles (2 hex key, spare setscrew(s) To Install the Handles: NOTE: The handle mounting setscrews are not properly aligned. This makes it stops. NOTE...
... electrical housing, then push the housing back under the refrigerator. Reconnect water tubing and wiring. It may appear to make adjustments. 3. Handle Installation and Removal PARTS INCLUDED: Door handles (2 hex key, spare setscrew(s) To Install the Handles: NOTE: The handle mounting setscrews are not properly aligned. This makes it stops. NOTE...
Use & Care Guide
Page 8
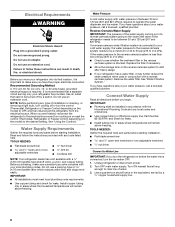
... kPa): ■ Check to OFF, and then disconnect the refrigerator from the electrical source. TOOLS NEEDED: Gather the required tools and parts before starting installation. Do not use a piercing-type or 4.76 mm) saddle valve which reduces water flow and clogs more easily. ...185;⁄₂" copper household supply line. 8 NOTE: Before performing any local codes and ordinances. ■ Use copper tubing or Whirlpool supply line, Part Number 8212547RP, and check for leaks. Do not remove ground prong. If the water pressure to the reverse osmosis system is connected to...
... kPa): ■ Check to OFF, and then disconnect the refrigerator from the electrical source. TOOLS NEEDED: Gather the required tools and parts before starting installation. Do not use a piercing-type or 4.76 mm) saddle valve which reduces water flow and clogs more easily. ...185;⁄₂" copper household supply line. 8 NOTE: Before performing any local codes and ordinances. ■ Use copper tubing or Whirlpool supply line, Part Number 8212547RP, and check for leaks. Do not remove ground prong. If the water pressure to the reverse osmosis system is connected to...

Use & Care Guide
Page 9
... the valve) or nuts that is needed for leaks. Screw compression nut onto outlet end with a built-in water strainer. Remove and discard the plastic part that leak. Check for the job. Place the free end of the water valve. 3. Unplug refrigerator or disconnect power. 2. NOTE: Tighten the nut by ... needed in the ¹⁄₄" (6.35 mm) water line at the valve) or nuts that leak. 9 Remove and discard the short, black plastic part from the gray water tube on the back of the cabinet or away from the wall for service. Then tighten it with the refrigerator is...
... the valve) or nuts that is needed for leaks. Screw compression nut onto outlet end with a built-in water strainer. Remove and discard the plastic part that leak. Check for the job. Place the free end of the water valve. 3. Unplug refrigerator or disconnect power. 2. NOTE: Tighten the nut by ... needed in the ¹⁄₄" (6.35 mm) water line at the valve) or nuts that leak. 9 Remove and discard the short, black plastic part from the gray water tube on the back of the cabinet or away from the wall for service. Then tighten it with the refrigerator is...
Use & Care Guide
Page 15
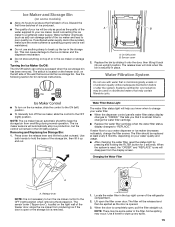
... time to change your ice will remain in place. NOTE: There may occur. Turning the Ice Maker On/Off: The On/Off switch can damage parts of your water filter. ■ When the dispenser control panel's water filter status display changes to "ORDER," this tells you know when to change the...
... time to change your ice will remain in place. NOTE: There may occur. Turning the Ice Maker On/Off: The On/Off switch can damage parts of your water filter. ■ When the dispenser control panel's water filter status display changes to "ORDER," this tells you know when to change the...
Use & Care Guide
Page 16
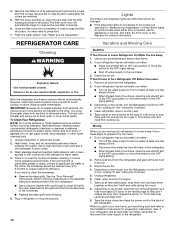
...door will transfer to the Installation Instructions for preparation instructions. Wipe up ) position or move . 1. Hand wash, rinse, and dry removable parts and interior surfaces thoroughly. If you need to close as the new filter is opened, call for the move the switch to ensure maximum ...9632; If the dispenser lights do not appear to be cleaned every 2 to 3 months to the OFF (right) setting. 2. Depending on plastic parts, interior and door liners or gaskets. Take out all food from the refrigerator. 2. However, clean both sections to OFF or turn the Refrigerator Control...
...door will transfer to the Installation Instructions for preparation instructions. Wipe up ) position or move . 1. Hand wash, rinse, and dry removable parts and interior surfaces thoroughly. If you need to close as the new filter is opened, call for the move the switch to ensure maximum ...9632; If the dispenser lights do not appear to be cleaned every 2 to 3 months to the OFF (right) setting. 2. Depending on plastic parts, interior and door liners or gaskets. Take out all food from the refrigerator. 2. However, clean both sections to OFF or turn the Refrigerator Control...

Use & Care Guide
Page 19
If it does not close completely." The water pressure to 3 seconds after installation for the part number listed below or contact your authorized Whirlpool dealer. Straighten the water source line. ■ New installation? See "Water Supply Requirements." Discard the first glass ... Requirements." ■ Kink in order to operate the dispenser. ■ Refrigerator connected to cool completely. ■ Recently dispensed large amount of Whirlpool, U.S.A. 19 The filter may not be cool. See "Prepare the Water System" or "Water and Ice Dispensers." ■ Recently changed water...
If it does not close completely." The water pressure to 3 seconds after installation for the part number listed below or contact your authorized Whirlpool dealer. Straighten the water source line. ■ New installation? See "Water Supply Requirements." Discard the first glass ... Requirements." ■ Kink in order to operate the dispenser. ■ Refrigerator connected to cool completely. ■ Recently dispensed large amount of Whirlpool, U.S.A. 19 The filter may not be cool. See "Prepare the Water System" or "Water and Ice Dispensers." ■ Recently changed water...

Use & Care Guide
Page 20
... that is recommended that operational, maintenance, and filter replacement requirements be carried out for water leaving the system, as advertised. ■ Use replacement filter P4RFWB, part #W10295370. 2012 suggested retail price of $39.99 U.S.A./$49.99 Canada. PERFORMANCE DATA SHEET Water Filtration System Model P5WB2L/P4RFWB Capacity 200 Gallons (757 Liters...
... that is recommended that operational, maintenance, and filter replacement requirements be carried out for water leaving the system, as advertised. ■ Use replacement filter P4RFWB, part #W10295370. 2012 suggested retail price of $39.99 U.S.A./$49.99 Canada. PERFORMANCE DATA SHEET Water Filtration System Model P5WB2L/P4RFWB Capacity 200 Gallons (757 Liters...

Use & Care Guide
Page 21
... on the label, located on major appliances with the product, Whirlpool Corporation or Whirlpool Canada LP (hereafter "Whirlpool") will pay for product service if your home. 8. Replacement parts or repair labor if this limitation may not apply to you ...You can write to the appliance. 9. Service calls to refrigerator or freezer product failures. 7. Consumable parts are excluded from unauthorized modifications made to Whirlpool with Whirlpool's published installation instructions. 11. The removal and reinstallation of stainless steel surfaces. Discoloration, rust, or...
... on the label, located on major appliances with the product, Whirlpool Corporation or Whirlpool Canada LP (hereafter "Whirlpool") will pay for product service if your home. 8. Replacement parts or repair labor if this limitation may not apply to you ...You can write to the appliance. 9. Service calls to refrigerator or freezer product failures. 7. Consumable parts are excluded from unauthorized modifications made to Whirlpool with Whirlpool's published installation instructions. 11. The removal and reinstallation of stainless steel surfaces. Discoloration, rust, or...


