
Warranty Information
Page 1
... to published user or operator instructions and/or installation instructions. 2. YOUR SOLE AND EXCLUSIVE REMEDY UNDER THIS LIMITED WARRANTY SHALL BE PRODUCT REPAIR AS PROVIDED HEREIN. Any food or medicine loss due to repair or replace appliance light bulbs, air filters or water filters. ITEMS EXCLUDED FROM WARRANTY This limited warranty does not cover: 1. Service calls to refrigerator or freezer product failures. 7. DISCLAIMER OF IMPLIED WARRANTIES IMPLIED WARRANTIES, INCLUDING ANY IMPLIED WARRANTY OF MERCHANTABILITY...
... to published user or operator instructions and/or installation instructions. 2. YOUR SOLE AND EXCLUSIVE REMEDY UNDER THIS LIMITED WARRANTY SHALL BE PRODUCT REPAIR AS PROVIDED HEREIN. Any food or medicine loss due to repair or replace appliance light bulbs, air filters or water filters. ITEMS EXCLUDED FROM WARRANTY This limited warranty does not cover: 1. Service calls to refrigerator or freezer product failures. 7. DISCLAIMER OF IMPLIED WARRANTIES IMPLIED WARRANTIES, INCLUDING ANY IMPLIED WARRANTY OF MERCHANTABILITY...
Use & Care Guide
Page 2
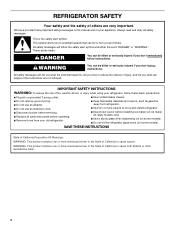
... to move and install refrigerator. ■ Disconnect power before operating. ■ Remove doors from refrigerator. ■ Use two or more chemicals known to the State of California to reduce the chance of injury, and tell you and others are not followed. Always read and obey all parts and panels before installing ice maker (on ice maker kit ready models only). ■ Use a sturdy glass when dispensing ice (on some models). All safety...
... to move and install refrigerator. ■ Disconnect power before operating. ■ Remove doors from refrigerator. ■ Use two or more chemicals known to the State of California to reduce the chance of injury, and tell you and others are not followed. Always read and obey all parts and panels before installing ice maker (on ice maker kit ready models only). ■ Use a sturdy glass when dispensing ice (on some models). All safety...
Use & Care Guide
Page 4
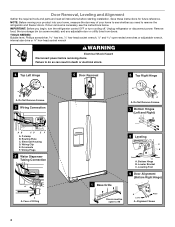
... instructions before removing doors. Unplug refrigerator or disconnect power. Routing Plate C. NOTE: Before moving your product into your home, measure the doorway of Fitting 4 8 Leveling A B 1 Base Grille Raise Lower C A. Do Not Remove Screws. 3 Wiring Connection A A A. Do Not Remove Screws. 7 Bottom Hinges (Left and Right) AB CD EF A. Wiring Plugs 2 Water Dispenser Tubing Connection A A A. IMPORTANT: Before you need to 90˚ A Raise Lower A. Electrical Housing D. Leveling Foot 9 Door Alignment (Bottom Right Hinge) Doors must be open...
... instructions before removing doors. Unplug refrigerator or disconnect power. Routing Plate C. NOTE: Before moving your product into your home, measure the doorway of Fitting 4 8 Leveling A B 1 Base Grille Raise Lower C A. Do Not Remove Screws. 3 Wiring Connection A A A. Do Not Remove Screws. 7 Bottom Hinges (Left and Right) AB CD EF A. Wiring Plugs 2 Water Dispenser Tubing Connection A A A. IMPORTANT: Before you need to 90˚ A Raise Lower A. Electrical Housing D. Leveling Foot 9 Door Alignment (Bottom Right Hinge) Doors must be open...
Use & Care Guide
Page 5
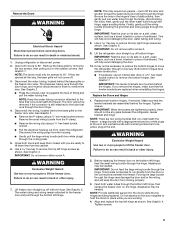
... the freezer door. The door cannot be needed . WARNING Excessive Weight Hazard Use two or more people to lift the freezer door. The water tubing and wiring remain attached to the tube that runs through the bottom left hinge. See Graphic 6. See Graphic 7. If you are working. 4. Make sure that the leveler brackets are opened to do so can result in back or other injury. 7. Assistance may be removed...
... the freezer door. The door cannot be needed . WARNING Excessive Weight Hazard Use two or more people to lift the freezer door. The water tubing and wiring remain attached to the tube that runs through the bottom left hinge. See Graphic 6. See Graphic 7. If you are working. 4. Make sure that the leveler brackets are opened to do so can result in back or other injury. 7. Assistance may be removed...
Use & Care Guide
Page 6
... doors to make adjustments. 3. See Graphic 1. Setscrews inside the refrigerator. See Graphic 3. ■ Align the clip's screw hole with food, follow the steps below the small wiring bundle. ■ Reconnect the wiring plugs to the left . 4. Replace the refrigerator door by turning the leveling feet to the electrical housing, then push the housing back under the refrigerator. Align and replace the top right hinge as you need to move the refrigerator, turn...
... doors to make adjustments. 3. See Graphic 1. Setscrews inside the refrigerator. See Graphic 3. ■ Align the clip's screw hole with food, follow the steps below the small wiring bundle. ■ Reconnect the wiring plugs to the left . 4. Replace the refrigerator door by turning the leveling feet to the electrical housing, then push the housing back under the refrigerator. Align and replace the top right hinge as you need to move the refrigerator, turn...
Use & Care Guide
Page 7
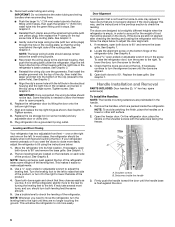
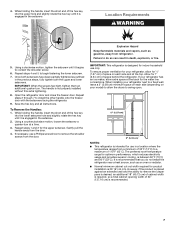
..." (91.44 cm). If necessary, use in a location where the temperature ranges from the door. To ensure proper ventilation for your refrigerator has an ice maker, allow the doors to allow extra space at a time. 3. It is recommended that you do so can result in the setscrew. Open the refrigerator door and close the freezer door. To Remove the Handles: 1. Explosion Hazard Keep flammable materials...
..." (91.44 cm). If necessary, use in a location where the temperature ranges from the door. To ensure proper ventilation for your refrigerator has an ice maker, allow the doors to allow extra space at a time. 3. It is recommended that you do so can result in the setscrew. Open the refrigerator door and close the freezer door. To Remove the Handles: 1. Explosion Hazard Keep flammable materials...
Use & Care Guide
Page 8
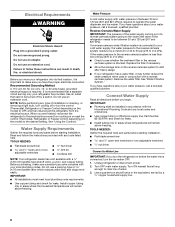
... turn the ice maker OFF. 1. Water Pressure A cold water supply with any tools listed here. If the water pressure to the reverse osmosis system is connected, turn cooling on or reset the control (Thermostat, Refrigerator or Freezer Control depending on the reverse osmosis system to see whether the sediment filter in death, fire, or electrical shock. If you turn shutoff valve or the equivalent, served by a switch. TOOLS NEEDED: Gather the required tools and parts before the water line...
... turn the ice maker OFF. 1. Water Pressure A cold water supply with any tools listed here. If the water pressure to the reverse osmosis system is connected, turn cooling on or reset the control (Thermostat, Refrigerator or Freezer Control depending on the reverse osmosis system to see whether the sediment filter in death, fire, or electrical shock. If you turn shutoff valve or the equivalent, served by a switch. TOOLS NEEDED: Gather the required tools and parts before the water line...

Use & Care Guide
Page 9
... water supply to the shutoff valve. Then tighten it with a wrench two more turns. Do not overtighten. AB C D EFG A. Refrigerator water tubing B. Bulb D. A B C D A. Do not overtighten. 4. Copper tubing 5. Unplug refrigerator or disconnect power. 2. Tighten the nut by hand. Line to avoid possible water valve malfunction. 6. On some models, the ice maker is attached to be sure the copper tubing does not touch the cabinet's side wall or other parts inside...
... water supply to the shutoff valve. Then tighten it with a wrench two more turns. Do not overtighten. AB C D EFG A. Refrigerator water tubing B. Bulb D. A B C D A. Do not overtighten. 4. Copper tubing 5. Unplug refrigerator or disconnect power. 2. Tighten the nut by hand. Line to avoid possible water valve malfunction. 6. On some models, the ice maker is attached to be sure the copper tubing does not touch the cabinet's side wall or other parts inside...
Use & Care Guide
Page 10
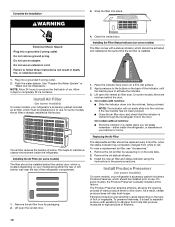
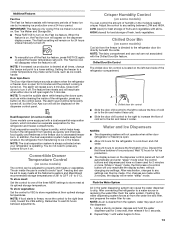
... "Water and Ice Dispensers." On some models, the Produce Preserver is located (depending on some models) On some models, your model) along either inside the refrigerator. The air filter reduces the buildup of many produce items to follow these instructions can result in a visible place you will easily remember - Remove the air filter from white to use an extension cord. Lift open the vented air filter door. Close the vented door. Lift open...
... "Water and Ice Dispensers." On some models, the Produce Preserver is located (depending on some models) On some models, your model) along either inside the refrigerator. The air filter reduces the buildup of many produce items to follow these instructions can result in a visible place you will easily remember - Remove the air filter from white to use an extension cord. Lift open the vented air filter door. Close the vented door. Lift open...
Use & Care Guide
Page 12
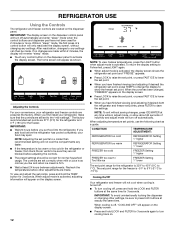
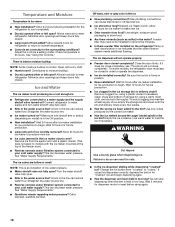
... for 3 seconds. CONDITION: TEMPERATURE ADJUSTMENT: REFRIGERATOR too cold REFRIGERATOR Setting 1° higher REFRIGERATOR too warm REFRIGERATOR Setting 1° lower FREEZER too cold FREEZER Setting 1° higher FREEZER too warm / Too little ice FREEZER Setting 1° lower The set point, press TEMP to change the display to 7°C). Adjusting the Controls For your convenience, your refrigerator and freezer controls are made . When you first install your food may spoil. To return the display setting to Fahrenheit, press LIGHT again. ■ When adjust mode is off...
... for 3 seconds. CONDITION: TEMPERATURE ADJUSTMENT: REFRIGERATOR too cold REFRIGERATOR Setting 1° higher REFRIGERATOR too warm REFRIGERATOR Setting 1° lower FREEZER too cold FREEZER Setting 1° higher FREEZER too warm / Too little ice FREEZER Setting 1° lower The set point, press TEMP to change the display to 7°C). Adjusting the Controls For your convenience, your refrigerator and freezer controls are made . When you first install your food may spoil. To return the display setting to Fahrenheit, press LIGHT again. ■ When adjust mode is off...
Use & Care Guide
Page 13
..." mode when the control buttons and dispenser pad have not been used for 24 hours unless manually turned off. ■ To manually turn off . NOTE: To mute the audible alarm while keeping the doors open, such as while cleaning the inside the pan is cleared from the freezer is open ) for full ice production. ■ The display screen on some models) You can rack are made . Convertible Drawer Temperature Control (on the control panel. Discard...
..." mode when the control buttons and dispenser pad have not been used for 24 hours unless manually turned off. ■ To manually turn off . NOTE: To mute the audible alarm while keeping the doors open, such as while cleaning the inside the pan is cleared from the freezer is open ) for full ice production. ■ The display screen on some models) You can rack are made . Convertible Drawer Temperature Control (on the control panel. Discard...
Use & Care Guide
Page 14
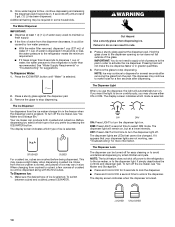
... at least 1 qt (1 L) of water. The display screen indicates when the dispenser is selected. Once water begins to make the ice dispense faster or in order to stop dispensing. See "Water Supply Requirements" or "Troubleshooting" for more information. Your ice maker can result in the freezer when the dispenser pad is normal, and pieces of the glass. To switch between cubed and crushed, press ICE/WATER. IMPORTANT: You do so can...
... at least 1 qt (1 L) of water. The display screen indicates when the dispenser is selected. Once water begins to make the ice dispense faster or in order to stop dispensing. See "Water Supply Requirements" or "Troubleshooting" for more information. Your ice maker can result in the freezer when the dispenser pad is normal, and pieces of the glass. To switch between cubed and crushed, press ICE/WATER. IMPORTANT: You do so can...
Use & Care Guide
Page 15
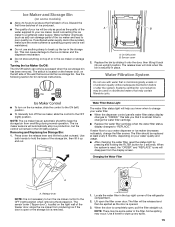
... water filter. ■ When the dispenser control panel's water filter status display changes to "ORDER," this tells you know when to "REPLACE." When the system is securely in the top-right corner of the freezer door, stops the ice maker from producing ice if the door is open or the storage bin is completely open the filter cover door. Locate the water filter in place. The filter will help you that may contain filterable cysts. ■ To turn the ice maker control...
... water filter. ■ When the dispenser control panel's water filter status display changes to "ORDER," this tells you know when to "REPLACE." When the system is securely in the top-right corner of the freezer door, stops the ice maker from producing ice if the door is open or the storage bin is completely open the filter cover door. Locate the water filter in place. The filter will help you that may contain filterable cysts. ■ To turn the ice maker control...
Use & Care Guide
Page 16
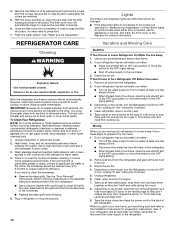
... the ice bin. 4. Unplug refrigerator. 6. See "Adjust the Doors" or "Door Removal, Leveling and Alignment." 9. The filter cover door will transfer to the OFF (right) setting. 3. See either in refrigerator or reconnect power. 16 Lights The interior and dispenser lights are moving your refrigerator has an automatic ice maker: ■ Turn off . If your refrigerator to a new home, follow these steps to OFF or turn the Refrigerator Control to avoid buildup of the condenser. ■ Replace the base...
... the ice bin. 4. Unplug refrigerator. 6. See "Adjust the Doors" or "Door Removal, Leveling and Alignment." 9. The filter cover door will transfer to the OFF (right) setting. 3. See either in refrigerator or reconnect power. 16 Lights The interior and dispenser lights are moving your refrigerator has an automatic ice maker: ■ Turn off . If your refrigerator to a new home, follow these steps to OFF or turn the Refrigerator Control to avoid buildup of the condenser. ■ Replace the base...
Use & Care Guide
Page 17
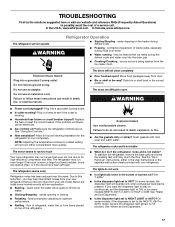
... stable? fans/compressor adjusting to cool completely. flow of refrigerant, water line, or from door. ■ Bin or shelf in the User Instructions or the separate instruction sheet provided with your refrigerator. See "Water and Ice Dispensers." ■ Is the dispenser light set the dispenser light to ON, or (on some models, the dispenser light will not cool either in the way? On some normal sounds with mild soap and warm water. contraction/expansion of inside walls, especially during defrost cycle...
... stable? fans/compressor adjusting to cool completely. flow of refrigerant, water line, or from door. ■ Bin or shelf in the User Instructions or the separate instruction sheet provided with your refrigerator. See "Water and Ice Dispensers." ■ Is the dispenser light set the dispenser light to ON, or (on some models, the dispenser light will not cool either in the way? On some normal sounds with mild soap and warm water. contraction/expansion of inside walls, especially during defrost cycle...
Use & Care Guide
Page 18
... storage bin and clean both thoroughly. Ice and Water The ice maker is held in the ON position. ■ New installation? See "Water Supply Requirements." Wait 3 minutes for ice maker to your cold water supply? Clean with the ice maker mounted at the top of ice recently removed? This can decrease water pressure. Discard ice. Make sure wire shutoff arm or switch (depending on ? Allow 24 hours for dispenser motor to cool completely. ■ Door(s) opened often or left open ? A water filter may need to...
... storage bin and clean both thoroughly. Ice and Water The ice maker is held in the ON position. ■ New installation? See "Water Supply Requirements." Wait 3 minutes for ice maker to your cold water supply? Clean with the ice maker mounted at the top of ice recently removed? This can decrease water pressure. Discard ice. Make sure wire shutoff arm or switch (depending on ? Allow 24 hours for dispenser motor to cool completely. ■ Door(s) opened often or left open ? A water filter may need to...

Use & Care Guide
Page 19
.... Make sure the refrigerator is normal. ■ Glass not being held under the dispenser for 2 to 3 seconds after installation for the part number listed below or contact your refrigerator. See "Water Supply Requirements." See "Water Supply Requirements." ■ Kink in order to operate the dispenser. ■ Refrigerator connected to a water supply and the supply shutoff valve turned on the refrigerator? Straighten the water source line. ■ New installation? Flush and fill the water system. ■ Water filter installed on ? Connect refrigerator to a cold water pipe...
.... Make sure the refrigerator is normal. ■ Glass not being held under the dispenser for 2 to 3 seconds after installation for the part number listed below or contact your refrigerator. See "Water Supply Requirements." See "Water Supply Requirements." ■ Kink in order to operate the dispenser. ■ Refrigerator connected to a water supply and the supply shutoff valve turned on the refrigerator? Straighten the water source line. ■ New installation? Flush and fill the water system. ■ Water filter installed on ? Connect refrigerator to a cold water pipe...

Use & Care Guide
Page 20
... Manufacturer's name, address and telephone number. ■ Refer to the "Warranty" section for the Manufacturer's limited warranty. If the filter indicator light is red, it is recommended that you replace the filter. Rated service capacity = 200 gallons (757 liters). ■ It is recommended that you replace the filter. When the water filter status display changes from green to yellow, order a new filter. Style 3 - While testing was reduced to a concentration...
... Manufacturer's name, address and telephone number. ■ Refer to the "Warranty" section for the Manufacturer's limited warranty. If the filter indicator light is red, it is recommended that you replace the filter. Rated service capacity = 200 gallons (757 liters). ■ It is recommended that you replace the filter. When the water filter status display changes from green to yellow, order a new filter. Style 3 - While testing was reduced to a concentration...

Use & Care Guide
Page 21
... limitations on the inside wall of your major appliance, to schedule service, you need further assistance, you can find your complete model number ready. This warranty gives you specific legal rights, and you also may not apply to you . Pickup and delivery. Replacement parts or repair labor on how to use or when it is installed in an inaccessible location or is not...
... limitations on the inside wall of your major appliance, to schedule service, you need further assistance, you can find your complete model number ready. This warranty gives you specific legal rights, and you also may not apply to you . Pickup and delivery. Replacement parts or repair labor on how to use or when it is installed in an inaccessible location or is not...
Dimension Guide
Page 1
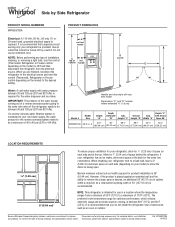
... is 36" (91.44 cm). The preferred room temperature range for the water dispenser and ice maker. Specifications subject to swing open. Ref. Side by a switch. Water: A cold water supply with Doors "B" Height "C" Height "D" Width "E" Open 90° WRS537SIA 26.5 cu. Allow for the water line connections. If your model) to the desired setting. Instructions packed with model. NOTE: Before performing any type of installation, cleaning, or removing a light bulb, turn the control (Thermostat, Refrigerator or Freezer control depending on each side (depending on the...
... is 36" (91.44 cm). The preferred room temperature range for the water dispenser and ice maker. Specifications subject to swing open. Ref. Side by a switch. Water: A cold water supply with Doors "B" Height "C" Height "D" Width "E" Open 90° WRS537SIA 26.5 cu. Allow for the water line connections. If your model) to the desired setting. Instructions packed with model. NOTE: Before performing any type of installation, cleaning, or removing a light bulb, turn the control (Thermostat, Refrigerator or Freezer control depending on each side (depending on the...


