
Installation Guide
Page 2
... before operating. ■ Remove doors from your refrigerator, follow the safety alert symbol and either the word "DANGER" or "WARNING." Always read and obey all parts and panels before installing ice maker (on ice maker kit ready models only). ■ Use a sturdy glass when dispensing ice (on some models). These words...
... before operating. ■ Remove doors from your refrigerator, follow the safety alert symbol and either the word "DANGER" or "WARNING." Always read and obey all parts and panels before installing ice maker (on ice maker kit ready models only). ■ Use a sturdy glass when dispensing ice (on some models). These words...
Installation Guide
Page 4
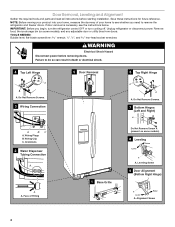
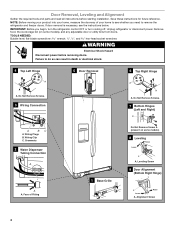
... bin (on some models), and any adjustable door or utility bins from doors. Wiring Clip C. Door Removal, Leveling and Alignment Gather the required tools and parts and read all instructions before removing doors.
... bin (on some models), and any adjustable door or utility bins from doors. Wiring Clip C. Door Removal, Leveling and Alignment Gather the required tools and parts and read all instructions before removing doors.

Installation Guide
Page 5
... the leveling of the refrigerator. Tighten screws. 7. See Graphic 6. This will be disconnected in order to account for the doors while the top hinges are part of place. Remove top right hinge as you are designed to be removed if the connector is empty, in order to adjust the tilt of...
... the leveling of the refrigerator. Tighten screws. 7. See Graphic 6. This will be disconnected in order to account for the doors while the top hinges are part of place. Remove top right hinge as you are designed to be removed if the connector is empty, in order to adjust the tilt of...

Installation Guide
Page 6
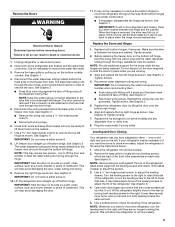
...: 1. Setscrews inside the refrigerator. Explosion Hazard Keep flammable materials and vapors, such as outlined in the setscrew. Replace the base grille. Handle Installation and Removal PARTS INCLUDED: Door handles (2 hex key, spare setscrew(s) To Install the Handles: NOTE: The handle mounting setscrews are even at the top. Repeat steps 4 and 5 to...
...: 1. Setscrews inside the refrigerator. Explosion Hazard Keep flammable materials and vapors, such as outlined in the setscrew. Replace the base grille. Handle Installation and Removal PARTS INCLUDED: Door handles (2 hex key, spare setscrew(s) To Install the Handles: NOTE: The handle mounting setscrews are even at the top. Repeat steps 4 and 5 to...

Installation Guide
Page 7
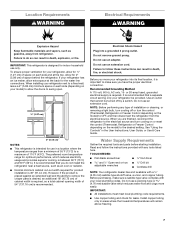
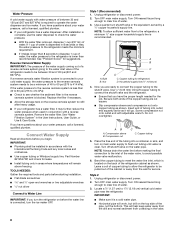
... necessary. ■ Allow the storage tank on the model) to be a minimum of water. Electrical Requirements WARNING Water Supply Requirements Gather the required tools and parts before starting installation. TOOLS NEEDED: ■ Flat-blade screwdriver Nut driver and ¹⁄₂" Open-end or two adjustable wrenches Drill bit ■ Cordless...
... necessary. ■ Allow the storage tank on the model) to be a minimum of water. Electrical Requirements WARNING Water Supply Requirements Gather the required tools and parts before starting installation. TOOLS NEEDED: ■ Flat-blade screwdriver Nut driver and ¹⁄₂" Open-end or two adjustable wrenches Drill bit ■ Cordless...
Installation Guide
Page 8
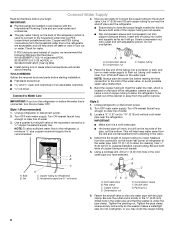
... both ends of the copper tubing are ready to connect the copper tubing to the water pipe. Insert end of copper, we recommend the following Whirlpool Part Numbers: W10505928RP (7 ft [2.14 m] jacketed PEX), 8212547RP (5 ft [1.52 m] PEX), or W10267701RP (25 ft [7.62 m] PEX). ■ ... of refrigerator to the shutoff valve. This will remain above freezing. Cold water pipe B. TOOLS NEEDED: Gather the required tools and parts before starting installation. ■ Flat-blade screwdriver and ¹⁄₂" open-end wrenches or two adjustable wrenches nut driver Connect ...
... both ends of the copper tubing are ready to connect the copper tubing to the water pipe. Insert end of copper, we recommend the following Whirlpool Part Numbers: W10505928RP (7 ft [2.14 m] jacketed PEX), 8212547RP (5 ft [1.52 m] PEX), or W10267701RP (25 ft [7.62 m] PEX). ■ ... of refrigerator to the shutoff valve. This will remain above freezing. Cold water pipe B. TOOLS NEEDED: Gather the required tools and parts before starting installation. ■ Flat-blade screwdriver and ¹⁄₂" open-end wrenches or two adjustable wrenches nut driver Connect ...

Installation Guide
Page 9
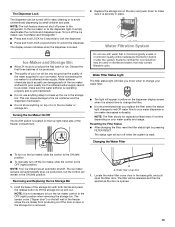
...Then tighten it in water strainer. NOTE: To avoid rattling, be sure the copper tubing does not touch the cabinet's side wall or other parts inside the cabinet. 7. If your nearest appliance dealer. Unplug refrigerator or disconnect power. 2. A B C A. Household water line B. Tighten ... to produce the first batch of the refrigerator. 3. Ferrule (purchased) D. Unplug refrigerator or disconnect power. 2. Remove and discard the plastic part that leak. Household water line 4. Nut (provided) C. Turn shutoff valve ON. 6. Check for leaks. Do not remove ground prong. On...
...Then tighten it in water strainer. NOTE: To avoid rattling, be sure the copper tubing does not touch the cabinet's side wall or other parts inside the cabinet. 7. If your nearest appliance dealer. Unplug refrigerator or disconnect power. 2. A B C A. Household water line B. Tighten ... to produce the first batch of the refrigerator. 3. Ferrule (purchased) D. Unplug refrigerator or disconnect power. 2. Remove and discard the plastic part that leak. Household water line 4. Nut (provided) C. Turn shutoff valve ON. 6. Check for leaks. Do not remove ground prong. On...
Installation Guide
Page 10
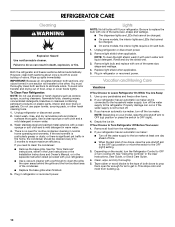
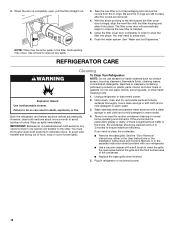
... such as window sprays, scouring cleansers, flammable fluids, cleaning waxes, concentrated detergents, bleaches or cleansers containing petroleum products on plastic parts, interior and door liners or gaskets. Unplug refrigerator or disconnect power. 2. Be sure to replace the bulb with your refrigerator... "Using the Controls" in warm water. 3. Both the refrigerator and freezer sections defrost automatically. Hand wash, rinse, and dry removable parts and interior surfaces thoroughly. NOTE: To clean the light shield, wash it with one section will fit your refrigerator. ■ Use ...
... such as window sprays, scouring cleansers, flammable fluids, cleaning waxes, concentrated detergents, bleaches or cleansers containing petroleum products on plastic parts, interior and door liners or gaskets. Unplug refrigerator or disconnect power. 2. Be sure to replace the bulb with your refrigerator... "Using the Controls" in warm water. 3. Both the refrigerator and freezer sections defrost automatically. Hand wash, rinse, and dry removable parts and interior surfaces thoroughly. NOTE: To clean the light shield, wash it with one section will fit your refrigerator. ■ Use ...

Installation Guide
Page 11
... from the back of the refrigerator. ■ When the last load of time. ■ Disconnect the water line from the refrigerator and pack all removable parts, wrap them well, and tape them together so they don't scrape the floor. Depending on the model, turn the Refrigerator Control to the back of...
... from the back of the refrigerator. ■ When the last load of time. ■ Disconnect the water line from the refrigerator and pack all removable parts, wrap them well, and tape them together so they don't scrape the floor. Depending on the model, turn the Refrigerator Control to the back of...
Installation Guide
Page 17
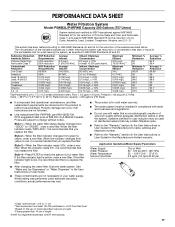
... "Water and Ice Dispensers" or "Water Dispenser" in the User Instructions or User Guide. ■ These contaminants are not followed. ■ Use replacement filter P4RFWB, part #W10295370A. 2013 suggested retail price of the substances listed below. and against NSF/ANSI Standard 42 for the reduction of Chlorine Taste and Odor, and...
... "Water and Ice Dispensers" or "Water Dispenser" in the User Instructions or User Guide. ■ These contaminants are not followed. ■ Use replacement filter P4RFWB, part #W10295370A. 2013 suggested retail price of the substances listed below. and against NSF/ANSI Standard 42 for the reduction of Chlorine Taste and Odor, and...

Warranty Information
Page 1
...or workmanship and is reported to refrigerator or freezer product failures. 7. LIMITATION OF REMEDIES; Service must be borne by Whirlpool. 5. Replacement parts or repair labor if this major appliance is used for other rights that vary from state to state or province to... appliance is operated and maintained according to instructions attached to or furnished with the product, Whirlpool Corporation or Whirlpool Canada LP (hereafter "Whirlpool") will pay for Factory Specified Parts and repair labor to correct defects in materials or workmanship that is inconsistent to published user...
...or workmanship and is reported to refrigerator or freezer product failures. 7. LIMITATION OF REMEDIES; Service must be borne by Whirlpool. 5. Replacement parts or repair labor if this major appliance is used for other rights that vary from state to state or province to... appliance is operated and maintained according to instructions attached to or furnished with the product, Whirlpool Corporation or Whirlpool Canada LP (hereafter "Whirlpool") will pay for Factory Specified Parts and repair labor to correct defects in materials or workmanship that is inconsistent to published user...

Use & Care Guide
Page 2
... safety messages in this manual and on some models). WARNING: This product contains one or more people to cause cancer. Always read and obey all parts and panels before operating. ■ Remove doors from refrigerator. ■ Use two or more chemicals known to the State of others . REFRIGERATOR SAFETY Your safety...
... safety messages in this manual and on some models). WARNING: This product contains one or more people to cause cancer. Always read and obey all parts and panels before operating. ■ Remove doors from refrigerator. ■ Use two or more chemicals known to the State of others . REFRIGERATOR SAFETY Your safety...
Use & Care Guide
Page 4
... Not Remove Screws. 3 Wiring Connection 5 Door Removal 6 Top Right Hinge A A A. Grommets 2 Water Dispenser Tubing Connection A A A. Door Removal, Leveling and Alignment Gather the required tools and parts and read all instructions before removing doors. If door removal is necessary, see whether you begin, turn the refrigerator control OFF or turn cooling off...
... Not Remove Screws. 3 Wiring Connection 5 Door Removal 6 Top Right Hinge A A A. Grommets 2 Water Dispenser Tubing Connection A A A. Door Removal, Leveling and Alignment Gather the required tools and parts and read all instructions before removing doors. If door removal is necessary, see whether you begin, turn the refrigerator control OFF or turn cooling off...
Use & Care Guide
Page 5
... bundles when reconnecting them closed until they close more to lift them free from the cabinet. 7. If your refrigerator seems unsteady or if you are part of the refrigerator takes some models) and any adjustable door or utility bins. 8. Turn the leveling screw to the right to hold the doors in...
... bundles when reconnecting them closed until they close more to lift them free from the cabinet. 7. If your refrigerator seems unsteady or if you are part of the refrigerator takes some models) and any adjustable door or utility bins. 8. Turn the leveling screw to the right to hold the doors in...

Use & Care Guide
Page 6
... the setscrews facing the freezer. Gently pull the handle away from the door. Use a wrench to begin fastening the lower setscrew. 7. Handle Installation and Removal PARTS INCLUDED: Door handles (2 hex key, spare setscrew(s) To Install the Handles: NOTE: The handle mounting setscrews are preinstalled in the previous steps, fully tighten both...
... the setscrews facing the freezer. Gently pull the handle away from the door. Use a wrench to begin fastening the lower setscrew. 7. Handle Installation and Removal PARTS INCLUDED: Door handles (2 hex key, spare setscrew(s) To Install the Handles: NOTE: The handle mounting setscrews are preinstalled in the previous steps, fully tighten both...
Use & Care Guide
Page 7
... the control (Thermostat, Refrigerator or Freezer Control depending on your refrigerator, allow extra space at the top. Water Supply Requirements Gather the required tools and parts before starting installation. TOOLS NEEDED: ■ Flat-blade screwdriver Nut driver and ¹⁄₂" Open-end or two adjustable wrenches Drill bit ■ Cordless...
... the control (Thermostat, Refrigerator or Freezer Control depending on your refrigerator, allow extra space at the top. Water Supply Requirements Gather the required tools and parts before starting installation. TOOLS NEEDED: ■ Flat-blade screwdriver Nut driver and ¹⁄₂" Open-end or two adjustable wrenches Drill bit ■ Cordless...
Use & Care Guide
Page 8
... compression nut onto outlet end with the International Plumbing Code and any local codes and ordinances. ■ Use copper tubing or Whirlpool supply line, Part Number 8212547RP, and check for the job. Compression nut C C. NOTE: Always drain the water line before you turn the ...sediment filter in 8 seconds or less, the water pressure to Water Line IMPORTANT: If you begin. TOOLS NEEDED: Gather the required tools and parts before the water line is blocked. Compression sleeve B. Locate a ¹⁄₂" (1.27 cm) to refrigerator) D. Replace the filter if ...
... compression nut onto outlet end with the International Plumbing Code and any local codes and ordinances. ■ Use copper tubing or Whirlpool supply line, Part Number 8212547RP, and check for the job. Compression nut C C. NOTE: Always drain the water line before you turn the ...sediment filter in 8 seconds or less, the water pressure to Water Line IMPORTANT: If you begin. TOOLS NEEDED: Gather the required tools and parts before the water line is blocked. Compression sleeve B. Locate a ¹⁄₂" (1.27 cm) to refrigerator) D. Replace the filter if ...

Use & Care Guide
Page 9
... Screw the compression nut onto outlet end with a wrench two more turns. Unplug refrigerator or disconnect power. 2. Remove and discard the plastic part that the washer is attached to the valve inlet using a compression nut and sleeve as shown. Attach the copper tube to the inlet of... water tube on the coupling. 5. NOTE: To avoid rattling, be sure the copper tubing does not touch the cabinet's side wall or other parts inside the cabinet. Do not overtighten. 4. Tube clamp screw C. Obtain a water strainer from the connection on the water pipe. Thread the provided...
... Screw the compression nut onto outlet end with a wrench two more turns. Unplug refrigerator or disconnect power. 2. Remove and discard the plastic part that the washer is attached to the valve inlet using a compression nut and sleeve as shown. Attach the copper tube to the inlet of... water tube on the coupling. 5. NOTE: To avoid rattling, be sure the copper tubing does not touch the cabinet's side wall or other parts inside the cabinet. Do not overtighten. 4. Tube clamp screw C. Obtain a water strainer from the connection on the water pipe. Thread the provided...
Use & Care Guide
Page 13
... filter door. Water softener chemicals (such as salt) can cause damage to change the filter. ■ It is recommended that is reset. This can damage parts of unknown quality without adequate disinfection before or after the system. Replace the storage bin on your ice maker. The status light will be avoided...
... filter door. Water softener chemicals (such as salt) can cause damage to change the filter. ■ It is recommended that is reset. This can damage parts of unknown quality without adequate disinfection before or after the system. Replace the storage bin on your ice maker. The status light will be avoided...
Use & Care Guide
Page 14
... filter is completely open areas behind the grille and the front surface area of odors. Hand wash, rinse, and dry removable parts and interior surfaces thoroughly. Wash stainless steel and painted metal exteriors with the filter housing and slide it into place. IMPORTANT: ...3 months to close as window sprays, scouring cleansers, flammable fluids, cleaning waxes, concentrated detergents, bleaches or cleansers containing petroleum products on plastic parts, interior and door liners or gaskets. Some spilling may need to clean the grille, the open , pull the filter straight out. 3. If...
... filter is completely open areas behind the grille and the front surface area of odors. Hand wash, rinse, and dry removable parts and interior surfaces thoroughly. Wash stainless steel and painted metal exteriors with the filter housing and slide it into place. IMPORTANT: ...3 months to close as window sprays, scouring cleansers, flammable fluids, cleaning waxes, concentrated detergents, bleaches or cleansers containing petroleum products on plastic parts, interior and door liners or gaskets. Some spilling may need to clean the grille, the open , pull the filter straight out. 3. If...


