Dimension Guide
Page 1
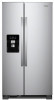
...(depending on each side and at the back for ½" (1.27 cm) of 55°F (13°C) to be turned off by Side Refrigerator PRODUCT MODEL NUMBERS WRS315SDH* WRS312SNH* WRS331SDH* WRS321SDH* WRSA15SNH* WRS315SNH* WRS335SDH* WRS311SDH* WRS555SIH* WRS325SDH* LOCATION REQUIREMENTS Electrical: A 115-volt, 60-Hz, AC-only, 15...source, such as an oven or radiator. When installing your refrigerator next to a fixed wall, leave a 2" (5.08 cm) minimum space on your model) to allow extra space at the top. QQ Normal minimum cabinet cutout width required for 1" (2.54 cm) of 54" (137.16 cm) ...
...(depending on each side and at the back for ½" (1.27 cm) of 55°F (13°C) to be turned off by Side Refrigerator PRODUCT MODEL NUMBERS WRS315SDH* WRS312SNH* WRS331SDH* WRS321SDH* WRSA15SNH* WRS315SNH* WRS335SDH* WRS311SDH* WRS555SIH* WRS325SDH* LOCATION REQUIREMENTS Electrical: A 115-volt, 60-Hz, AC-only, 15...source, such as an oven or radiator. When installing your refrigerator next to a fixed wall, leave a 2" (5.08 cm) minimum space on your model) to allow extra space at the top. QQ Normal minimum cabinet cutout width required for 1" (2.54 cm) of 54" (137.16 cm) ...

Dimension Guide
Page 2
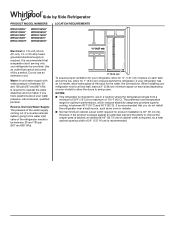
PRODUCT DIMENSIONS Model Number/ Capacity WRS315SDH* 24.57 cu. ft (80.33 cm) 335/8" (85.41 cm) 655/8" (174.31 cm) 665/8" 323/4" 495/16" (169.23 cm) (... cm) (84.12 cm) (125.25 cm) 685/8" (174.31 cm) 695/8" 357/8" 495/16" (176.85 cm) (90.11 cm) (125.25 cm) Because Whirlpool Corporation policy includes a continuous commitment to improve our products, we reserve the right to top of Cabinet "C" 685/8" (174.31 cm) Overall height "D" 695/8" (176...
PRODUCT DIMENSIONS Model Number/ Capacity WRS315SDH* 24.57 cu. ft (80.33 cm) 335/8" (85.41 cm) 655/8" (174.31 cm) 665/8" 323/4" 495/16" (169.23 cm) (... cm) (84.12 cm) (125.25 cm) 685/8" (174.31 cm) 695/8" 357/8" 495/16" (176.85 cm) (90.11 cm) (125.25 cm) Because Whirlpool Corporation policy includes a continuous commitment to improve our products, we reserve the right to top of Cabinet "C" 685/8" (174.31 cm) Overall height "D" 695/8" (176...
Owners Manual
Page 2
... install the refrigerator. Disconnect the power before installing the ice maker (on ice maker kit-ready models only). Use a sturdy glass when dispensing ice (on some models). Do not hit the refrigerator glass doors (on your appliance. This is intended to be supervised... if you and others are not followed. Farm houses and by persons (including children) with a flammable propellant in this manual and on some models). This appliance is damaged, it must be replaced by a person responsible for use by clients in hotels, motels and other working ...
... install the refrigerator. Disconnect the power before installing the ice maker (on ice maker kit-ready models only). Use a sturdy glass when dispensing ice (on some models). Do not hit the refrigerator glass doors (on your appliance. This is intended to be supervised... if you and others are not followed. Farm houses and by persons (including children) with a flammable propellant in this manual and on some models). This appliance is damaged, it must be replaced by a person responsible for use by clients in hotels, motels and other working ...

Owners Manual
Page 4
... Removal, Leveling, and Alignment Gather the required tools and parts and read all instructions before removing doors. Remove food, the ice storage bin (on some models), and any adjustable door or utility bins from doors. TOOLS NEEDED: Bubble level; WARNING Electrical Shock Hazard Disconnect power before starting installation. Lower 5/16" wrench...
... Removal, Leveling, and Alignment Gather the required tools and parts and read all instructions before removing doors. Remove food, the ice storage bin (on some models), and any adjustable door or utility bins from doors. TOOLS NEEDED: Bubble level; WARNING Electrical Shock Hazard Disconnect power before starting installation. Lower 5/16" wrench...

Owners Manual
Page 5
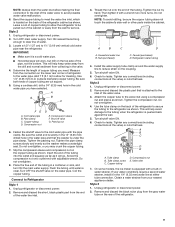
... to create a leveled floor for re-installation: 1. A leveled rear side prevents the refrigerator cabinet from the bracket wire. 8. If your model has water dispensing, please open the water filter door by pulling it toward you may remove both bottom hinges. Failure to align and reinstall ... tubing. Hold the door while hinge is not necessary to feed the water dispenser tubing and wiring through the door hinge. 7. If your model has water dispensing in the door, disconnect the water dispenser tubing located below : 1. See graphic 7. ■■ Insert the freezer door...
... to create a leveled floor for re-installation: 1. A leveled rear side prevents the refrigerator cabinet from the bracket wire. 8. If your model has water dispensing, please open the water filter door by pulling it toward you may remove both bottom hinges. Failure to align and reinstall ... tubing. Hold the door while hinge is not necessary to feed the water dispenser tubing and wiring through the door hinge. 7. If your model has water dispensing in the door, disconnect the water dispenser tubing located below : 1. See graphic 7. ■■ Insert the freezer door...
Owners Manual
Page 7
...;C) to do not install the refrigerator near a heat source, such as gasoline, away from the door. Do not remove ground prong. Before you move your model) to allow the doors to swing open -end or two adjustable wrenches ■■ 1/4" nut driver ■■ 1/4" drill bit ■■ Cordless ... sure a saddle-type valve complies with your refrigerator has an ice maker, allow for 1/2" (1.27 cm) of space on each side (depending on the model) to remove the crisper pans is desired, an additional 18" (45.72 cm) of cabinet width is required, so a total cabinet opening width of ...
...;C) to do not install the refrigerator near a heat source, such as gasoline, away from the door. Do not remove ground prong. Before you move your model) to allow the doors to swing open -end or two adjustable wrenches ■■ 1/4" nut driver ■■ 1/4" drill bit ■■ Cordless ... sure a saddle-type valve complies with your refrigerator has an ice maker, allow for 1/2" (1.27 cm) of space on each side (depending on the model) to remove the crisper pans is desired, an additional 18" (45.72 cm) of cabinet width is required, so a total cabinet opening width of ...
Owners Manual
Page 9
... refrigerator as it is solidly in the ¹⁄4" (6.35 mm) drilled hole in the cold water pipe you need. A B C D E A. Tube clamp screw C. On some models, the ice maker is clear. Unplug refrigerator or disconnect power. 2. Unplug refrigerator or disconnect power. 2. IMPORTANT: ■■ Make sure it will help avoid damage...
... refrigerator as it is solidly in the ¹⁄4" (6.35 mm) drilled hole in the cold water pipe you need. A B C D E A. Tube clamp screw C. On some models, the ice maker is clear. Unplug refrigerator or disconnect power. 2. Unplug refrigerator or disconnect power. 2. IMPORTANT: ■■ Make sure it will help avoid damage...

Owners Manual
Page 11
...the refrigerator. See "Warranty" for the move the switch to OFF (right). 4. Property damage can occur if the water supply is opened , call whirlpool service for preparation instructions. Empty the ice bin. Tape rubber or wood blocks to the tops of ice drops, raise the wire shutoff arm to... or "Door Removal, Leveling and Alignment." 8. Tape the doors closed and tape the power cord to prepare it rolls more easily OR screw in some models, the interior lights require a 40 W bulb max. If you get in this appliance may consist of: ■■ Sealed LED modules ■■...
...the refrigerator. See "Warranty" for the move the switch to OFF (right). 4. Property damage can occur if the water supply is opened , call whirlpool service for preparation instructions. Empty the ice bin. Tape rubber or wood blocks to the tops of ice drops, raise the wire shutoff arm to... or "Door Removal, Leveling and Alignment." 8. Tape the doors closed and tape the power cord to prepare it rolls more easily OR screw in some models, the interior lights require a 40 W bulb max. If you get in this appliance may consist of: ■■ Sealed LED modules ■■...
Owners Manual
Page 12
... to the electrical outlet - FREEZER SHELF (number of the shelf, and remove from the cabinet. Lift up the front and back of shelves varies by model) To Remove and Replace the Bottom Shelf: 1.
... to the electrical outlet - FREEZER SHELF (number of the shelf, and remove from the cabinet. Lift up the front and back of shelves varies by model) To Remove and Replace the Bottom Shelf: 1.
Owners Manual
Page 13
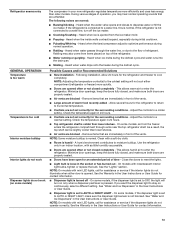
... the "Lights" section. See "Water and Ice Dispensers" in the User Instructions or User Guide for contact information. 13 NOTE: On models with as little humidity as possible. ■■ Doors are blocked - The following noises are not set correctly for the surrounding conditions ...Adjust the controls to enter the refrigerator. Remove items that are unfamiliar. Close the doors to the flow of the vents. On some models) Possible Causes and/or Recommended Solutions ■■ New installation - A humid environment contributes to cool completely. See "Water and Ice ...
... the "Lights" section. See "Water and Ice Dispensers" in the User Instructions or User Guide for contact information. 13 NOTE: On models with as little humidity as possible. ■■ Doors are blocked - The following noises are not set correctly for the surrounding conditions ...Adjust the controls to enter the refrigerator. Remove items that are unfamiliar. Close the doors to the flow of the vents. On some models) Possible Causes and/or Recommended Solutions ■■ New installation - A humid environment contributes to cool completely. See "Water and Ice ...

Owners Manual
Page 14
... or User Guide. ■■ A reverse osmosis water filtration system is connected to do so can result in the ice maker ejector arm (on some models) - This can reduce water flow, resulting in their correct positions. Possible Causes and/or Recommended Solutions ■■ Gaskets are in decreased ice production, small...
... or User Guide. ■■ A reverse osmosis water filtration system is connected to do so can result in the ice maker ejector arm (on some models) - This can reduce water flow, resulting in their correct positions. Possible Causes and/or Recommended Solutions ■■ Gaskets are in decreased ice production, small...

Owners Manual
Page 15
...indicates that the water filtration system needs additional flushing. See "Water Supply Requirements" section. ■■ There are firmly closed. (On some models, only the freezer door must be closed completely - Make sure both doors are minerals (such as sulfur) in position. See "Water Supply Requirements...through the dispenser. ■■ Water pressure to the home is locked - Make sure both doors are firmly closed. (On some models, only the freezer door must be closed completely - Clean the ice delivery chute and the bottom of ice directly from the dispenser. ...
...indicates that the water filtration system needs additional flushing. See "Water Supply Requirements" section. ■■ There are firmly closed. (On some models, only the freezer door must be closed completely - Make sure both doors are minerals (such as sulfur) in position. See "Water Supply Requirements...through the dispenser. ■■ Water pressure to the home is locked - Make sure both doors are firmly closed. (On some models, only the freezer door must be closed completely - Clean the ice delivery chute and the bottom of ice directly from the dispenser. ...

Owners Manual
Page 16
... the dispenser is not connected to 50°F (10°C). ■■ New installation - Make sure the ice chute is not cool enough (on some models) Possible Causes and/or Recommended Solutions NOTE: After dispensing, a few additional drops of water may not be cool. The first glass of water are firmly...
... the dispenser is not connected to 50°F (10°C). ■■ New installation - Make sure the ice chute is not cool enough (on some models) Possible Causes and/or Recommended Solutions NOTE: After dispensing, a few additional drops of water may not be cool. The first glass of water are firmly...
Owners Manual
Page 17
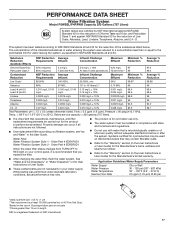
...; Use replacement filter according you replace the filter. ■■ After changing the water filter, flush the water system. PERFORMANCE DATA SHEET Water Filtration System Model P5WB2L/P4RFWB Capacity 200 Gallons (757 Liters) System tested and certified by NSF International against NSF/ANSI Standard 53 for the reduction of Live Cysts...
...; Use replacement filter according you replace the filter. ■■ After changing the water filter, flush the water system. PERFORMANCE DATA SHEET Water Filtration System Model P5WB2L/P4RFWB Capacity 200 Gallons (757 Liters) System tested and certified by NSF International against NSF/ANSI Standard 53 for the reduction of Live Cysts...


