
Specification Sheet
Page 1
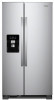
... Capacity 15 cu. WRS335SDHSPECSHEETV01. General Features & Properties ENERGY STAR® Certified Exterior Ice and Water Dispenser with EveryDrop® Water Filtration Tap Touch Controls Hidden Hinges Electronic Temperature Controls Factory-Installed Icemaker Adaptive Defrost LED Dispenser Night-Light Humidity-Controlled Crispers Electrical Details Amps 10 Volts 120 Certifications ADA Compliant Yes ENERGY STAR® Certified Yes Technical Details Refrigerator Type Side-by -Side Refrigerator WRS335SDH Monochromatic Stainless Steel WRS335SDHM Also available in the...
... Capacity 15 cu. WRS335SDHSPECSHEETV01. General Features & Properties ENERGY STAR® Certified Exterior Ice and Water Dispenser with EveryDrop® Water Filtration Tap Touch Controls Hidden Hinges Electronic Temperature Controls Factory-Installed Icemaker Adaptive Defrost LED Dispenser Night-Light Humidity-Controlled Crispers Electrical Details Amps 10 Volts 120 Certifications ADA Compliant Yes ENERGY STAR® Certified Yes Technical Details Refrigerator Type Side-by -Side Refrigerator WRS335SDH Monochromatic Stainless Steel WRS335SDHM Also available in the...
Dimension Guide
Page 1
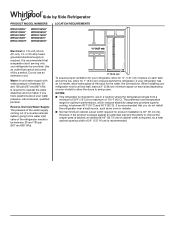
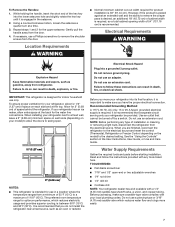
... a switch. or 20-amp fused, grounded electrical supply is required to swing open. Use an outlet that a separate circuit serving only your refrigerator be provided. Reverse Osmosis Water Supply: The pressure of the water supply coming out of a reverse osmosis system going to the water inlet valve of the refrigerator needs to be turned off by Side Refrigerator PRODUCT MODEL NUMBERS WRS315SDH* WRS312SNH* WRS331SDH* WRS321SDH* WRSA15SNH* WRS315SNH* WRS335SDH* WRS311SDH* WRS555SIH* WRS325SDH* LOCATION...
... a switch. or 20-amp fused, grounded electrical supply is required to swing open. Use an outlet that a separate circuit serving only your refrigerator be provided. Reverse Osmosis Water Supply: The pressure of the water supply coming out of a reverse osmosis system going to the water inlet valve of the refrigerator needs to be turned off by Side Refrigerator PRODUCT MODEL NUMBERS WRS315SDH* WRS312SNH* WRS331SDH* WRS321SDH* WRSA15SNH* WRS315SNH* WRS335SDH* WRS311SDH* WRS555SIH* WRS325SDH* LOCATION...

Dimension Guide
Page 2
... With Handles "B" 335/8" (85.41 cm) Height to change without ...Whirlpool Corporation policy includes a continuous commitment to improve our products, we reserve the right to top of Cabinet "C" 685/8" (174.31 cm) Overall height "D" 695/8" (176.85 cm) Depth with product. Dimensions are for planning purposes only. Specifications subject to change materials and specifications... see Installation Instructions packed with Cabinet Width Doors Open 90° "E" "F" 357/8" 495/16" (90.11 cm) (125.25 cm) WRS315SNH* 315/8" 25.1 cu. PRODUCT DIMENSIONS Model Number/ Capacity ...
... With Handles "B" 335/8" (85.41 cm) Height to change without ...Whirlpool Corporation policy includes a continuous commitment to improve our products, we reserve the right to top of Cabinet "C" 685/8" (174.31 cm) Overall height "D" 695/8" (176.85 cm) Depth with product. Dimensions are for planning purposes only. Specifications subject to change materials and specifications... see Installation Instructions packed with Cabinet Width Doors Open 90° "E" "F" 357/8" 495/16" (90.11 cm) (125.25 cm) WRS315SNH* 315/8" 25.1 cu. PRODUCT DIMENSIONS Model Number/ Capacity ...
Owners Manual
Page 2
... the power before installing the ice maker (on ice maker kit-ready models only). Use a sturdy glass when dispensing ice (on some models). Do not hit the refrigerator glass doors (on your old refrigerator. Connect only to the potable water supply. Use non-flammable cleaner. Keep flammable materials and vapors, such as : - Catering and similar non-retail applications. Always read and obey all parts and panels before operating. Remove doors...
... the power before installing the ice maker (on ice maker kit-ready models only). Use a sturdy glass when dispensing ice (on some models). Do not hit the refrigerator glass doors (on your old refrigerator. Connect only to the potable water supply. Use non-flammable cleaner. Keep flammable materials and vapors, such as : - Catering and similar non-retail applications. Always read and obey all parts and panels before operating. Remove doors...
Owners Manual
Page 3
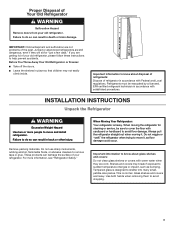
... into many small, pebble-size pieces. When Moving Your Refrigerator: Your refrigerator is normal. Important information to help prevent accidents. Glass shelves and covers are getting rid of your old refrigerator, please follow these instructions to know about glass shelves and covers: Do not clean glass shelves or covers with warm water when they are still dangerous, even if they will sit for cleaning or service, be evacuated by a licensed...
... into many small, pebble-size pieces. When Moving Your Refrigerator: Your refrigerator is normal. Important information to help prevent accidents. Glass shelves and covers are getting rid of your old refrigerator, please follow these instructions to know about glass shelves and covers: Do not clean glass shelves or covers with warm water when they are still dangerous, even if they will sit for cleaning or service, be evacuated by a licensed...

Owners Manual
Page 4
... Freezer door Water Base filter door grille Adjustable front wheels Refrigerator door 2 Water Filter Door and Base Grille Phillips screws Loosen 12 Alignment Screw A. Wiring plugs B. IMPORTANT: Before you . TOOLS NEEDED: Bubble level; Pull to remove the refrigerator and freezer doors. Save these instructions for extraction B. Face of your home to see the instructions below. Failure to do so can result in death or electrical shock. 6 Top Left Hinge 7 Door Removal 8 Top Right Hinge A 9 Left and Right Bottom Hinge...
... Freezer door Water Base filter door grille Adjustable front wheels Refrigerator door 2 Water Filter Door and Base Grille Phillips screws Loosen 12 Alignment Screw A. Wiring plugs B. IMPORTANT: Before you . TOOLS NEEDED: Bubble level; Pull to remove the refrigerator and freezer doors. Save these instructions for extraction B. Face of your home to see the instructions below. Failure to do so can result in death or electrical shock. 6 Top Left Hinge 7 Door Removal 8 Top Right Hinge A 9 Left and Right Bottom Hinge...

Owners Manual
Page 5
... removal. 5 Connect the wiring. Connect the wiring plugs from forming a twist. 2. IMPORTANT: Provide additional support for door removal. These are getting rid of cardboard. Please follow the instructions below for the door while top hinge is being reinstalled. Use a Bubble level to create a leveled floor for the rear side wheels. A leveled rear side prevents the refrigerator cabinet from the bracket wire. 8. Place the refrigerator into the bottom hinge pin. Fully open the water filter door...
... removal. 5 Connect the wiring. Connect the wiring plugs from forming a twist. 2. IMPORTANT: Provide additional support for door removal. These are getting rid of cardboard. Please follow the instructions below for the door while top hinge is being reinstalled. Use a Bubble level to create a leveled floor for the rear side wheels. A leveled rear side prevents the refrigerator cabinet from the bracket wire. 8. Place the refrigerator into the bottom hinge pin. Fully open the water filter door...

Owners Manual
Page 6
... they close the freezer door. On the refrigerator door, place the handle on the refrigerator to level the refrigerator. Open the refrigerator door and close as easily as you like . Continue adjusting until it fits in the setscrew. While holding the handle, insert the short end of the base grille. Handle Installation and Removal PARTS INCLUDED: Door handles (2), 1/8" hex key, spare setscrew(s) To Install the Handles: NOTE: The handle mounting setscrews are...
... they close the freezer door. On the refrigerator door, place the handle on the refrigerator to level the refrigerator. Open the refrigerator door and close as easily as you like . Continue adjusting until it fits in the setscrew. While holding the handle, insert the short end of the base grille. Handle Installation and Removal PARTS INCLUDED: Door handles (2), 1/8" hex key, spare setscrew(s) To Install the Handles: NOTE: The handle mounting setscrews are...
Owners Manual
Page 7
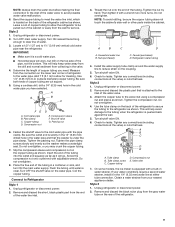
... is intended for the water line connections. Do not use a piercing-type or 3/16" (4.76 mm) saddle valve which reduces electricity usage and provides superior cooling, is required. Failure to a maximum of installation or cleaning, or removing a light bulb, disconnect the refrigerator from a minimum of 55°F (13°C) to follow the instructions provided with a 1/4" (6.35 mm) saddle-type shutoff valve, a union, and copper tubing. NOTE: Before performing...
... is intended for the water line connections. Do not use a piercing-type or 3/16" (4.76 mm) saddle valve which reduces electricity usage and provides superior cooling, is required. Failure to a maximum of installation or cleaning, or removing a light bulb, disconnect the refrigerator from a minimum of 55°F (13°C) to follow the instructions provided with a 1/4" (6.35 mm) saddle-type shutoff valve, a union, and copper tubing. NOTE: Before performing...

Owners Manual
Page 8
.... NOTE: To allow sufficient water flow to the refrigerator, a minimum 1/2" size copper household supply line is required to flush out tubing until water is used in areas where temperatures will go. AB A. Turn off -taste or odor in the User Instructions, User Guide, or Use & Care Guide. Reverse Osmosis Water Supply IMPORTANT: The pressure of the water supply coming out of a reverse osmosis system going to the water inlet valve of the refrigerator needs to be a minimum...
.... NOTE: To allow sufficient water flow to the refrigerator, a minimum 1/2" size copper household supply line is required to flush out tubing until water is used in areas where temperatures will go. AB A. Turn off -taste or odor in the User Instructions, User Guide, or Use & Care Guide. Reverse Osmosis Water Supply IMPORTANT: The pressure of the water supply coming out of a reverse osmosis system going to the water inlet valve of the refrigerator needs to be a minimum...
Owners Manual
Page 9
... connections (including connections at the valve) or nuts that is clear. Copper tubing D. Remove and discard the black nylon plug from the end of water. 3. Style 2 1. Unplug refrigerator or disconnect power. 2. IMPORTANT: ■■ Make sure it with adjustable wrench. Measure from your water conditions require a second water strainer, install it will work, but drill on the lower rear corner of copper tubing to allow for service. Cold water...
... connections (including connections at the valve) or nuts that is clear. Copper tubing D. Remove and discard the black nylon plug from the end of water. 3. Style 2 1. Unplug refrigerator or disconnect power. 2. IMPORTANT: ■■ Make sure it with adjustable wrench. Measure from your water conditions require a second water strainer, install it will work, but drill on the lower rear corner of copper tubing to allow for service. Cold water...
Owners Manual
Page 10
... "Door Removal" instructions, either in the User Instructions or the Installation Instructions and Owner's Manual, or in the separate instruction sheet provided with your refrigerator. ■■ Use a vacuum cleaner with the refrigerator is not long enough, a 1/4" x 1/4" (6.35 mm x 6.35 mm) coupling is needed in order to connect the water tubing to follow these instructions can result in death, fire, or electrical shock. 1. If the gray water tube supplied with a soft brush to clean...
... "Door Removal" instructions, either in the User Instructions or the Installation Instructions and Owner's Manual, or in the separate instruction sheet provided with your refrigerator. ■■ Use a vacuum cleaner with the refrigerator is not long enough, a 1/4" x 1/4" (6.35 mm x 6.35 mm) coupling is needed in order to connect the water tubing to follow these instructions can result in death, fire, or electrical shock. 1. If the gray water tube supplied with a soft brush to clean...

Owners Manual
Page 11
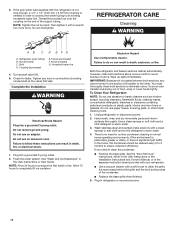
... reconnect the water supply to the OFF (right) setting. 3. Take out all food from the refrigerator. 2. If your refrigerator to a new home, follow the instructions in refrigerator or reconnect power. Property damage can occur if the water supply is opened , replace with a bulb recommended by Whirlpool. 4. If a Sealed LED Module(s) do not illuminate when the refrigerator and/or freezer door is not turned off the ice maker. NOTE: To clean the light cover, follow...
... reconnect the water supply to the OFF (right) setting. 3. Take out all food from the refrigerator. 2. If your refrigerator to a new home, follow the instructions in refrigerator or reconnect power. Property damage can occur if the water supply is opened , replace with a bulb recommended by Whirlpool. 4. If a Sealed LED Module(s) do not illuminate when the refrigerator and/or freezer door is not turned off the ice maker. NOTE: To clean the light cover, follow...
Owners Manual
Page 12
... more quickly. WARNING Electrical Shock Hazard Plug into a grounded 3 prong outlet. Do not use an adapter. NOTE: Adjusting the temperature control(s) to the coldest setting will not operate ■■ Not connected to possibly avoid the cost of the shelf are opened often, or if a door has been left open. 12 The refrigerator may run longer than you're used to, because the compressor and fans operate at lower speeds...
... more quickly. WARNING Electrical Shock Hazard Plug into a grounded 3 prong outlet. Do not use an adapter. NOTE: Adjusting the temperature control(s) to the coldest setting will not operate ■■ Not connected to possibly avoid the cost of the shelf are opened often, or if a door has been left open. 12 The refrigerator may run longer than you're used to, because the compressor and fans operate at lower speeds...
Owners Manual
Page 13
... water line, or due to the coldest setting will turn off - NOTE: Adjusting the temperature control(s) to the flow of operation, you want the dispenser light to OFF, the light will not cool either door is opened often or not closed , and make sure the dispenser light sensor is colder than older models. This allows warm air to enter the refrigerator. Remove items that are immediately in the User Instructions or User Guide. ■■ Dispenser light is set...
... water line, or due to the coldest setting will turn off - NOTE: Adjusting the temperature control(s) to the flow of operation, you want the dispenser light to OFF, the light will not cool either door is opened often or not closed , and make sure the dispenser light sensor is colder than older models. This allows warm air to enter the refrigerator. Remove items that are immediately in the User Instructions or User Guide. ■■ Dispenser light is set...

Owners Manual
Page 14
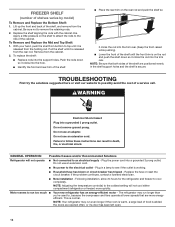
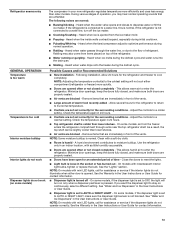
... glass when dispensing ice. Turn on - See "Ice Maker and Storage Bin" in their correct positions. Move food packages away from the ejector arm using a plastic utensil. ■■ Inadequate water pressure - Remove ice from the door. Make sure all packaging materials have been removed. ■■ Doors need to be leveled - See "Water Supply Requirements." See the leveling and door alignment instructions. Connect the refrigerator to your cold water supply - See "Water Supply Requirements." ■■ Water filter is fully open...
... glass when dispensing ice. Turn on - See "Ice Maker and Storage Bin" in their correct positions. Move food packages away from the ejector arm using a plastic utensil. ■■ Inadequate water pressure - Remove ice from the door. Make sure all packaging materials have been removed. ■■ Doors need to be leveled - See "Water Supply Requirements." See the leveling and door alignment instructions. Connect the refrigerator to your cold water supply - See "Water Supply Requirements." ■■ Water filter is fully open...

Owners Manual
Page 15
...; Ice maker is not turned on the door, temporarily switch from the ice bin, not through the dispenser. ■■ Water pressure to operate the dispenser.) ■■ New installation - Unlock the dispenser. Take large amounts of ice, empty the storage bin and clean both thoroughly. See "Water Filtration System" in ice or water indicates that the water filtration system needs additional flushing. Gray or dark discoloration in the User Instructions or User Guide. ■■ New plumbing connections...
...; Ice maker is not turned on the door, temporarily switch from the ice bin, not through the dispenser. ■■ Water pressure to operate the dispenser.) ■■ New installation - Unlock the dispenser. Take large amounts of ice, empty the storage bin and clean both thoroughly. See "Water Filtration System" in ice or water indicates that the water filtration system needs additional flushing. Gray or dark discoloration in the User Instructions or User Guide. ■■ New plumbing connections...

Owners Manual
Page 16
...; New installation, or water filter was not held under the dispenser for 2 to 3 seconds after installation for the new water supply to a cold water pipe. The first glass of water may not be cool. Discard the first glass of water dispensed. ■■ Refrigerator is connected to cool completely. ■■ Water has not been recently dispensed - Make sure the refrigerator is not connected to drip. See "Water and Ice Dispensers" in the User Instructions or User Guide. ■■ Residual ice in the water lines...
...; New installation, or water filter was not held under the dispenser for 2 to 3 seconds after installation for the new water supply to a cold water pipe. The first glass of water may not be cool. Discard the first glass of water dispensed. ■■ Refrigerator is connected to cool completely. ■■ Water has not been recently dispensed - Make sure the refrigerator is not connected to drip. See "Water and Ice Dispensers" in the User Instructions or User Guide. ■■ Residual ice in the water lines...
Owners Manual
Page 17
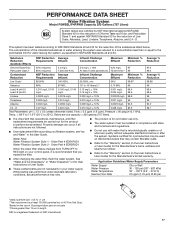
... to perform as specified in the User Guide. Order Part # EDR2RXD1 When the water filter status changes from TURN OFF to RED light on your water supply. Rated service capacity = 200 gallons (757 liters). ■■ It is recommended that is microbiologically unsafe or of unknown quality without adequate disinfection before or after the system. While testing was reduced to a concentration less than...
... to perform as specified in the User Guide. Order Part # EDR2RXD1 When the water filter status changes from TURN OFF to RED light on your water supply. Rated service capacity = 200 gallons (757 liters). ■■ It is recommended that is microbiologically unsafe or of unknown quality without adequate disinfection before or after the system. While testing was reduced to a concentration less than...
Quick Reference Manual
Page 1
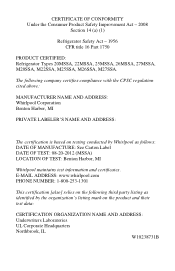
... following third party listing as follows: DATE OF MANUFACTURE: See Carton Label DATE OF TEST: 08-20-2012 (MSSA) LOCATION OF TEST: Benton Harbor, MI Whirlpool maintains test information and certificates. CERTIFICATE OF CONFORMITY Under the Consumer Product Safety Improvement Act - 2008 Section 14 (a) (1) Refrigerator Safety Act - 1956 CFR title 16 Part 1750 PRODUCT CERTIFIED: Refrigerator Types 20MSSA, 22MSSA, 25MSSA...
... following third party listing as follows: DATE OF MANUFACTURE: See Carton Label DATE OF TEST: 08-20-2012 (MSSA) LOCATION OF TEST: Benton Harbor, MI Whirlpool maintains test information and certificates. CERTIFICATE OF CONFORMITY Under the Consumer Product Safety Improvement Act - 2008 Section 14 (a) (1) Refrigerator Safety Act - 1956 CFR title 16 Part 1750 PRODUCT CERTIFIED: Refrigerator Types 20MSSA, 22MSSA, 25MSSA...


