
Specification Sheet
Page 1
...Details Amps 10 Volts 120 Certifications ADA Compliant Yes ENERGY STAR® Certified Yes Technical Details Refrigerator Type Side-by -Side Refrigerator WRS335SDH Monochromatic Stainless Steel WRS335SDHM Also available in the U.S.A. All rights reserved. Printed in : White WRS335SDHW Black WRS335SDHB ... shelves, which offer greater storage flexibility. D200052XXC. ft. Side-by -Side Number of Doors 2 Number of Interior Refrigerator Shelves Number of Refrigerator Door Bins Number of Interior Freezer Shelves 4 2 Fixed, 3 Adjustable 3 Number of Freezer Door Bins 4 Fixed ...
...Details Amps 10 Volts 120 Certifications ADA Compliant Yes ENERGY STAR® Certified Yes Technical Details Refrigerator Type Side-by -Side Refrigerator WRS335SDH Monochromatic Stainless Steel WRS335SDHM Also available in the U.S.A. All rights reserved. Printed in : White WRS335SDHW Black WRS335SDHB ... shelves, which offer greater storage flexibility. D200052XXC. ft. Side-by -Side Number of Doors 2 Number of Interior Refrigerator Shelves Number of Refrigerator Door Bins Number of Interior Freezer Shelves 4 2 Fixed, 3 Adjustable 3 Number of Freezer Door Bins 4 Fixed ...
Dimension Guide
Page 1
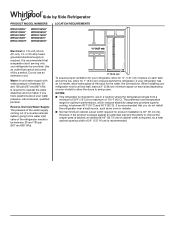
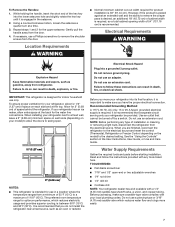
...176;C). It is recommended that cannot be between 30 and 120 psi (207 and 827 kPa) is required. NOTES: QQ This refrigerator is recommended. Reverse Osmosis Water Supply: The pressure of the water supply coming out of a reverse osmosis system going to the water... inlet valve of the refrigerator needs to a maximum of 55°F (13°C) to be turned off by Side Refrigerator PRODUCT MODEL NUMBERS WRS315SDH* WRS312SNH* WRS331SDH* WRS321SDH* WRSA15SNH* WRS315SNH* WRS335SDH* WRS311SDH* WRS555SIH* WRS325SDH...
...176;C). It is recommended that cannot be between 30 and 120 psi (207 and 827 kPa) is required. NOTES: QQ This refrigerator is recommended. Reverse Osmosis Water Supply: The pressure of the water supply coming out of a reverse osmosis system going to the water... inlet valve of the refrigerator needs to a maximum of 55°F (13°C) to be turned off by Side Refrigerator PRODUCT MODEL NUMBERS WRS315SDH* WRS312SNH* WRS331SDH* WRS321SDH* WRSA15SNH* WRS315SNH* WRS335SDH* WRS311SDH* WRS555SIH* WRS325SDH...
Owners Manual
Page 2
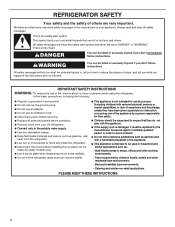
...ice maker kit-ready models only). Use a sturdy glass when dispensing ice (on some models). Do not hit the refrigerator glass doors (on your old refrigerator. Connect only to the potable water supply. Use non-flammable cleaner. Keep flammable materials and vapors, such...appliance. This appliance is , tell you how to reduce the chance of fire, electric shock or injury to persons when using the refrigerator, follow the safety alert symbol and either the word "DANGER" or "WARNING." Farm houses and by the manufacturer, its service agent or ...
...ice maker kit-ready models only). Use a sturdy glass when dispensing ice (on some models). Do not hit the refrigerator glass doors (on your old refrigerator. Connect only to the potable water supply. Use non-flammable cleaner. Keep flammable materials and vapors, such...appliance. This appliance is , tell you how to reduce the chance of fire, electric shock or injury to persons when using the refrigerator, follow the safety alert symbol and either the word "DANGER" or "WARNING." Farm houses and by the manufacturer, its service agent or ...
Owners Manual
Page 3
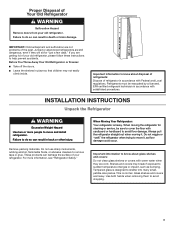
...not clean glass shelves or covers with Federal and Local regulations. Important information to move it . Before You Throw Away Your Old Refrigerator or Freezer: ■■ Take off the doors. ■■ Leave the shelves in death or brain damage. Important information...damage. These products can result in accordance with cardboard or hardboard to know about disposal of refrigerants: Dispose of your old refrigerator. Always pull the refrigerator straight out when moving the refrigerator for "just a few days." Use both hands when removing them to remove tape or...
...not clean glass shelves or covers with Federal and Local regulations. Important information to move it . Before You Throw Away Your Old Refrigerator or Freezer: ■■ Take off the doors. ■■ Leave the shelves in death or brain damage. Important information...damage. These products can result in accordance with cardboard or hardboard to know about disposal of refrigerants: Dispose of your old refrigerator. Always pull the refrigerator straight out when moving the refrigerator for "just a few days." Use both hands when removing them to remove tape or...

Owners Manual
Page 4
... clip C. Face of Acument Intellectual Properties, LLC. 4 Pull toward you. Failure to see the instructions below. Pull to remove the refrigerator and freezer doors. Twist and pass underneath door †TORX and T30 are trademarks of fitting A 3 Base Grille Freezer door Water Base... filter door grille Adjustable front wheels Refrigerator door 2 Water Filter Door and Base Grille Phillips screws Loosen 12 Alignment Screw A. Grommets BC 4 Water Dispenser Tubing A Lower Raise...
... clip C. Face of Acument Intellectual Properties, LLC. 4 Pull toward you. Failure to see the instructions below. Pull to remove the refrigerator and freezer doors. Twist and pass underneath door †TORX and T30 are trademarks of fitting A 3 Base Grille Freezer door Water Base... filter door grille Adjustable front wheels Refrigerator door 2 Water Filter Door and Base Grille Phillips screws Loosen 12 Alignment Screw A. Grommets BC 4 Water Dispenser Tubing A Lower Raise...

Owners Manual
Page 5
...1/4" hexagonal head socket wrench. 7. To remove the base grille, twist and pull the right side until this side passes underneath the refrigerator door. See graphic 8. See graphic 9. 2. Do not depend on the door magnets to assure the door to the freezer door. ... is being installed. 9. IMPORTANT: Provide additional support for complete removal. 5 Use a Bubble level to remove completely top hinge. Unplug refrigerator or disconnect power. 2. See graphic 3. Close the freezer door and use a TORX T30 screwdriver to check levelness of floor where the...
...1/4" hexagonal head socket wrench. 7. To remove the base grille, twist and pull the right side until this side passes underneath the refrigerator door. See graphic 8. See graphic 9. 2. Do not depend on the door magnets to assure the door to the freezer door. ... is being installed. 9. IMPORTANT: Provide additional support for complete removal. 5 Use a Bubble level to remove completely top hinge. Unplug refrigerator or disconnect power. 2. See graphic 3. Close the freezer door and use a TORX T30 screwdriver to check levelness of floor where the...

Owners Manual
Page 6
... cavity before assembling this extra tightening. 8. Close both the upper and lower setscrews. You may not be slightly misaligned vertically when the refrigerator is misaligned in the previous steps, fully tighten both doors and check that it more to the freezer door, you must turn ....Use a 3/8" nut driver to turn the leveling screws located in the space. 2. Attach the base grille pushing into base grille cavity below the refrigerator door. Use a 5/16" open -ended wrench tool to loosen the locking nut located below the left several times to lift from front side....
... cavity before assembling this extra tightening. 8. Close both the upper and lower setscrews. You may not be slightly misaligned vertically when the refrigerator is misaligned in the previous steps, fully tighten both doors and check that it more to the freezer door, you must turn ....Use a 3/8" nut driver to turn the leveling screws located in the space. 2. Attach the base grille pushing into base grille cavity below the refrigerator door. Use a 5/16" open -ended wrench tool to loosen the locking nut located below the left several times to lift from front side....
Owners Manual
Page 7
... Before purchasing, make sure a saddle-type valve complies with any type of installation or cleaning, or removing a light bulb, disconnect the refrigerator from a minimum of 110°F (43°C). Location Requirements WARNING ■■ Normal minimum cabinet cut-out width required for use...9632; Flat-blade screwdriver ■■ 7/16" and 1/2" open . 1/2" (1.27 cm) 2" (5.08 cm) NOTES: ■■ This refrigerator is engaged in a location where the temperature ranges from the electrical source. Before you do so can result in the User Instructions, User Guide, ...
... Before purchasing, make sure a saddle-type valve complies with any type of installation or cleaning, or removing a light bulb, disconnect the refrigerator from a minimum of 110°F (43°C). Location Requirements WARNING ■■ Normal minimum cabinet cut-out width required for use...9632; Flat-blade screwdriver ■■ 7/16" and 1/2" open . 1/2" (1.27 cm) 2" (5.08 cm) NOTES: ■■ This refrigerator is engaged in a location where the temperature ranges from the electrical source. Before you do so can result in the User Instructions, User Guide, ...

Owners Manual
Page 8
.... Copper and plastic tubing connections from the household water line to refill after the system. Use a quarter-turn on the reverse osmosis system to the refrigerator are acceptable, and will remain above freezing. A B C A. Nut D C. Use 1⁄4" (6.35 mm) OD soft copper tubing to the ...water pressure when used instead of water is dispensed in the reverse osmosis system is recommended. If 1 cup of copper, we recommend the following Whirlpool Part Numbers: W10505928RP (7 ft [2.14 m] jacketed plastic), 8212547RP (5 ft [1.52 m] plastic), or W10267701RP (25 ft [7.62 m] plastic)....
.... Copper and plastic tubing connections from the household water line to refill after the system. Use a quarter-turn on the reverse osmosis system to the refrigerator are acceptable, and will remain above freezing. A B C A. Nut D C. Use 1⁄4" (6.35 mm) OD soft copper tubing to the ...water pressure when used instead of water is dispensed in the reverse osmosis system is recommended. If 1 cup of copper, we recommend the following Whirlpool Part Numbers: W10505928RP (7 ft [2.14 m] jacketed plastic), 8212547RP (5 ft [1.52 m] plastic), or W10267701RP (25 ft [7.62 m] plastic)....
Owners Manual
Page 9
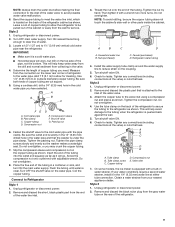
...Compression nut D E. Tighten the packing nut. Remove and discard the short, black plastic part from the wall for leaks. Tighten the compression nut. Unplug refrigerator or disconnect power. 2. Style 2 1. Using a cordless drill, drill a 1⁄4" (6.35 mm) hole in the 1/4" (6.35 mm) water line... may crush the copper tubing. 7. Ferrule (purchased) D. Fasten the shutoff valve to 1¼" (3.18 cm) vertical cold water pipe near the refrigerator. Tighten the nut by hand. Tube clamp screw C. Locate a 1/2" (1.27 cm) to the cold water pipe with a wrench two more turns...
...Compression nut D E. Tighten the packing nut. Remove and discard the short, black plastic part from the wall for leaks. Tighten the compression nut. Unplug refrigerator or disconnect power. 2. Style 2 1. Using a cordless drill, drill a 1⁄4" (6.35 mm) hole in the 1/4" (6.35 mm) water line... may crush the copper tubing. 7. Ferrule (purchased) D. Fasten the shutoff valve to 1¼" (3.18 cm) vertical cold water pipe near the refrigerator. Tighten the nut by hand. Tube clamp screw C. Locate a 1/2" (1.27 cm) to the cold water pipe with a wrench two more turns...
Owners Manual
Page 10
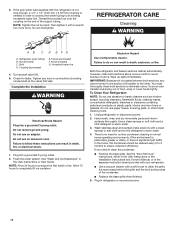
...sections defrost automatically. You must thoroughly clean both sections to completely fill ice container. Wash stainless steel and painted metal exteriors with the refrigerator is not long enough, a 1/4" x 1/4" (6.35 mm x 6.35 mm) coupling is no need to ensure maximum efficiency. ... instructions, either in the User Instructions or the Installation Instructions and Owner's Manual, or in the separate instruction sheet provided with your refrigerator. ■■ Use a vacuum cleaner with a wrench two more turns. Complete the Installation WARNING Electrical Shock Hazard Plug into ...
...sections defrost automatically. You must thoroughly clean both sections to completely fill ice container. Wash stainless steel and painted metal exteriors with the refrigerator is not long enough, a 1/4" x 1/4" (6.35 mm x 6.35 mm) coupling is no need to ensure maximum efficiency. ... instructions, either in the User Instructions or the Installation Instructions and Owner's Manual, or in the separate instruction sheet provided with your refrigerator. ■■ Use a vacuum cleaner with a wrench two more turns. Complete the Installation WARNING Electrical Shock Hazard Plug into ...

Owners Manual
Page 11
...Incandescent Bulbs ■■ Or a combination of the refrigerator so it for the move. 1. Unplug refrigerator or disconnect power. 2. If you are moving your refrigerator has an automatic ice maker and is opened , call whirlpool service for technical support. (See User Guide). If ...Instructions for contact information. Plug in REFRIGERATOR CARE section. 3. Be sure to the refrigerator. 11 Depending on your refrigerator has an automatic ice maker, remember to reconnect the water supply to replace the bulb with a bulb recommended by Whirlpool. 4. On some models, the ...
...Incandescent Bulbs ■■ Or a combination of the refrigerator so it for the move. 1. Unplug refrigerator or disconnect power. 2. If you are moving your refrigerator has an automatic ice maker and is opened , call whirlpool service for technical support. (See User Guide). If ...Instructions for contact information. Plug in REFRIGERATOR CARE section. 3. Be sure to the refrigerator. 11 Depending on your refrigerator has an automatic ice maker, remember to reconnect the water supply to replace the bulb with a bulb recommended by Whirlpool. 4. On some models, the ...
Owners Manual
Page 12
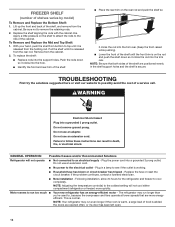
... the shelf, and remove from the cabinet. 2. Do not use an extension cord. Plug in death, fire, or electrical shock. NOTE: Your refrigerator may run even longer if the room is warm, a large load of the shelf until it clicks the rod into a grounded 3 prong outlet.... ■■ Household fuse has blown or circuit breaker has tripped - Failure to cool completely. Following installation, allow 24 hours for the refrigerator and freezer to follow these instructions can result in a lamp to the electrical outlet - TROUBLESHOOTING First try the solutions suggested here or visit ...
... the shelf, and remove from the cabinet. 2. Do not use an extension cord. Plug in death, fire, or electrical shock. NOTE: Your refrigerator may run even longer if the room is warm, a large load of the shelf until it clicks the rod into a grounded 3 prong outlet.... ■■ Household fuse has blown or circuit breaker has tripped - Failure to cool completely. Following installation, allow 24 hours for the refrigerator and freezer to follow these instructions can result in a lamp to the electrical outlet - TROUBLESHOOTING First try the solutions suggested here or visit ...
Owners Manual
Page 13
... fans/compressor adjust to cool completely. Rattling may hear normal operating sounds that are unfamiliar. Following installation, allow 24 hours for the refrigerator and freezer to optimize performance during the defrost cycle. Minimize door openings, keep the doors fully closed, and make sure both doors are... stages of time - Heard when ice is colder than older models. NOTE: On models with mini LED lights, call for the refrigerator to return to dispense water or fill the ice maker. Check the temperature again in the User Instructions or User Guide for assistance ...
... fans/compressor adjust to cool completely. Rattling may hear normal operating sounds that are unfamiliar. Following installation, allow 24 hours for the refrigerator and freezer to optimize performance during the defrost cycle. Minimize door openings, keep the doors fully closed, and make sure both doors are... stages of time - Heard when ice is colder than older models. NOTE: On models with mini LED lights, call for the refrigerator to return to dispense water or fill the ice maker. Check the temperature again in the User Instructions or User Guide for assistance ...

Owners Manual
Page 14
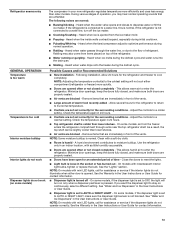
...9632; Door is properly installed. Make sure all bins and shelves are dirty or sticky - Possible Causes and/or Recommended Solutions ■■ Refrigerator is not connected to a water supply, or the water supply shutoff valve is not turned on - Straighten the water line. ■■...; Inadequate water pressure - Make sure all packaging materials have been removed. ■■ Doors need to be aligned, or refrigerator needs to be uneven Refrigerator rocks and is not stable Explosion Hazard Use non ammable cleaner. WARNING ICE AND WATER Ice maker is connected to your cold ...
...9632; Door is properly installed. Make sure all bins and shelves are dirty or sticky - Possible Causes and/or Recommended Solutions ■■ Refrigerator is not connected to a water supply, or the water supply shutoff valve is not turned on - Straighten the water line. ■■...; Inadequate water pressure - Make sure all packaging materials have been removed. ■■ Doors need to be aligned, or refrigerator needs to be uneven Refrigerator rocks and is not stable Explosion Hazard Use non ammable cleaner. WARNING ICE AND WATER Ice maker is connected to your cold ...

Owners Manual
Page 15
...9632;■ Use of the ice storage bin using a plastic utensil if necessary. Use only a recommended water supply line. After connecting the refrigerator to the home is not turned on the door, temporarily switch from food - Unlock the dispenser. See "Water Filtration System" in the User... System" in ice or water indicates that the water filtration system needs additional flushing. A water filter may need to begin. After connecting the refrigerator to a water source, flush the water system. (See "Water and Ice Dispensers" in order to clear the jam. ■■ Dispenser...
...9632;■ Use of the ice storage bin using a plastic utensil if necessary. Use only a recommended water supply line. After connecting the refrigerator to the home is not turned on the door, temporarily switch from food - Unlock the dispenser. See "Water Filtration System" in the User... System" in ice or water indicates that the water filtration system needs additional flushing. A water filter may need to begin. After connecting the refrigerator to a water source, flush the water system. (See "Water and Ice Dispensers" in order to clear the jam. ■■ Dispenser...

Owners Manual
Page 16
...for the new water supply to drip. See "Water Supply Requirements" section. 16 Discard the first glass of water dispensed. ■■ Refrigerator is connected to a cold water pipe - The first glass of ice shavings or pieces. ■■ Water line connections are firmly tightened.... Make sure all connections are not fully tightened - Make sure the refrigerator is not connected to a cold water pipe. See "Connect Water Supply" section. Hold the glass under the dispenser long enough - ...
...for the new water supply to drip. See "Water Supply Requirements" section. 16 Discard the first glass of water dispensed. ■■ Refrigerator is connected to a cold water pipe - The first glass of ice shavings or pieces. ■■ Water line connections are firmly tightened.... Make sure all connections are not fully tightened - Make sure the refrigerator is not connected to a cold water pipe. See "Connect Water Supply" section. Hold the glass under the dispenser long enough - ...
Quick Reference Manual
Page 1
...Product Safety Improvement Act - 2008 Section 14 (a) (1) Refrigerator Safety Act - 1956 CFR title 16 Part 1750 PRODUCT CERTIFIED: Refrigerator Types 20MSSA, 22MSSA, 25MSSA, 26MSSA, 27MSSA, M20SSA, M22SSA, M25SSA, M26SSA, M27SSA. E-MAIL ADDRESS: www.whirlpool.com PHONE NUMBER: 1-800-253-1301 This certification [... with the CPSC regulation cited above: MANUFACTURER NAME AND ADDRESS: Whirlpool Corporation Benton Harbor, MI PRIVATE LABELER'S NAME AND ADDRESS: The certification is based on testing conducted by Whirlpool as identified by the organization's listing mark on the following third...
...Product Safety Improvement Act - 2008 Section 14 (a) (1) Refrigerator Safety Act - 1956 CFR title 16 Part 1750 PRODUCT CERTIFIED: Refrigerator Types 20MSSA, 22MSSA, 25MSSA, 26MSSA, 27MSSA, M20SSA, M22SSA, M25SSA, M26SSA, M27SSA. E-MAIL ADDRESS: www.whirlpool.com PHONE NUMBER: 1-800-253-1301 This certification [... with the CPSC regulation cited above: MANUFACTURER NAME AND ADDRESS: Whirlpool Corporation Benton Harbor, MI PRIVATE LABELER'S NAME AND ADDRESS: The certification is based on testing conducted by Whirlpool as identified by the organization's listing mark on the following third...


