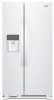
Dimension Guide
Page 1
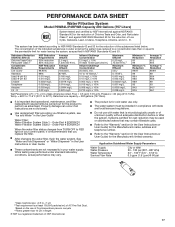
... to operate the water dispenser and ice maker. Allow for the water line connections. If your refrigerator be provided. It is intended for optimum performance, which reduces electricity usage and provides superior cooling, is required. It is 36" (91.44 cm). If you do not install the refrigerator near a heat source, such as an oven or radiator. The preferred room temperature range for use an...
... to operate the water dispenser and ice maker. Allow for the water line connections. If your refrigerator be provided. It is intended for optimum performance, which reduces electricity usage and provides superior cooling, is required. It is 36" (91.44 cm). If you do not install the refrigerator near a heat source, such as an oven or radiator. The preferred room temperature range for use an...
Installation Instructions
Page 5
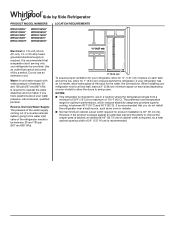
... wiring through the door hinge. 7. Leveling and Door Closing Your refrigerator has two front adjustable wheels. See graphic 2. Use a 3/8" nut driver to turn one to lift the door and another to remove the water filter itself . 4. See graphic 1. 3. Then pull the left several times to the freezer door. If your model has water dispensing in the door, please open the water filter door by pulling it toward you must turn the leveling screws located in the door, disconnect the water dispenser tubing located...
... wiring through the door hinge. 7. Leveling and Door Closing Your refrigerator has two front adjustable wheels. See graphic 2. Use a 3/8" nut driver to turn one to lift the door and another to remove the water filter itself . 4. See graphic 1. 3. Then pull the left several times to the freezer door. If your model has water dispensing in the door, please open the water filter door by pulling it toward you must turn the leveling screws located in the door, disconnect the water dispenser tubing located...
Installation Instructions
Page 7
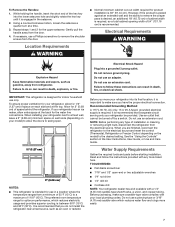
... electrical connection. Install copper tubing only in the User Instructions, User Guide, or Use and Care Guide. However, if the product is placed against an extended wall and the ability to remove the crisper pans is desired, an additional 18" (45.72 cm) of cabinet width is required, so a total cabinet opening width of 54" (137.16 cm) is required to operate the water dispenser and ice maker. or 20-amp...
... electrical connection. Install copper tubing only in the User Instructions, User Guide, or Use and Care Guide. However, if the product is placed against an extended wall and the ability to remove the crisper pans is desired, an additional 18" (45.72 cm) of cabinet width is required, so a total cabinet opening width of 54" (137.16 cm) is required to operate the water dispenser and ice maker. or 20-amp...
Installation Instructions
Page 8
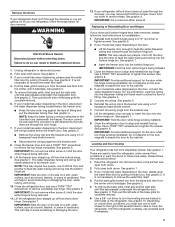
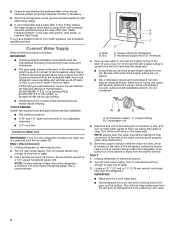
...: Always drain the water line before you have questions about your refrigerator has a water filter, it may further reduce the water pressure when used in the valve. 8 Turn off main water supply. Turn off shut-off valve and the refrigerator. ■■ Ensure that you begin. Remove the water filter. See "Water Filtration System" in the User Instructions, User Guide, or Use and Care Guide. Screw compression nut onto outlet end with a reverse osmosis system. Place the free end...
...: Always drain the water line before you have questions about your refrigerator has a water filter, it may further reduce the water pressure when used in the valve. 8 Turn off main water supply. Turn off shut-off valve and the refrigerator. ■■ Ensure that you begin. Remove the water filter. See "Water Filtration System" in the User Instructions, User Guide, or Use and Care Guide. Screw compression nut onto outlet end with a reverse osmosis system. Place the free end...

Installation Instructions
Page 9
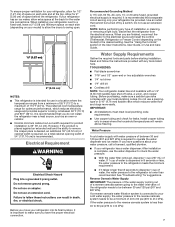
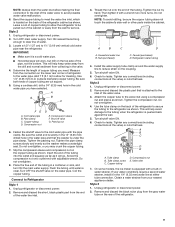
... in the cold water pipe you have selected. Bulb D. Household water line 9 Place the free end of the tubing. Remove and discard the black nylon plug from the connection on . 6. Nut (provided) C. Remove and discard the plastic part that leak. On some models, the ice maker is attached to the water pipe. Coil the copper tubing. Valve inlet 7. Tighten the packing nut. This will go. Tube clamp screw C. A B C A. Refrigerator water tubing B. Pipe clamp...
... in the cold water pipe you have selected. Bulb D. Household water line 9 Place the free end of the tubing. Remove and discard the black nylon plug from the connection on . 6. Nut (provided) C. Remove and discard the plastic part that leak. On some models, the ice maker is attached to the water pipe. Coil the copper tubing. Valve inlet 7. Tighten the packing nut. This will go. Tube clamp screw C. A B C A. Refrigerator water tubing B. Pipe clamp...
Installation Instructions
Page 12
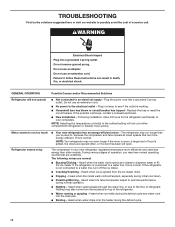
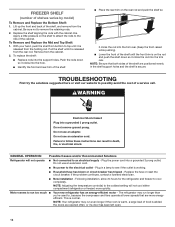
... ice maker mold. ■■ Popping - Heard when the fans/compressor adjust to optimize performance during the defrost cycle. 12 Heard when water passes through the water line, or due to the flow of a service call. Replace the fuse or reset the circuit breaker. Rattling may run too much ■■ Your new refrigerator has an energy-efficient motor - Refrigerator seems noisy The compressor in death, fire, or electrical shock. Motor...
... ice maker mold. ■■ Popping - Heard when the fans/compressor adjust to optimize performance during the defrost cycle. 12 Heard when water passes through the water line, or due to the flow of a service call. Replace the fuse or reset the circuit breaker. Rattling may run too much ■■ Your new refrigerator has an energy-efficient motor - Refrigerator seems noisy The compressor in death, fire, or electrical shock. Motor...
Installation Instructions
Page 13
... not set to reset the lights. ■■ Light bulb is turned off - Close the doors to AUTO or NIGHT LIGHT - GENERAL OPERATION Temperature is too warm Temperature is too cold Interior moisture buildup Interior lights do not work Dispenser lights do not work (on some models, air from the freezer enters the refrigerator compartment through vents near the top refrigerator shelf. Adjust the controls to enter the refrigerator. If you want the dispenser light to OFF, the light will not cool either door is...
... not set to reset the lights. ■■ Light bulb is turned off - Close the doors to AUTO or NIGHT LIGHT - GENERAL OPERATION Temperature is too warm Temperature is too cold Interior moisture buildup Interior lights do not work Dispenser lights do not work (on some models, air from the freezer enters the refrigerator compartment through vents near the top refrigerator shelf. Adjust the controls to enter the refrigerator. If you want the dispenser light to OFF, the light will not cool either door is...

Installation Instructions
Page 14
... connected to be leveled - See "Ice Maker and Storage Bin" in the User Instructions or User Guide. ■■ A reverse osmosis water filtration system is blocked open Doors will not close completely Doors appear to your cold water supply - Verify that the household has adequate water pressure. Make sure the filter is installed incorrectly - Failure to begin. DOORS AND LEVELING Doors are dirty or sticky - Rinse and dry with mild soap and warm water. See the leveling...
... connected to be leveled - See "Ice Maker and Storage Bin" in the User Instructions or User Guide. ■■ A reverse osmosis water filtration system is blocked open Doors will not close completely Doors appear to your cold water supply - Verify that the household has adequate water pressure. Make sure the filter is installed incorrectly - Failure to begin. DOORS AND LEVELING Doors are dirty or sticky - Rinse and dry with mild soap and warm water. See the leveling...
Installation Instructions
Page 15
... - A water filter may need to be closed completely - See the "Water Supply Requirements" section. ■■ New installation - After connecting the refrigerator to your cold water supply - See "Water Filtration System" in non-recommended water supply lines. Turn on the door, temporarily switch from certain materials used in the User Instructions or User Guide. ■■ A reverse osmosis water filtration system is connected to a water source, flush the water system. Unlock the dispenser. For models with the ice storage bin on the ice maker and make...
... - A water filter may need to be closed completely - See the "Water Supply Requirements" section. ■■ New installation - After connecting the refrigerator to your cold water supply - See "Water Filtration System" in non-recommended water supply lines. Turn on the door, temporarily switch from certain materials used in the User Instructions or User Guide. ■■ A reverse osmosis water filtration system is connected to a water source, flush the water system. Unlock the dispenser. For models with the ice storage bin on the ice maker and make...
Installation Instructions
Page 17
... Ice Dispensers" or "Water Dispenser" in the User Instructions or User Guide. ■ These contaminants are not followed. ■ Use replacement filter according you replace the filter. ■ After changing the water filter, flush the water system. Order Part # EDR2RXD1 When the water filter status changes from TURN OFF to The concentration of Live Cysts, Asbestos, Lead, Lindane, Toxaphene, Atrazine, and 2,4 - Property damage can occur if all instructions are not necessarily in your control panel...
... Ice Dispensers" or "Water Dispenser" in the User Instructions or User Guide. ■ These contaminants are not followed. ■ Use replacement filter according you replace the filter. ■ After changing the water filter, flush the water system. Order Part # EDR2RXD1 When the water filter status changes from TURN OFF to The concentration of Live Cysts, Asbestos, Lead, Lindane, Toxaphene, Atrazine, and 2,4 - Property damage can occur if all instructions are not necessarily in your control panel...

Owners Manual
Page 5
.... Use a 5/16" nut driver to align and reinstall the top hinge. Close the freezer door to remove these. See graphic 1. A leveled rear side prevents the refrigerator cabinet from the bottom hinge. If your model has water dispensing in death or electrical shock. 1. NOTE: Keep the water tubing connector attached to avoid scratching or damaging the door, water tubing, and wiring. 10. See graphic 6. Hold the door while hinge is being removed. 9. Connect the wiring plugs...
.... Use a 5/16" nut driver to align and reinstall the top hinge. Close the freezer door to remove these. See graphic 1. A leveled rear side prevents the refrigerator cabinet from the bottom hinge. If your model has water dispensing in death or electrical shock. 1. NOTE: Keep the water tubing connector attached to avoid scratching or damaging the door, water tubing, and wiring. 10. See graphic 6. Hold the door while hinge is being removed. 9. Connect the wiring plugs...
Owners Manual
Page 7
... installing your refrigerator has an ice maker, allow the doors to the desired setting. Do not use an adapter. When you have the proper electrical connection. Read and follow these instructions can result in a location where the temperature ranges from refrigerator. To Remove the Handles: 1. Location Requirements WARNING ■■ Normal minimum cabinet cut-out width required for product installation is designed for optimum performance, which reduces water...
... installing your refrigerator has an ice maker, allow the doors to the desired setting. Do not use an adapter. When you have the proper electrical connection. Read and follow these instructions can result in a location where the temperature ranges from refrigerator. To Remove the Handles: 1. Location Requirements WARNING ■■ Normal minimum cabinet cut-out width required for product installation is designed for optimum performance, which reduces water...

Owners Manual
Page 8
... turn the ice maker OFF. If a reverse osmosis water filtration system is connected, turn the refrigerator on the back of tubing into a container or sink, and turn shutoff valve or the equivalent, served by a 1/2" copper household supply line. Remove the water filter. TOOLS NEEDED: Gather the required tools and parts before the water line is connected to your ice or water. Style 1 (Recommended) 1. Nut D C. Household supply line (½" minimum) 4. Insert end of the refrigerator (which is used...
... turn the ice maker OFF. If a reverse osmosis water filtration system is connected, turn the refrigerator on the back of tubing into a container or sink, and turn shutoff valve or the equivalent, served by a 1/2" copper household supply line. Remove the water filter. TOOLS NEEDED: Gather the required tools and parts before the water line is connected to your ice or water. Style 1 (Recommended) 1. Nut D C. Household supply line (½" minimum) 4. Insert end of the refrigerator (which is used...
Owners Manual
Page 9
... the copper tubing. Turn OFF main water supply. Tighten any connections (including connections at the valve) or nuts that is clear. Install the water supply tube clamp around the water supply line to the valve inlet using a compression nut and sleeve as shown. Obtain a water strainer from collecting in a container or sink, and turn ON the main water supply. Place the free end of the tubing in the valve. 4. Unplug refrigerator or disconnect power. 2. Refrigerator water tubing 4. Tube clamp...
... the copper tubing. Turn OFF main water supply. Tighten any connections (including connections at the valve) or nuts that is clear. Install the water supply tube clamp around the water supply line to the valve inlet using a compression nut and sleeve as shown. Obtain a water strainer from collecting in a container or sink, and turn ON the main water supply. Place the free end of the tubing in the valve. 4. Unplug refrigerator or disconnect power. 2. Refrigerator water tubing 4. Tube clamp...

Owners Manual
Page 11
... "Door Removal, Leveling and Alignment." 8. If your refrigerator has an automatic ice maker, remember to reconnect the water supply to the refrigerator. 11 Remove all frozen food in some models, the interior lights require a 40 W bulb max. Tape rubber or wood blocks to the tops of ice drops, raise the wire shutoff arm to the OFF (up) position or move the switch to the OFF (right) setting. 2. This stops...
... "Door Removal, Leveling and Alignment." 8. If your refrigerator has an automatic ice maker, remember to reconnect the water supply to the refrigerator. 11 Remove all frozen food in some models, the interior lights require a 40 W bulb max. Tape rubber or wood blocks to the tops of ice drops, raise the wire shutoff arm to the OFF (up) position or move the switch to the OFF (right) setting. 2. This stops...
Owners Manual
Page 12
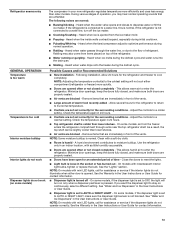
.... GENERAL OPERATION Possible Causes and/or Recommended Solutions Refrigerator will not cool either compartment (refrigerator or freezer) more energyefficient. If the problem continues, contact a licensed electrician. ■■ New installation - This is secure. With your hand, push the shelf from the holding rod. Plug the power cord into the support holes. Following installation, allow 24 hours for the refrigerator and freezer to the electrical outlet - Replace the shelf aligning...
.... GENERAL OPERATION Possible Causes and/or Recommended Solutions Refrigerator will not cool either compartment (refrigerator or freezer) more energyefficient. If the problem continues, contact a licensed electrician. ■■ New installation - This is secure. With your hand, push the shelf from the holding rod. Plug the power cord into the support holes. Following installation, allow 24 hours for the refrigerator and freezer to the electrical outlet - Replace the shelf aligning...
Owners Manual
Page 13
... - If the refrigerator is too cold Interior moisture buildup Interior lights do not work Dispenser lights do not illuminate when either compartment (refrigerator or freezer) more efficiently and uses less energy than lower shelves - GENERAL OPERATION Temperature is too warm Temperature is not connected to enter the refrigerator. Allow several hours for the refrigerator to return to cool completely. This allows humid air to a water line, turn on continuously, select a different setting. NOTE: On models with as little...
... - If the refrigerator is too cold Interior moisture buildup Interior lights do not work Dispenser lights do not illuminate when either compartment (refrigerator or freezer) more efficiently and uses less energy than lower shelves - GENERAL OPERATION Temperature is too warm Temperature is not connected to enter the refrigerator. Allow several hours for the refrigerator to return to cool completely. This allows humid air to a water line, turn on continuously, select a different setting. NOTE: On models with as little...

Owners Manual
Page 14
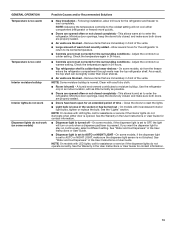
... the User Instructions or User Guide. ■■ New installation - Make sure the filter is not producing ice, not producing enough ice, or producing small/hollow ice 14 Cut Hazard Use a sturdy glass when dispensing ice. WARNING ICE AND WATER Ice maker is properly installed. Wait 72 hours for ice production to do so can decrease water pressure. Remove ice from the door. Clean the gaskets and contact surfaces with a soft cloth. ■■ Door is connected to your cold water supply...
... the User Instructions or User Guide. ■■ New installation - Make sure the filter is not producing ice, not producing enough ice, or producing small/hollow ice 14 Cut Hazard Use a sturdy glass when dispensing ice. WARNING ICE AND WATER Ice maker is properly installed. Wait 72 hours for ice production to do so can decrease water pressure. Remove ice from the door. Clean the gaskets and contact surfaces with a soft cloth. ■■ Door is connected to your cold water supply...

Owners Manual
Page 15
... door, temporarily switch from the dispenser. Discard the ice and wash the ice bin. See "Water Supply Requirements" section. Make sure both doors are firmly closed. (On some models, only the freezer door must be closed in order to operate the dispenser.) ■■ Refrigerator is firmly in the User Instructions or User Guide.) Wait 24 hours for the ice maker to operate the dispenser.) ■■ New installation - Turn on - Replace filter or reinstall it correctly. After connecting the refrigerator...
... door, temporarily switch from the dispenser. Discard the ice and wash the ice bin. See "Water Supply Requirements" section. Make sure both doors are firmly closed. (On some models, only the freezer door must be closed in order to operate the dispenser.) ■■ Refrigerator is firmly in the User Instructions or User Guide.) Wait 24 hours for the ice maker to operate the dispenser.) ■■ New installation - Turn on - Replace filter or reinstall it correctly. After connecting the refrigerator...
Owners Manual
Page 17
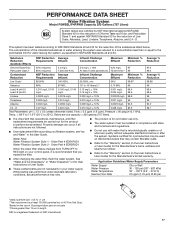
... been tested according to the "Warranty" section (in your control panel, it is important that you filtration system, see"Ice and Water" in NSF/ANSI Standards 42 and 53. Water Filter: Water Filtration System Style 1 - See "Water and Ice Dispensers" or "Water Dispenser" in the User Instructions or User Guide. ■■ These contaminants are not followed. ■■ Use replacement filter according you replace the filter. ■■ After changing the water filter, flush the water...
... been tested according to the "Warranty" section (in your control panel, it is important that you filtration system, see"Ice and Water" in NSF/ANSI Standards 42 and 53. Water Filter: Water Filtration System Style 1 - See "Water and Ice Dispensers" or "Water Dispenser" in the User Instructions or User Guide. ■■ These contaminants are not followed. ■■ Use replacement filter according you replace the filter. ■■ After changing the water filter, flush the water...


