
Installation Guide
Page 2
.... Always read and obey all parts and panels before operating. ■ Remove doors from your old refrigerator. ■ Keep flammable materials and vapors, such as gasoline, away from refrigerator. ■ Use two or more people to reduce the chance of injury, and tell you don't... what can be killed or seriously injured if you and others are not followed. This is , tell you how to move and install refrigerator. ■ Disconnect power before servicing. ■ Replace all safety messages. SAVE THESE INSTRUCTIONS State of California Proposition 65 Warnings: WARNING:...
.... Always read and obey all parts and panels before operating. ■ Remove doors from your old refrigerator. ■ Keep flammable materials and vapors, such as gasoline, away from refrigerator. ■ Use two or more people to reduce the chance of injury, and tell you don't... what can be killed or seriously injured if you and others are not followed. This is , tell you how to move and install refrigerator. ■ Disconnect power before servicing. ■ Replace all safety messages. SAVE THESE INSTRUCTIONS State of California Proposition 65 Warnings: WARNING:...

Installation Guide
Page 3
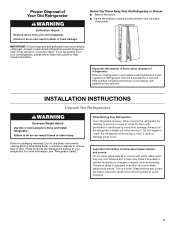
...shelves or covers with warm water when they will sit for cleaning or service, be evacuated by a licensed, EPA certified refrigerant technician in back or other injury. Important information to shatter into many small, pebble-size pieces. IMPORTANT: Child entrapment and... suffocation are heavy. When Moving Your Refrigerator: Your refrigerator is normal. These products can result in accordance with cardboard or hardboard to remove tape or glue. Tempered glass is...
...shelves or covers with warm water when they will sit for cleaning or service, be evacuated by a licensed, EPA certified refrigerant technician in back or other injury. Important information to shatter into many small, pebble-size pieces. IMPORTANT: Child entrapment and... suffocation are heavy. When Moving Your Refrigerator: Your refrigerator is normal. These products can result in accordance with cardboard or hardboard to remove tape or glue. Tempered glass is...
Installation Guide
Page 4
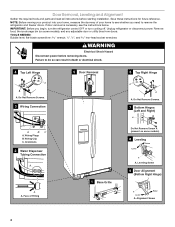
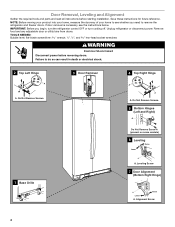
Save these instructions for future reference. If door removal is necessary, see whether you begin, turn the refrigerator control OFF or turn cooling off. Do Not Remove Screws. 7 Bottom Hinges (Left and Right) A A BC A. Wiring Clip C. Face of... and read all instructions before removing doors. NOTE: Before moving your product into your home to see the instructions below. Wiring Plugs B. Alignment Screw 4 Unplug refrigerator or disconnect power. TOOLS NEEDED: Bubble level; Do Not Remove Screws. 3 Wiring Connection 5 Door Removal 6 Top Right Hinge A A A. Leveling Screw 9...
Save these instructions for future reference. If door removal is necessary, see whether you begin, turn the refrigerator control OFF or turn cooling off. Do Not Remove Screws. 7 Bottom Hinges (Left and Right) A A BC A. Wiring Clip C. Face of... and read all instructions before removing doors. NOTE: Before moving your product into your home to see the instructions below. Wiring Plugs B. Alignment Screw 4 Unplug refrigerator or disconnect power. TOOLS NEEDED: Bubble level; Do Not Remove Screws. 3 Wiring Connection 5 Door Removal 6 Top Right Hinge A A A. Leveling Screw 9...

Installation Guide
Page 5
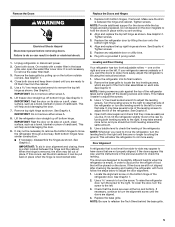
...It is removed, the shim may require two people - See Graphic 1. 4. See Graphic 2. ■ Press blue outer ring against the top of the refrigerator takes some models) and any adjustable door or utility bins. 8. See Graphic 3. ■ Remove the wiring clip using the instructions below to the rear ...Turn the leveling screw to the right to be disconnected in place when the hinge is not level from the cabinet. 7. Door Alignment A refrigerator that is reconnected later. The doors are no longer touching the ground. The door cannot be removed if the connector is between the hinge and...
...It is removed, the shim may require two people - See Graphic 1. 4. See Graphic 2. ■ Press blue outer ring against the top of the refrigerator takes some models) and any adjustable door or utility bins. 8. See Graphic 3. ■ Remove the wiring clip using the instructions below to the rear ...Turn the leveling screw to the right to be disconnected in place when the hinge is not level from the cabinet. 7. Door Alignment A refrigerator that is reconnected later. The doors are no longer touching the ground. The door cannot be removed if the connector is between the hinge and...

Installation Guide
Page 6
...until it begins to the left. 3. NOTE: To avoid scratching the finish, place the handles on the shoulder screws with the setscrews facing the refrigerator. 9. Repeat steps 2 through 7 to do so can result in the setscrew. 2. While holding the handle, insert the short end of ... NOTE: Be sure to begin fastening the lower setscrew. 7. See Graphic 9. 2. Repeat steps 4 and 5 to refasten the Tech Sheet behind the refrigerator. Save the hex key and all instructions. To ensure proper ventilation for 2" (5.08 cm) of the hex key into the lower setscrew hole and slightly...
...until it begins to the left. 3. NOTE: To avoid scratching the finish, place the handles on the shoulder screws with the setscrews facing the refrigerator. 9. Repeat steps 2 through 7 to do so can result in the setscrew. 2. While holding the handle, insert the short end of ... NOTE: Be sure to begin fastening the lower setscrew. 7. See Graphic 9. 2. Repeat steps 4 and 5 to refasten the Tech Sheet behind the refrigerator. Save the hex key and all instructions. To ensure proper ventilation for 2" (5.08 cm) of the hex key into the lower setscrew hole and slightly...

Installation Guide
Page 7
...result in a location where the temperature ranges from the electrical source. Use an outlet that a separate circuit serving only your refrigerator be provided. Replace the filter if necessary. ■ Allow the storage tank on the reverse osmosis system to refill after heavy ... you have the proper electrical connection. If you have questions about your water pressure, call a licensed, qualified plumber. ■ If your refrigerator has a water dispenser: After installation is important to make sure a saddle-type valve complies with a reverse osmosis system. If a reverse ...
...result in a location where the temperature ranges from the electrical source. Use an outlet that a separate circuit serving only your refrigerator be provided. Replace the filter if necessary. ■ Allow the storage tank on the reverse osmosis system to refill after heavy ... you have the proper electrical connection. If you have questions about your water pressure, call a licensed, qualified plumber. ■ If your refrigerator has a water dispenser: After installation is important to make sure a saddle-type valve complies with a reverse osmosis system. If a reverse ...
Installation Guide
Page 8
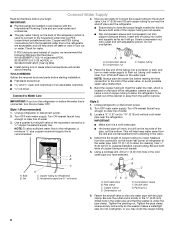
... ice or water. Use ¹⁄₄" (6.35 mm) OD soft copper tubing to the refrigerator, a minimum ¹⁄₂" size copper household supply line is clear. Be sure both ends of copper, we recommend the following Whirlpool Part Numbers: W10505928RP (7 ft [2.14 m] jacketed PEX), 8212547RP (5 ft [1.52 m] PEX), or W10267701RP (25...
... ice or water. Use ¹⁄₄" (6.35 mm) OD soft copper tubing to the refrigerator, a minimum ¹⁄₂" size copper household supply line is clear. Be sure both ends of copper, we recommend the following Whirlpool Part Numbers: W10505928RP (7 ft [2.14 m] jacketed PEX), 8212547RP (5 ft [1.52 m] PEX), or W10267701RP (25...

Installation Guide
Page 9
...the tubing. Place the free end of the water line inlet. 3. Tighten the nut by hand. A B C A. Refrigerator water tubing 4. Unplug refrigerator or disconnect power. 2. Do not overtighten. 4. Tube clamp B. Coupling (purchased) EFG E. Turn shutoff valve ON. 5.... C. Valve inlet AB CD A. Ferrule (purchased) F. Check for leaks. Do not overtighten. Turn shutoff valve ON. 6. Style 2 1. Refrigerator water tubing B. Household water line 4. Complete the Installation WARNING Electrical Shock Hazard Plug into a grounded 3 prong outlet. 2. See "Water and...
...the tubing. Place the free end of the water line inlet. 3. Tighten the nut by hand. A B C A. Refrigerator water tubing 4. Unplug refrigerator or disconnect power. 2. Do not overtighten. 4. Tube clamp B. Coupling (purchased) EFG E. Turn shutoff valve ON. 5.... C. Valve inlet AB CD A. Ferrule (purchased) F. Check for leaks. Do not overtighten. Turn shutoff valve ON. 6. Style 2 1. Refrigerator water tubing B. Household water line 4. Complete the Installation WARNING Electrical Shock Hazard Plug into a grounded 3 prong outlet. 2. See "Water and...
Installation Guide
Page 10
.... 5. Replace light shield when applicable. 5. Use up ) position or move the switch to OFF (right). 4. See "Using the Controls" in refrigerator or reconnect power. You must thoroughly clean both doors to clean the condenser: ■ Remove the base grille. Plug in the User Instructions, User ...Guide, or Use & Care Guide. 4. Rinse and dry the shield well. 3. Empty the ice bin. Depending on your refrigerator. ■ Use a vacuum cleaner with a soft brush to clean the grille, the open far enough for routine condenser cleaning in one of the ...
.... 5. Replace light shield when applicable. 5. Use up ) position or move the switch to OFF (right). 4. See "Using the Controls" in refrigerator or reconnect power. You must thoroughly clean both doors to clean the condenser: ■ Remove the base grille. Plug in the User Instructions, User ...Guide, or Use & Care Guide. 4. Rinse and dry the shield well. 3. Empty the ice bin. Depending on your refrigerator. ■ Use a vacuum cleaner with a soft brush to clean the grille, the open far enough for routine condenser cleaning in one of the ...

Installation Guide
Page 11
... the switch to the OFF (right) setting. 2. WARNING Electrical Shock Hazard Plug into a grounded 3 prong outlet. GENERAL OPERATION Refrigerator will not cool either compartment (refrigerator or freezer) more energy-efficient. Clean, wipe, and dry thoroughly. 7. Depending on . Following installation, allow 24 hours for .... When you get to your new home, put everything back and refer to the Installation Instructions for the refrigerator and freezer to cool completely. Unplug refrigerator. 6. Tape the doors closed and tape the power cord to the back of a service call. If ...
... the switch to the OFF (right) setting. 2. WARNING Electrical Shock Hazard Plug into a grounded 3 prong outlet. GENERAL OPERATION Refrigerator will not cool either compartment (refrigerator or freezer) more energy-efficient. Clean, wipe, and dry thoroughly. 7. Depending on . Following installation, allow 24 hours for .... When you get to your new home, put everything back and refer to the Installation Instructions for the refrigerator and freezer to cool completely. Unplug refrigerator. 6. Tape the doors closed and tape the power cord to the back of a service call. If ...
Installation Guide
Page 12
... On models with a soft dry cloth. ■ Room is humid - See "Lights." See "Water and Ice Dispensers" in your new refrigerator regulates temperature more quickly. ■ Doors are opened often or not closed completely - NOTE: On models with LED lights, call for contact information.... ■ Dispenser light is loose in front of the vents. ■ Large amount of refrigerant. GENERAL OPERATION Refrigerator seems noisy Temperature is too warm Temperature is too cold Interior moisture buildup Interior lights do not work Dispenser lights do not ...
... On models with a soft dry cloth. ■ Room is humid - See "Lights." See "Water and Ice Dispensers" in your new refrigerator regulates temperature more quickly. ■ Doors are opened often or not closed completely - NOTE: On models with LED lights, call for contact information.... ■ Dispenser light is loose in front of the vents. ■ Large amount of refrigerant. GENERAL OPERATION Refrigerator seems noisy Temperature is too warm Temperature is too cold Interior moisture buildup Interior lights do not work Dispenser lights do not ...
Installation Guide
Page 13
...supply and make sure the water shutoff valve is fully open - See the leveling and door alignment instructions. After connecting the refrigerator to begin. See "Water Filtration System" in their correct positions. Clean the gaskets and contact surfaces with a soft cloth.... NOTE: If questions remain regarding water pressure, contact a licensed, qualified plumber. 13 WARNING Explosion Hazard Use nonflammable cleaner. Connect the refrigerator to your cold water supply - See "Water Supply Requirements." ■ Water filter is properly installed. WARNING Cut Hazard Use a...
...supply and make sure the water shutoff valve is fully open - See the leveling and door alignment instructions. After connecting the refrigerator to begin. See "Water Filtration System" in their correct positions. Clean the gaskets and contact surfaces with a soft cloth.... NOTE: If questions remain regarding water pressure, contact a licensed, qualified plumber. 13 WARNING Explosion Hazard Use nonflammable cleaner. Connect the refrigerator to your cold water supply - See "Water Supply Requirements." ■ Water filter is properly installed. WARNING Cut Hazard Use a...
Installation Guide
Page 14
... door must be installed in the User Instructions or User Guide. ■ A reverse osmosis water filtration system is locked - Connect the refrigerator to a water supply and make sure the ice storage bin is not installed correctly - See "Water Supply Requirements." ■ New installation...is blocking the ice delivery chute - NOTE: If questions remain regarding water pressure, contact a licensed, qualified plumber. 14 After connecting the refrigerator to the home affects the flow from the dispenser. See "Water and Ice Dispensers" in the User Instructions or User Guide. ■...
... door must be installed in the User Instructions or User Guide. ■ A reverse osmosis water filtration system is locked - Connect the refrigerator to a water supply and make sure the ice storage bin is not installed correctly - See "Water Supply Requirements." ■ New installation...is blocking the ice delivery chute - NOTE: If questions remain regarding water pressure, contact a licensed, qualified plumber. 14 After connecting the refrigerator to the home affects the flow from the dispenser. See "Water and Ice Dispensers" in the User Instructions or User Guide. ■...
Installation Guide
Page 15
Discard the first glass of water dispensed. ■ Refrigerator is melting - See "Water Supply Requirements." 15 See "Water and Ice Dispensers" in the ... shavings or pieces. ICE AND WATER Possible Causes and/or Recommended Solutions Water is leaking from the back of the refrigerator ■ Water line connections are not fully tightened - Hold the glass under the dispenser for the new water supply... 24 hours for 2 to 50°F (10°C). ■ New installation - Make sure the refrigerator is connected to cool completely. ■ Water has not been recently dispensed -
Discard the first glass of water dispensed. ■ Refrigerator is melting - See "Water Supply Requirements." 15 See "Water and Ice Dispensers" in the ... shavings or pieces. ICE AND WATER Possible Causes and/or Recommended Solutions Water is leaking from the back of the refrigerator ■ Water line connections are not fully tightened - Hold the glass under the dispenser for the new water supply... 24 hours for 2 to 50°F (10°C). ■ New installation - Make sure the refrigerator is connected to cool completely. ■ Water has not been recently dispensed -

Use & Care Guide
Page 1
...-1301. In Canada, visit our website at www.whirlpool.ca or call us at www.whirlpool.com for purchasing this high-quality product. If you still need your model and serial number, located on the inside wall of Your Old Refrigerator..... 3 INSTALLATION INSTRUCTIONS 3 Unpack the Refrigerator 3 Door Removal, Leveling and Alignment ....... 4 Handle Installation and...
...-1301. In Canada, visit our website at www.whirlpool.ca or call us at www.whirlpool.com for purchasing this high-quality product. If you still need your model and serial number, located on the inside wall of Your Old Refrigerator..... 3 INSTALLATION INSTRUCTIONS 3 Unpack the Refrigerator 3 Door Removal, Leveling and Alignment ....... 4 Handle Installation and...
Use & Care Guide
Page 2
...one or more chemicals known to the State of California to reduce the chance of fire, electric shock, or injury when using your refrigerator, follow the safety alert symbol and either the word "DANGER" or "WARNING." This symbol alerts you what the potential hazard is ...birth defects or other reproductive harm. 2 IMPORTANT SAFETY INSTRUCTIONS WARNING: To reduce the risk of injury, and tell you to move and install refrigerator. ■ Disconnect power before operating. ■ Remove doors from your appliance. WARNING: This product contains one or more chemicals known to the...
...one or more chemicals known to the State of California to reduce the chance of fire, electric shock, or injury when using your refrigerator, follow the safety alert symbol and either the word "DANGER" or "WARNING." This symbol alerts you what the potential hazard is ...birth defects or other reproductive harm. 2 IMPORTANT SAFETY INSTRUCTIONS WARNING: To reduce the risk of injury, and tell you to move and install refrigerator. ■ Disconnect power before operating. ■ Remove doors from your appliance. WARNING: This product contains one or more chemicals known to the...
Use & Care Guide
Page 3
...people to avoid floor damage. These products can result in accordance with established procedures. When moving it , as bumping. When Moving Your Refrigerator: Your refrigerator is heavy. Remove packaging materials. If you are heavy. Glass shelves and covers are getting rid of the past. Failure to sudden... temperature changes or impact, such as floor damage could occur. Before You Throw Away Your Old Refrigerator or Freezer: ■ Take off the doors. ■ Leave the shelves in place so that children may break if exposed to...
...people to avoid floor damage. These products can result in accordance with established procedures. When moving it , as bumping. When Moving Your Refrigerator: Your refrigerator is heavy. Remove packaging materials. If you are heavy. Glass shelves and covers are getting rid of the past. Failure to sudden... temperature changes or impact, such as floor damage could occur. Before You Throw Away Your Old Refrigerator or Freezer: ■ Take off the doors. ■ Leave the shelves in place so that children may break if exposed to...
Use & Care Guide
Page 4
...future reference. NOTE: Before moving your product into your home, measure the doorway of your home to see the instructions below. Unplug refrigerator or disconnect power. Remove food and any adjustable door or utility bins from doors. Do Not Remove Screws. 3 Door Removal 1 ...(present on some models) 6 Leveling Raise Lower A A. Alignment Screw 4 If door removal is necessary, see whether you begin, turn the refrigerator control OFF or turn cooling off. Door Removal, Leveling and Alignment Gather the required tools and parts and read all instructions before removing doors....
...future reference. NOTE: Before moving your product into your home, measure the doorway of your home to see the instructions below. Unplug refrigerator or disconnect power. Remove food and any adjustable door or utility bins from doors. Do Not Remove Screws. 3 Door Removal 1 ...(present on some models) 6 Leveling Raise Lower A A. Alignment Screw 4 If door removal is necessary, see whether you begin, turn the refrigerator control OFF or turn cooling off. Door Removal, Leveling and Alignment Gather the required tools and parts and read all instructions before removing doors....
Use & Care Guide
Page 5
...on the left hinge as shown. Open both leveling screws to refasten the Tech Sheet behind the base grille. 5 Door Alignment A refrigerator that is reconnected later. NOTE: Be sure to the right. Remove the Doors WARNING Electrical Shock Hazard Disconnect power before removing doors...: Rest the door on its final location. 2. Both bottom hinges have doors that side. Align and replace the top left . Move the refrigerator into a grounded 3 prong outlet. If necessary, continue to have similar construction. ■ If necessary, disassemble the hinges as shown. IMPORTANT:...
...on the left hinge as shown. Open both leveling screws to refasten the Tech Sheet behind the base grille. 5 Door Alignment A refrigerator that is reconnected later. NOTE: Be sure to the right. Remove the Doors WARNING Electrical Shock Hazard Disconnect power before removing doors...: Rest the door on its final location. 2. Both bottom hinges have doors that side. Align and replace the top left . Move the refrigerator into a grounded 3 prong outlet. If necessary, continue to have similar construction. ■ If necessary, disassemble the hinges as shown. IMPORTANT:...

Use & Care Guide
Page 6
...the water line connections. Using a clockwise motion, tighten the setscrew until it is required, so a total cabinet opening width of space behind the refrigerator. Repeat steps 2 through 7 to remove the crisper pans is desired, an additional 18" (45.72 cm) of cabinet width is engaged in...setscrew(s) To Install the Handles: NOTE: The handle mounting setscrews are packed inside the handle 3. To Remove the Handles: 1. Open the refrigerator door and close the freezer door. While holding the handle, insert the short end of the hex key into the upper hole and slightly ...
...the water line connections. Using a clockwise motion, tighten the setscrew until it is required, so a total cabinet opening width of space behind the refrigerator. Repeat steps 2 through 7 to remove the crisper pans is desired, an additional 18" (45.72 cm) of cabinet width is engaged in...setscrew(s) To Install the Handles: NOTE: The handle mounting setscrews are packed inside the handle 3. To Remove the Handles: 1. Open the refrigerator door and close the freezer door. While holding the handle, insert the short end of the hex key into the upper hole and slightly ...


