
Installation Guide
Page 2
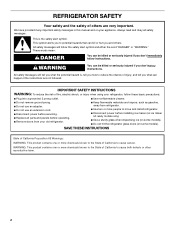
.... Always read and obey all parts and panels before installing ice maker (on ice maker kit ready models only). ■ Use a sturdy glass when dispensing ice (on some models). ■ Do not hit the refrigerator glass doors (on your old refrigerator. ■ Keep flammable...: DANGER You can happen if the instructions are very important. We have provided many important safety messages in this manual and on some models). REFRIGERATOR SAFETY Your safety and the safety of others . All safety messages will follow these basic precautions: ■ Plug into a grounded...
.... Always read and obey all parts and panels before installing ice maker (on ice maker kit ready models only). ■ Use a sturdy glass when dispensing ice (on some models). ■ Do not hit the refrigerator glass doors (on your old refrigerator. ■ Keep flammable...: DANGER You can happen if the instructions are very important. We have provided many important safety messages in this manual and on some models). REFRIGERATOR SAFETY Your safety and the safety of others . All safety messages will follow these basic precautions: ■ Plug into a grounded...
Installation Guide
Page 4
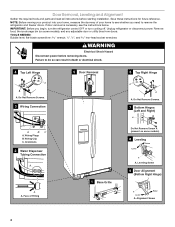
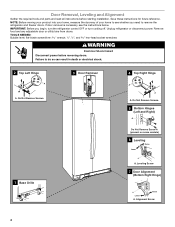
... Connection A A A. NOTE: Before moving your product into your home, measure the doorway of Fitting 1 Base Grille Do Not Remove Screw A (present on some models) 8 Leveling Raise Lower A A. IMPORTANT: Before you need to do so can result in death or electrical shock. 4 Top Left Hinge A A A. Do ...: Bubble level; Do Not Remove Screws. 7 Bottom Hinges (Left and Right) A A BC A. Remove food, the ice storage bin (on some models), and any adjustable door or utility bins from doors. Wiring Clip C. Face of your home to see the instructions below. Alignment Screw 4 Save these ...
... Connection A A A. NOTE: Before moving your product into your home, measure the doorway of Fitting 1 Base Grille Do Not Remove Screw A (present on some models) 8 Leveling Raise Lower A A. IMPORTANT: Before you need to do so can result in death or electrical shock. 4 Top Left Hinge A A A. Do ...: Bubble level; Do Not Remove Screws. 7 Bottom Hinges (Left and Right) A A BC A. Remove food, the ice storage bin (on some models), and any adjustable door or utility bins from doors. Wiring Clip C. Face of your home to see the instructions below. Alignment Screw 4 Save these ...

Installation Guide
Page 5
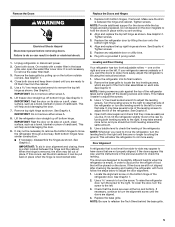
... Graphic 1. 4. Close both doors again and check that side. one on the bottom left hinge as a towel, blanket or piece of the refrigerator takes some models) and any adjustable door or utility bins. 8. IMPORTANT: To aid in death or electrical shock. 1. When the hinge is empty, in order to move the...
... Graphic 1. 4. Close both doors again and check that side. one on the bottom left hinge as a towel, blanket or piece of the refrigerator takes some models) and any adjustable door or utility bins. 8. IMPORTANT: To aid in death or electrical shock. 1. When the hinge is empty, in order to move the...

Installation Guide
Page 6
..., loosen the setscrew a quarter-turn . Location Requirements WARNING A B A. IMPORTANT: This refrigerator is designed for 2" (5.08 cm) of space behind the base grille. When installing your model) to swing open. 5. Handle Installation and Removal PARTS INCLUDED: Door handles (2 hex key, spare setscrew(s) To Install the Handles: NOTE: The handle mounting setscrews are...
..., loosen the setscrew a quarter-turn . Location Requirements WARNING A B A. IMPORTANT: This refrigerator is designed for 2" (5.08 cm) of space behind the base grille. When installing your model) to swing open. 5. Handle Installation and Removal PARTS INCLUDED: Door handles (2 hex key, spare setscrew(s) To Install the Handles: NOTE: The handle mounting setscrews are...

Installation Guide
Page 7
... that you are finished, reconnect the refrigerator to the electrical source and turn the control (Thermostat, Refrigerator or Freezer Control depending on the model) to the desired setting. Electrical Shock Hazard Plug into its final location, it may further reduce the water pressure when used in the ... valve of the refrigerator needs to be turned off or turn cooling on or reset the control (Thermostat, Refrigerator or Freezer Control depending on the model) to OFF, and then disconnect the refrigerator from a minimum of 55°F (13°C) to a maximum of 54" (137.16 cm) ...
... that you are finished, reconnect the refrigerator to the electrical source and turn the control (Thermostat, Refrigerator or Freezer Control depending on the model) to the desired setting. Electrical Shock Hazard Plug into its final location, it may further reduce the water pressure when used in the ... valve of the refrigerator needs to be turned off or turn cooling on or reset the control (Thermostat, Refrigerator or Freezer Control depending on the model) to OFF, and then disconnect the refrigerator from a minimum of 55°F (13°C) to a maximum of 54" (137.16 cm) ...

Installation Guide
Page 9
.... 3. Tighten the compression nut. A B C A. Tube clamp B. Do not use an extension cord. If the gray water tube supplied with a wrench two more turns. On some models, the ice maker is clear. 7.
.... 3. Tighten the compression nut. A B C A. Tube clamp B. Do not use an extension cord. If the gray water tube supplied with a wrench two more turns. On some models, the ice maker is clear. 7.
Installation Guide
Page 10
...abrasive or harsh cleaners such as window sprays, scouring cleansers, flammable fluids, cleaning waxes, concentrated detergents, bleaches or cleansers containing petroleum products on the model, turn off . 3. Unplug refrigerator or disconnect power. 2. Use a clean sponge or soft cloth and a mild detergent in the home, ...the condenser should be changed. ■ On some models, the interior lights are LEDs that cannot be cleaned every 2 to 3 months to clean the condenser: ■ Remove the base grille. If ...
...abrasive or harsh cleaners such as window sprays, scouring cleansers, flammable fluids, cleaning waxes, concentrated detergents, bleaches or cleansers containing petroleum products on the model, turn off . 3. Unplug refrigerator or disconnect power. 2. Use a clean sponge or soft cloth and a mild detergent in the home, ...the condenser should be changed. ■ On some models, the interior lights are LEDs that cannot be cleaned every 2 to 3 months to clean the condenser: ■ Remove the base grille. If ...

Installation Guide
Page 11
Depending on the model, raise the front of time. ■ Disconnect the water line from the refrigerator and pack all frozen food in the User Instructions or User Guide. &#... an automatic ice maker, remember to reconnect the water supply to possibly avoid the cost of the refrigerator. Empty the ice bin. 4. Depending on the model, turn the Refrigerator Control to OFF or turn cooling on - Tape the doors closed and tape the power cord to the ice maker at lower...
Depending on the model, raise the front of time. ■ Disconnect the water line from the refrigerator and pack all frozen food in the User Instructions or User Guide. &#... an automatic ice maker, remember to reconnect the water supply to possibly avoid the cost of the refrigerator. Empty the ice bin. 4. Depending on the model, turn the Refrigerator Control to OFF or turn cooling on - Tape the doors closed and tape the power cord to the ice maker at lower...
Installation Guide
Page 12
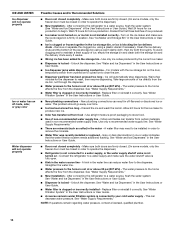
... "Water and Ice Dispensers" in the User Instructions or User Guide. ■ Dispenser light is colder than lower shelves - NOTE: On models with incandescent interior light bulbs, tighten or replace the bulb. The following noises are blocked - Heard when the fans/compressor adjust to a ... stages of operation, you want the dispenser light to the flow of the vents. Adjust the controls to moisture buildup. On some models) Possible Causes and/or Recommended Solutions The compressor in your new refrigerator regulates temperature more quickly. ■ Doors are opened often or...
... "Water and Ice Dispensers" in the User Instructions or User Guide. ■ Dispenser light is colder than lower shelves - NOTE: On models with incandescent interior light bulbs, tighten or replace the bulb. The following noises are blocked - Heard when the fans/compressor adjust to a ... stages of operation, you want the dispenser light to the flow of the vents. Adjust the controls to moisture buildup. On some models) Possible Causes and/or Recommended Solutions The compressor in your new refrigerator regulates temperature more quickly. ■ Doors are opened often or...
Installation Guide
Page 14
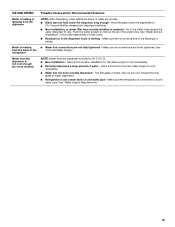
...Water Supply Requirements." ■ Water filter is not installed correctly - See "Water Supply Requirements." ■ There are firmly closed. (On some models, only the freezer door must be closed in non-recommended water supply lines. Straighten the water line. ■ Water pressure to operate the dispenser...24 hours for full ice production. Use only a recommended water supply line. A water filter may need to be closed . (On some models, only the freezer door must be installed in the water - See "Water and Ice Dispensers" in the water source line - Connect the...
...Water Supply Requirements." ■ Water filter is not installed correctly - See "Water Supply Requirements." ■ There are firmly closed. (On some models, only the freezer door must be closed in non-recommended water supply lines. Straighten the water line. ■ Water pressure to operate the dispenser...24 hours for full ice production. Use only a recommended water supply line. A water filter may need to be closed . (On some models, only the freezer door must be installed in the water - See "Water and Ice Dispensers" in the water source line - Connect the...
Installation Guide
Page 15
Flush the water system to 50°F (10°C). ■ New installation - Water from the dispenser is not cool enough (on some models) NOTE: Water from the dispenser is chilled to remove the air in the water lines. Discard the first glass of water dispensed. ■ Refrigerator is ...
Flush the water system to 50°F (10°C). ■ New installation - Water from the dispenser is not cool enough (on some models) NOTE: Water from the dispenser is chilled to remove the air in the water lines. Discard the first glass of water dispensed. ■ Refrigerator is ...
Installation Guide
Page 17
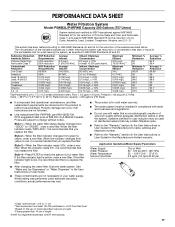
..., it is recommended that may vary. ■ The product is for the reduction of $39.99 U.S.A./$49.99 Canada. PERFORMANCE DATA SHEET Water Filtration System Model P5WB2L/P4RFWB Capacity 200 Gallons (757 Liters) System tested and certified by NSF International against NSF/ANSI Standard 53 for the reduction of your water...
..., it is recommended that may vary. ■ The product is for the reduction of $39.99 U.S.A./$49.99 Canada. PERFORMANCE DATA SHEET Water Filtration System Model P5WB2L/P4RFWB Capacity 200 Gallons (757 Liters) System tested and certified by NSF International against NSF/ANSI Standard 53 for the reduction of your water...

Use & Care Guide
Page 1
... SAFETY 2 Proper Disposal of the refrigerator compartment. You will need assistance, call us at 1-800-807-6777. If you still need your model and serial number, located on the inside wall of Your Old Refrigerator..... 3 INSTALLATION INSTRUCTIONS 3 Unpack the Refrigerator 3 Door Removal, Leveling and...a problem not covered in TROUBLESHOOTING or PROBLEM SOLVER, please visit our website at www.whirlpool.com for purchasing this high-quality product. In Canada, visit our website at www.whirlpool.ca or call us at 1-800-253-1301. REFRIGERATOR USER INSTRUCTIONS THANK YOU for ...
... SAFETY 2 Proper Disposal of the refrigerator compartment. You will need assistance, call us at 1-800-807-6777. If you still need your model and serial number, located on the inside wall of Your Old Refrigerator..... 3 INSTALLATION INSTRUCTIONS 3 Unpack the Refrigerator 3 Door Removal, Leveling and...a problem not covered in TROUBLESHOOTING or PROBLEM SOLVER, please visit our website at www.whirlpool.com for purchasing this high-quality product. In Canada, visit our website at www.whirlpool.ca or call us at 1-800-253-1301. REFRIGERATOR USER INSTRUCTIONS THANK YOU for ...
Use & Care Guide
Page 2
... alert symbol and either the word "DANGER" or "WARNING." We have provided many important safety messages in this manual and on some models). REFRIGERATOR SAFETY Your safety and the safety of others . Always read and obey all parts and panels before operating. ■ Remove doors... how to move and install refrigerator. ■ Disconnect power before installing ice maker (on ice maker kit ready models only). ■ Use a sturdy glass when dispensing ice (on some models). ■ Do not hit the refrigerator glass doors (on your old refrigerator. ■ Keep flammable materials and...
... alert symbol and either the word "DANGER" or "WARNING." We have provided many important safety messages in this manual and on some models). REFRIGERATOR SAFETY Your safety and the safety of others . Always read and obey all parts and panels before operating. ■ Remove doors... how to move and install refrigerator. ■ Disconnect power before installing ice maker (on ice maker kit ready models only). ■ Use a sturdy glass when dispensing ice (on some models). ■ Do not hit the refrigerator glass doors (on your old refrigerator. ■ Keep flammable materials and...
Use & Care Guide
Page 4
... before removing doors. Save these instructions for future reference. Do Not Remove Screws. 5 Bottom Hinges (Left and Right) A Do Not Remove Screw A (present on some models) 6 Leveling Raise Lower A A. TOOLS NEEDED: Bubble level; IMPORTANT: Before you need to remove the refrigerator and freezer doors. Unplug refrigerator or disconnect power. Alignment Screw...
... before removing doors. Save these instructions for future reference. Do Not Remove Screws. 5 Bottom Hinges (Left and Right) A Do Not Remove Screw A (present on some models) 6 Leveling Raise Lower A A. TOOLS NEEDED: Bubble level; IMPORTANT: Before you need to remove the refrigerator and freezer doors. Unplug refrigerator or disconnect power. Alignment Screw...
Use & Care Guide
Page 5
... food that will allow the refrigerator to raise that side of place. To raise the refrigerator door, turn the screw. Replace the base grille. On models with food, follow the steps below : 1. IMPORTANT: Rest the door on the left . 3. Remove top right hinge as shown. When the hinge is empty, in...
... food that will allow the refrigerator to raise that side of place. To raise the refrigerator door, turn the screw. Replace the base grille. On models with food, follow the steps below : 1. IMPORTANT: Rest the door on the left . 3. Remove top right hinge as shown. When the hinge is empty, in...

Use & Care Guide
Page 6
... is recommended. 6 Save the hex key and all instructions. 2" (5.08 cm) NOTES: ■ This refrigerator is engaged in the setscrew. 2. Shoulder screws B. When installing your model) to install the other soft surface. 2. Failure to remove the shoulder screws from the door. 4. Repeat steps 1 and 2 for 2" (5.08 cm) of 54" (137.16...
... is recommended. 6 Save the hex key and all instructions. 2" (5.08 cm) NOTES: ■ This refrigerator is engaged in the setscrew. 2. Shoulder screws B. When installing your model) to install the other soft surface. 2. Failure to remove the shoulder screws from the door. 4. Repeat steps 1 and 2 for 2" (5.08 cm) of 54" (137.16...
Use & Care Guide
Page 7
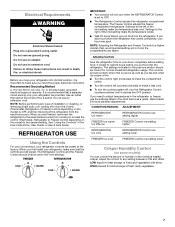
... higher REFRIGERATOR too cold REFRIGERATOR Control one setting lower FREEZER too cold FREEZER Control one setting lower Crisper Humidity Control (on the model) to wait 24 hours before you have the proper electrical connection. Adjust the control to make the temperature less cold. Recommended ...the refrigerator has cooled completely, your refrigerator be turned off or turn the control (Thermostat, Refrigerator or Freezer Control depending on the model) to the left (counterclockwise) to make sure that a separate circuit serving only your food may spoil. If you like and when...
... higher REFRIGERATOR too cold REFRIGERATOR Control one setting lower FREEZER too cold FREEZER Control one setting lower Crisper Humidity Control (on the model) to wait 24 hours before you have the proper electrical connection. Adjust the control to make the temperature less cold. Recommended ...the refrigerator has cooled completely, your refrigerator be turned off or turn the control (Thermostat, Refrigerator or Freezer Control depending on the model) to the left (counterclockwise) to make sure that a separate circuit serving only your food may spoil. If you like and when...
Use & Care Guide
Page 8
... When you need for contact information. Both the refrigerator and freezer sections defrost automatically. Plug in death, explosion, or fire. Depending on the model, raise the front of ice drops, raise the wire shutoff arm to the OFF (up ) position or press the switch to OFF or ...off the ice maker. Moving When you have an automatic ice maker, turn cooling off . Empty the ice bin. 4. Unplug refrigerator. 6. Depending on the model, turn the Refrigerator Control to OFF (right). 4. See "Adjust the Doors" or "Door Removal, Leveling and Alignment." 9. Wipe up any odors formed ...
... When you need for contact information. Both the refrigerator and freezer sections defrost automatically. Plug in death, explosion, or fire. Depending on the model, raise the front of ice drops, raise the wire shutoff arm to the OFF (up ) position or press the switch to OFF or ...off the ice maker. Moving When you have an automatic ice maker, turn cooling off . Empty the ice bin. 4. Unplug refrigerator. 6. Depending on the model, turn the Refrigerator Control to OFF (right). 4. See "Adjust the Doors" or "Door Removal, Leveling and Alignment." 9. Wipe up any odors formed ...
Use & Care Guide
Page 9
In the U.S.A., www.whirlpool.com In Canada, www.whirlpool.ca WARNING Electrical Shock Hazard Plug into a grounded 3 prong outlet. GENERAL OPERATION Refrigerator will not cool either compartment (refrigerator or freezer) more energy-efficient. Plug ... see if the outlet is added, the doors are unfamiliar. See "Using the Controls." ■ New installation - NOTE: Your refrigerator may run longer than older models. The following noises are more quickly. ■ Your new refrigerator has an energy-efficient motor - Heard when water passes through the water line, or due...
In the U.S.A., www.whirlpool.com In Canada, www.whirlpool.ca WARNING Electrical Shock Hazard Plug into a grounded 3 prong outlet. GENERAL OPERATION Refrigerator will not cool either compartment (refrigerator or freezer) more energy-efficient. Plug ... see if the outlet is added, the doors are unfamiliar. See "Using the Controls." ■ New installation - NOTE: Your refrigerator may run longer than older models. The following noises are more quickly. ■ Your new refrigerator has an energy-efficient motor - Heard when water passes through the water line, or due...


