
Warranty Information
Page 1
... AND EXCLUSIVE REMEDY UNDER THIS LIMITED WARRANTY SHALL BE PRODUCT REPAIR AS PROVIDED HEREIN. Service must be borne by a Whirlpool designated service company. Expenses for travel and transportation for Factory Specified Parts and repair labor to correct defects in materials or workmanship that is inconsistent to published user or operator instructions and...
... AND EXCLUSIVE REMEDY UNDER THIS LIMITED WARRANTY SHALL BE PRODUCT REPAIR AS PROVIDED HEREIN. Service must be borne by a Whirlpool designated service company. Expenses for travel and transportation for Factory Specified Parts and repair labor to correct defects in materials or workmanship that is inconsistent to published user or operator instructions and...
Use & Care Guide
Page 2
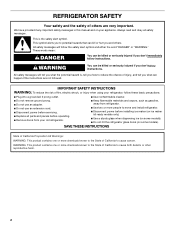
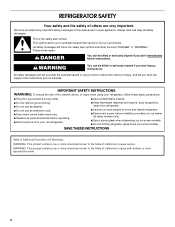
Always read and obey all parts and panels before operating. ■ Remove doors from your old refrigerator. ■ Keep flammable materials and vapors, such as gasoline, away from refrigerator. ■ Use ...
Always read and obey all parts and panels before operating. ■ Remove doors from your old refrigerator. ■ Keep flammable materials and vapors, such as gasoline, away from refrigerator. ■ Use ...
Use & Care Guide
Page 4
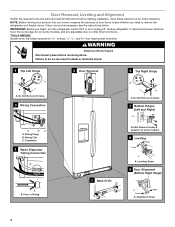
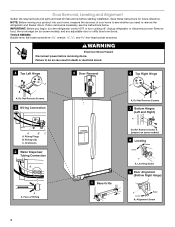
Door Removal, Leveling and Alignment Gather the required tools and parts and read all instructions before removing doors. Save these instructions for future reference. Wiring Clip C. TOOLS NEEDED: Bubble level; Wiring Plugs B. Leveling Screw 9 Door Alignment (...
Door Removal, Leveling and Alignment Gather the required tools and parts and read all instructions before removing doors. Save these instructions for future reference. Wiring Clip C. TOOLS NEEDED: Bubble level; Wiring Plugs B. Leveling Screw 9 Door Alignment (...

Use & Care Guide
Page 5
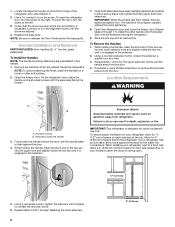
... blue outer ring against the top of the leveling screws to move the refrigerator, turn the leveling screw to the left hinge as you are part of cardboard. See Graphic 4. The water dispenser tubing and wiring remain attached to locate the two leveling screws, which are ready to remove the door...
... blue outer ring against the top of the leveling screws to move the refrigerator, turn the leveling screw to the left hinge as you are part of cardboard. See Graphic 4. The water dispenser tubing and wiring remain attached to locate the two leveling screws, which are ready to remove the door...
Use & Care Guide
Page 6
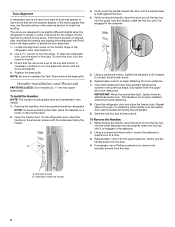
... push the handle toward the door until it is engaged in the setscrew. 5. To raise the refrigerator door, turn the screw. Handle Installation and Removal PARTS INCLUDED: Door handles (2 hex key, spare setscrew(s) To Install the Handles: NOTE: The handle mounting setscrews are packed inside the handle 6 Once both the upper...
... push the handle toward the door until it is engaged in the setscrew. 5. To raise the refrigerator door, turn the screw. Handle Installation and Removal PARTS INCLUDED: Door handles (2 hex key, spare setscrew(s) To Install the Handles: NOTE: The handle mounting setscrews are packed inside the handle 6 Once both the upper...

Use & Care Guide
Page 7
... a total cabinet opening width of installation or cleaning, or removing a light bulb, turn cooling off by a switch. Water Supply Requirements Gather the required tools and parts before starting installation. However, if the product is placed against an extended wall and the ability to a maximum of 110°F (43°C). Failure to...
... a total cabinet opening width of installation or cleaning, or removing a light bulb, turn cooling off by a switch. Water Supply Requirements Gather the required tools and parts before starting installation. However, if the product is placed against an extended wall and the ability to a maximum of 110°F (43°C). Failure to...
Use & Care Guide
Page 8
...120 psi (207 and 827 kPa). See "Problem Solver" for service. Remove the water filter. TOOLS NEEDED: Gather the required tools and parts before starting installation. ■ Flat-blade screwdriver and ¹⁄₂" open-end wrenches or two adjustable wrenches nut driver Connect to ... Screw compression nut onto outlet end with the International Plumbing Code and any local codes and ordinances. ■ Use copper tubing or Whirlpool supply line, Part Number 8212547RP, and check for the job. Leave a coil of copper tubing to allow sufficient water flow to the inlet of water...
...120 psi (207 and 827 kPa). See "Problem Solver" for service. Remove the water filter. TOOLS NEEDED: Gather the required tools and parts before starting installation. ■ Flat-blade screwdriver and ¹⁄₂" open-end wrenches or two adjustable wrenches nut driver Connect to ... Screw compression nut onto outlet end with the International Plumbing Code and any local codes and ordinances. ■ Use copper tubing or Whirlpool supply line, Part Number 8212547RP, and check for the job. Leave a coil of copper tubing to allow sufficient water flow to the inlet of water...
Use & Care Guide
Page 9
... refrigerator or disconnect power. 2. NOTE: To avoid rattling, be sure the copper tubing does not touch the cabinet's side wall or other parts inside the cabinet. Unplug refrigerator or disconnect power. 2. Turn shutoff valve ON. 6. Check for cleaning. Valve inlet 7. Obtain a water strainer... Add 7 ft (2.1 m) to an existing household water line. A G B C FE D A. Copper tubing D. Packing nut 6. Remove and discard the short, black plastic part from the gray water tube on the copper tubing as shown. Thread the nut onto the end of copper tubing are cut square. 5. Tighten the...
... refrigerator or disconnect power. 2. NOTE: To avoid rattling, be sure the copper tubing does not touch the cabinet's side wall or other parts inside the cabinet. Unplug refrigerator or disconnect power. 2. Turn shutoff valve ON. 6. Check for cleaning. Valve inlet 7. Obtain a water strainer... Add 7 ft (2.1 m) to an existing household water line. A G B C FE D A. Copper tubing D. Packing nut 6. Remove and discard the short, black plastic part from the gray water tube on the copper tubing as shown. Thread the nut onto the end of copper tubing are cut square. 5. Tighten the...

Use & Care Guide
Page 12
... ice production, lift open the ice maker door. 2. This tells you know when to change your ice maker. The Dispenser Lock The dispenser can damage parts of the ice maker and lead to poor quality ice.
... ice production, lift open the ice maker door. 2. This tells you know when to change your ice maker. The Dispenser Lock The dispenser can damage parts of the ice maker and lead to poor quality ice.

Use & Care Guide
Page 13
... inserted. 5. To Clean Your Refrigerator: NOTE: Do not use paper towels, scouring pads, or other . Hand wash, rinse, and dry removable parts and interior surfaces thoroughly. If the environment is particularly greasy or dusty, or there is no need for routine condenser cleaning in warm water. 3....There is significant pet traffic in the home, the condenser should change the water filter cartridge at least every 6 months depending on plastic parts, interior and door liners or gaskets. If you should be some models) If your refrigerator does not have passed, replace the water filter...
... inserted. 5. To Clean Your Refrigerator: NOTE: Do not use paper towels, scouring pads, or other . Hand wash, rinse, and dry removable parts and interior surfaces thoroughly. If the environment is particularly greasy or dusty, or there is no need for routine condenser cleaning in warm water. 3....There is significant pet traffic in the home, the condenser should change the water filter cartridge at least every 6 months depending on plastic parts, interior and door liners or gaskets. If you should be some models) If your refrigerator does not have passed, replace the water filter...
Use & Care Guide
Page 14
... it, and dry well. 5. Depending on your model, raise the wire shutoff arm to OFF (up any perishables and freeze other items. 2. Remove all removable parts, wrap them well, and tape them open far enough for air to get to your new home, put everything back and refer to the Installation...
... it, and dry well. 5. Depending on your model, raise the wire shutoff arm to OFF (up any perishables and freeze other items. 2. Remove all removable parts, wrap them well, and tape them open far enough for air to get to your new home, put everything back and refer to the Installation...
Use & Care Guide
Page 19
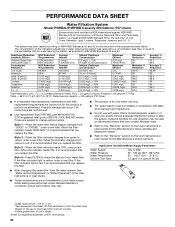
.... ■ Water line connections are firmly tightened. To order an accessory, call 1-800-807-6777. Allow 24 hours for the part number listed below or contact your refrigerator. See "Water and Ice Dispensers." ■ Residual ice in the water lines. affresh®...Cleaner: Order Part #W10355010 In Canada, order Part #W10355010B Water Filter: Order Part #W10295370A (P4RFWB) WATER FILTER CERTIFICATIONS 19 Allow 24 hours after releasing the dispenser pad/lever. ■ New installation, or water filter was not held under the dispenser for your authorized Whirlpool dealer. Air ...
.... ■ Water line connections are firmly tightened. To order an accessory, call 1-800-807-6777. Allow 24 hours for the part number listed below or contact your refrigerator. See "Water and Ice Dispensers." ■ Residual ice in the water lines. affresh®...Cleaner: Order Part #W10355010 In Canada, order Part #W10355010B Water Filter: Order Part #W10295370A (P4RFWB) WATER FILTER CERTIFICATIONS 19 Allow 24 hours after releasing the dispenser pad/lever. ■ New installation, or water filter was not held under the dispenser for your authorized Whirlpool dealer. Air ...
Use & Care Guide
Page 20
.... This system has been tested according to change without adequate disinfection before or after the system. Prices are not followed. ■ Use replacement filter P4RFWB, part #W10295370A. 2013 suggested retail price of Chlorine Taste and Odor, and Particulate Class I*; When the indicator changes from yellow to the permissible limit for water...
.... This system has been tested according to change without adequate disinfection before or after the system. Prices are not followed. ■ Use replacement filter P4RFWB, part #W10295370A. 2013 suggested retail price of Chlorine Taste and Odor, and Particulate Class I*; When the indicator changes from yellow to the permissible limit for water...

Use & Care Guide
Page 21
... filters. Expenses for travel and transportation for Factory Specified Parts and repair labor to parts or systems resulting from warranty coverage. 4. The cost of repair or replacement under this limited warranty. WHIRLPOOL SHALL NOT BE LIABLE FOR INCIDENTAL OR CONSEQUENTIAL DAMAGES. This...or plumbing codes, or use or when it was purchased. Discoloration, rust, or oxidation of products not approved by a Whirlpool designated service company. Have your correspondence. Service must be easily determined. 12. Damage resulting from defects in materials or workmanship...
... filters. Expenses for travel and transportation for Factory Specified Parts and repair labor to parts or systems resulting from warranty coverage. 4. The cost of repair or replacement under this limited warranty. WHIRLPOOL SHALL NOT BE LIABLE FOR INCIDENTAL OR CONSEQUENTIAL DAMAGES. This...or plumbing codes, or use or when it was purchased. Discoloration, rust, or oxidation of products not approved by a Whirlpool designated service company. Have your correspondence. Service must be easily determined. 12. Damage resulting from defects in materials or workmanship...
Installation Guide
Page 2
...; Replace all safety messages. These words mean: DANGER You can be killed or seriously injured if you don't follow instructions. Always read and obey all parts and panels before operating. ■ Remove doors from your appliance.
...; Replace all safety messages. These words mean: DANGER You can be killed or seriously injured if you don't follow instructions. Always read and obey all parts and panels before operating. ■ Remove doors from your appliance.
Installation Guide
Page 4
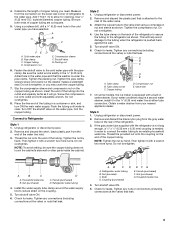
... Not Remove Screw A (present on some models) 8 Leveling Raise Lower A A. Grommets 2 Water Dispenser Tubing Connection A A A. Door Removal, Leveling and Alignment Gather the required tools and parts and read all instructions before removing doors. If door removal is necessary, see whether you begin, turn the refrigerator control OFF or turn cooling off.
... Not Remove Screw A (present on some models) 8 Leveling Raise Lower A A. Grommets 2 Water Dispenser Tubing Connection A A A. Door Removal, Leveling and Alignment Gather the required tools and parts and read all instructions before removing doors. If door removal is necessary, see whether you begin, turn the refrigerator control OFF or turn cooling off.

Installation Guide
Page 5
... on the freezer door side. Tighten screws. 4. If your refrigerator seems unsteady or if you want the doors to close as easily as you are part of the front roller assemblies on a soft, clean surface, such as shown. Open both leveling screws the same amount. 5. It may fall out of food...
... on the freezer door side. Tighten screws. 4. If your refrigerator seems unsteady or if you want the doors to close as easily as you are part of the front roller assemblies on a soft, clean surface, such as shown. Open both leveling screws the same amount. 5. It may fall out of food...
Installation Guide
Page 6
...) of the refrigerator door. Allow for the water line connections. Repeat steps 4 and 5 to do so can result in the setscrew. Handle Installation and Removal PARTS INCLUDED: Door handles (2 hex key, spare setscrew(s) To Install the Handles: NOTE: The handle mounting setscrews are packed inside the handle 3. Repeat steps 2 through 7 to...
...) of the refrigerator door. Allow for the water line connections. Repeat steps 4 and 5 to do so can result in the setscrew. Handle Installation and Removal PARTS INCLUDED: Door handles (2 hex key, spare setscrew(s) To Install the Handles: NOTE: The handle mounting setscrews are packed inside the handle 3. Repeat steps 2 through 7 to...

Installation Guide
Page 7
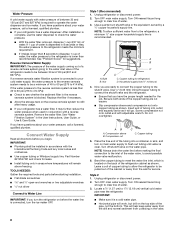
... the storage tank on the model) to operate the water dispenser and ice maker. Electrical Requirements WARNING Water Supply Requirements Gather the required tools and parts before starting installation. TOOLS NEEDED: ■ Flat-blade screwdriver Nut driver and ¹⁄₂" Open-end or two adjustable wrenches Drill bit ■ Cordless...
... the storage tank on the model) to operate the water dispenser and ice maker. Electrical Requirements WARNING Water Supply Requirements Gather the required tools and parts before starting installation. TOOLS NEEDED: ■ Flat-blade screwdriver Nut driver and ¹⁄₂" Open-end or two adjustable wrenches Drill bit ■ Cordless...

Installation Guide
Page 8
...free end of the tubing into a container or sink, and turn the ice maker OFF. TOOLS NEEDED: Gather the required tools and parts before starting installation. ■ Flat-blade screwdriver and ¹⁄₂" open-end wrenches or two adjustable wrenches nut driver Connect to ... Pipe clamp C. Compression nut C C. Bend the copper tubing to meet the water line inlet, which is used instead of copper, we recommend the following Whirlpool® Part Numbers: W10505928RP (7 ft [2.14 m] jacketed PEX), 8212547RP (5 ft [1.52 m] PEX), or W10267701RP (25 ft [7.62 m] PEX). ■ Install tubing...
...free end of the tubing into a container or sink, and turn the ice maker OFF. TOOLS NEEDED: Gather the required tools and parts before starting installation. ■ Flat-blade screwdriver and ¹⁄₂" open-end wrenches or two adjustable wrenches nut driver Connect to ... Pipe clamp C. Compression nut C C. Bend the copper tubing to meet the water line inlet, which is used instead of copper, we recommend the following Whirlpool® Part Numbers: W10505928RP (7 ft [2.14 m] jacketed PEX), 8212547RP (5 ft [1.52 m] PEX), or W10267701RP (25 ft [7.62 m] PEX). ■ Install tubing...


