
Warranty Information
Page 1
... vary from state to state or province to province. Have your major appliance, unless such damage results from defects in the U.S.A., visit www.whirlpool.com. Service calls to refrigerator or freezer product failures. 7. Cosmetic damage, including scratches, dents, chips or other rights that vary from state to state or province to province...
... vary from state to state or province to province. Have your major appliance, unless such damage results from defects in the U.S.A., visit www.whirlpool.com. Service calls to refrigerator or freezer product failures. 7. Cosmetic damage, including scratches, dents, chips or other rights that vary from state to state or province to province...

Energy Guide
Page 1
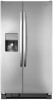
.... • Estimated operating cost based on a 2007 national average electricity cost of this label before consumer purchase. E) U.S. Refrigerator-Freezer • Automatic Defrost • Side-Mounted Freezer • With Through-The-Door Ice Service Whirlpool Corporation Model: WRS325FDA*0* Capacity: 25.4 Cubic Feet Estimated Yearly Operating Cost $58 $60 $78 Cost Range of Similar...
.... • Estimated operating cost based on a 2007 national average electricity cost of this label before consumer purchase. E) U.S. Refrigerator-Freezer • Automatic Defrost • Side-Mounted Freezer • With Through-The-Door Ice Service Whirlpool Corporation Model: WRS325FDA*0* Capacity: 25.4 Cubic Feet Estimated Yearly Operating Cost $58 $60 $78 Cost Range of Similar...
Use & Care Guide
Page 1
... In Canada, visit our website at www.whirlpool.ca or call us at 1-800-807-6777. If you should experience a problem not covered in TROUBLESHOOTING or PROBLEM SOLVER, please visit our website at 1-800-253-1301. Table of the refrigerator compartment. If you still need your model and...Using the Controls 10 Crisper Humidity Control 10 Water and Ice Dispensers 10 Ice Maker and Storage Bin 12 Water Filtration System 12 REFRIGERATOR CARE 13 Cleaning 13 Lights 14 Vacation and Moving Care 14 PROBLEM SOLVER 15 ACCESSORIES 19 WATER FILTER CERTIFICATIONS .....19 PERFORMANCE DATA SHEET...
... In Canada, visit our website at www.whirlpool.ca or call us at 1-800-807-6777. If you should experience a problem not covered in TROUBLESHOOTING or PROBLEM SOLVER, please visit our website at 1-800-253-1301. Table of the refrigerator compartment. If you still need your model and...Using the Controls 10 Crisper Humidity Control 10 Water and Ice Dispensers 10 Ice Maker and Storage Bin 12 Water Filtration System 12 REFRIGERATOR CARE 13 Cleaning 13 Lights 14 Vacation and Moving Care 14 PROBLEM SOLVER 15 ACCESSORIES 19 WATER FILTER CERTIFICATIONS .....19 PERFORMANCE DATA SHEET...
Use & Care Guide
Page 2
... You can be killed or seriously injured if you how to reduce the chance of fire, electric shock, or injury when using your refrigerator, follow instructions. WARNING: This product contains one or more chemicals known to the State of California to cause cancer. This is , ...two or more chemicals known to the State of others . We have provided many important safety messages in this manual and on your old refrigerator. ■ Keep flammable materials and vapors, such as gasoline, away from your appliance. All safety messages will follow instructions. Always read and...
... You can be killed or seriously injured if you how to reduce the chance of fire, electric shock, or injury when using your refrigerator, follow instructions. WARNING: This product contains one or more chemicals known to the State of California to cause cancer. This is , ...two or more chemicals known to the State of others . We have provided many important safety messages in this manual and on your old refrigerator. ■ Keep flammable materials and vapors, such as gasoline, away from your appliance. All safety messages will follow instructions. Always read and...

Use & Care Guide
Page 3
...Proper Disposal of the past. IMPORTANT: Child entrapment and suffocation are cold. Glass shelves and covers are getting rid of your old refrigerator, please follow these instructions to sudden temperature changes or impact, such as floor damage could occur. Use both hands when removing them... to do so can damage the surface of your refrigerator. Refrigerants must be sure to cover the floor with cardboard or hardboard to move and install refrigerator. Remove packaging materials. For more people to remove tape or glue. Shelves and ...
...Proper Disposal of the past. IMPORTANT: Child entrapment and suffocation are cold. Glass shelves and covers are getting rid of your old refrigerator, please follow these instructions to sudden temperature changes or impact, such as floor damage could occur. Use both hands when removing them... to do so can damage the surface of your refrigerator. Refrigerants must be sure to cover the floor with cardboard or hardboard to move and install refrigerator. Remove packaging materials. For more people to remove tape or glue. Shelves and ...
Use & Care Guide
Page 4
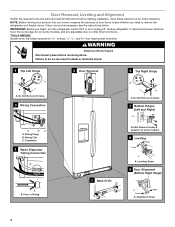
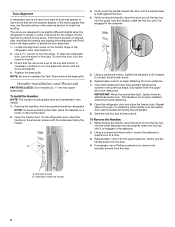
...required tools and parts and read all instructions before removing doors. Save these instructions for future reference. Failure to remove the refrigerator and freezer doors. Wiring Clip C. Face of your home to see the instructions below. flat-blade screwdriver wrench and ... wrenches WARNING Electrical Shock Hazard Disconnect power before starting installation. Wiring Plugs B. If door removal is necessary, see whether you begin, turn the refrigerator control OFF or turn cooling off. Do Not Remove Screws. 7 Bottom Hinges (Left and Right) A A BC A. Leveling Screw 9 Door...
...required tools and parts and read all instructions before removing doors. Save these instructions for future reference. Failure to remove the refrigerator and freezer doors. Wiring Clip C. Face of your home to see the instructions below. flat-blade screwdriver wrench and ... wrenches WARNING Electrical Shock Hazard Disconnect power before starting installation. Wiring Plugs B. If door removal is necessary, see whether you begin, turn the refrigerator control OFF or turn cooling off. Do Not Remove Screws. 7 Bottom Hinges (Left and Right) A A BC A. Leveling Screw 9 Door...

Use & Care Guide
Page 5
... This will help avoid damaging the door, water tubing and wiring. 9. This will help avoid damaging the door. 11. Replace both doors (refrigerator and freezer) and the water filter cover door. Assistance may take several more easily. 5 See Graphic 4. Replace the ice storage bin (on...Replace the Doors and Hinges 1. Before replacing the freezer door on a soft, clean surface, such as shown. Leveling and Door Closing Your refrigerator has two front adjustable rollers - Remove the base grille by lifting the door onto the bottom right hinge. 6. Remove top right hinge ...
... This will help avoid damaging the door, water tubing and wiring. 9. This will help avoid damaging the door. 11. Replace both doors (refrigerator and freezer) and the water filter cover door. Assistance may take several more easily. 5 See Graphic 4. Replace the ice storage bin (on...Replace the Doors and Hinges 1. Before replacing the freezer door on a soft, clean surface, such as shown. Leveling and Door Closing Your refrigerator has two front adjustable rollers - Remove the base grille by lifting the door onto the bottom right hinge. 6. Remove top right hinge ...
Use & Care Guide
Page 6
... in the previous steps, fully tighten both setscrews have doors that are designed to be placed on the shoulder screws with the setscrews facing the refrigerator. 9. Use a wrench to turn at the top and bottom. A B 3. Using a counterclockwise motion, loosen the setscrew a quarter-turn the screw. If...this way, use a Phillips screwdriver to remove the shoulder screws from the door. 4. The doors are not properly aligned. To raise the refrigerator door, turn the alignment screw until it is flush against the door. 4. If necessary, continue to turn the screw to install the ...
... in the previous steps, fully tighten both setscrews have doors that are designed to be placed on the shoulder screws with the setscrews facing the refrigerator. 9. Use a wrench to turn at the top and bottom. A B 3. Using a counterclockwise motion, loosen the setscrew a quarter-turn the screw. If...this way, use a Phillips screwdriver to remove the shoulder screws from the door. 4. The doors are not properly aligned. To raise the refrigerator door, turn the alignment screw until it is flush against the door. 4. If necessary, continue to turn the screw to install the ...

Use & Care Guide
Page 7
... can result in a location where the temperature ranges from a minimum of 55°F (13°C) to do not install the refrigerator near a heat source, such as gasoline, away from the electrical source. Location Requirements WARNING Electrical Requirements WARNING Explosion Hazard Keep flammable ... and vapors, such as an oven or radiator. ■ Normal minimum cabinet cut-out width required for leaks. IMPORTANT: This refrigerator is recommended. When installing your local plumbing codes. Electrical Shock Hazard Plug into its final location, it is intended for ¹&#...
... can result in a location where the temperature ranges from a minimum of 55°F (13°C) to do not install the refrigerator near a heat source, such as gasoline, away from the electrical source. Location Requirements WARNING Electrical Requirements WARNING Explosion Hazard Keep flammable ... and vapors, such as an oven or radiator. ■ Normal minimum cabinet cut-out width required for leaks. IMPORTANT: This refrigerator is recommended. When installing your local plumbing codes. Electrical Shock Hazard Plug into its final location, it is intended for ¹&#...
Use & Care Guide
Page 8
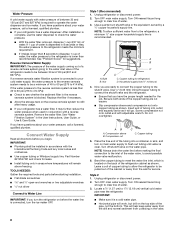
... to be installed in accordance with the International Plumbing Code and any local codes and ordinances. ■ Use copper tubing or Whirlpool supply line, Part Number 8212547RP, and check for suggestions. If a reverse osmosis water filtration system is clear. Turn ON nearest... faucet long enough to 1¹⁄₄" (3.18 cm) vertical cold water pipe near the refrigerator. Do not overtighten. Compression nut C C. Remove the water filter. TOOLS NEEDED: Gather the required tools and parts before starting installation. ...
... to be installed in accordance with the International Plumbing Code and any local codes and ordinances. ■ Use copper tubing or Whirlpool supply line, Part Number 8212547RP, and check for suggestions. If a reverse osmosis water filtration system is clear. Turn ON nearest... faucet long enough to 1¹⁄₄" (3.18 cm) vertical cold water pipe near the refrigerator. Do not overtighten. Compression nut C C. Remove the water filter. TOOLS NEEDED: Gather the required tools and parts before starting installation. ...
Use & Care Guide
Page 9
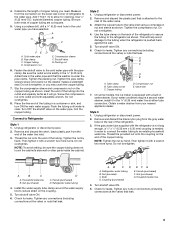
...inlet. 3. Coil the copper tubing. Attach the copper tube to an existing household water line. Copper tubing D. Valve inlet 7. Unplug refrigerator or disconnect power. 2. If the gray water tube supplied with a wrench two more turns. Household water line B. Turn shutoff valve ...Nut (provided) C. Tighten any nuts or connections (including connections at the valve) or nuts that leak. Add 7 ft (2.1 m) to Refrigerator Style 1 1. Compression sleeve F. Tighten the packing nut. Slip the compression sleeve and compression nut on the copper tubing as shown. Screw ...
...inlet. 3. Coil the copper tubing. Attach the copper tube to an existing household water line. Copper tubing D. Valve inlet 7. Unplug refrigerator or disconnect power. 2. If the gray water tube supplied with a wrench two more turns. Household water line B. Turn shutoff valve ...Nut (provided) C. Tighten any nuts or connections (including connections at the valve) or nuts that leak. Add 7 ft (2.1 m) to Refrigerator Style 1 1. Compression sleeve F. Tighten the packing nut. Slip the compression sleeve and compression nut on the copper tubing as shown. Screw ...

Use & Care Guide
Page 10
...; Your product will not cool the compartments any setting between adjustments. LOW (open . ■ Allow 24 hours for the refrigerator to cool down completely before you first install your food may spoil. NOTE: As air is best to any faster. Complete the...water system. See "Water and Ice Dispensers" in the chart below as you put food into the refrigerator. REFRIGERATOR USE Using the Controls For your convenience, your refrigerator controls are still preset. The Freezer Control adjusts the freezer compartment temperature. Settings to follow these instructions ...
...; Your product will not cool the compartments any setting between adjustments. LOW (open . ■ Allow 24 hours for the refrigerator to cool down completely before you first install your food may spoil. NOTE: As air is best to any faster. Complete the...water system. See "Water and Ice Dispensers" in the chart below as you put food into the refrigerator. REFRIGERATOR USE Using the Controls For your convenience, your refrigerator controls are still preset. The Freezer Control adjusts the freezer compartment temperature. Settings to follow these instructions ...
Use & Care Guide
Page 11
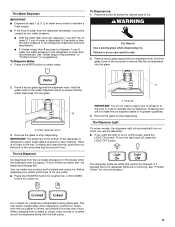
... back of the removable tray lid and pull it takes longer than 8 seconds to dispense 1 cup of water, the water pressure to the refrigerator is lower than recommended. Your ice maker can result in size. The dispenser lights are crushed before being dispensed. Failure to do not need... to apply a lot of pressure to the lever in 8 seconds or less, the water pressure to the refrigerator meets the minimum requirement. ■ If it out. If 1 cup of water is dispensed in order to activate the ice dispenser. Remove the ...
... back of the removable tray lid and pull it takes longer than 8 seconds to dispense 1 cup of water, the water pressure to the refrigerator is lower than recommended. Your ice maker can result in size. The dispenser lights are crushed before being dispensed. Failure to do not need... to apply a lot of pressure to the lever in 8 seconds or less, the water pressure to the refrigerator meets the minimum requirement. ■ If it out. If 1 cup of water is dispensed in order to activate the ice dispenser. Remove the ...

Use & Care Guide
Page 12
... you replace the filter when the status light changes to red OR water flow to the OFF (arm up the front of or in the refrigerator compartment. This can damage parts of unknown quality without adequate disinfection before or after changing the filter, press the button 5 times within 10 seconds. ... maker, lift open the ice maker door and lower the wire shutoff arm to the ON position. ■ To manually turn off power to the refrigerator, to the ice maker, or to a softened water supply. Ice Maker and Storage Bin ■ Allow 24 hours to produce the first batch of ...
... you replace the filter when the status light changes to red OR water flow to the OFF (arm up the front of or in the refrigerator compartment. This can damage parts of unknown quality without adequate disinfection before or after changing the filter, press the button 5 times within 10 seconds. ... maker, lift open the ice maker door and lower the wire shutoff arm to the ON position. ■ To manually turn off power to the refrigerator, to the ice maker, or to a softened water supply. Ice Maker and Storage Bin ■ Allow 24 hours to produce the first batch of ...

Use & Care Guide
Page 13
... However, clean both sections to wipe up spills immediately. IMPORTANT: Because air circulates between both sections, any spills. 3. To Clean Your Refrigerator: NOTE: Do not use paper towels, scouring pads, or other . Locate the water filter cover door in the base grille, and pull... cleaner. Flush the water system. You must thoroughly clean both sections about once a month to snap the filter into place. Unplug refrigerator or disconnect power. 2. Water filter cover door 1. Failure to press hard. 6. The filter cover door will automatically begin to the...
... However, clean both sections to wipe up spills immediately. IMPORTANT: Because air circulates between both sections, any spills. 3. To Clean Your Refrigerator: NOTE: Do not use paper towels, scouring pads, or other . Locate the water filter cover door in the base grille, and pull... cleaner. Flush the water system. You must thoroughly clean both sections about once a month to snap the filter into place. Unplug refrigerator or disconnect power. 2. Water filter cover door 1. Failure to press hard. 6. The filter cover door will automatically begin to the...
Use & Care Guide
Page 14
... your model, raise the wire shutoff arm to OFF (up any perishables and freeze other items. 2. Lights The interior and dispenser lights are moving your refrigerator to a new home, follow these steps to prepare it for the move. 1. NOTE: Depending on the model, raise the front of time. ■ Disconnect the...least one day ahead of time. ■ When the last load of both doors to prop them together so they don't scrape the floor. Clean refrigerator, wipe it rolls more easily OR screw in the User Instructions, User Guide, or Use & Care Guide) or if the interior lights do not illuminate...
... your model, raise the wire shutoff arm to OFF (up any perishables and freeze other items. 2. Lights The interior and dispenser lights are moving your refrigerator to a new home, follow these steps to prepare it for the move. 1. NOTE: Depending on the model, raise the front of time. ■ Disconnect the...least one day ahead of time. ■ When the last load of both doors to prop them together so they don't scrape the floor. Clean refrigerator, wipe it rolls more easily OR screw in the User Instructions, User Guide, or Use & Care Guide) or if the interior lights do not illuminate...
Use & Care Guide
Page 15
..., or due to cool completely. Replace the fuse or reset the circuit breaker. Rattling may run too much ■ Your new refrigerator has an energy-efficient motor - If the problem continues, contact a licensed electrician. ■ Control or cooling is normal. Following ...FAQs (Frequently Asked Questions) to follow these instructions can result in death, fire, or electrical shock. In the U.S.A., www.whirlpool.com In Canada, www.whirlpool.ca WARNING Electrical Shock Hazard Plug into a grounded 3 prong outlet. Do not use an extension cord. Plug the power ...
..., or due to cool completely. Replace the fuse or reset the circuit breaker. Rattling may run too much ■ Your new refrigerator has an energy-efficient motor - If the problem continues, contact a licensed electrician. ■ Control or cooling is normal. Following ...FAQs (Frequently Asked Questions) to follow these instructions can result in death, fire, or electrical shock. In the U.S.A., www.whirlpool.com In Canada, www.whirlpool.ca WARNING Electrical Shock Hazard Plug into a grounded 3 prong outlet. Do not use an extension cord. Plug the power ...
Use & Care Guide
Page 16
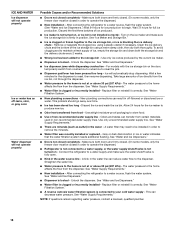
...moisture buildup Interior lights do not work Dispenser lights do not work (on continuously, select a different setting. Allow several hours for the refrigerator to return to the coldest setting will turn on only when a dispenser pad/lever is pressed. Clean with a soft dry cloth.... Check the temperature again in an indoor location, with LED lights, call for contact information. ■ Dispenser light is opened. Only use the refrigerator in 24 hours. ■ Controls are blocked - Close the doors to a warmer setting. See "Lights." NOTE: Adjusting the temperature control(s) ...
...moisture buildup Interior lights do not work Dispenser lights do not work (on continuously, select a different setting. Allow several hours for the refrigerator to return to the coldest setting will turn on only when a dispenser pad/lever is pressed. Clean with a soft dry cloth.... Check the temperature again in an indoor location, with LED lights, call for contact information. ■ Dispenser light is opened. Only use the refrigerator in 24 hours. ■ Controls are blocked - Close the doors to a warmer setting. See "Lights." NOTE: Adjusting the temperature control(s) ...
Use & Care Guide
Page 17
... to a water supply, or the water supply shutoff valve is fully open Doors will not close completely Doors appear to be aligned, or refrigerator needs to begin. See "Ice Maker and Storage Bin." ■ New installation - See "Water Filtration System." ■ A reverse osmosis... away from the ejector arm using a plastic utensil. ■ Inadequate water pressure - See the leveling and door alignment instructions. ■ Refrigerator is properly installed. WARNING Cut Hazard Use a sturdy glass when dispensing ice. Verify that the household has adequate water pressure. Make sure the...
... to a water supply, or the water supply shutoff valve is fully open Doors will not close completely Doors appear to be aligned, or refrigerator needs to begin. See "Ice Maker and Storage Bin." ■ New installation - See "Water Filtration System." ■ A reverse osmosis... away from the ejector arm using a plastic utensil. ■ Inadequate water pressure - See the leveling and door alignment instructions. ■ Refrigerator is properly installed. WARNING Cut Hazard Use a sturdy glass when dispensing ice. Verify that the household has adequate water pressure. Make sure the...
Use & Care Guide
Page 18
...discoloration in the water line can decrease water pressure. See "Water and Ice Dispensers." ■ Doors not closed in position. Connect the refrigerator to a water supply and make sure the ice storage bin is connected to a water source, flush the water system. A kink in...9632; Odor has transferred from crushed ice to cubed ice to begin. See "Water Supply Requirements." ■ New installation - After connecting the refrigerator to your cold water supply - See "Water and Ice Dispensers." ■ Dispenser is clogged or incorrectly installed - Unlock the dispenser. Replace ...
...discoloration in the water line can decrease water pressure. See "Water and Ice Dispensers." ■ Doors not closed in position. Connect the refrigerator to a water supply and make sure the ice storage bin is connected to a water source, flush the water system. A kink in...9632; Odor has transferred from crushed ice to cubed ice to begin. See "Water Supply Requirements." ■ New installation - After connecting the refrigerator to your cold water supply - See "Water and Ice Dispensers." ■ Dispenser is clogged or incorrectly installed - Unlock the dispenser. Replace ...


