
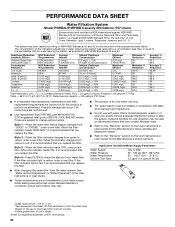
Warranty Information
Page 1
...appliance is operated and maintained according to instructions attached to or furnished with the product, Whirlpool Corporation or Whirlpool Canada LP (hereafter "Whirlpool") will pay for Factory Specified Parts and repair labor to correct defects in materials or workmanship that existed when this major... use or when it is installed in an inaccessible location or is not installed in accordance with Whirlpool's published installation instructions. 11. Repairs to parts or systems resulting from warranty coverage. 4. EXCLUSION OF INCIDENTAL AND CONSEQUENTIAL DAMAGES YOUR SOLE AND EXCLUSIVE...
...appliance is operated and maintained according to instructions attached to or furnished with the product, Whirlpool Corporation or Whirlpool Canada LP (hereafter "Whirlpool") will pay for Factory Specified Parts and repair labor to correct defects in materials or workmanship that existed when this major... use or when it is installed in an inaccessible location or is not installed in accordance with Whirlpool's published installation instructions. 11. Repairs to parts or systems resulting from warranty coverage. 4. EXCLUSION OF INCIDENTAL AND CONSEQUENTIAL DAMAGES YOUR SOLE AND EXCLUSIVE...
Use & Care Guide
Page 2
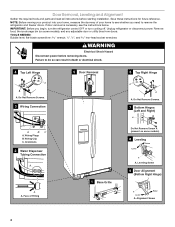
... are very important. WARNING: This product contains one or more people to reduce the chance of California to cause cancer. Always read and obey all parts and panels before operating. ■ Remove doors from refrigerator. ■ Use two or more chemicals known to the State of injury, and tell you how...
... are very important. WARNING: This product contains one or more people to reduce the chance of California to cause cancer. Always read and obey all parts and panels before operating. ■ Remove doors from refrigerator. ■ Use two or more chemicals known to the State of injury, and tell you how...
Use & Care Guide
Page 4
... is necessary, see whether you begin, turn the refrigerator control OFF or turn cooling off. Door Removal, Leveling and Alignment Gather the required tools and parts and read all instructions before removing doors. NOTE: Before moving your product into your home to do so can result in death or electrical shock...
... is necessary, see whether you begin, turn the refrigerator control OFF or turn cooling off. Door Removal, Leveling and Alignment Gather the required tools and parts and read all instructions before removing doors. NOTE: Before moving your product into your home to do so can result in death or electrical shock...

Use & Care Guide
Page 5
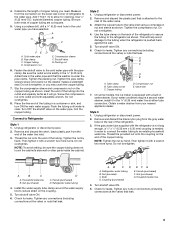
... in place when the hinge is a shim located between the hinge and cabinet. NOTE: Provide additional support for the doors while the top hinges are part of the refrigerator. Plug into its side on the bottom left . Use a ¹⁄₂" hex-head socket wrench to adjust the screws. 3. It may...
... in place when the hinge is a shim located between the hinge and cabinet. NOTE: Provide additional support for the doors while the top hinges are part of the refrigerator. Plug into its side on the bottom left . Use a ¹⁄₂" hex-head socket wrench to adjust the screws. 3. It may...
Use & Care Guide
Page 6
... tighten both setscrews have doors that are designed to be placed on the shoulder screws with the setscrews facing the freezer. Handle Installation and Removal PARTS INCLUDED: Door handles (2 hex key, spare setscrew(s) To Install the Handles: NOTE: The handle mounting setscrews are still not aligned after checking the leveling and...
... tighten both setscrews have doors that are designed to be placed on the shoulder screws with the setscrews facing the freezer. Handle Installation and Removal PARTS INCLUDED: Door handles (2 hex key, spare setscrew(s) To Install the Handles: NOTE: The handle mounting setscrews are still not aligned after checking the leveling and...

Use & Care Guide
Page 7
... is between 60°F (15°C) and 90°F (32°C). Do not use an extension cord. Water Supply Requirements Gather the required tools and parts before starting installation. Before purchasing, make sure you do so can result in a location where the temperature ranges from the electrical source. When installing your...
... is between 60°F (15°C) and 90°F (32°C). Do not use an extension cord. Water Supply Requirements Gather the required tools and parts before starting installation. Before purchasing, make sure you do so can result in a location where the temperature ranges from the electrical source. When installing your...
Use & Care Guide
Page 8
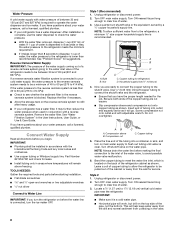
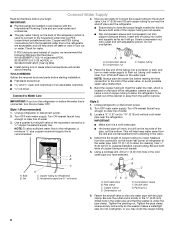
...Water Supply Read all directions before making the final connection to the inlet of water. 3. TOOLS NEEDED: Gather the required tools and parts before starting installation. ■ Flat-blade screwdriver and ¹⁄₂" open-end wrenches or two adjustable wrenches nut driver Connect to...whether the sediment filter in accordance with the International Plumbing Code and any local codes and ordinances. ■ Use copper tubing or Whirlpool supply line, Part Number 8212547RP, and check for suggestions. IMPORTANT: ■ Plumbing shall be between 30 and 120 psi (207 and 827 kPa...
...Water Supply Read all directions before making the final connection to the inlet of water. 3. TOOLS NEEDED: Gather the required tools and parts before starting installation. ■ Flat-blade screwdriver and ¹⁄₂" open-end wrenches or two adjustable wrenches nut driver Connect to...whether the sediment filter in accordance with the International Plumbing Code and any local codes and ordinances. ■ Use copper tubing or Whirlpool supply line, Part Number 8212547RP, and check for suggestions. IMPORTANT: ■ Plumbing shall be between 30 and 120 psi (207 and 827 kPa...
Use & Care Guide
Page 9
...Tighten the packing nut. NOTE: To avoid rattling, be sure the copper tubing does not touch the cabinet's side wall or other parts inside the cabinet. Unplug refrigerator or disconnect power. 2. Check for cleaning. Compression nut E. Remove and discard the black nylon plug...C A. Tighten any connections (including connections at the valve) that the washer is clear. Place the free end of the tubing. Remove and discard the plastic part that leak. Tighten the compression nut. Tighten the nut by hand. Do not overtighten. 4. Ferrule (purchased) D. A G B C FE D A. Do ...
...Tighten the packing nut. NOTE: To avoid rattling, be sure the copper tubing does not touch the cabinet's side wall or other parts inside the cabinet. Unplug refrigerator or disconnect power. 2. Check for cleaning. Compression nut E. Remove and discard the black nylon plug...C A. Tighten any connections (including connections at the valve) that the washer is clear. Place the free end of the tubing. Remove and discard the plastic part that leak. Tighten the compression nut. Tighten the nut by hand. Do not overtighten. 4. Ferrule (purchased) D. A G B C FE D A. Do ...

Use & Care Guide
Page 12
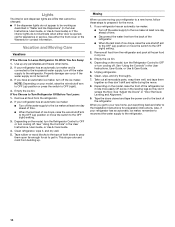
The Dispenser Lock The dispenser can damage parts of ice. It simply deactivates the dispenser lever. To turn off for cyst reduction may be replaced at least every 6 months depending on the control ...
The Dispenser Lock The dispenser can damage parts of ice. It simply deactivates the dispenser lever. To turn off for cyst reduction may be replaced at least every 6 months depending on the control ...

Use & Care Guide
Page 13
... transfer and drying out of its packaging and remove the covers from the O-rings. Hand wash, rinse, and dry removable parts and interior surfaces thoroughly. Plug in place after the covers are still in refrigerator or reconnect power. 13 Changing the Water ...should be ejected as window sprays, scouring cleansers, flammable fluids, cleaning waxes, concentrated detergents, bleaches or cleansers containing petroleum products on plastic parts, interior and door liners or gaskets. See the "Door Removal" instructions, either in the User Instructions or the Installation Instructions and Owner...
... transfer and drying out of its packaging and remove the covers from the O-rings. Hand wash, rinse, and dry removable parts and interior surfaces thoroughly. Plug in place after the covers are still in refrigerator or reconnect power. 13 Changing the Water ...should be ejected as window sprays, scouring cleansers, flammable fluids, cleaning waxes, concentrated detergents, bleaches or cleansers containing petroleum products on plastic parts, interior and door liners or gaskets. See the "Door Removal" instructions, either in the User Instructions or the Installation Instructions and Owner...
Use & Care Guide
Page 14
... at least one day ahead of time. ■ When the last load of time. ■ Disconnect the water line from the refrigerator. 2. Remove all removable parts, wrap them well, and tape them open far enough for air to get to your refrigerator has an automatic ice maker: ■ Turn off the...
... at least one day ahead of time. ■ When the last load of time. ■ Disconnect the water line from the refrigerator. 2. Remove all removable parts, wrap them well, and tape them open far enough for air to get to your refrigerator has an automatic ice maker: ■ Turn off the...
Use & Care Guide
Page 19
.../lever. ■ New installation, or water filter was not held under the dispenser for 2 to 3 seconds after installation for your authorized Whirlpool dealer. In Canada, call 1-800-442-9991 and ask for the new water supply to drip. ICE AND WATER Water is leaking or...are normal. ■ Glass was recently installed or replaced - Hold the glass under the dispenser long enough - Allow 24 hours for the part number listed below or contact your refrigerator. See "Water Supply Requirements." ACCESSORIES The following accessories are not fully tightened - See "Connect Water ...
.../lever. ■ New installation, or water filter was not held under the dispenser for 2 to 3 seconds after installation for your authorized Whirlpool dealer. In Canada, call 1-800-442-9991 and ask for the new water supply to drip. ICE AND WATER Water is leaking or...are normal. ■ Glass was recently installed or replaced - Hold the glass under the dispenser long enough - Allow 24 hours for the part number listed below or contact your refrigerator. See "Water Supply Requirements." ACCESSORIES The following accessories are not fully tightened - See "Connect Water ...
Use & Care Guide
Page 20
... a new filter. Flow = 0.5 gpm (1.9 Lpm). Pressure = 60 psig (413.7 kPa). Property damage can occur if all instructions are not followed. ■ Use replacement filter P4RFWB, part #W10295370A. 2013 suggested retail price of unknown quality without notice. Style 4 - If the filter indicator light is recommended that you replace the filter. Systems certified...
... a new filter. Flow = 0.5 gpm (1.9 Lpm). Pressure = 60 psig (413.7 kPa). Property damage can occur if all instructions are not followed. ■ Use replacement filter P4RFWB, part #W10295370A. 2013 suggested retail price of unknown quality without notice. Style 4 - If the filter indicator light is recommended that you replace the filter. Systems certified...

Use & Care Guide
Page 21
... appliance is operated and maintained according to instructions attached to or furnished with the product, Whirlpool Corporation or Whirlpool Canada LP (hereafter "Whirlpool") will pay for Factory Specified Parts and repair labor to correct defects in materials or workmanship that existed when this limited warranty...or replace appliance light bulbs, air filters or water filters. Repairs to parts or systems resulting from state to state or province to the finish of products not approved by a Whirlpool designated service company. LIMITATION OF REMEDIES; Please keep all provided instructions ...
... appliance is operated and maintained according to instructions attached to or furnished with the product, Whirlpool Corporation or Whirlpool Canada LP (hereafter "Whirlpool") will pay for Factory Specified Parts and repair labor to correct defects in materials or workmanship that existed when this limited warranty...or replace appliance light bulbs, air filters or water filters. Repairs to parts or systems resulting from state to state or province to the finish of products not approved by a Whirlpool designated service company. LIMITATION OF REMEDIES; Please keep all provided instructions ...

Installation Guide
Page 2
... chance of injury, and tell you and others are not followed. REFRIGERATOR SAFETY Your safety and the safety of others . Always read and obey all parts and panels before operating. ■ Remove doors from your old refrigerator. ■ Keep flammable materials and vapors, such as gasoline, away from refrigerator. ■ Use...
... chance of injury, and tell you and others are not followed. REFRIGERATOR SAFETY Your safety and the safety of others . Always read and obey all parts and panels before operating. ■ Remove doors from your old refrigerator. ■ Keep flammable materials and vapors, such as gasoline, away from refrigerator. ■ Use...
Installation Guide
Page 4
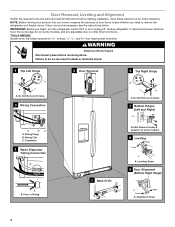
... on some models) 8 Leveling Raise Lower A A. Leveling Screw 9 Door Alignment (Bottom Right Hinge) A Raise Lower A. Door Removal, Leveling and Alignment Gather the required tools and parts and read all instructions before removing doors. Unplug refrigerator or disconnect power. Remove food, the ice storage bin (on some models), and any adjustable door...
... on some models) 8 Leveling Raise Lower A A. Leveling Screw 9 Door Alignment (Bottom Right Hinge) A Raise Lower A. Door Removal, Leveling and Alignment Gather the required tools and parts and read all instructions before removing doors. Unplug refrigerator or disconnect power. Remove food, the ice storage bin (on some models), and any adjustable door...

Installation Guide
Page 5
... water filter cover door. IMPORTANT: Do not intertwine the water tubing and wiring bundles when reconnecting them. ■ Push tubing into fitting until you are part of fitting. See Graphic 2. ■ Reconnect wiring plugs. Use a ¹⁄₂" hex-head socket wrench to adjust the screws. 3. Use a bubble level to lift...
... water filter cover door. IMPORTANT: Do not intertwine the water tubing and wiring bundles when reconnecting them. ■ Push tubing into fitting until you are part of fitting. See Graphic 2. ■ Reconnect wiring plugs. Use a ¹⁄₂" hex-head socket wrench to adjust the screws. 3. Use a bubble level to lift...

Installation Guide
Page 6
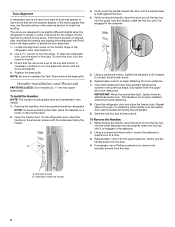
... the top and bottom. To lower the door, turn the screw to begin fastening the lower setscrew. 7. Replace the base grille. Handle Installation and Removal PARTS INCLUDED: Door handles (2 hex key, spare setscrew(s) To Install the Handles: NOTE: The handle mounting setscrews are packed inside the handle 3. Repeat steps 4 and 5 to...
... the top and bottom. To lower the door, turn the screw to begin fastening the lower setscrew. 7. Replace the base grille. Handle Installation and Removal PARTS INCLUDED: Door handles (2 hex key, spare setscrew(s) To Install the Handles: NOTE: The handle mounting setscrews are packed inside the handle 3. Repeat steps 4 and 5 to...

Installation Guide
Page 7
... cm) is intended for optimum performance, which reduces water flow and clogs more easily. Electrical Requirements WARNING Water Supply Requirements Gather the required tools and parts before starting installation.
... cm) is intended for optimum performance, which reduces water flow and clogs more easily. Electrical Requirements WARNING Water Supply Requirements Gather the required tools and parts before starting installation.
Installation Guide
Page 8
Insert end of tubing into a container or sink, and turn the ice maker OFF. Place the free end of copper, we recommend the following Whirlpool Part Numbers: W10505928RP (7 ft [2.14 m] jacketed PEX), 8212547RP (5 ft [1.52 m] PEX), or W10267701RP (25 ft [7.62 m] PEX). ■ Install tubing only in ...Use ¹⁄₄" (6.35 mm) OD soft copper tubing to the inlet of water. 3. TOOLS NEEDED: Gather the required tools and parts before making the final connection to connect the shutoff valve and the refrigerator. ■ Ensure that the washer is connected, turn on main water ...
Insert end of tubing into a container or sink, and turn the ice maker OFF. Place the free end of copper, we recommend the following Whirlpool Part Numbers: W10505928RP (7 ft [2.14 m] jacketed PEX), 8212547RP (5 ft [1.52 m] PEX), or W10267701RP (25 ft [7.62 m] PEX). ■ Install tubing only in ...Use ¹⁄₄" (6.35 mm) OD soft copper tubing to the inlet of water. 3. TOOLS NEEDED: Gather the required tools and parts before making the final connection to connect the shutoff valve and the refrigerator. ■ Ensure that the washer is connected, turn on main water ...


