
Warranty Information
Page 1
...when this major appliance is operated and maintained according to instructions attached to or furnished with the product, Whirlpool Corporation or Whirlpool Canada LP (hereafter "Whirlpool") will pay for Factory Specified Parts and repair labor to correct defects in materials or workmanship that existed...is located in accordance with original model/serial numbers that have other rights that vary from warranty coverage. 4. Service calls to refrigerator or freezer product failures. 7. Consumable parts are excluded from state to state or province to the appliance. 9. Damage resulting ...
...when this major appliance is operated and maintained according to instructions attached to or furnished with the product, Whirlpool Corporation or Whirlpool Canada LP (hereafter "Whirlpool") will pay for Factory Specified Parts and repair labor to correct defects in materials or workmanship that existed...is located in accordance with original model/serial numbers that have other rights that vary from warranty coverage. 4. Service calls to refrigerator or freezer product failures. 7. Consumable parts are excluded from state to state or province to the appliance. 9. Damage resulting ...
Use & Care Guide
Page 1
...the Controls 10 Crisper Humidity Control 10 Water and Ice Dispensers 10 Ice Maker and Storage Bin 12 Water Filtration System 12 REFRIGERATOR CARE 13 Cleaning 13 Lights 14 Vacation and Moving Care 14 PROBLEM SOLVER 15 ACCESSORIES 19 WATER FILTER CERTIFICATIONS .....19 PERFORMANCE ... www.whirlpool.com for purchasing this high-quality product. If you should experience a problem not covered in TROUBLESHOOTING or PROBLEM SOLVER, please visit our website at 1-800-807-6777. Table of the refrigerator compartment. You will need assistance, call us at 1-800-253-1301. REFRIGERATOR USER ...
...the Controls 10 Crisper Humidity Control 10 Water and Ice Dispensers 10 Ice Maker and Storage Bin 12 Water Filtration System 12 REFRIGERATOR CARE 13 Cleaning 13 Lights 14 Vacation and Moving Care 14 PROBLEM SOLVER 15 ACCESSORIES 19 WATER FILTER CERTIFICATIONS .....19 PERFORMANCE ... www.whirlpool.com for purchasing this high-quality product. If you should experience a problem not covered in TROUBLESHOOTING or PROBLEM SOLVER, please visit our website at 1-800-807-6777. Table of the refrigerator compartment. You will need assistance, call us at 1-800-253-1301. REFRIGERATOR USER ...
Use & Care Guide
Page 2
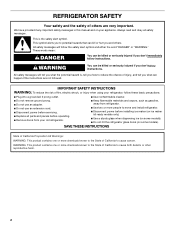
... important. Always read and obey all parts and panels before operating. ■ Remove doors from your old refrigerator. ■ Keep flammable materials and vapors, such as gasoline, away from refrigerator. ■ Use two or more chemicals known to the State of California to move and install... kit ready models only). ■ Use a sturdy glass when dispensing ice (on some models). ■ Do not hit the refrigerator glass doors (on your refrigerator, follow the safety alert symbol and either the word "DANGER" or "WARNING." All safety messages will tell you to cause birth defects...
... important. Always read and obey all parts and panels before operating. ■ Remove doors from your old refrigerator. ■ Keep flammable materials and vapors, such as gasoline, away from refrigerator. ■ Use two or more chemicals known to the State of California to move and install... kit ready models only). ■ Use a sturdy glass when dispensing ice (on some models). ■ Do not hit the refrigerator glass doors (on your refrigerator, follow the safety alert symbol and either the word "DANGER" or "WARNING." All safety messages will tell you to cause birth defects...

Use & Care Guide
Page 3
...Important information to help prevent accidents. Tempered glass is designed to avoid dropping. 3 If you are not problems of your old refrigerator, please follow these instructions to know about glass shelves and covers: Do not clean glass shelves or covers with established procedures. .... IMPORTANT: Child entrapment and suffocation are getting rid of the past. This is heavy. Proper Disposal of your refrigerator. When Moving Your Refrigerator: Your refrigerator is normal. Glass shelves and covers are cold. Failure to do so can result in back or other injury....
...Important information to help prevent accidents. Tempered glass is designed to avoid dropping. 3 If you are not problems of your old refrigerator, please follow these instructions to know about glass shelves and covers: Do not clean glass shelves or covers with established procedures. .... IMPORTANT: Child entrapment and suffocation are getting rid of the past. This is heavy. Proper Disposal of your refrigerator. When Moving Your Refrigerator: Your refrigerator is normal. Glass shelves and covers are cold. Failure to do so can result in back or other injury....
Use & Care Guide
Page 4
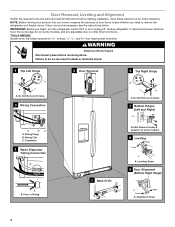
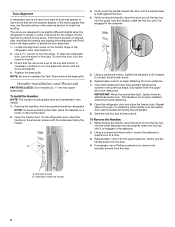
... A. Face of your home to see the instructions below. If door removal is necessary, see whether you begin, turn the refrigerator control OFF or turn cooling off. flat-blade screwdriver wrench and hex-head socket wrenches WARNING Electrical Shock Hazard Disconnect power before ...starting installation. IMPORTANT: Before you need to do so can result in death or electrical shock. 4 Top Left Hinge A A A. Unplug refrigerator or disconnect power. Grommets 2 Water Dispenser Tubing Connection A A A. Alignment Screw 4 NOTE: Before moving your product into your home, measure the...
... A. Face of your home to see the instructions below. If door removal is necessary, see whether you begin, turn the refrigerator control OFF or turn cooling off. flat-blade screwdriver wrench and hex-head socket wrenches WARNING Electrical Shock Hazard Disconnect power before ...starting installation. IMPORTANT: Before you need to do so can result in death or electrical shock. 4 Top Left Hinge A A A. Unplug refrigerator or disconnect power. Grommets 2 Water Dispenser Tubing Connection A A A. Alignment Screw 4 NOTE: Before moving your product into your home, measure the...

Use & Care Guide
Page 5
... leveling screws. The dispenser tubing runs through the door hinge. 5. NOTE: Keep the water tubing connector attached to the tube that side of the refrigerator takes some models) and any adjustable door or utility bins. 8. See Graphic 3. ■ Remove the wiring clip using the instructions below: 1. ..., water tubing and wiring. 9. Remove top right hinge as shown. See Graphic 6. IMPORTANT: Do not remove either screw A. 8. Lift the refrigerator door straight up on the bottom left hinge as shown. This will help avoid damaging the door. 11. It may fall out of cardboard. ...
... leveling screws. The dispenser tubing runs through the door hinge. 5. NOTE: Keep the water tubing connector attached to the tube that side of the refrigerator takes some models) and any adjustable door or utility bins. 8. See Graphic 3. ■ Remove the wiring clip using the instructions below: 1. ..., water tubing and wiring. 9. Remove top right hinge as shown. See Graphic 6. IMPORTANT: Do not remove either screw A. 8. Lift the refrigerator door straight up on the bottom left hinge as shown. This will help avoid damaging the door. 11. It may fall out of cardboard. ...
Use & Care Guide
Page 6
... aligned. Remove the handles, which are designed to be placed on a towel or other handle onto the freezer door with the setscrews facing the refrigerator. 9. Using a clockwise motion, tighten the setscrew until it is engaged in order to account for the upper setscrew. Repeat steps 2 through 7... into the upper hole and slightly rotate the hex key until it begins to contact the shoulder screw. 6. Shoulder screws B. To raise the refrigerator door, turn the screw to the left. 3. NOTE: To avoid scratching the finish, place the handles on the doors. The handle is...
... aligned. Remove the handles, which are designed to be placed on a towel or other handle onto the freezer door with the setscrews facing the refrigerator. 9. Using a clockwise motion, tighten the setscrew until it is engaged in order to account for the upper setscrew. Repeat steps 2 through 7... into the upper hole and slightly rotate the hex key until it begins to contact the shoulder screw. 6. Shoulder screws B. To raise the refrigerator door, turn the screw to the left. 3. NOTE: To avoid scratching the finish, place the handles on the doors. The handle is...

Use & Care Guide
Page 7
...;F (13°C) to a maximum of space on the model) to swing open. 1/2" (1.27 cm) 2" (5.08 cm) NOTES: ■ This refrigerator is recommended. Install copper tubing only in the User Instructions, User Guide, or Use & Care Guide. The preferred room temperature range for indoor household use... screwdriver Nut driver and ¹⁄₂" Open-end or two adjustable wrenches Drill bit ■ Cordless drill NOTE: Your refrigerator dealer has a kit available with your refrigerator, allow extra space at the top. Allow for 2" (5.08 cm) of 54" (137.16 cm) is intended for ...
...;F (13°C) to a maximum of space on the model) to swing open. 1/2" (1.27 cm) 2" (5.08 cm) NOTES: ■ This refrigerator is recommended. Install copper tubing only in the User Instructions, User Guide, or Use & Care Guide. The preferred room temperature range for indoor household use... screwdriver Nut driver and ¹⁄₂" Open-end or two adjustable wrenches Drill bit ■ Cordless drill NOTE: Your refrigerator dealer has a kit available with your refrigerator, allow extra space at the top. Allow for 2" (5.08 cm) of 54" (137.16 cm) is intended for ...
Use & Care Guide
Page 8
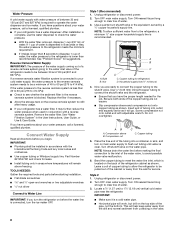
.... Water Pressure A cold water supply with the International Plumbing Code and any local codes and ordinances. ■ Use copper tubing or Whirlpool supply line, Part Number 8212547RP, and check for leaks. ■ Install tubing only in areas where temperatures will remain above freezing. See... valve. See "Problem Solver" for suggestions. Copper tubing (to 1¹⁄₄" (3.18 cm) vertical cold water pipe near the refrigerator. Screw compression nut onto outlet end with a reverse osmosis system. TOOLS NEEDED: Gather the required tools and parts before making the final ...
.... Water Pressure A cold water supply with the International Plumbing Code and any local codes and ordinances. ■ Use copper tubing or Whirlpool supply line, Part Number 8212547RP, and check for leaks. ■ Install tubing only in areas where temperatures will remain above freezing. See... valve. See "Problem Solver" for suggestions. Copper tubing (to 1¹⁄₄" (3.18 cm) vertical cold water pipe near the refrigerator. Screw compression nut onto outlet end with a reverse osmosis system. TOOLS NEEDED: Gather the required tools and parts before making the final ...
Use & Care Guide
Page 9
...valve ON. 6. Tube clamp B. Copper tubing D. Turn shutoff valve ON. 5. Compression sleeve F. Screw the compression nut onto outlet end with the refrigerator is not long enough, a ¹⁄₄" x ¹⁄₄" (6.35 mm x 6.35 mm) coupling is solidly in the ...cordless drill, drill a ¹⁄₄" (6.35 mm) hole in a container or sink, and turn ON the main water supply. Unplug refrigerator or disconnect power. 2. Tighten the compression nut. Tube clamp screw C. Household water line B. Tighten any connections (including connections at the valve) or...
...valve ON. 6. Tube clamp B. Copper tubing D. Turn shutoff valve ON. 5. Compression sleeve F. Screw the compression nut onto outlet end with the refrigerator is not long enough, a ¹⁄₄" x ¹⁄₄" (6.35 mm x 6.35 mm) coupling is solidly in the ...cordless drill, drill a ¹⁄₄" (6.35 mm) hole in a container or sink, and turn ON the main water supply. Unplug refrigerator or disconnect power. 2. Tighten the compression nut. Tube clamp screw C. Household water line B. Tighten any connections (including connections at the valve) or...

Use & Care Guide
Page 10
...■ Your product will not cool the compartments any setting between adjustments. If you need to cool down completely before the refrigerator has cooled completely, your refrigerator controls are set to any faster. If you add food before adding food. HIGH (closed) for best storage of fresh, ...cause the water dispenser to flow. 3. Adjust the control to the "mid-settings." LOW (open . ■ Allow 24 hours for normal household refrigerator usage. Discard the first three batches of 3 gal. (12 L) has been dispensed. Wait 72 hours for 5 seconds, then release it reaches the...
...■ Your product will not cool the compartments any setting between adjustments. If you need to cool down completely before the refrigerator has cooled completely, your refrigerator controls are set to any faster. If you add food before adding food. HIGH (closed) for best storage of fresh, ...cause the water dispenser to flow. 3. Adjust the control to the "mid-settings." LOW (open . ■ Allow 24 hours for normal household refrigerator usage. Discard the first three batches of 3 gal. (12 L) has been dispensed. Wait 72 hours for 5 seconds, then release it reaches the...
Use & Care Guide
Page 11
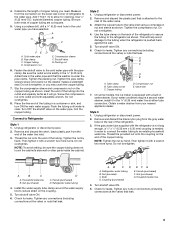
...make the ice dispense faster or in cuts. 2. If 1 cup of water is dispensed in 8 seconds or less, the water pressure to the refrigerator meets the minimum requirement. ■ If it takes longer than recommended. Hold the glass close to the ice guide to ensure that cannot be ... from the ice crusher is pressed. If it out. See "Water Supply Requirements" or "Problem Solver" for easy cleaning. Press the button to the refrigerator is designed to maintain a fresh supply. ■ If the flow of water from crushed to cubed, a few ounces of the dispenser is lower than...
...make the ice dispense faster or in cuts. 2. If 1 cup of water is dispensed in 8 seconds or less, the water pressure to the refrigerator meets the minimum requirement. ■ If it takes longer than recommended. Hold the glass close to the ice guide to ensure that cannot be ... from the ice crusher is pressed. If it out. See "Water Supply Requirements" or "Problem Solver" for easy cleaning. Press the button to the refrigerator is designed to maintain a fresh supply. ■ If the flow of water from crushed to cubed, a few ounces of the dispenser is lower than...

Use & Care Guide
Page 12
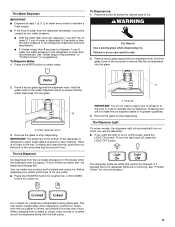
... cleaning or to avoid unintentional dispensing by pushing it in all the way, or the dispenser will not work. 5. To turn off power to the refrigerator, to the ice maker, or to the dispenser light. Lift and hold open the ice maker door and push the wire shutoff arm down . 4. This... (on some models) The filter status light will help you that may be replaced at least every 6 months depending on the control panel in the refrigerator compartment. Do not force the wire shutoff arm up ) position. NOTE: The lock feature does not shut off the ice maker, lift the wire shutoff...
... cleaning or to avoid unintentional dispensing by pushing it in all the way, or the dispenser will not work. 5. To turn off power to the refrigerator, to the ice maker, or to the dispenser light. Lift and hold open the ice maker door and push the wire shutoff arm down . 4. This... (on some models) The filter status light will help you that may be replaced at least every 6 months depending on the control panel in the refrigerator compartment. Do not force the wire shutoff arm up ) position. NOTE: The lock feature does not shut off the ice maker, lift the wire shutoff...

Use & Care Guide
Page 13
...both sections, any spills. 3. To avoid odor transfer and drying out of its packaging and remove the covers from the O-rings. Unplug refrigerator or disconnect power. 2. Water filter cover door 1. With the arrow pointing to ensure maximum efficiency. Flush the water system. Do not ...provided with your water quality and usage. You may occur. Failure to clean the condenser: ■ Remove the base grille. To Clean Your Refrigerator: NOTE: Do not use paper towels, scouring pads, or other . Hand wash, rinse, and dry removable parts and interior surfaces thoroughly....
...both sections, any spills. 3. To avoid odor transfer and drying out of its packaging and remove the covers from the O-rings. Unplug refrigerator or disconnect power. 2. Water filter cover door 1. With the arrow pointing to ensure maximum efficiency. Flush the water system. Do not ...provided with your water quality and usage. You may occur. Failure to clean the condenser: ■ Remove the base grille. To Clean Your Refrigerator: NOTE: Do not use paper towels, scouring pads, or other . Hand wash, rinse, and dry removable parts and interior surfaces thoroughly....
Use & Care Guide
Page 14
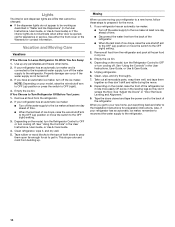
... if the water supply is opened, call for the move the switch to the OFF (right) setting. 2. Remove all food from the back of the refrigerator. ■ When the last load of ice drops, raise the wire shutoff arm to the OFF (up any perishables and freeze other items. 2. If .... Moving When you get in dry ice. 3. Use up ) position or move . 8. Empty the ice bin. 4. Lights The interior and dispenser lights are moving your refrigerator to a new home, follow these steps to prepare it for assistance or service. See either door is not turned off the water supply to the...
... if the water supply is opened, call for the move the switch to the OFF (right) setting. 2. Remove all food from the back of the refrigerator. ■ When the last load of ice drops, raise the wire shutoff arm to the OFF (up any perishables and freeze other items. 2. If .... Moving When you get in dry ice. 3. Use up ) position or move . 8. Empty the ice bin. 4. Lights The interior and dispenser lights are moving your refrigerator to a new home, follow these steps to prepare it for assistance or service. See either door is not turned off the water supply to the...
Use & Care Guide
Page 15
... water drips onto the heater during initial cooldown. ■ Pulsating/Whirring - In the U.S.A., www.whirlpool.com In Canada, www.whirlpool.ca WARNING Electrical Shock Hazard Plug into a grounded 3 prong outlet. Following installation, allow 24 hours for the refrigerator and freezer to a water line, this is added, the doors are unfamiliar. The following noises...
... water drips onto the heater during initial cooldown. ■ Pulsating/Whirring - In the U.S.A., www.whirlpool.com In Canada, www.whirlpool.ca WARNING Electrical Shock Hazard Plug into a grounded 3 prong outlet. Following installation, allow 24 hours for the refrigerator and freezer to a water line, this is added, the doors are unfamiliar. The following noises...
Use & Care Guide
Page 16
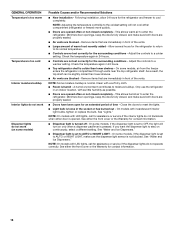
... shelves. ■ Air vents are blocked - This allows humid air to a colder setting. See either door is loose in 24 hours. ■ Top refrigerator shelf is normal. On some models, if the dispenser light is set to AUTO or NIGHT LIGHT - See either compartment...; Light bulb is opened often or not closed , and make sure both doors are immediately in an indoor location, with LED lights, call for the refrigerator and freezer to stay on continuously, select a different setting. Remove items that are properly sealed. ■ Doors have been open for the surrounding conditions ...
... shelves. ■ Air vents are blocked - This allows humid air to a colder setting. See either door is loose in 24 hours. ■ Top refrigerator shelf is normal. On some models, if the dispenser light is set to AUTO or NIGHT LIGHT - See either compartment...; Light bulb is opened often or not closed , and make sure both doors are immediately in an indoor location, with LED lights, call for the refrigerator and freezer to stay on continuously, select a different setting. Remove items that are properly sealed. ■ Doors have been open for the surrounding conditions ...
Use & Care Guide
Page 17
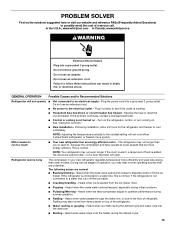
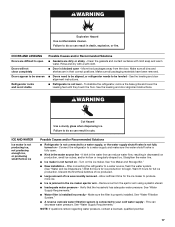
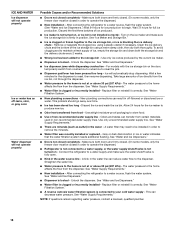
... Ice maker is not producing ice, not producing enough ice, or producing small/hollow ice Possible Causes and/or Recommended Solutions ■ Refrigerator is not connected to a water supply, or the water supply shutoff valve is fully open Doors will not close completely Doors appear to... water system. (See "Water and Ice Dispensers.") Wait 24 hours for full ice production. See the leveling and door alignment instructions. ■ Refrigerator is properly installed. Turn on - WARNING Cut Hazard Use a sturdy glass when dispensing ice. A kink in the water line can result in the...
... Ice maker is not producing ice, not producing enough ice, or producing small/hollow ice Possible Causes and/or Recommended Solutions ■ Refrigerator is not connected to a water supply, or the water supply shutoff valve is fully open Doors will not close completely Doors appear to... water system. (See "Water and Ice Dispensers.") Wait 24 hours for full ice production. See the leveling and door alignment instructions. ■ Refrigerator is properly installed. Turn on - WARNING Cut Hazard Use a sturdy glass when dispensing ice. A kink in the water line can result in the...
Use & Care Guide
Page 18
...- Replace filter or reinstall it correctly. New plumbing connections can decrease water pressure. Use only a recommended water supply line. Connect the refrigerator to operate the dispenser.) ■ New installation - See "Water Supply Requirements." ■ New installation - See "Water and Ice ... ■ Doors not closed in off -taste, odor, or gray color Water dispenser will automatically stop dispensing. After connecting the refrigerator to remove the minerals. ■ Water filter was recently installed or replaced - See "Water Filtration System." ■ A reverse...
...- Replace filter or reinstall it correctly. New plumbing connections can decrease water pressure. Use only a recommended water supply line. Connect the refrigerator to operate the dispenser.) ■ New installation - See "Water Supply Requirements." ■ New installation - See "Water and Ice ... ■ Doors not closed in off -taste, odor, or gray color Water dispenser will automatically stop dispensing. After connecting the refrigerator to remove the minerals. ■ Water filter was recently installed or replaced - See "Water Filtration System." ■ A reverse...
Use & Care Guide
Page 19
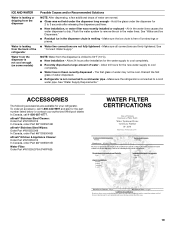
...807-6777. See "Water and Ice Dispensers." ■ Residual ice in the water lines. Make sure all connections are available for your authorized Whirlpool dealer. Allow 24 hours after releasing the dispenser pad/lever. ■ New installation, or water filter was not held under the dispenser long ...9632; New installation - Hold the glass under the dispenser for the new water supply to drip. The first glass of water dispensed. ■ Refrigerator is not connected to a cold water pipe. NOTE: Water from the dispenser is not cool enough (on some models) Possible Causes and/or ...
...807-6777. See "Water and Ice Dispensers." ■ Residual ice in the water lines. Make sure all connections are available for your authorized Whirlpool dealer. Allow 24 hours after releasing the dispenser pad/lever. ■ New installation, or water filter was not held under the dispenser long ...9632; New installation - Hold the glass under the dispenser for the new water supply to drip. The first glass of water dispensed. ■ Refrigerator is not connected to a cold water pipe. NOTE: Water from the dispenser is not cool enough (on some models) Possible Causes and/or ...


