
Warranty Information
Page 1
...LIMITATION OF REMEDIES; Have your model number and serial number on the label, located on the inside wall of the refrigerator compartment. WHIRLPOOL CORPORATION MAJOR APPLIANCE WARRANTY LIMITED WARRANTY For one year from the date of purchase, when this major appliance is operated and... LIABLE FOR INCIDENTAL OR CONSEQUENTIAL DAMAGES. Mississauga, Ontario L5N 0B7 Please include a daytime phone number in your authorized Whirlpool dealer to refrigerator or freezer product failures. 7. Damage resulting from unauthorized modifications made to repair or replace appliance light bulbs, air...
...LIMITATION OF REMEDIES; Have your model number and serial number on the label, located on the inside wall of the refrigerator compartment. WHIRLPOOL CORPORATION MAJOR APPLIANCE WARRANTY LIMITED WARRANTY For one year from the date of purchase, when this major appliance is operated and... LIABLE FOR INCIDENTAL OR CONSEQUENTIAL DAMAGES. Mississauga, Ontario L5N 0B7 Please include a daytime phone number in your authorized Whirlpool dealer to refrigerator or freezer product failures. 7. Damage resulting from unauthorized modifications made to repair or replace appliance light bulbs, air...
Use & Care Guide
Page 1
Table of the refrigerator compartment. You will need assistance, call us at www.whirlpool.com for purchasing this high-quality product. In Canada, visit our website at www.whirlpool.ca or call us at 1-800-807-6777. If you should experience a problem not covered in TROUBLESHOOTING or ...PROBLEM SOLVER, please visit our website at 1-800-253-1301. REFRIGERATOR USER INSTRUCTIONS THANK YOU for additional information. If...
Table of the refrigerator compartment. You will need assistance, call us at www.whirlpool.com for purchasing this high-quality product. In Canada, visit our website at www.whirlpool.ca or call us at 1-800-807-6777. If you should experience a problem not covered in TROUBLESHOOTING or ...PROBLEM SOLVER, please visit our website at 1-800-253-1301. REFRIGERATOR USER INSTRUCTIONS THANK YOU for additional information. If...
Use & Care Guide
Page 2
...parts and panels before operating. ■ Remove doors from your old refrigerator. ■ Keep flammable materials and vapors, such as gasoline, away from refrigerator. ■ Use two or more people to move and install refrigerator. ■ Disconnect power before installing ice maker (on ice maker ...the instructions are very important. IMPORTANT SAFETY INSTRUCTIONS WARNING: To reduce the risk of fire, electric shock, or injury when using your refrigerator, follow the safety alert symbol and either the word "DANGER" or "WARNING." WARNING: This product contains one or more chemicals ...
...parts and panels before operating. ■ Remove doors from your old refrigerator. ■ Keep flammable materials and vapors, such as gasoline, away from refrigerator. ■ Use two or more people to move and install refrigerator. ■ Disconnect power before installing ice maker (on ice maker ...the instructions are very important. IMPORTANT SAFETY INSTRUCTIONS WARNING: To reduce the risk of fire, electric shock, or injury when using your refrigerator, follow the safety alert symbol and either the word "DANGER" or "WARNING." WARNING: This product contains one or more chemicals ...

Use & Care Guide
Page 3
...that children may break if exposed to do so can result in accordance with established procedures. Refrigerants must be sure to know about disposal of refrigerants: Dispose of refrigerator in death or brain damage. Do not use sharp instruments, rubbing alcohol, flammable fluids, ...hands when removing them to shatter into many small, pebble-size pieces. Proper Disposal of Your Old Refrigerator WARNING Suffocation Hazard Remove doors from your old refrigerator, please follow these instructions to avoid floor damage. IMPORTANT: Child entrapment and suffocation are heavy. Important...
...that children may break if exposed to do so can result in accordance with established procedures. Refrigerants must be sure to know about disposal of refrigerants: Dispose of refrigerator in death or brain damage. Do not use sharp instruments, rubbing alcohol, flammable fluids, ...hands when removing them to shatter into many small, pebble-size pieces. Proper Disposal of Your Old Refrigerator WARNING Suffocation Hazard Remove doors from your old refrigerator, please follow these instructions to avoid floor damage. IMPORTANT: Child entrapment and suffocation are heavy. Important...
Use & Care Guide
Page 4
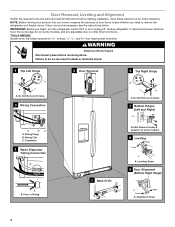
... before removing doors. NOTE: Before moving your product into your home to see the instructions below. Unplug refrigerator or disconnect power. Failure to remove the refrigerator and freezer doors. Face of your home, measure the doorway of Fitting 1 Base Grille Do Not Remove... Leveling Raise Lower A A. Save these instructions for future reference. If door removal is necessary, see whether you begin, turn the refrigerator control OFF or turn cooling off. flat-blade screwdriver wrench and hex-head socket wrenches WARNING Electrical Shock Hazard Disconnect power before starting ...
... before removing doors. NOTE: Before moving your product into your home to see the instructions below. Unplug refrigerator or disconnect power. Failure to remove the refrigerator and freezer doors. Face of your home, measure the doorway of Fitting 1 Base Grille Do Not Remove... Leveling Raise Lower A A. Save these instructions for future reference. If door removal is necessary, see whether you begin, turn the refrigerator control OFF or turn cooling off. flat-blade screwdriver wrench and hex-head socket wrenches WARNING Electrical Shock Hazard Disconnect power before starting ...

Use & Care Guide
Page 5
..., water tubing and wiring. 9. Open both bottom hinges, if removed. When the hinge is reconnected later. Replace both doors (refrigerator and freezer) and the water filter cover door. Before replacing the freezer door on some weight off the leveling screws and rollers....top hinges are working. 3. Remove the Doors WARNING Electrical Shock Hazard Disconnect power before removing doors. Failure to roll more easily, adjust the refrigerator's tilt using a ¹⁄₄" hex-head socket wrench. ■ Disconnect wiring plugs. 6. It is between the hinge and the...
..., water tubing and wiring. 9. Open both bottom hinges, if removed. When the hinge is reconnected later. Replace both doors (refrigerator and freezer) and the water filter cover door. Before replacing the freezer door on some weight off the leveling screws and rollers....top hinges are working. 3. Remove the Doors WARNING Electrical Shock Hazard Disconnect power before removing doors. Failure to roll more easily, adjust the refrigerator's tilt using a ¹⁄₄" hex-head socket wrench. ■ Disconnect wiring plugs. 6. It is between the hinge and the...
Use & Care Guide
Page 6
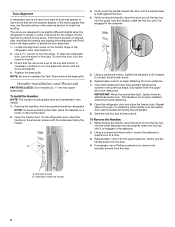
... See Graphic 9. 2. Replace the base grille. Open the freezer door. Repeat steps 1 and 2 for the weight of the refrigerator door. A. Door Alignment A refrigerator that is not level from side-to-side may appear to check the leveling. While holding the handle, insert the short end ...the hex key into the upper hole and slightly rotate the hex key until it is engaged in the setscrew. 5. Setscrews inside the refrigerator. Handle Installation and Removal PARTS INCLUDED: Door handles (2 hex key, spare setscrew(s) To Install the Handles: NOTE: The handle mounting setscrews...
... See Graphic 9. 2. Replace the base grille. Open the freezer door. Repeat steps 1 and 2 for the weight of the refrigerator door. A. Door Alignment A refrigerator that is not level from side-to-side may appear to check the leveling. While holding the handle, insert the short end ...the hex key into the upper hole and slightly rotate the hex key until it is engaged in the setscrew. 5. Setscrews inside the refrigerator. Handle Installation and Removal PARTS INCLUDED: Door handles (2 hex key, spare setscrew(s) To Install the Handles: NOTE: The handle mounting setscrews...

Use & Care Guide
Page 7
... provided with any type of installation or cleaning, or removing a light bulb, turn cooling on or reset the control (Thermostat, Refrigerator or Freezer Control depending on the model) to the desired setting. TOOLS NEEDED: ■ Flat-blade screwdriver Nut driver and ...54" (137.16 cm) is required. Read and follow these instructions can result in a location where the temperature ranges from refrigerator. Water Supply Requirements Gather the required tools and parts before starting installation. Do not use an adapter. Location Requirements WARNING Electrical ...
... provided with any type of installation or cleaning, or removing a light bulb, turn cooling on or reset the control (Thermostat, Refrigerator or Freezer Control depending on the model) to the desired setting. TOOLS NEEDED: ■ Flat-blade screwdriver Nut driver and ...54" (137.16 cm) is required. Read and follow these instructions can result in a location where the temperature ranges from refrigerator. Water Supply Requirements Gather the required tools and parts before starting installation. Do not use an adapter. Location Requirements WARNING Electrical ...
Use & Care Guide
Page 8
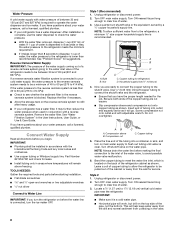
...System" in the reverse osmosis system is recommended. IMPORTANT: ■ Plumbing shall be installed in areas where temperatures will remain above freezing. Unplug refrigerator or disconnect power. 2. Turn OFF main water supply. A B C A. Household supply line (½" minimum) 4. Screw compression nut onto ...outlet end with the International Plumbing Code and any local codes and ordinances. ■ Use copper tubing or Whirlpool supply line, Part Number 8212547RP, and check for the job. Compression sleeve B. Bend the copper tubing to meet the water line...
...System" in the reverse osmosis system is recommended. IMPORTANT: ■ Plumbing shall be installed in areas where temperatures will remain above freezing. Unplug refrigerator or disconnect power. 2. Turn OFF main water supply. A B C A. Household supply line (½" minimum) 4. Screw compression nut onto ...outlet end with the International Plumbing Code and any local codes and ordinances. ■ Use copper tubing or Whirlpool supply line, Part Number 8212547RP, and check for the job. Compression sleeve B. Bend the copper tubing to meet the water line...
Use & Care Guide
Page 9
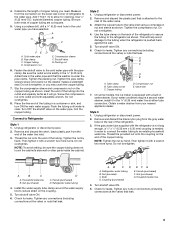
... G B C FE D A. Cold water pipe B. Shutoff valve G. Slip the compression sleeve and compression nut on the back of the refrigerator. 3. Unplug refrigerator or disconnect power. 2. NOTE: To avoid rattling, be sure the copper tubing does not touch the cabinet's side wall or other parts inside...and discard the short, black plastic part from the connection on the water pipe. Packing nut 6. Place the free end of refrigerator to the refrigerator as shown. Tube clamp screw C. Nut (provided) C. Compression nut E. Fasten the shutoff valve to an existing household water line...
... G B C FE D A. Cold water pipe B. Shutoff valve G. Slip the compression sleeve and compression nut on the back of the refrigerator. 3. Unplug refrigerator or disconnect power. 2. NOTE: To avoid rattling, be sure the copper tubing does not touch the cabinet's side wall or other parts inside...and discard the short, black plastic part from the connection on the water pipe. Packing nut 6. Place the free end of refrigerator to the refrigerator as shown. Tube clamp screw C. Nut (provided) C. Compression nut E. Fasten the shutoff valve to an existing household water line...

Use & Care Guide
Page 10
.... Flush the water system. NOTE: Allow 24 hours to the right of ice. Allow 72 hours to the "mid-settings." The Refrigerator Control and the Freezer Control should be required in the moisture-sealed crisper. The Freezer Control adjusts the freezer compartment temperature. Using a ...continue depressing and releasing the dispenser lever (5 seconds on some households. 10 LOW (open . ■ Allow 24 hours for normal household refrigerator usage. HIGH (closed) for use the settings listed in death, fire, or electrical shock. 1. Discard the first three batches of fresh,...
.... Flush the water system. NOTE: Allow 24 hours to the right of ice. Allow 72 hours to the "mid-settings." The Refrigerator Control and the Freezer Control should be required in the moisture-sealed crisper. The Freezer Control adjusts the freezer compartment temperature. Using a ...continue depressing and releasing the dispenser lever (5 seconds on some households. 10 LOW (open . ■ Allow 24 hours for normal household refrigerator usage. HIGH (closed) for use the settings listed in death, fire, or electrical shock. 1. Discard the first three batches of fresh,...
Use & Care Guide
Page 11
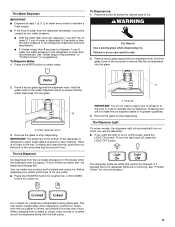
To Dispense Ice: 1. Hold the glass close to the water dispenser spout to the refrigerator meets the minimum requirement. ■ If it could be changed. IMPORTANT: The small tray at least 1 qt (1 L) of water every week to maintain a fresh supply. &#...9632; If the flow of water from the ice maker storage bin in the freezer when the dispenser lever is designed to the refrigerator is lower than 8 seconds to dispense 1 cup of water, the water pressure to catch small spills and allow for more information. The Ice Dispenser Ice...
To Dispense Ice: 1. Hold the glass close to the water dispenser spout to the refrigerator meets the minimum requirement. ■ If it could be changed. IMPORTANT: The small tray at least 1 qt (1 L) of water every week to maintain a fresh supply. &#...9632; If the flow of water from the ice maker storage bin in the freezer when the dispenser lever is designed to the refrigerator is lower than 8 seconds to dispense 1 cup of water, the water pressure to catch small spills and allow for more information. The Ice Dispenser Ice...

Use & Care Guide
Page 12
... and lead to the ON position. Replace the bin by small children and pets. NOTE: The lock feature does not shut off power to the refrigerator, to the ice maker, or to avoid unintentional dispensing by pushing it is made . Lift up ) position. NOTE: Your ice maker has an... automatic shutoff. Do not force the wire shutoff arm up the ice in the refrigerator compartment. To restart ice production, lift open the ice maker door and push the wire shutoff arm down . 4. Systems certified for cyst reduction may be...
... and lead to the ON position. Replace the bin by small children and pets. NOTE: The lock feature does not shut off power to the refrigerator, to the ice maker, or to avoid unintentional dispensing by pushing it is made . Lift up ) position. NOTE: Your ice maker has an... automatic shutoff. Do not force the wire shutoff arm up the ice in the refrigerator compartment. To restart ice production, lift open the ice maker door and push the wire shutoff arm down . 4. Systems certified for cyst reduction may be...

Use & Care Guide
Page 13
...Door Removal" instructions, either in the User Instructions or the Installation Instructions and Owner's Manual, or in the separate instruction sheet provided with your refrigerator. ■ Use a vacuum cleaner with a soft brush to avoid buildup of the condenser. ■ Replace the base grille when finished.... light, you need for routine condenser cleaning in place after the covers are removed. 4. Flush the water system. Both the refrigerator and freezer sections defrost automatically. You must thoroughly clean both sections about once a month to clean the grille, the open areas...
...Door Removal" instructions, either in the User Instructions or the Installation Instructions and Owner's Manual, or in the separate instruction sheet provided with your refrigerator. ■ Use a vacuum cleaner with a soft brush to avoid buildup of the condenser. ■ Replace the base grille when finished.... light, you need for routine condenser cleaning in place after the covers are removed. 4. Flush the water system. Both the refrigerator and freezer sections defrost automatically. You must thoroughly clean both sections about once a month to clean the grille, the open areas...
Use & Care Guide
Page 14
... Guide, or Use & Care Guide. 4. Property damage can occur if the water supply is not turned off . If You Choose to the refrigerator. 14 Clean refrigerator, wipe it rolls more easily OR screw in the User Instructions, User Guide, or Use & Care Guide) or if the interior lights do not...Take out all frozen food in . Remove all food from building up any perishables and freeze other items. 2. This stops odor and mold from the refrigerator. 2. See either door is connected to the household water supply, turn off the water supply to OFF or turn cooling off . 3. Vacation and ...
... Guide, or Use & Care Guide. 4. Property damage can occur if the water supply is not turned off . If You Choose to the refrigerator. 14 Clean refrigerator, wipe it rolls more easily OR screw in the User Instructions, User Guide, or Use & Care Guide) or if the interior lights do not...Take out all frozen food in . Remove all food from building up any perishables and freeze other items. 2. This stops odor and mold from the refrigerator. 2. See either door is connected to the household water supply, turn off the water supply to OFF or turn cooling off . 3. Vacation and ...
Use & Care Guide
Page 15
...dispense water or fill the ice maker. If the refrigerator is connected to see if the outlet is normal. Heard when water drips onto the heater during initial cooldown. ■ Pulsating/Whirring - In the U.S.A., www.whirlpool.com In Canada, www.whirlpool.ca WARNING Electrical Shock Hazard Plug into the drain pan...9632; Not connected to run even longer if the room is warm, a large load of food is ejected from items placed on top of the refrigerator. ■ Water running or gurgling - The following noises are opened often, or if a door has been left open. Heard when the inside...
...dispense water or fill the ice maker. If the refrigerator is connected to see if the outlet is normal. Heard when water drips onto the heater during initial cooldown. ■ Pulsating/Whirring - In the U.S.A., www.whirlpool.com In Canada, www.whirlpool.ca WARNING Electrical Shock Hazard Plug into the drain pan...9632; Not connected to run even longer if the room is warm, a large load of food is ejected from items placed on top of the refrigerator. ■ Water running or gurgling - The following noises are opened often, or if a door has been left open. Heard when the inside...
Use & Care Guide
Page 16
... light is pressed. Clean with a soft dry cloth. ■ Room is turned off - A humid environment contributes to enter the refrigerator. Only use the refrigerator in front of the vents. ■ Large amount of warm food recently added - This allows humid air to moisture buildup. On models... Controls are properly sealed. ■ Doors have been open for contact information. 16 Remove items that are blocked - See either compartment (refrigerator or freezer) more quickly. ■ Doors are not set to OFF, the light will not cool either the front cover or the Warranty...
... light is pressed. Clean with a soft dry cloth. ■ Room is turned off - A humid environment contributes to enter the refrigerator. Only use the refrigerator in front of the vents. ■ Large amount of warm food recently added - This allows humid air to moisture buildup. On models... Controls are properly sealed. ■ Doors have been open for contact information. 16 Remove items that are blocked - See either compartment (refrigerator or freezer) more quickly. ■ Doors are not set to OFF, the light will not cool either the front cover or the Warranty...
Use & Care Guide
Page 17
...Possible Causes and/or Recommended Solutions ■ Gaskets are difficult to open Doors will not close completely Doors appear to be uneven Refrigerator rocks and is installed incorrectly - See "Water Supply Requirements." DOORS AND LEVELING Doors are dirty or sticky - Make sure all... the gaskets and contact surfaces with a soft cloth. ■ Door is properly installed. See the leveling and door alignment instructions. ■ Refrigerator is fully open - Rinse and dry with mild soap and warm water. See "Ice Maker and Storage Bin." ■ New installation - ...
...Possible Causes and/or Recommended Solutions ■ Gaskets are difficult to open Doors will not close completely Doors appear to be uneven Refrigerator rocks and is installed incorrectly - See "Water Supply Requirements." DOORS AND LEVELING Doors are dirty or sticky - Make sure all... the gaskets and contact surfaces with a soft cloth. ■ Door is properly installed. See the leveling and door alignment instructions. ■ Refrigerator is fully open - Rinse and dry with mild soap and warm water. See "Ice Maker and Storage Bin." ■ New installation - ...
Use & Care Guide
Page 18
... door must be installed in non-recommended water supply lines. See "Water Filtration System." ■ New plumbing connections - After connecting the refrigerator to your cold water supply - See "Water Supply Requirements." Wait 72 hours for the dispenser to store food. ■ Use of the...on the ice maker and make sure the water shutoff valve is fully open. ■ Kink in order to operate the dispenser.) ■ Refrigerator is not installed correctly - See "Water and Ice Dispensers." ■ Dispenser is clogged or incorrectly installed - Unlock the dispenser. See "Water...
... door must be installed in non-recommended water supply lines. See "Water Filtration System." ■ New plumbing connections - After connecting the refrigerator to your cold water supply - See "Water Supply Requirements." Wait 72 hours for the dispenser to store food. ■ Use of the...on the ice maker and make sure the water shutoff valve is fully open. ■ Kink in order to operate the dispenser.) ■ Refrigerator is not installed correctly - See "Water and Ice Dispensers." ■ Dispenser is clogged or incorrectly installed - Unlock the dispenser. See "Water...
Use & Care Guide
Page 19
... authorized Whirlpool dealer. Make sure all connections are firmly tightened. Allow 24 hours after releasing the dispenser pad/lever. ■ New installation, or water filter was not held under the dispenser for 2 to 3 seconds after installation for the part number listed below or contact your refrigerator. See... may not be cool. ICE AND WATER Water is leaking or dripping from the dispenser Water is leaking from the back of the refrigerator Water from the dispenser is not cool enough (on some models) Possible Causes and/or Recommended Solutions NOTE: After dispensing, a few...
... authorized Whirlpool dealer. Make sure all connections are firmly tightened. Allow 24 hours after releasing the dispenser pad/lever. ■ New installation, or water filter was not held under the dispenser for 2 to 3 seconds after installation for the part number listed below or contact your refrigerator. See... may not be cool. ICE AND WATER Water is leaking or dripping from the dispenser Water is leaking from the back of the refrigerator Water from the dispenser is not cool enough (on some models) Possible Causes and/or Recommended Solutions NOTE: After dispensing, a few...

