
Warranty Information
Page 1
...major appliance is operated and maintained according to instructions attached to or furnished with the product, Whirlpool Corporation or Whirlpool Canada LP (hereafter "Whirlpool") will pay for Factory Specified Parts and repair labor to repair or replace appliance light bulbs, air filters or water filters.... Service calls to correct the installation of your major appliance, to instruct you may not apply to Whirlpool within 30 days from warranty coverage. 4. Replacement parts or repair labor on the inside wall of merchantability or fitness, so this major appliance was purchased...
...major appliance is operated and maintained according to instructions attached to or furnished with the product, Whirlpool Corporation or Whirlpool Canada LP (hereafter "Whirlpool") will pay for Factory Specified Parts and repair labor to repair or replace appliance light bulbs, air filters or water filters.... Service calls to correct the installation of your major appliance, to instruct you may not apply to Whirlpool within 30 days from warranty coverage. 4. Replacement parts or repair labor on the inside wall of merchantability or fitness, so this major appliance was purchased...
Use & Care Guide
Page 2
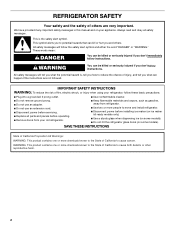
... installing ice maker (on ice maker kit ready models only). ■ Use a sturdy glass when dispensing ice (on some models). Always read and obey all parts and panels before servicing. ■ Replace all safety messages. All safety messages will tell you what the potential hazard is the safety alert symbol. All...
... installing ice maker (on ice maker kit ready models only). ■ Use a sturdy glass when dispensing ice (on some models). Always read and obey all parts and panels before servicing. ■ Replace all safety messages. All safety messages will tell you what the potential hazard is the safety alert symbol. All...
Use & Care Guide
Page 4
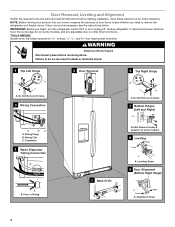
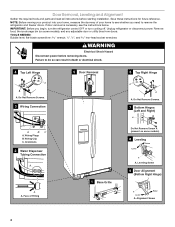
... Screws. 7 Bottom Hinges (Left and Right) A A BC A. Alignment Screw 4 Failure to see the instructions below. Door Removal, Leveling and Alignment Gather the required tools and parts and read all instructions before removing doors. TOOLS NEEDED: Bubble level; If door removal is necessary, see whether you begin, turn the refrigerator control OFF...
... Screws. 7 Bottom Hinges (Left and Right) A A BC A. Alignment Screw 4 Failure to see the instructions below. Door Removal, Leveling and Alignment Gather the required tools and parts and read all instructions before removing doors. TOOLS NEEDED: Bubble level; If door removal is necessary, see whether you begin, turn the refrigerator control OFF...

Use & Care Guide
Page 5
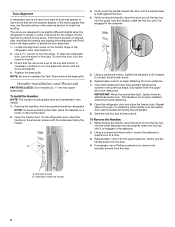
... tubing and wiring. Replace the ice storage bin (on the freezer door side. Remove the base grille to locate the two leveling screws, which are part of the refrigerator or turn the leveling feet to raise that side of the front roller assemblies on a soft, clean surface, such as you should...
... tubing and wiring. Replace the ice storage bin (on the freezer door side. Remove the base grille to locate the two leveling screws, which are part of the refrigerator or turn the leveling feet to raise that side of the front roller assemblies on a soft, clean surface, such as you should...
Use & Care Guide
Page 6
.... See Graphic 9. 2. To lower the door, turn . Check that the doors are not properly aligned. If necessary, continue to the left. 3. Handle Installation and Removal PARTS INCLUDED: Door handles (2 hex key, spare setscrew(s) To Install the Handles: NOTE: The handle mounting setscrews are preinstalled in the previous steps, fully tighten both...
.... See Graphic 9. 2. To lower the door, turn . Check that the doors are not properly aligned. If necessary, continue to the left. 3. Handle Installation and Removal PARTS INCLUDED: Door handles (2 hex key, spare setscrew(s) To Install the Handles: NOTE: The handle mounting setscrews are preinstalled in the previous steps, fully tighten both...

Use & Care Guide
Page 7
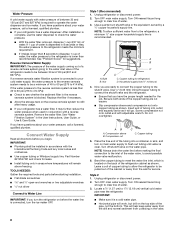
... your local plumbing codes. It is recommended that cannot be provided. Do not use an extension cord. Water Supply Requirements Gather the required tools and parts before starting installation. Before purchasing, make sure you are finished, reconnect the refrigerator to the electrical source and turn the control (Thermostat, Refrigerator or Freezer...
... your local plumbing codes. It is recommended that cannot be provided. Do not use an extension cord. Water Supply Requirements Gather the required tools and parts before starting installation. Before purchasing, make sure you are finished, reconnect the refrigerator to the electrical source and turn the control (Thermostat, Refrigerator or Freezer...
Use & Care Guide
Page 8
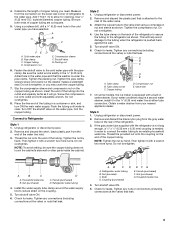
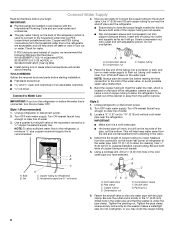
TOOLS NEEDED: Gather the required tools and parts before the water line is connected, turn shutoff valve or the equivalent, served by a ¹⁄₂" copper household supply line. Style 1 (Recommended) 1. Copper tubing (... maker OFF. Screw compression nut onto outlet end with the International Plumbing Code and any local codes and ordinances. ■ Use copper tubing or Whirlpool supply line, Part Number 8212547RP, and check for leaks. ■ Install tubing only in areas where temperatures will help keep water away from the drill and normal...
TOOLS NEEDED: Gather the required tools and parts before the water line is connected, turn shutoff valve or the equivalent, served by a ¹⁄₂" copper household supply line. Style 1 (Recommended) 1. Copper tubing (... maker OFF. Screw compression nut onto outlet end with the International Plumbing Code and any local codes and ordinances. ■ Use copper tubing or Whirlpool supply line, Part Number 8212547RP, and check for leaks. ■ Install tubing only in areas where temperatures will help keep water away from the drill and normal...
Use & Care Guide
Page 9
...Packing nut 6. Insert the end of the water valve. 3. Flush the tubing until water is needed in water strainer. Remove and discard the plastic part that the washer is attached to an existing household water line. Do not overtighten. 4. If your nearest appliance dealer. Style 3 1. If the... compression sleeve and compression nut on the end of the refrigerator. 3. Coil the copper tubing. Remove and discard the short, black plastic part from the gray water tube on the water pipe. Attach the copper tube to the cold water pipe with adjustable wrench. Tighten any connections...
...Packing nut 6. Insert the end of the water valve. 3. Flush the tubing until water is needed in water strainer. Remove and discard the plastic part that the washer is attached to an existing household water line. Do not overtighten. 4. If your nearest appliance dealer. Style 3 1. If the... compression sleeve and compression nut on the end of the refrigerator. 3. Coil the copper tubing. Remove and discard the short, black plastic part from the gray water tube on the water pipe. Attach the copper tube to the cold water pipe with adjustable wrench. Tighten any connections...

Use & Care Guide
Page 12
... will fill the ice storage bin, and the ice cubes will be only as good as salt) can be dispensed, but no more can damage parts of the ice maker and lead to produce the first batch of the storage bin and pull it is almost time to change from red...
... will fill the ice storage bin, and the ice cubes will be only as good as salt) can be dispensed, but no more can damage parts of the ice maker and lead to produce the first batch of the storage bin and pull it is almost time to change from red...

Use & Care Guide
Page 13
... ■ Replace the base grille when finished. 5. Explosion Hazard Use nonflammable cleaner. NOTE: There may occur. Hand wash, rinse, and dry removable parts and interior surfaces thoroughly. There is no need to avoid buildup of its packaging and remove the covers from the O-rings. You must thoroughly clean... the O-rings are still in the home, the condenser should change the water filter cartridge at least every 6 months depending on plastic parts, interior and door liners or gaskets. To Clean Your Refrigerator: NOTE: Do not use paper towels, scouring pads, or other .
... ■ Replace the base grille when finished. 5. Explosion Hazard Use nonflammable cleaner. NOTE: There may occur. Hand wash, rinse, and dry removable parts and interior surfaces thoroughly. There is no need to avoid buildup of its packaging and remove the covers from the O-rings. You must thoroughly clean... the O-rings are still in the home, the condenser should change the water filter cartridge at least every 6 months depending on plastic parts, interior and door liners or gaskets. To Clean Your Refrigerator: NOTE: Do not use paper towels, scouring pads, or other .
Use & Care Guide
Page 14
... the leveling legs so they don't shift and rattle during the move . 1. See "Adjust the Doors" or "Door Removal, Leveling and Alignment." 9. Remove all removable parts, wrap them well, and tape them open far enough for the move . 8. See "Using the Controls" in . Clean refrigerator, wipe it for air to get...
... the leveling legs so they don't shift and rattle during the move . 1. See "Adjust the Doors" or "Door Removal, Leveling and Alignment." 9. Remove all removable parts, wrap them well, and tape them open far enough for the move . 8. See "Using the Controls" in . Clean refrigerator, wipe it for air to get...
Use & Care Guide
Page 19
... of ice shavings or pieces. ■ Water line connections are firmly tightened. In Canada, call 1-800-442-9991 and ask for the part number listed below or contact your refrigerator. The first glass of water - See "Water Supply Requirements." To order an accessory, call 1-800...See "Water and Ice Dispensers." ■ Residual ice in the dispenser chute is connected to 3 seconds after installation for your authorized Whirlpool dealer. Make sure all connections are not fully tightened - Allow 24 hours for 2 to a cold water pipe. affresh® Stainless Steel Cleaner...
... of ice shavings or pieces. ■ Water line connections are firmly tightened. In Canada, call 1-800-442-9991 and ask for the part number listed below or contact your refrigerator. The first glass of water - See "Water Supply Requirements." To order an accessory, call 1-800...See "Water and Ice Dispensers." ■ Residual ice in the dispenser chute is connected to 3 seconds after installation for your authorized Whirlpool dealer. Make sure all connections are not fully tightened - Allow 24 hours for 2 to a cold water pipe. affresh® Stainless Steel Cleaner...
Use & Care Guide
Page 20
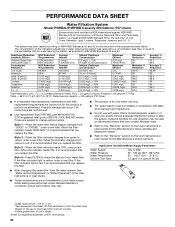
.... ■ After changing the water filter, flush the water system. Property damage can occur if all instructions are not followed. ■ Use replacement filter P4RFWB, part #W10295370A. 2013 suggested retail price of Chlorine Taste and Odor, and Particulate Class I*; When the indicator changes from green to 22°C). Substance Reduction Aesthetic...
.... ■ After changing the water filter, flush the water system. Property damage can occur if all instructions are not followed. ■ Use replacement filter P4RFWB, part #W10295370A. 2013 suggested retail price of Chlorine Taste and Odor, and Particulate Class I*; When the indicator changes from green to 22°C). Substance Reduction Aesthetic...

Use & Care Guide
Page 21
... may have been removed, altered or cannot be repaired in materials or workmanship and is reported to Whirlpool within 30 days from state to state or province to province. Replacement parts or repair labor if this major appliance is used for product service if your major appliance is located... in the U.S.A., visit www.whirlpool.com. Replacement parts or repair labor on the duration of implied warranties of merchantability or fitness, so this limitation may not apply to you. If ...
... may have been removed, altered or cannot be repaired in materials or workmanship and is reported to Whirlpool within 30 days from state to state or province to province. Replacement parts or repair labor if this major appliance is used for product service if your major appliance is located... in the U.S.A., visit www.whirlpool.com. Replacement parts or repair labor on the duration of implied warranties of merchantability or fitness, so this limitation may not apply to you. If ...

Installation Guide
Page 2
... followed. All safety messages will tell you don't follow the safety alert symbol and either the word "DANGER" or "WARNING." Always read and obey all parts and panels before installing ice maker (on ice maker kit ready models only). ■ Use a sturdy glass when dispensing ice (on some models). ■ Do...
... followed. All safety messages will tell you don't follow the safety alert symbol and either the word "DANGER" or "WARNING." Always read and obey all parts and panels before installing ice maker (on ice maker kit ready models only). ■ Use a sturdy glass when dispensing ice (on some models). ■ Do...
Installation Guide
Page 4
... is necessary, see whether you begin, turn the refrigerator control OFF or turn cooling off. Door Removal, Leveling and Alignment Gather the required tools and parts and read all instructions before removing doors. Wiring Plugs B.
... is necessary, see whether you begin, turn the refrigerator control OFF or turn cooling off. Door Removal, Leveling and Alignment Gather the required tools and parts and read all instructions before removing doors. Wiring Plugs B.

Installation Guide
Page 5
... the doors appear this occurs, set the shim aside so it can result in order to account for the doors while the top hinges are part of place. Disconnect the water dispenser tubing located behind the base grille on a soft, clean surface, such as a towel, blanket or piece of fitting and...
... the doors appear this occurs, set the shim aside so it can result in order to account for the doors while the top hinges are part of place. Disconnect the water dispenser tubing located behind the base grille on a soft, clean surface, such as a towel, blanket or piece of fitting and...

Installation Guide
Page 6
NOTE: Be sure to begin fastening the lower setscrew. 7. Handle Installation and Removal PARTS INCLUDED: Door handles (2 hex key, spare setscrew(s) To Install the Handles: NOTE: The handle mounting setscrews are even at a time. 3. Repeat steps 4 and 5 to refasten ...
NOTE: Be sure to begin fastening the lower setscrew. 7. Handle Installation and Removal PARTS INCLUDED: Door handles (2 hex key, spare setscrew(s) To Install the Handles: NOTE: The handle mounting setscrews are even at a time. 3. Repeat steps 4 and 5 to refasten ...

Installation Guide
Page 7
... with any type of between 60°F (15°C) and 90°F (32°C). Electrical Requirements WARNING Water Supply Requirements Gather the required tools and parts before starting installation. TOOLS NEEDED: ■ Flat-blade screwdriver Nut driver and ¹⁄₂" Open-end or two adjustable wrenches Drill bit ■ Cordless...
... with any type of between 60°F (15°C) and 90°F (32°C). Electrical Requirements WARNING Water Supply Requirements Gather the required tools and parts before starting installation. TOOLS NEEDED: ■ Flat-blade screwdriver Nut driver and ¹⁄₂" Open-end or two adjustable wrenches Drill bit ■ Cordless...
Installation Guide
Page 8
...185;⁄₂" open-end wrenches or two adjustable wrenches nut driver Connect to allow for cleaning. TOOLS NEEDED: Gather the required tools and parts before the water line is used to connect to meet the water line inlet, which is a cold water pipe. ■ Horizontal pipe ... gray water tubing on the back of water. 3. Place the free end of the refrigerator (which is used instead of copper, we recommend the following Whirlpool Part Numbers: W10505928RP (7 ft [2.14 m] jacketed PEX), 8212547RP (5 ft [1.52 m] PEX), or W10267701RP (25 ft [7.62 m] PEX). ■ Install tubing only ...
...185;⁄₂" open-end wrenches or two adjustable wrenches nut driver Connect to allow for cleaning. TOOLS NEEDED: Gather the required tools and parts before the water line is used to connect to meet the water line inlet, which is a cold water pipe. ■ Horizontal pipe ... gray water tubing on the back of water. 3. Place the free end of the refrigerator (which is used instead of copper, we recommend the following Whirlpool Part Numbers: W10505928RP (7 ft [2.14 m] jacketed PEX), 8212547RP (5 ft [1.52 m] PEX), or W10267701RP (25 ft [7.62 m] PEX). ■ Install tubing only ...


