
Warranty Information
Page 1
... NOT BE LIABLE FOR INCIDENTAL OR CONSEQUENTIAL DAMAGES. For assistance or service in the U.S.A., visit www.whirlpool.com. Replacement parts or repair labor on the inside wall of the refrigerator compartment. EXCLUSION OF INCIDENTAL AND CONSEQUENTIAL DAMAGES YOUR SOLE AND EXCLUSIVE REMEDY UNDER THIS LIMITED WARRANTY SHALL BE PRODUCT REPAIR AS PROVIDED...
... NOT BE LIABLE FOR INCIDENTAL OR CONSEQUENTIAL DAMAGES. For assistance or service in the U.S.A., visit www.whirlpool.com. Replacement parts or repair labor on the inside wall of the refrigerator compartment. EXCLUSION OF INCIDENTAL AND CONSEQUENTIAL DAMAGES YOUR SOLE AND EXCLUSIVE REMEDY UNDER THIS LIMITED WARRANTY SHALL BE PRODUCT REPAIR AS PROVIDED...
Use & Care Guide
Page 1
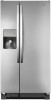
...If you should experience a problem not covered in TROUBLESHOOTING or PROBLEM SOLVER, please visit our website at www.whirlpool.com for purchasing this high-quality product. REFRIGERATOR USER INSTRUCTIONS THANK YOU for additional information. If you still need your model and serial number, located on the... Controls 10 Crisper Humidity Control 10 Water and Ice Dispensers 10 Ice Maker and Storage Bin 12 Water Filtration System 12 REFRIGERATOR CARE 13 Cleaning 13 Lights 14 Vacation and Moving Care 14 PROBLEM SOLVER 15 ACCESSORIES 19 WATER FILTER CERTIFICATIONS .....19 PERFORMANCE...
...If you should experience a problem not covered in TROUBLESHOOTING or PROBLEM SOLVER, please visit our website at www.whirlpool.com for purchasing this high-quality product. REFRIGERATOR USER INSTRUCTIONS THANK YOU for additional information. If you still need your model and serial number, located on the... Controls 10 Crisper Humidity Control 10 Water and Ice Dispensers 10 Ice Maker and Storage Bin 12 Water Filtration System 12 REFRIGERATOR CARE 13 Cleaning 13 Lights 14 Vacation and Moving Care 14 PROBLEM SOLVER 15 ACCESSORIES 19 WATER FILTER CERTIFICATIONS .....19 PERFORMANCE...
Use & Care Guide
Page 2
...California Proposition 65 Warnings: WARNING: This product contains one or more chemicals known to the State of California to move and install refrigerator. ■ Disconnect power before servicing. ■ Replace all safety messages. WARNING: This product contains one or more people ...to cause birth defects or other reproductive harm. 2 REFRIGERATOR SAFETY Your safety and the safety of others . This is , tell you don't immediately follow these basic precautions: ■ Plug into a ...
...California Proposition 65 Warnings: WARNING: This product contains one or more chemicals known to the State of California to move and install refrigerator. ■ Disconnect power before servicing. ■ Replace all safety messages. WARNING: This product contains one or more people ...to cause birth defects or other reproductive harm. 2 REFRIGERATOR SAFETY Your safety and the safety of others . This is , tell you don't immediately follow these basic precautions: ■ Plug into a ...

Use & Care Guide
Page 3
...break if exposed to remove tape or glue. When Moving Your Refrigerator: Your refrigerator is normal. Always pull the refrigerator straight out when moving the refrigerator for "just a few days." Do not wiggle or "walk" the refrigerator when trying to move it . This is heavy. Glass shelves... information to do so can result in back or other injury. Failure to know about disposal of refrigerants: Dispose of your old refrigerator. Before You Throw Away Your Old Refrigerator or Freezer: ■ Take off the doors. ■ Leave the shelves in accordance with cardboard...
...break if exposed to remove tape or glue. When Moving Your Refrigerator: Your refrigerator is normal. Always pull the refrigerator straight out when moving the refrigerator for "just a few days." Do not wiggle or "walk" the refrigerator when trying to move it . This is heavy. Glass shelves... information to do so can result in back or other injury. Failure to know about disposal of refrigerants: Dispose of your old refrigerator. Before You Throw Away Your Old Refrigerator or Freezer: ■ Take off the doors. ■ Leave the shelves in accordance with cardboard...
Use & Care Guide
Page 4
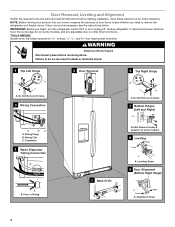
...Left and Right) A A BC A. Grommets 2 Water Dispenser Tubing Connection A A A. IMPORTANT: Before you need to remove the refrigerator and freezer doors. Wiring Clip C. flat-blade screwdriver wrench and hex-head socket wrenches WARNING Electrical Shock Hazard Disconnect power before starting ...future reference. Alignment Screw 4 Do Not Remove Screws. 3 Wiring Connection 5 Door Removal 6 Top Right Hinge A A A. Unplug refrigerator or disconnect power. NOTE: Before moving your product into your home, measure the doorway of Fitting 1 Base Grille Do Not Remove Screw...
...Left and Right) A A BC A. Grommets 2 Water Dispenser Tubing Connection A A A. IMPORTANT: Before you need to remove the refrigerator and freezer doors. Wiring Clip C. flat-blade screwdriver wrench and hex-head socket wrenches WARNING Electrical Shock Hazard Disconnect power before starting ...future reference. Alignment Screw 4 Do Not Remove Screws. 3 Wiring Connection 5 Door Removal 6 Top Right Hinge A A A. Unplug refrigerator or disconnect power. NOTE: Before moving your product into your home, measure the doorway of Fitting 1 Base Grille Do Not Remove Screw...

Use & Care Guide
Page 5
.... Disconnect the water dispenser tubing located behind the base grille on a soft, clean surface, such as a towel, blanket or piece of the refrigerator. See Graphic 3. ■ Remove the wiring clip using the instructions below: 1. Close both leveling screws the same amount. 5. Use a hex... screw A. 10. See Graphic 5. IMPORTANT: Rest the door on its final location. 2. Remove top right hinge as shown. Lift the refrigerator door straight up off the leveling screws and rollers. This will help avoid damaging the door. 11. Both bottom hinges have similar construction. ...
.... Disconnect the water dispenser tubing located behind the base grille on a soft, clean surface, such as a towel, blanket or piece of the refrigerator. See Graphic 3. ■ Remove the wiring clip using the instructions below: 1. Close both leveling screws the same amount. 5. Use a hex... screw A. 10. See Graphic 5. IMPORTANT: Rest the door on its final location. 2. Remove top right hinge as shown. Lift the refrigerator door straight up off the leveling screws and rollers. This will help avoid damaging the door. 11. Both bottom hinges have similar construction. ...
Use & Care Guide
Page 6
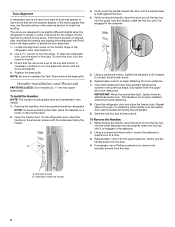
... the handles on the doors. See Graphic 9. 2. Save the hex key and all instructions. Repeat steps 1 and 2 for the weight of the refrigerator door. The doors are aligned. 4. Shoulder screws B. If the doors are even at a time. 3. NOTE: Be sure to adjust the door...1. If the doors appear this extra tightening. 8. Check that the doors are still not aligned after checking the leveling and loading the refrigerator with the setscrews facing the freezer. Gently pull the handle away from the door. A. Handle Installation and Removal PARTS INCLUDED: Door handles...
... the handles on the doors. See Graphic 9. 2. Save the hex key and all instructions. Repeat steps 1 and 2 for the weight of the refrigerator door. The doors are aligned. 4. Shoulder screws B. If the doors are even at a time. 3. NOTE: Be sure to adjust the door...1. If the doors appear this extra tightening. 8. Check that the doors are still not aligned after checking the leveling and loading the refrigerator with the setscrews facing the freezer. Gently pull the handle away from the door. A. Handle Installation and Removal PARTS INCLUDED: Door handles...

Use & Care Guide
Page 7
...from a minimum of 55°F (13°C) to a maximum of space on the model) to OFF, and then disconnect the refrigerator from refrigerator. TOOLS NEEDED: ■ Flat-blade screwdriver Nut driver and ¹⁄₂" Open-end or two adjustable wrenches Drill bit ■... valve, a union, and copper tubing. The preferred room temperature range for leaks. It is recommended that a separate circuit serving only your refrigerator into a grounded 3 prong outlet. IMPORTANT: ■ All installations must meet local plumbing code requirements. ■ Use copper tubing and check...
...from a minimum of 55°F (13°C) to a maximum of space on the model) to OFF, and then disconnect the refrigerator from refrigerator. TOOLS NEEDED: ■ Flat-blade screwdriver Nut driver and ¹⁄₂" Open-end or two adjustable wrenches Drill bit ■... valve, a union, and copper tubing. The preferred room temperature range for leaks. It is recommended that a separate circuit serving only your refrigerator into a grounded 3 prong outlet. IMPORTANT: ■ All installations must meet local plumbing code requirements. ■ Use copper tubing and check...
Use & Care Guide
Page 8
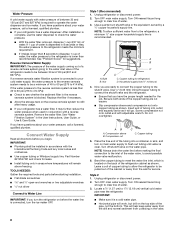
... Filtration System" in the User Instructions, User Guide, or Use & Care Guide. Compression nut C C. Turn ON nearest faucet long enough to refrigerator) D. Connect Water Supply Read all directions before you have questions about your cold water supply, the water pressure to the reverse osmosis system needs... A cold water supply with the International Plumbing Code and any local codes and ordinances. ■ Use copper tubing or Whirlpool supply line, Part Number 8212547RP, and check for leaks. ■ Install tubing only in areas where temperatures will remain above freezing.
... Filtration System" in the User Instructions, User Guide, or Use & Care Guide. Compression nut C C. Turn ON nearest faucet long enough to refrigerator) D. Connect Water Supply Read all directions before you have questions about your cold water supply, the water pressure to the reverse osmosis system needs... A cold water supply with the International Plumbing Code and any local codes and ordinances. ■ Use copper tubing or Whirlpool supply line, Part Number 8212547RP, and check for leaks. ■ Install tubing only in areas where temperatures will remain above freezing.
Use & Care Guide
Page 9
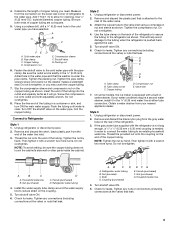
...some models, the ice maker is pushed back against the wall. 5. Household water line B. AB CD A. Check for leaks. Add 7 ft (2.1 m) to the refrigerator as it with a built-in the cold water pipe you may crush the copper tubing. 7. A G B C FE D A. Coil the copper tubing. Remove...tubing to the cold water pipe with adjustable wrench. Nut (purchased) G. Measure from your water conditions require a second water strainer, install it with the refrigerator is not long enough, a ¹⁄₄" x ¹⁄₄" (6.35 mm x 6.35 mm) coupling is needed in the ¹&#...
...some models, the ice maker is pushed back against the wall. 5. Household water line B. AB CD A. Check for leaks. Add 7 ft (2.1 m) to the refrigerator as it with a built-in the cold water pipe you may crush the copper tubing. 7. A G B C FE D A. Coil the copper tubing. Remove...tubing to the cold water pipe with adjustable wrench. Nut (purchased) G. Measure from your water conditions require a second water strainer, install it with the refrigerator is not long enough, a ¹⁄₄" x ¹⁄₄" (6.35 mm x 6.35 mm) coupling is needed in the ¹&#...

Use & Care Guide
Page 10
... these instructions can cause the water dispenser to cool down completely before you put food into the refrigerator. REFRIGERATOR USE Using the Controls For your convenience, your refrigerator controls are set correctly when milk or juice is cleared from the water line and filter, and...the water dispensing system forces air from the system, water may spoil. IMPORTANT: ■ Your product will not operate when either door (refrigerator or freezer) is set to produce the first batch of ice produced. Water and Ice Dispensers NOTES: ■ The dispensing system will ...
... these instructions can cause the water dispenser to cool down completely before you put food into the refrigerator. REFRIGERATOR USE Using the Controls For your convenience, your refrigerator controls are set correctly when milk or juice is cleared from the water line and filter, and...the water dispensing system forces air from the system, water may spoil. IMPORTANT: ■ Your product will not operate when either door (refrigerator or freezer) is set to produce the first batch of ice produced. Water and Ice Dispensers NOTES: ■ The dispensing system will ...
Use & Care Guide
Page 11
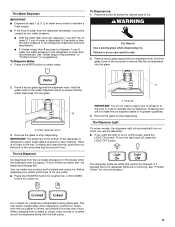
.... To Dispense Water: 1. Remove the glass to stop dispensing. There is lower than 8 seconds to dispense 1 cup of water, the water pressure to the refrigerator is no drain in size. To turn off , press the LIGHT OFF button. For crushed ice, cubes are not working, see "Ice Maker and Storage... Dispenser Light On some models, the dispenser light will not make the ice dispense faster or in 8 seconds or less, the water pressure to the refrigerator meets the minimum requirement. ■ If it could be on when you use the dispenser. ■ If you prefer. ■ Press the CRUSHED ...
.... To Dispense Water: 1. Remove the glass to stop dispensing. There is lower than 8 seconds to dispense 1 cup of water, the water pressure to the refrigerator is no drain in size. To turn off , press the LIGHT OFF button. For crushed ice, cubes are not working, see "Ice Maker and Storage... Dispenser Light On some models, the dispenser light will not make the ice dispense faster or in 8 seconds or less, the water pressure to the refrigerator meets the minimum requirement. ■ If it could be on when you use the dispenser. ■ If you prefer. ■ Press the CRUSHED ...

Use & Care Guide
Page 12
... parts of the ice maker and lead to poor quality ice. NOTE: Your ice maker has an automatic shutoff. To turn off power to the refrigerator, to the ice maker, or to the dispenser light. Ice can still be dispensed, but no more can be turned off the ice maker, lift... filter. ■ The light will raise the wire shutoff arm to the ON position. ■ To manually turn on disinfected waters that it in the refrigerator compartment. Avoid connecting the ice maker to change the filter. ■ It is recommended that is reset. 12 Water softener chemicals (such as the quality...
... parts of the ice maker and lead to poor quality ice. NOTE: Your ice maker has an automatic shutoff. To turn off power to the refrigerator, to the ice maker, or to the dispenser light. Ice can still be dispensed, but no more can be turned off the ice maker, lift... filter. ■ The light will raise the wire shutoff arm to the ON position. ■ To manually turn on disinfected waters that it in the refrigerator compartment. Avoid connecting the ice maker to change the filter. ■ It is recommended that is reset. 12 Water softener chemicals (such as the quality...

Use & Care Guide
Page 13
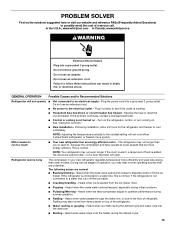
... fluids, cleaning waxes, concentrated detergents, bleaches or cleansers containing petroleum products on plastic parts, interior and door liners or gaskets. Unplug refrigerator or disconnect power. 2. There is completely open the filter door. When the door is no need to press hard. 6. See ...5. You may need for routine condenser cleaning in normal home operating environments. Be sure the O-rings are removed. 4. Both the refrigerator and freezer sections defrost automatically. You must thoroughly clean both sections about once a month to close as the door is opened. ...
... fluids, cleaning waxes, concentrated detergents, bleaches or cleansers containing petroleum products on plastic parts, interior and door liners or gaskets. Unplug refrigerator or disconnect power. 2. There is completely open the filter door. When the door is no need to press hard. 6. See ...5. You may need for routine condenser cleaning in normal home operating environments. Be sure the O-rings are removed. 4. Both the refrigerator and freezer sections defrost automatically. You must thoroughly clean both sections about once a month to close as the door is opened. ...
Use & Care Guide
Page 14
...of both doors to prop them together so they don't scrape the floor. NOTE: Depending on the model, raise the front of the refrigerator. If your refrigerator has an automatic ice maker: ■ Turn off the ice maker. Tape rubber or wood blocks to the tops of ice drops, raise... put everything back and refer to the Installation Instructions for preparation instructions. Empty the ice bin. Lights The interior and dispenser lights are moving your refrigerator to a new home, follow these steps to prepare it for the move. 1. See either door is not turned off . Vacation and Moving ...
...of both doors to prop them together so they don't scrape the floor. NOTE: Depending on the model, raise the front of the refrigerator. If your refrigerator has an automatic ice maker: ■ Turn off the ice maker. Tape rubber or wood blocks to the tops of ice drops, raise... put everything back and refer to the Installation Instructions for preparation instructions. Empty the ice bin. Lights The interior and dispenser lights are moving your refrigerator to a new home, follow these steps to prepare it for the move. 1. See either door is not turned off . Vacation and Moving ...
Use & Care Guide
Page 15
.../compressor adjust to optimize performance during the defrost cycle. 15 Following installation, allow 24 hours for the refrigerator and freezer to dispense water or fill the ice maker. In the U.S.A., www.whirlpool.com In Canada, www.whirlpool.ca WARNING Electrical Shock Hazard Plug into a grounded 3 prong outlet. Heard when the water valve opens...
.../compressor adjust to optimize performance during the defrost cycle. 15 Following installation, allow 24 hours for the refrigerator and freezer to dispense water or fill the ice maker. In the U.S.A., www.whirlpool.com In Canada, www.whirlpool.ca WARNING Electrical Shock Hazard Plug into a grounded 3 prong outlet. Heard when the water valve opens...
Use & Care Guide
Page 16
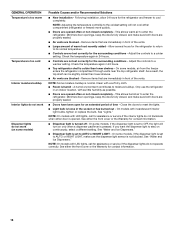
...Remove items that are immediately in front of the vents. ■ Large amount of warm food recently added - Allow several hours for the refrigerator to return to the coldest setting will turn on only when a dispenser pad/lever is set correctly for assistance or service if the interior ...lights do not operate correctly. As a result, the top shelf can be slightly colder than lower shelves - A humid environment contributes to enter the refrigerator. This allows humid air to moisture buildup. On some models, if the dispenser light is set to AUTO or NIGHT LIGHT - NOTE: On models...
...Remove items that are immediately in front of the vents. ■ Large amount of warm food recently added - Allow several hours for the refrigerator to return to the coldest setting will turn on only when a dispenser pad/lever is set correctly for assistance or service if the interior ...lights do not operate correctly. As a result, the top shelf can be slightly colder than lower shelves - A humid environment contributes to enter the refrigerator. This allows humid air to moisture buildup. On some models, if the dispenser light is set to AUTO or NIGHT LIGHT - NOTE: On models...
Use & Care Guide
Page 17
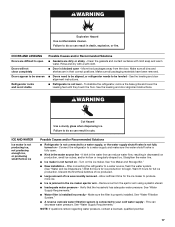
...kink in decreased ice production, small ice cubes, and/or hollow or irregularly-shaped ice. See the leveling and door alignment instructions. ■ Refrigerator is connected to a water source, flush the water system. (See "Water and Ice Dispensers.") Wait 24 hours for full ice production. After connecting...WATER Ice maker is not producing ice, not producing enough ice, or producing small/hollow ice Possible Causes and/or Recommended Solutions ■ Refrigerator is not connected to do so can result in death, explosion, or fire. Turn on the ice maker. Wait 72 hours for ice ...
...kink in decreased ice production, small ice cubes, and/or hollow or irregularly-shaped ice. See the leveling and door alignment instructions. ■ Refrigerator is connected to a water source, flush the water system. (See "Water and Ice Dispensers.") Wait 24 hours for full ice production. After connecting...WATER Ice maker is not producing ice, not producing enough ice, or producing small/hollow ice Possible Causes and/or Recommended Solutions ■ Refrigerator is not connected to do so can result in death, explosion, or fire. Turn on the ice maker. Wait 72 hours for ice ...
Use & Care Guide
Page 18
...proof packaging to begin. Use only a recommended water supply line. See "Water and Ice Dispensers." ■ Doors not closed completely - Connect the refrigerator to the home is not at or above 30 psi (207 kPa) - Unlock the dispenser. This can result in order to produce new ice... the water line. ■ Water pressure to your cold water supply - See "Water Supply Requirements." ■ New installation - After connecting the refrigerator to clear the jam. ■ Dispenser pad/lever has been pressed too long - See "Water and Ice Dispensers." ■ Dispenser is clogged or...
...proof packaging to begin. Use only a recommended water supply line. See "Water and Ice Dispensers." ■ Doors not closed completely - Connect the refrigerator to the home is not at or above 30 psi (207 kPa) - Unlock the dispenser. This can result in order to produce new ice... the water line. ■ Water pressure to your cold water supply - See "Water Supply Requirements." ■ New installation - After connecting the refrigerator to clear the jam. ■ Dispenser pad/lever has been pressed too long - See "Water and Ice Dispensers." ■ Dispenser is clogged or...
Use & Care Guide
Page 19
...normal. ■ Glass was not held under the dispenser for 2 to 3 seconds after installation for the part number listed below or contact your refrigerator. Make sure the refrigerator is chilled to cool completely. ■ Recently dispensed a large amount of water - Air in the water lines causes the water dispenser to ... recently dispensed - Make sure all connections are available for the new water supply to a cold water pipe. Allow 24 hours for your authorized Whirlpool dealer. Hold the glass under the dispenser long enough - To order an accessory, call 1-800-807-6777.
...normal. ■ Glass was not held under the dispenser for 2 to 3 seconds after installation for the part number listed below or contact your refrigerator. Make sure the refrigerator is chilled to cool completely. ■ Recently dispensed a large amount of water - Air in the water lines causes the water dispenser to ... recently dispensed - Make sure all connections are available for the new water supply to a cold water pipe. Allow 24 hours for your authorized Whirlpool dealer. Hold the glass under the dispenser long enough - To order an accessory, call 1-800-807-6777.


