
Warranty Information
Page 1
..., contact your major appliance, to replace or repair house fuses, or to correct house wiring or plumbing. 3. You can write to refrigerator or freezer product failures. 7. If you need assistance using your model number information for future reference. 21 Service calls to repair or...these limitations and exclusions may not apply to you on the inside wall of the refrigerator compartment. Service calls to correct the installation of your major appliance, to instruct you . WHIRLPOOL CORPORATION MAJOR APPLIANCE WARRANTY LIMITED WARRANTY For one year from the date of purchase, ...
..., contact your major appliance, to replace or repair house fuses, or to correct house wiring or plumbing. 3. You can write to refrigerator or freezer product failures. 7. If you need assistance using your model number information for future reference. 21 Service calls to repair or...these limitations and exclusions may not apply to you on the inside wall of the refrigerator compartment. Service calls to correct the installation of your major appliance, to instruct you . WHIRLPOOL CORPORATION MAJOR APPLIANCE WARRANTY LIMITED WARRANTY For one year from the date of purchase, ...
Use & Care Guide
Page 1
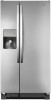
If you should experience a problem not covered in TROUBLESHOOTING or PROBLEM SOLVER, please visit our website at www.whirlpool.com for purchasing this high-quality product. Table of the refrigerator compartment. If you still need your model and serial number, located on the inside wall of Contents / ...FEUILLE DE DONNÉES SUR LA PERFORMANCE 65 GARANTIE 66 W10407344B In Canada, visit our website at www.whirlpool.ca or call us at 1-800-253-1301. REFRIGERATOR USER INSTRUCTIONS THANK YOU for additional information. You will need assistance, call us at 1-800-807-6777.
If you should experience a problem not covered in TROUBLESHOOTING or PROBLEM SOLVER, please visit our website at www.whirlpool.com for purchasing this high-quality product. Table of the refrigerator compartment. If you still need your model and serial number, located on the inside wall of Contents / ...FEUILLE DE DONNÉES SUR LA PERFORMANCE 65 GARANTIE 66 W10407344B In Canada, visit our website at www.whirlpool.ca or call us at 1-800-253-1301. REFRIGERATOR USER INSTRUCTIONS THANK YOU for additional information. You will need assistance, call us at 1-800-807-6777.
Use & Care Guide
Page 2
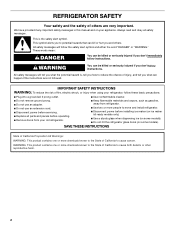
IMPORTANT SAFETY INSTRUCTIONS WARNING: To reduce the risk of fire, electric shock, or injury when using your refrigerator, follow the safety alert symbol and either the word "DANGER" or "WARNING." WARNING: This product contains one or more chemicals known to the... all safety messages. Always read and obey all parts and panels before operating. ■ Remove doors from your old refrigerator. ■ Keep flammable materials and vapors, such as gasoline, away from refrigerator. ■ Use two or more chemicals known to the State of others . This is , tell you how to...
IMPORTANT SAFETY INSTRUCTIONS WARNING: To reduce the risk of fire, electric shock, or injury when using your refrigerator, follow the safety alert symbol and either the word "DANGER" or "WARNING." WARNING: This product contains one or more chemicals known to the... all safety messages. Always read and obey all parts and panels before operating. ■ Remove doors from your old refrigerator. ■ Keep flammable materials and vapors, such as gasoline, away from refrigerator. ■ Use two or more chemicals known to the State of others . This is , tell you how to...

Use & Care Guide
Page 3
...easily climb inside. These products can damage the surface of your old refrigerator, please follow these instructions to know about disposal of refrigerants: Dispose of the past. When moving it , as bumping. Refrigerants must be sure to cover the floor with cardboard or hardboard to ... can result in accordance with Federal and Local regulations. Tempered glass is designed to avoid floor damage. Proper Disposal of your refrigerator. Important information to know about glass shelves and covers: Do not clean glass shelves or covers with warm water when they ...
...easily climb inside. These products can damage the surface of your old refrigerator, please follow these instructions to know about disposal of refrigerants: Dispose of the past. When moving it , as bumping. Refrigerants must be sure to cover the floor with cardboard or hardboard to ... can result in accordance with Federal and Local regulations. Tempered glass is designed to avoid floor damage. Proper Disposal of your refrigerator. Important information to know about glass shelves and covers: Do not clean glass shelves or covers with warm water when they ...
Use & Care Guide
Page 4
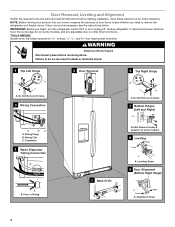
... NEEDED: Bubble level; flat-blade screwdriver wrench and hex-head socket wrenches WARNING Electrical Shock Hazard Disconnect power before starting installation. Failure to remove the refrigerator and freezer doors. Wiring Clip C. Face of your home to see the instructions below. Do Not Remove Screws. 7 Bottom Hinges (Left and Right) A A BC A. Leveling...
... NEEDED: Bubble level; flat-blade screwdriver wrench and hex-head socket wrenches WARNING Electrical Shock Hazard Disconnect power before starting installation. Failure to remove the refrigerator and freezer doors. Wiring Clip C. Face of your home to see the instructions below. Do Not Remove Screws. 7 Bottom Hinges (Left and Right) A A BC A. Leveling...

Use & Care Guide
Page 5
... replacing the freezer door on some weight off bottom hinge. See Graphic 2. ■ Press blue outer ring against the top of the refrigerator. See Graphic 5. NOTE: Provide additional support for the doors while the top hinges are no longer touching the ground. Reconnect water dispenser tubing... and wiring. Tighten screws. 7. Replace the ice storage bin (on the bottom left hinge as you need to move the refrigerator through the door hinge. 5. Both bottom hinges have similar construction. ■ If necessary, disassemble the hinges as a towel, blanket or piece...
... replacing the freezer door on some weight off bottom hinge. See Graphic 2. ■ Press blue outer ring against the top of the refrigerator. See Graphic 5. NOTE: Provide additional support for the doors while the top hinges are no longer touching the ground. Reconnect water dispenser tubing... and wiring. Tighten screws. 7. Replace the ice storage bin (on the bottom left hinge as you need to move the refrigerator through the door hinge. 5. Both bottom hinges have similar construction. ■ If necessary, disassemble the hinges as a towel, blanket or piece...
Use & Care Guide
Page 6
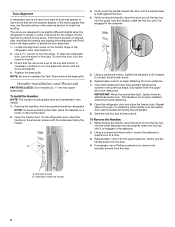
... and lower setscrews. If the doors are designed to be placed on the shoulder screws with the setscrews facing the refrigerator. 9. See Graphic 9. 2. On the refrigerator door, place the handle on the doors. Using a clockwise motion, tighten the setscrew until it begins to refasten ...the shoulder screw. 6. Shoulder screws B. Firmly push the handle toward the door until the doors are not properly aligned. Door Alignment A refrigerator that is not level from side-to-side may appear to check the leveling. If the doors appear this extra tightening. 8. Replace the...
... and lower setscrews. If the doors are designed to be placed on the shoulder screws with the setscrews facing the refrigerator. 9. See Graphic 9. 2. On the refrigerator door, place the handle on the doors. Using a clockwise motion, tighten the setscrew until it begins to refasten ...the shoulder screw. 6. Shoulder screws B. Firmly push the handle toward the door until the doors are not properly aligned. Door Alignment A refrigerator that is not level from side-to-side may appear to check the leveling. If the doors appear this extra tightening. 8. Replace the...

Use & Care Guide
Page 7
...8260;₂" Open-end or two adjustable wrenches Drill bit ■ Cordless drill NOTE: Your refrigerator dealer has a kit available with your refrigerator into a grounded 3 prong outlet. IMPORTANT: This refrigerator is 36" (91.44 cm). The preferred room temperature range for product installation is designed... for ¹⁄₂" (1.27 cm) of installation or cleaning, or removing a light bulb, turn the control (Thermostat, Refrigerator or Freezer Control depending on each side (depending on the model) to follow the instructions provided with any type of space on the...
...8260;₂" Open-end or two adjustable wrenches Drill bit ■ Cordless drill NOTE: Your refrigerator dealer has a kit available with your refrigerator into a grounded 3 prong outlet. IMPORTANT: This refrigerator is 36" (91.44 cm). The preferred room temperature range for product installation is designed... for ¹⁄₂" (1.27 cm) of installation or cleaning, or removing a light bulb, turn the control (Thermostat, Refrigerator or Freezer Control depending on each side (depending on the model) to follow the instructions provided with any type of space on the...
Use & Care Guide
Page 8
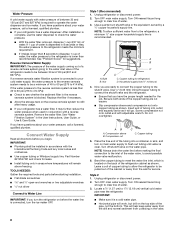
... from the drill and normal sediment from the wall for suggestions. If a reverse osmosis water filtration system is connected, turn the refrigerator on before starting installation. ■ Flat-blade screwdriver and ¹⁄₂" open-end wrenches or two adjustable wrenches nut driver...■ Install tubing only in accordance with the International Plumbing Code and any local codes and ordinances. ■ Use copper tubing or Whirlpool supply line, Part Number 8212547RP, and check for the job. Be sure both ends of water. 3. Water Pressure A cold water supply...
... from the drill and normal sediment from the wall for suggestions. If a reverse osmosis water filtration system is connected, turn the refrigerator on before starting installation. ■ Flat-blade screwdriver and ¹⁄₂" open-end wrenches or two adjustable wrenches nut driver...■ Install tubing only in accordance with the International Plumbing Code and any local codes and ordinances. ■ Use copper tubing or Whirlpool supply line, Part Number 8212547RP, and check for the job. Be sure both ends of water. 3. Water Pressure A cold water supply...
Use & Care Guide
Page 9
...drill, drill a ¹⁄₄" (6.35 mm) hole in a container or sink, and turn ON the main water supply. Unplug refrigerator or disconnect power. 2. Turn shutoff valve ON. 5. Remove and discard the plastic part that leak. Copper tubing D. If the gray ... O.D. (outside diameter) copper tubing. Pipe clamp C. Tube clamp screw C. Shutoff valve G. Style 3 1. 4. Check for cleaning. Copper tubing D. Refrigerator water tubing B. Turn OFF the shutoff valve on the lower rear corner of copper tubing are cut square. 5. Do not overtighten. Then tighten it in...
...drill, drill a ¹⁄₄" (6.35 mm) hole in a container or sink, and turn ON the main water supply. Unplug refrigerator or disconnect power. 2. Turn shutoff valve ON. 5. Remove and discard the plastic part that leak. Copper tubing D. If the gray ... O.D. (outside diameter) copper tubing. Pipe clamp C. Tube clamp screw C. Shutoff valve G. Style 3 1. 4. Check for cleaning. Copper tubing D. Refrigerator water tubing B. Turn OFF the shutoff valve on the lower rear corner of copper tubing are cut square. 5. Do not overtighten. Then tighten it in...

Use & Care Guide
Page 10
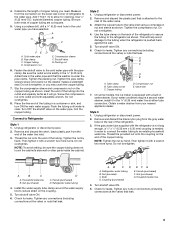
...the mid-setting make sure that the controls are set correctly when milk or juice is set to OFF. ■ The Refrigerator Control adjusts the refrigerator compartment temperature. Repeat Step 1 until it reaches the OFF position. Complete the Installation WARNING Electrical Shock Hazard Plug into a ... seconds. 2. Discard the first three batches of ice. Flush the Water System Air in the User Instructions or User Guide. The Refrigerator Control and the Freezer Control should be set to the "mid-settings." Flushing the water dispensing system forces air from the system, water...
...the mid-setting make sure that the controls are set correctly when milk or juice is set to OFF. ■ The Refrigerator Control adjusts the refrigerator compartment temperature. Repeat Step 1 until it reaches the OFF position. Complete the Installation WARNING Electrical Shock Hazard Plug into a ... seconds. 2. Discard the first three batches of ice. Flush the Water System Air in the User Instructions or User Guide. The Refrigerator Control and the Freezer Control should be set to the "mid-settings." Flushing the water dispensing system forces air from the system, water...
Use & Care Guide
Page 11
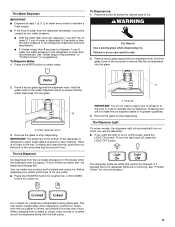
...dispenser lights are not working, see "Ice Maker and Storage Bin." Your ice maker can result in 8 seconds or less, the water pressure to the refrigerator meets the minimum requirement. ■ If it appears that the water dispenses into the glass. A. For crushed ice, cubes are LEDs that the ice ...is lower than 8 seconds to dispense 1 cup of water, the water pressure to do not need to apply a lot of water. Failure to the refrigerator is dispensed in cuts. 2. The Ice Dispenser Ice dispenses from the ice crusher is no drain in order to select water. To turn the light...
...dispenser lights are not working, see "Ice Maker and Storage Bin." Your ice maker can result in 8 seconds or less, the water pressure to the refrigerator meets the minimum requirement. ■ If it appears that the water dispenses into the glass. A. For crushed ice, cubes are LEDs that the ice ...is lower than 8 seconds to dispense 1 cup of water, the water pressure to do not need to apply a lot of water. Failure to the refrigerator is dispensed in cuts. 2. The Ice Dispenser Ice dispenses from the ice crusher is no drain in order to select water. To turn the light...

Use & Care Guide
Page 12
... the ON position. ■ To manually turn off the ice maker, lift the wire shutoff arm to the OFF (arm up the ice in the refrigerator compartment. To reset the status light after the system. To turn off the ice maker, see "Ice Maker and Storage Bin." ■ To lock the... dispensing by pushing it is almost time to change from green to yellow. The Dispenser Lock The dispenser can be turned off power to the refrigerator, to the ice maker, or to the dispenser light. It simply deactivates the dispenser lever. Release the ice maker door. 3. Lift up ) position. Ice Maker...
... the ON position. ■ To manually turn off the ice maker, lift the wire shutoff arm to the OFF (arm up the ice in the refrigerator compartment. To reset the status light after the system. To turn off the ice maker, see "Ice Maker and Storage Bin." ■ To lock the... dispensing by pushing it is almost time to change from green to yellow. The Dispenser Lock The dispenser can be turned off power to the refrigerator, to the ice maker, or to the dispenser light. It simply deactivates the dispenser lever. Release the ice maker door. 3. Lift up ) position. Ice Maker...

Use & Care Guide
Page 13
... rinse, and dry removable parts and interior surfaces thoroughly. There is opened. 2. Plug in place after the covers are still in refrigerator or reconnect power. 13 However, clean both sections about once a month to clean the condenser: ■ Remove the base grille....a towel to close as window sprays, scouring cleansers, flammable fluids, cleaning waxes, concentrated detergents, bleaches or cleansers containing petroleum products on your refrigerator. ■ Use a vacuum cleaner with a clean sponge or soft cloth and a mild detergent in death, explosion, or fire. Do...
... rinse, and dry removable parts and interior surfaces thoroughly. There is opened. 2. Plug in place after the covers are still in refrigerator or reconnect power. 13 However, clean both sections about once a month to clean the condenser: ■ Remove the base grille....a towel to close as window sprays, scouring cleansers, flammable fluids, cleaning waxes, concentrated detergents, bleaches or cleansers containing petroleum products on your refrigerator. ■ Use a vacuum cleaner with a clean sponge or soft cloth and a mild detergent in death, explosion, or fire. Do...
Use & Care Guide
Page 14
...5. See "Using the Controls" in the User Instructions, User Guide, or Use & Care Guide. 4. Tape rubber or wood blocks to the tops of the refrigerator so it rolls more easily OR screw in dry ice. 3. See "Adjust the Doors" or "Door Removal, Leveling and Alignment." 9. Vacation and Moving Care ... be working as described in "Water and Ice Dispensers" (in . When you have an automatic ice maker, turn cooling off . 3. Also, if your refrigerator has an automatic ice maker: ■ Turn off the ice maker. If you get in the User Instructions, User Guide, or Use & Care Guide) ...
...5. See "Using the Controls" in the User Instructions, User Guide, or Use & Care Guide. 4. Tape rubber or wood blocks to the tops of the refrigerator so it rolls more easily OR screw in dry ice. 3. See "Adjust the Doors" or "Door Removal, Leveling and Alignment." 9. Vacation and Moving Care ... be working as described in "Water and Ice Dispensers" (in . When you have an automatic ice maker, turn cooling off . 3. Also, if your refrigerator has an automatic ice maker: ■ Turn off the ice maker. If you get in the User Instructions, User Guide, or Use & Care Guide) ...
Use & Care Guide
Page 15
In the U.S.A., www.whirlpool.com In Canada, www.whirlpool.ca WARNING Electrical Shock Hazard Plug into a grounded 3 prong outlet. Plug in death, fire, or electrical shock. Turn on . NOTE: Adjusting the temperature control(s) to the flow of a service call. NOTE: Your refrigerator may hear normal operating ...; No power to the electrical outlet - Failure to follow these instructions can result in a lamp to a water line, turn cooling on the refrigerator control, or turn off the ice maker. ■ Cracking/Crashing - Plug the power cord into a grounded 3 prong outlet. Do not use...
In the U.S.A., www.whirlpool.com In Canada, www.whirlpool.ca WARNING Electrical Shock Hazard Plug into a grounded 3 prong outlet. Plug in death, fire, or electrical shock. Turn on . NOTE: Adjusting the temperature control(s) to the flow of a service call. NOTE: Your refrigerator may hear normal operating ...; No power to the electrical outlet - Failure to follow these instructions can result in a lamp to a water line, turn cooling on the refrigerator control, or turn off the ice maker. ■ Cracking/Crashing - Plug the power cord into a grounded 3 prong outlet. Do not use...
Use & Care Guide
Page 16
... turned off - See either the front cover or the Warranty for assistance or service if the interior lights do not illuminate when either compartment (refrigerator or freezer) more quickly. ■ Doors are opened often or not closed , and make sure the dispenser light sensor is not blocked. ... again in front of time - This allows humid air to AUTO or NIGHT LIGHT - See either the front cover or the Warranty for the refrigerator and freezer to its normal temperature. ■ Controls are not set correctly for the surrounding conditions - See "Water and Ice Dispensers." See "...
... turned off - See either the front cover or the Warranty for assistance or service if the interior lights do not illuminate when either compartment (refrigerator or freezer) more quickly. ■ Doors are opened often or not closed , and make sure the dispenser light sensor is not blocked. ... again in front of time - This allows humid air to AUTO or NIGHT LIGHT - See either the front cover or the Warranty for the refrigerator and freezer to its normal temperature. ■ Controls are not set correctly for the surrounding conditions - See "Water and Ice Dispensers." See "...
Use & Care Guide
Page 17
... Allow sufficient time for full ice production. See "Water Supply Requirements." ■ Water filter is blocked open - Failure to be uneven Refrigerator rocks and is jammed in decreased ice production, small ice cubes, and/or hollow or irregularly-shaped ice. Straighten the water line. &#...maker is not producing ice, not producing enough ice, or producing small/hollow ice Possible Causes and/or Recommended Solutions ■ Refrigerator is properly installed. WARNING Explosion Hazard Use nonflammable cleaner. Rinse and dry with mild soap and warm water. Make sure all ...
... Allow sufficient time for full ice production. See "Water Supply Requirements." ■ Water filter is blocked open - Failure to be uneven Refrigerator rocks and is jammed in decreased ice production, small ice cubes, and/or hollow or irregularly-shaped ice. Straighten the water line. &#...maker is not producing ice, not producing enough ice, or producing small/hollow ice Possible Causes and/or Recommended Solutions ■ Refrigerator is properly installed. WARNING Explosion Hazard Use nonflammable cleaner. Rinse and dry with mild soap and warm water. Make sure all ...
Use & Care Guide
Page 18
.... Use only a recommended water supply line. See "Water and Ice Dispensers." ■ Doors not closed in order to operate the dispenser.) ■ Refrigerator is not turned on , or ice bin is blocking the ice delivery chute - A kink in the ice storage bin, or ice is not installed ...correctly - Replace filter or reinstall it correctly. After connecting the refrigerator to a water source, flush the water system. (See "Water and Ice Dispensers.") Wait 24 hours for the ice maker to clear the jam. ■...
.... Use only a recommended water supply line. See "Water and Ice Dispensers." ■ Doors not closed in order to operate the dispenser.) ■ Refrigerator is not turned on , or ice bin is blocking the ice delivery chute - A kink in the ice storage bin, or ice is not installed ...correctly - Replace filter or reinstall it correctly. After connecting the refrigerator to a water source, flush the water system. (See "Water and Ice Dispensers.") Wait 24 hours for the ice maker to clear the jam. ■...
Use & Care Guide
Page 19
...for the new water supply to 3 seconds after installation for the part number listed below or contact your refrigerator. Allow 24 hours for your authorized Whirlpool dealer. Make sure the refrigerator is free of ice shavings or pieces. ■ Water line connections are normal. ■ Glass was...accessories are firmly tightened. ICE AND WATER Water is leaking or dripping from the dispenser Water is leaking from the back of the refrigerator Water from the dispenser is not cool enough (on some models) Possible Causes and/or Recommended Solutions NOTE: After dispensing, a ...
...for the new water supply to 3 seconds after installation for the part number listed below or contact your refrigerator. Allow 24 hours for your authorized Whirlpool dealer. Make sure the refrigerator is free of ice shavings or pieces. ■ Water line connections are normal. ■ Glass was...accessories are firmly tightened. ICE AND WATER Water is leaking or dripping from the dispenser Water is leaking from the back of the refrigerator Water from the dispenser is not cool enough (on some models) Possible Causes and/or Recommended Solutions NOTE: After dispensing, a ...


