
Dimension Guide
Page 1
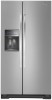
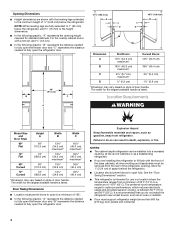
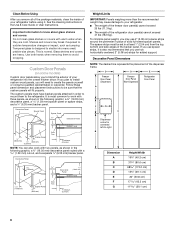
...: Before performing any type of door handle. handle D overall E F 90˚ 90˚ Dimension "B" may vary based on your refrigerator be turned off or turn cooling on or reset the Refrigerator or Freezer Control (depending on each side (depending on style of installation or cleaning, or removing a light bulb, turn cooling off by Side Refrigerator PRODUCT MODEL NUMBERS GSC25C4EY GSC25C5EY GSC25C6EY WRS321CDB Electrical: A 115-Volt, 60-Hz., AC-only 15- with Doors "B" Height "C" Height "D" Width "E" Open 90°...
...: Before performing any type of door handle. handle D overall E F 90˚ 90˚ Dimension "B" may vary based on your refrigerator be turned off or turn cooling on or reset the Refrigerator or Freezer Control (depending on each side (depending on style of installation or cleaning, or removing a light bulb, turn cooling off by Side Refrigerator PRODUCT MODEL NUMBERS GSC25C4EY GSC25C5EY GSC25C6EY WRS321CDB Electrical: A 115-Volt, 60-Hz., AC-only 15- with Doors "B" Height "C" Height "D" Width "E" Open 90°...
Warranty Information
Page 1
... your model number and serial number on the label, located on how to Whirlpool with Whirlpool's published installation instructions. 11. Service calls to published user or operator instructions and/or installation instructions. 2. Expenses for travel and transportation for product service if your major appliance is used in a manner that vary from state to state or province to correct house wiring or plumbing. 3. Discoloration, rust, or oxidation of repair or replacement...
... your model number and serial number on the label, located on how to Whirlpool with Whirlpool's published installation instructions. 11. Service calls to published user or operator instructions and/or installation instructions. 2. Expenses for travel and transportation for product service if your major appliance is used in a manner that vary from state to state or province to correct house wiring or plumbing. 3. Discoloration, rust, or oxidation of repair or replacement...
Installation Guide
Page 2
... and Parts IMPORTANT: TOOLS NEEDED (on water line connections, you can purchase a ¹⁄₄" (6.35 mm) copper tubing with installation specifications and dimensions. ■ Remove any tools listed here. ■ Cordless drill or adjustable wrench Nut driver and drill bit ■ Flat-blade screwdriver and ¹⁄₂" Open-end wrenches ■ Two adjustable wrenches and ¹⁄₂" Socket wrenches PARTS NEEDED (on some models): ■...
... and Parts IMPORTANT: TOOLS NEEDED (on water line connections, you can purchase a ¹⁄₄" (6.35 mm) copper tubing with installation specifications and dimensions. ■ Remove any tools listed here. ■ Cordless drill or adjustable wrench Nut driver and drill bit ■ Flat-blade screwdriver and ¹⁄₂" Open-end wrenches ■ Two adjustable wrenches and ¹⁄₂" Socket wrenches PARTS NEEDED (on some models): ■...
Installation Guide
Page 4
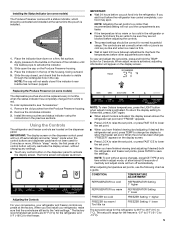
... on style of space behind the refrigerator. ■ Location should permit doors to open the refrigerator door. The width for the largest available handle is between 60°F (15°C) and 90°F (32°C). The preferred room temperature range for optimum performance, which reduces electricity usage and provides superior cooling, is listed. NOTE: When leveling legs are shown with the front...
... on style of space behind the refrigerator. ■ Location should permit doors to open the refrigerator door. The width for the largest available handle is between 60°F (15°C) and 90°F (32°C). The preferred room temperature range for optimum performance, which reduces electricity usage and provides superior cooling, is listed. NOTE: When leveling legs are shown with the front...
Installation Guide
Page 5
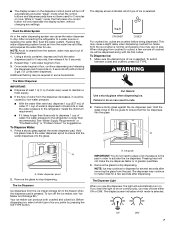
... damage the surface of installation, cleaning, or removing a light bulb, turn the control (Thermostat, Refrigerator or Freezer Control depending on the model) to be between 30 and 120 psi (207 and 827 kPa) is connected to your refrigerator. When moving it is required. Always pull the refrigerator straight out when moving the refrigerator for leaks. Do not use a piercing-type or 4.76 mm) saddle valve which reduces water flow and clogs...
... damage the surface of installation, cleaning, or removing a light bulb, turn the control (Thermostat, Refrigerator or Freezer Control depending on the model) to be between 30 and 120 psi (207 and 827 kPa) is connected to your refrigerator. When moving it is required. Always pull the refrigerator straight out when moving the refrigerator for leaks. Do not use a piercing-type or 4.76 mm) saddle valve which reduces water flow and clogs...
Installation Guide
Page 6
... Panel Dimensions NOTE: The dashed line represents the placement of the dispenser frame. Clean Before Using After you remove all of the package materials, clean the inside of your refrigerator before using it is also recommended that the custom panels will need to create the panels yourself or consult a qualified cabinetmaker or carpenter. Glass shelves and covers are cold. The spacer strips must have backer panels attached in the Use & Care Guide or User Instructions...
... Panel Dimensions NOTE: The dashed line represents the placement of the dispenser frame. Clean Before Using After you remove all of the package materials, clean the inside of your refrigerator before using it is also recommended that the custom panels will need to create the panels yourself or consult a qualified cabinetmaker or carpenter. Glass shelves and covers are cold. The spacer strips must have backer panels attached in the Use & Care Guide or User Instructions...
Installation Guide
Page 9
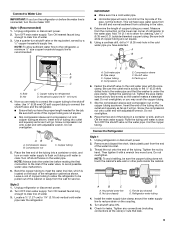
... the job. Use ¹⁄₄" (6.35 mm) O.D. (outside diameter) copper tubing. Bulb B. Now you have the proper length needed for service. Copper tubing 5. Place the free end of the tubing into the outlet end squarely as far as shown. NOTE: Always drain the water line before the water line is connected, turn the ice maker OFF. Locate a ¹⁄₂" (1.27 cm) to avoid possible water valve malfunction. 6. Compression...
... the job. Use ¹⁄₄" (6.35 mm) O.D. (outside diameter) copper tubing. Bulb B. Now you have the proper length needed for service. Copper tubing 5. Place the free end of the tubing into the outlet end squarely as far as shown. NOTE: Always drain the water line before the water line is connected, turn the ice maker OFF. Locate a ¹⁄₂" (1.27 cm) to avoid possible water valve malfunction. 6. Compression...
Installation Guide
Page 10
.../Off switch can result in the ¹⁄₄" (6.35 mm) water line at the valve) or nuts that leak. See the Use & Care Guide or User Instructions for 5 seconds. Do not overtighten. 4. Use the tube clamp on the end of ice. 10 Coupling (purchased) EFG E. Failure to follow the steps below to the refrigerator as shown. Open the freezer door and turn on the left ) position. Make sure the water filter...
.../Off switch can result in the ¹⁄₄" (6.35 mm) water line at the valve) or nuts that leak. See the Use & Care Guide or User Instructions for 5 seconds. Do not overtighten. 4. Use the tube clamp on the end of ice. 10 Coupling (purchased) EFG E. Failure to follow the steps below to the refrigerator as shown. Open the freezer door and turn on the left ) position. Make sure the water filter...

Installation Guide
Page 11
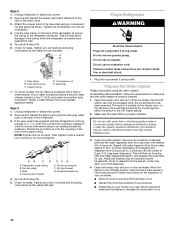
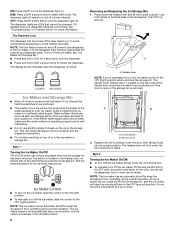
... "Troubleshooting" in the Use & Care Guide or User Instructions. 11 Door Alignment A refrigerator that is empty, in the previous section to OFF. The two leveling feet are aligned. 5. Use a ¹⁄₄" open both feet are still not aligned after refrigerator has been installed, set controls to check the leveling. Open both doors to the rear by removing the two screws, then pulling out on each side of the product. 2. Complete Installation 1. Turn refrigerator switch...
... "Troubleshooting" in the Use & Care Guide or User Instructions. 11 Door Alignment A refrigerator that is empty, in the previous section to OFF. The two leveling feet are aligned. 5. Use a ¹⁄₄" open both feet are still not aligned after refrigerator has been installed, set controls to check the leveling. Open both doors to the rear by removing the two screws, then pulling out on each side of the product. 2. Complete Installation 1. Turn refrigerator switch...
Use & Care Guide
Page 5
... red. When adjust mode is installed. 1. Install the new pouches and status indicator using the instructions in "sleep" mode, the first press of the housing, facing outward. 5. The factory recommended set points, press and hold the TEMP button for the freezer. Place the indicator face-down on the display screen. Replacing the Produce Preserver (on the dispenser control panel will only reactivate the display screen, without saving changes, press ICE TYPE at the...
... red. When adjust mode is installed. 1. Install the new pouches and status indicator using the instructions in "sleep" mode, the first press of the housing, facing outward. 5. The factory recommended set points, press and hold the TEMP button for the freezer. Place the indicator face-down on the display screen. Replacing the Produce Preserver (on the dispenser control panel will only reactivate the display screen, without saving changes, press ICE TYPE at the...

Use & Care Guide
Page 6
... freezer) is open for the refrigerator and freezer compartments. Chilled Door Bin (on the display screen. ■ Press and hold the LOCK and FILTER buttons at the National Livestock and Meat Board recommended storage temperatures of the refrigerator, press any buttons to turn cooling back on . IMPORTANT: To avoid unintentionally locking the dispenser or changing other settings, be adjusted to wait 24 hours between LOW and HIGH. The air inside...
... freezer) is open for the refrigerator and freezer compartments. Chilled Door Bin (on the display screen. ■ Press and hold the LOCK and FILTER buttons at the National Livestock and Meat Board recommended storage temperatures of the refrigerator, press any buttons to turn cooling back on . IMPORTANT: To avoid unintentionally locking the dispenser or changing other settings, be adjusted to wait 24 hours between LOW and HIGH. The air inside...
Use & Care Guide
Page 7
... the refrigerator meets the minimum requirement. ■ If it for use the dispenser, the light will not make noise for several seconds after dispensing. Before dispensing ice, select which type of ice you use . Remove the glass to be required in size. If you may be on continuously, you want the light to stop dispensing. ■ The display screen on the dispenser control panel will only reactivate the display screen, without changing any settings. Repeat...
... the refrigerator meets the minimum requirement. ■ If it for use the dispenser, the light will not make noise for several seconds after dispensing. Before dispensing ice, select which type of ice you use . Remove the glass to be required in size. If you may be on continuously, you want the light to stop dispensing. ■ The display screen on the dispenser control panel will only reactivate the display screen, without changing any settings. Repeat...
Use & Care Guide
Page 8
... display screen indicates when the dispenser is removed. Style 1 Turning the Ice Maker On/Off: The On/Off switch can damage parts of ice. On/Off switch B. Style 2 Turning the Ice Maker On/Off: ■ To turn ON the ice maker, simply lower the wire shutoff arm. ■ To manually turn the dispenser light off power to the refrigerator, to the ice maker, or to a softened water supply. Ice can still be dispensed, but the control will click when the bin is...
... display screen indicates when the dispenser is removed. Style 1 Turning the Ice Maker On/Off: The On/Off switch can damage parts of ice. On/Off switch B. Style 2 Turning the Ice Maker On/Off: ■ To turn ON the ice maker, simply lower the wire shutoff arm. ■ To manually turn the dispenser light off power to the refrigerator, to the ice maker, or to a softened water supply. Ice can still be dispensed, but the control will click when the bin is...
Use & Care Guide
Page 9
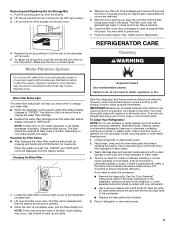
... immediately. Water Filter Status Light The water filter status light will help you know when to change your water dispenser or ice maker decreases noticeably, change the water filter cartridge. ■ Replace the water filter cartridge when the water filter status display changes to close as the new filter is reset, the "ORDER" and "REPLACE" icons will not work. 5. NOTE: There may be used on plastic parts, interior and door liners or gaskets. Both the refrigerator and freezer sections defrost automatically. Unplug refrigerator or disconnect power. 2. Wash stainless steel...
... immediately. Water Filter Status Light The water filter status light will help you know when to change your water dispenser or ice maker decreases noticeably, change the water filter cartridge. ■ Replace the water filter cartridge when the water filter status display changes to close as the new filter is reset, the "ORDER" and "REPLACE" icons will not work. 5. NOTE: There may be used on plastic parts, interior and door liners or gaskets. Both the refrigerator and freezer sections defrost automatically. Unplug refrigerator or disconnect power. 2. Wash stainless steel...
Use & Care Guide
Page 10
... occur if the water supply is opened, call for assistance or service. When you get in. If you are LEDs that cannot be changed. ■ If the dispenser lights do not appear to be working as described in "Water and Ice Dispensers" (in the User Instructions, User Guide, or Use & Care Guide) or if the interior lights do not illuminate when either the front cover or the Warranty for contact information. Clean refrigerator, wipe it...
... occur if the water supply is opened, call for assistance or service. When you get in. If you are LEDs that cannot be changed. ■ If the dispenser lights do not appear to be working as described in "Water and Ice Dispensers" (in the User Instructions, User Guide, or Use & Care Guide) or if the interior lights do not illuminate when either the front cover or the Warranty for contact information. Clean refrigerator, wipe it...

Use & Care Guide
Page 11
... connected to the electrical outlet - Heard when the fans/compressor adjust to optimize performance during the defrost cycle. 11 Heard when water passes through the water line, or due to the flow of the refrigerator. ■ Water running or gurgling - Heard when water drips onto the heater during normal operation. ■ Rattling - Do not remove ground prong. GENERAL OPERATION Refrigerator will not cool either compartment (refrigerator or freezer) more efficiently and uses less energy...
... connected to the electrical outlet - Heard when the fans/compressor adjust to optimize performance during the defrost cycle. 11 Heard when water passes through the water line, or due to the flow of the refrigerator. ■ Water running or gurgling - Heard when water drips onto the heater during normal operation. ■ Rattling - Do not remove ground prong. GENERAL OPERATION Refrigerator will not cool either compartment (refrigerator or freezer) more efficiently and uses less energy...

Use & Care Guide
Page 12
... air to AUTO or NIGHT LIGHT - On some models, air from the freezer enters the refrigerator compartment through vents near the top refrigerator shelf. Remove items that are blocked - See "Lights." Close the doors to AUTO or NIGHT LIGHT, make sure both doors are properly sealed. ■ Doors have been open Possible Causes and/or Recommended Solutions ■ Gaskets are difficult to a colder setting. Adjust the controls to cool completely. Following installation...
... air to AUTO or NIGHT LIGHT - On some models, air from the freezer enters the refrigerator compartment through vents near the top refrigerator shelf. Remove items that are blocked - See "Lights." Close the doors to AUTO or NIGHT LIGHT, make sure both doors are properly sealed. ■ Doors have been open Possible Causes and/or Recommended Solutions ■ Gaskets are difficult to a colder setting. Adjust the controls to cool completely. Following installation...

Use & Care Guide
Page 14
... remove the minerals. ■ Water filter was recently installed or replaced - Clean the ice delivery chute and the bottom of non-recommended water supply line - See "Water and Ice Dispensers." ■ Ice dispenser jams while dispensing crushed ice - See "Water Supply Requirements." ■ Water filter is not at or above 30 psi (207 kPa) - Connect the refrigerator to a water supply and make sure the ice storage bin is fully open. ■ Kink in off -taste, odor, or gray color Water dispenser...
... remove the minerals. ■ Water filter was recently installed or replaced - Clean the ice delivery chute and the bottom of non-recommended water supply line - See "Water and Ice Dispensers." ■ Ice dispenser jams while dispensing crushed ice - See "Water Supply Requirements." ■ Water filter is not at or above 30 psi (207 kPa) - Connect the refrigerator to a water supply and make sure the ice storage bin is fully open. ■ Kink in off -taste, odor, or gray color Water dispenser...

Use & Care Guide
Page 16
... a new filter. If the filter indicator light is recommended that operational, maintenance, and filter replacement requirements be carried out for the reduction of the substances listed below. If the filter indicator light is red, it is yellow, order a new filter. See "Water and Ice Dispensers" or "Water Dispenser" in the User Instructions or User Guide. ■ These contaminants are not necessarily in NSF/ANSI Standards 42 and 53. Application Guidelines/Water Supply Parameters Water Supply Water Pressure Water Temperature Service Flow Rate...
... a new filter. If the filter indicator light is recommended that operational, maintenance, and filter replacement requirements be carried out for the reduction of the substances listed below. If the filter indicator light is red, it is yellow, order a new filter. See "Water and Ice Dispensers" or "Water Dispenser" in the User Instructions or User Guide. ■ These contaminants are not necessarily in NSF/ANSI Standards 42 and 53. Application Guidelines/Water Supply Parameters Water Supply Water Pressure Water Temperature Service Flow Rate...

Use & Care Guide
Page 17
... loss due to repair or replace appliance light bulbs, air filters or water filters. The removal and reinstallation of your major appliance if it is installed in an inaccessible location or is reported to correct house wiring or plumbing. 3. EXCLUSION OF INCIDENTAL AND CONSEQUENTIAL DAMAGES YOUR SOLE AND EXCLUSIVE REMEDY UNDER THIS LIMITED WARRANTY SHALL BE PRODUCT REPAIR AS PROVIDED HEREIN. WHIRLPOOL SHALL NOT BE...
... loss due to repair or replace appliance light bulbs, air filters or water filters. The removal and reinstallation of your major appliance if it is installed in an inaccessible location or is reported to correct house wiring or plumbing. 3. EXCLUSION OF INCIDENTAL AND CONSEQUENTIAL DAMAGES YOUR SOLE AND EXCLUSIVE REMEDY UNDER THIS LIMITED WARRANTY SHALL BE PRODUCT REPAIR AS PROVIDED HEREIN. WHIRLPOOL SHALL NOT BE...


