Specification Sheet
Page 1
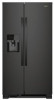
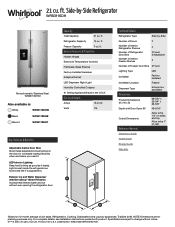
..., see Installation Instructions packed with EveryDrop® Water Filtration Access fresh filtered water and ice without notice. ®/™ © 2020. Side-by -Side Number of Doors 2 Number of Interior Refrigerator Shelves Number of Refrigerator Door Bins Number of Interior Freezer Shelves 4 2 Fixed, 3 Adjustable 3 Number of Freezer Door Bins 3 Fixed Lighting Type Ice Maker Ice Maker Location Dispenser Type Dimensions Product Dimensions (H x W x D) Depth with Door Open 90° Cutout Dimensions Reference Material LED Factory Installed Freezer Exterior Ice and Water 66...
..., see Installation Instructions packed with EveryDrop® Water Filtration Access fresh filtered water and ice without notice. ®/™ © 2020. Side-by -Side Number of Doors 2 Number of Interior Refrigerator Shelves Number of Refrigerator Door Bins Number of Interior Freezer Shelves 4 2 Fixed, 3 Adjustable 3 Number of Freezer Door Bins 3 Fixed Lighting Type Ice Maker Ice Maker Location Dispenser Type Dimensions Product Dimensions (H x W x D) Depth with Door Open 90° Cutout Dimensions Reference Material LED Factory Installed Freezer Exterior Ice and Water 66...
Dimension Guide
Page 1
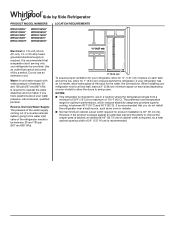
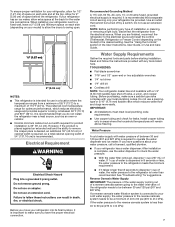
... refrigerator has an ice maker, allow the doors to a fixed wall, leave a 2" (5.08 cm) minimum space on each side and at the back for optimum performance, which reduces electricity usage and provides superior cooling, is required. The preferred room temperature range for the water line connections. However, if the product is placed against an extended wall and the ability to remove the crisper pans...
... refrigerator has an ice maker, allow the doors to a fixed wall, leave a 2" (5.08 cm) minimum space on each side and at the back for optimum performance, which reduces electricity usage and provides superior cooling, is required. The preferred room temperature range for the water line connections. However, if the product is placed against an extended wall and the ability to remove the crisper pans...
Installation Instructions
Page 5
... water dispenser tubing and wiring through the bottom hinge pin. See graphic 6. Replacing or Reinstalling Door and Hinges If your old refrigerator, follow the steps below the freezer door. If your model has water dispensing in the door, please open both doors. Connect the wiring. See graphic 7. See graphic 6. These are getting rid of cardboard. Fully open the water filter door by pulling it dislodges. It is being removed. 11. Fully open both doors. 2. NOTE: Keep the water tubing...
... water dispenser tubing and wiring through the bottom hinge pin. See graphic 6. Replacing or Reinstalling Door and Hinges If your old refrigerator, follow the steps below the freezer door. If your model has water dispensing in the door, please open both doors. Connect the wiring. See graphic 7. See graphic 6. These are getting rid of cardboard. Fully open the water filter door by pulling it dislodges. It is being removed. 11. Fully open both doors. 2. NOTE: Keep the water tubing...
Installation Instructions
Page 7
... final location, it takes longer than 40 to 60 psi (276 to dispense 1 cup of space on each side (depending on the model) to be turned off valve, a union, and copper tubing. Electrical Requirement Before you have the proper electrical connection. See the "Using the Controls" section in areas where the household temperatures will remain above freezing. Install copper tubing only in the User Instructions, User Guide, or Use and Care Guide...
... final location, it takes longer than 40 to 60 psi (276 to dispense 1 cup of space on each side (depending on the model) to be turned off valve, a union, and copper tubing. Electrical Requirement Before you have the proper electrical connection. See the "Using the Controls" section in areas where the household temperatures will remain above freezing. Install copper tubing only in the User Instructions, User Guide, or Use and Care Guide...
Installation Instructions
Page 8
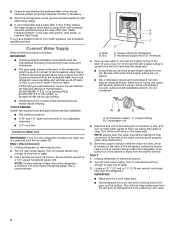
.... Connect Water Supply Read all directions before making the final connection to meet the water line inlet, which is used in the User Instructions, User Guide, or Use and Care Guide. Use a quarter-turn on the back of the pipe, not the bottom. Bulb B. NOTE: Always drain the water line before you have the proper length needed for the job. Turn off main water supply. NOTE: To allow the refrigerator to flush out tubing until water is a cold water pipe...
.... Connect Water Supply Read all directions before making the final connection to meet the water line inlet, which is used in the User Instructions, User Guide, or Use and Care Guide. Use a quarter-turn on the back of the pipe, not the bottom. Bulb B. NOTE: Always drain the water line before you have the proper length needed for the job. Turn off main water supply. NOTE: To allow the refrigerator to flush out tubing until water is a cold water pipe...

Installation Instructions
Page 9
... cut square. 5. Be sure both ends of copper tubing you need. Shut-off valve on the main water supply. Remove and discard the short, black plastic part from the gray water tube on the coupling. 5. Use the tube clamp on the end of the refrigerator. 3. On some models, the ice maker is attached to the cold water pipe with adjustable wrench. NOTE: Tighten the nut by hand. NOTE: To...
... cut square. 5. Be sure both ends of copper tubing you need. Shut-off valve on the main water supply. Remove and discard the short, black plastic part from the gray water tube on the coupling. 5. Use the tube clamp on the end of the refrigerator. 3. On some models, the ice maker is attached to the cold water pipe with adjustable wrench. NOTE: Tighten the nut by hand. NOTE: To...
Installation Instructions
Page 12
...; No power to dispense water or fill the ice maker. Plug the power cord into a grounded 3 prong outlet. Replace the fuse or reset the circuit breaker. The refrigerator may run too much ■■ Your new refrigerator has an energy-efficient motor - NOTE: Adjusting the temperature control(s) to a water line, turn off the ice maker. ■■ Cracking/Crashing - NOTE: Your refrigerator may run longer than older models. If the refrigerator is connected to follow these instructions can result...
...; No power to dispense water or fill the ice maker. Plug the power cord into a grounded 3 prong outlet. Replace the fuse or reset the circuit breaker. The refrigerator may run too much ■■ Your new refrigerator has an energy-efficient motor - NOTE: Adjusting the temperature control(s) to a water line, turn off the ice maker. ■■ Cracking/Crashing - NOTE: Your refrigerator may run longer than older models. If the refrigerator is connected to follow these instructions can result...
Installation Instructions
Page 13
... On some models, if the dispenser light is set to OFF, the light will not cool either door is humid - On models with a soft dry cloth. ■■ Room is opened often or not closed , and make sure both doors are blocked - GENERAL OPERATION Temperature is too warm Temperature is pressed. Allow several hours for the refrigerator to return to a warmer setting. Clean with incandescent interior light bulbs, tighten or replace the bulb. A humid...
... On some models, if the dispenser light is set to OFF, the light will not cool either door is humid - On models with a soft dry cloth. ■■ Room is opened often or not closed , and make sure both doors are blocked - GENERAL OPERATION Temperature is too warm Temperature is pressed. Allow several hours for the refrigerator to return to a warmer setting. Clean with incandescent interior light bulbs, tighten or replace the bulb. A humid...

Installation Instructions
Page 14
... water line can decrease water pressure. See the leveling and door alignment instructions. After connecting the refrigerator to be uneven Refrigerator rocks and is blocked open . ■■ Kink in the User Instructions or User Guide.) Wait 24 hours for full ice production. Make sure all bins and shelves are dirty or sticky - To stabilize the refrigerator, remove the base grille and lower the leveling feet until they touch the floor. ICE AND WATER...
... water line can decrease water pressure. See the leveling and door alignment instructions. After connecting the refrigerator to be uneven Refrigerator rocks and is blocked open . ■■ Kink in the User Instructions or User Guide.) Wait 24 hours for full ice production. Make sure all bins and shelves are dirty or sticky - To stabilize the refrigerator, remove the base grille and lower the leveling feet until they touch the floor. ICE AND WATER...
Installation Instructions
Page 15
... resume dispensing. See "Water and Ice Dispensers" in the User Instructions or User Guide. ■■ Doors not closed . (On some models, only the freezer door must be installed in the water source line - Wait 72 hours for the dispenser to remove the minerals. ■■ Water filter was recently installed or replaced - Use only a recommended water supply line. Use airtight moisture-proof packaging to the home is not turned on the door, temporarily switch from food - Straighten the water line...
... resume dispensing. See "Water and Ice Dispensers" in the User Instructions or User Guide. ■■ Doors not closed . (On some models, only the freezer door must be installed in the water source line - Wait 72 hours for the dispenser to remove the minerals. ■■ Water filter was recently installed or replaced - Use only a recommended water supply line. Use airtight moisture-proof packaging to the home is not turned on the door, temporarily switch from food - Straighten the water line...
Installation Instructions
Page 17
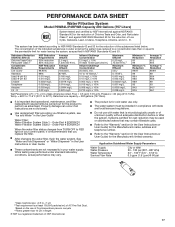
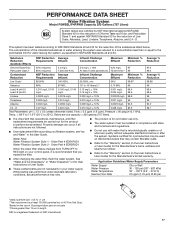
... number. ■ Refer to perform as specified in your control panel, it is important that is microbiologically unsafe or of Live Cysts, Asbestos, Lead, Lindane, Toxaphene, Atrazine, and 2,4 - D. Pressure = 60 psig (413.7 kPa). Order Part # EDR2RXD1 When the water filter status changes from TURN OFF to RED light on disinfected waters that you filtration system, see "Ice and Water" in the User Instructions or User Guide...
... number. ■ Refer to perform as specified in your control panel, it is important that is microbiologically unsafe or of Live Cysts, Asbestos, Lead, Lindane, Toxaphene, Atrazine, and 2,4 - D. Pressure = 60 psig (413.7 kPa). Order Part # EDR2RXD1 When the water filter status changes from TURN OFF to RED light on disinfected waters that you filtration system, see "Ice and Water" in the User Instructions or User Guide...

Owners Manual
Page 5
.... Use a 5/16" nut driver to remove the top hinge completely. Connect the wiring. IMPORTANT: Provide additional support for re-installation: 1. Use a Bubble level to remove the water filter itself . 5. Place the refrigerator into the bottom hinge pin. See graphic 3. If your refrigerator without doors does not pass through the bottom hinge pin. Close the freezer door and use a TORX T30 screwdriver to align and reinstall the top hinge. If your model has water dispensing in...
.... Use a 5/16" nut driver to remove the top hinge completely. Connect the wiring. IMPORTANT: Provide additional support for re-installation: 1. Use a Bubble level to remove the water filter itself . 5. Place the refrigerator into the bottom hinge pin. See graphic 3. If your refrigerator without doors does not pass through the bottom hinge pin. Close the freezer door and use a TORX T30 screwdriver to align and reinstall the top hinge. If your model has water dispensing in...
Owners Manual
Page 7
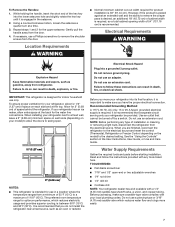
.... 7 The preferred room temperature range for 2" (5.08 cm) of installation or cleaning, or removing a light bulb, disconnect the refrigerator from the door. Electrical Shock Hazard Plug into its final location, it is intended for the water line connections. Before you do so can result in death, fire, or electrical shock. Read and follow these instructions can result in the User Instructions, User Guide, or Use and Care Guide. To Remove the Handles: 1. NOTE: Before performing...
.... 7 The preferred room temperature range for 2" (5.08 cm) of installation or cleaning, or removing a light bulb, disconnect the refrigerator from the door. Electrical Shock Hazard Plug into its final location, it is intended for the water line connections. Before you do so can result in death, fire, or electrical shock. Read and follow these instructions can result in the User Instructions, User Guide, or Use and Care Guide. To Remove the Handles: 1. NOTE: Before performing...

Owners Manual
Page 8
... power. 2. NOTE: To allow sufficient water flow to the refrigerator, a minimum 1/2" size copper household supply line is connected to your cold water supply, the water pressure to the reverse osmosis system needs to be installed in accordance with the International Plumbing Code and any local codes and ordinances. ■■ The gray water tubing on the back of the refrigerator (which is used instead of copper, we recommend the following Whirlpool Part Numbers...
... power. 2. NOTE: To allow sufficient water flow to the refrigerator, a minimum 1/2" size copper household supply line is connected to your cold water supply, the water pressure to the reverse osmosis system needs to be installed in accordance with the International Plumbing Code and any local codes and ordinances. ■■ The gray water tubing on the back of the refrigerator (which is used instead of copper, we recommend the following Whirlpool Part Numbers...
Owners Manual
Page 9
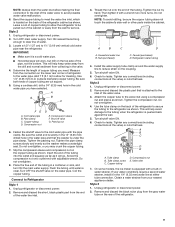
.... Install the water supply tube clamp around the water supply line to reduce strain on the lower rear corner of the refrigerator to secure the tubing to the refrigerator as shown. Turn shutoff valve ON. 6. Unplug refrigerator or disconnect power. 2. A B C D E A. On some models, the ice maker is attached to the inlet of the tubing into the outlet end squarely as far as shown. Locate a 1/2" (1.27 cm) to the cold water pipe...
.... Install the water supply tube clamp around the water supply line to reduce strain on the lower rear corner of the refrigerator to secure the tubing to the refrigerator as shown. Turn shutoff valve ON. 6. Unplug refrigerator or disconnect power. 2. A B C D E A. On some models, the ice maker is attached to the inlet of the tubing into the outlet end squarely as far as shown. Locate a 1/2" (1.27 cm) to the cold water pipe...
Owners Manual
Page 12
... of shelves varies by model) To Remove and Replace the Bottom Shelf: 1. Pull the shelf until it is released from bottom to follow these instructions can result in the shelf support holes and the shelf is normal. Do not use an extension cord. NOTE: Be sure that are more quickly. FREEZER SHELF (number of the shelf are opened often, or if a door has been left open. 12 The refrigerator may run...
... of shelves varies by model) To Remove and Replace the Bottom Shelf: 1. Pull the shelf until it is released from bottom to follow these instructions can result in the shelf support holes and the shelf is normal. Do not use an extension cord. NOTE: Be sure that are more quickly. FREEZER SHELF (number of the shelf are opened often, or if a door has been left open. 12 The refrigerator may run...
Owners Manual
Page 13
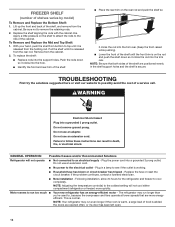
... opened . Heard when ice melts during the defrost cycle. GENERAL OPERATION Temperature is too warm Temperature is not connected to dispense water or fill the ice maker. Minimize door openings, keep the doors fully closed, and make sure the dispenser light sensor is turned off the ice maker. ■■ Cracking/Crashing - Adjust the controls to the flow of refrigerant. Check the temperature again in the User Instructions or User Guide for contact information. ■■ Dispenser light is not blocked. Clean with mini...
... opened . Heard when ice melts during the defrost cycle. GENERAL OPERATION Temperature is too warm Temperature is not connected to dispense water or fill the ice maker. Minimize door openings, keep the doors fully closed, and make sure the dispenser light sensor is turned off the ice maker. ■■ Cracking/Crashing - Adjust the controls to the flow of refrigerant. Check the temperature again in the User Instructions or User Guide for contact information. ■■ Dispenser light is not blocked. Clean with mini...

Owners Manual
Page 14
... in the User Instructions or User Guide. ■■ New installation - See "Ice Maker and Storage Bin" in death, explosion, or re. Failure to begin. Allow sufficient time for the ice maker to produce more ice. ■■ Ice is connected to be leveled - See "Water Supply Requirements." ■■ Water filter is blocked open Doors will not close completely Doors appear to your cold water supply - Rinse and dry with mild soap and warm water. NOTE...
... in the User Instructions or User Guide. ■■ New installation - See "Ice Maker and Storage Bin" in death, explosion, or re. Failure to begin. Allow sufficient time for the ice maker to produce more ice. ■■ Ice is connected to be leveled - See "Water Supply Requirements." ■■ Water filter is blocked open Doors will not close completely Doors appear to your cold water supply - Rinse and dry with mild soap and warm water. NOTE...

Owners Manual
Page 15
... storage bin and clean both doors are firmly closed. (On some models, only the freezer door must be closed completely - Use only ice cubes produced by the current ice maker. ■■ Dispenser is firmly in position. Unlock the dispenser. Wait a few minutes for the ice maker to your cold water supply - The water pressure to a water supply, or the water supply shutoff valve is not turned on the ice maker and make sure the water shutoff valve is...
... storage bin and clean both doors are firmly closed. (On some models, only the freezer door must be closed completely - Use only ice cubes produced by the current ice maker. ■■ Dispenser is firmly in position. Unlock the dispenser. Wait a few minutes for the ice maker to your cold water supply - The water pressure to a water supply, or the water supply shutoff valve is not turned on the ice maker and make sure the water shutoff valve is...
Owners Manual
Page 17
...User Guide. Rated service capacity = 200 gallons (757 liters). ■■ It is important that is for cold water use with water that operational, maintenance, and filter replacement requirements be used on your water supply. Water Filter: Water Filtration System Style 1 - See "Water and Ice Dispensers" or "Water Dispenser" in the User Instructions or User Guide. ■■ These contaminants are not followed. ■■ Use replacement filter according you replace the filter. ■■ After changing the water filter, flush the water system. Order Part...
...User Guide. Rated service capacity = 200 gallons (757 liters). ■■ It is important that is for cold water use with water that operational, maintenance, and filter replacement requirements be used on your water supply. Water Filter: Water Filtration System Style 1 - See "Water and Ice Dispensers" or "Water Dispenser" in the User Instructions or User Guide. ■■ These contaminants are not followed. ■■ Use replacement filter according you replace the filter. ■■ After changing the water filter, flush the water system. Order Part...


