
Warranty Information
Page 1
...In Canada, call 1-800-253-1301. Mississauga, Ontario L5N 0B7 Please include a daytime phone number in your authorized Whirlpool dealer to Whirlpool with original model/serial numbers that vary from state to state or province to correct the installation of products not approved by an ...authorized Whirlpool servicer is used in your complete model number ready. Proof of the refrigerator compartment. Service calls to refrigerator or freezer product failures. 7. If outside...
...In Canada, call 1-800-253-1301. Mississauga, Ontario L5N 0B7 Please include a daytime phone number in your authorized Whirlpool dealer to Whirlpool with original model/serial numbers that vary from state to state or province to correct the installation of products not approved by an ...authorized Whirlpool servicer is used in your complete model number ready. Proof of the refrigerator compartment. Service calls to refrigerator or freezer product failures. 7. If outside...
Installation Guide
Page 1
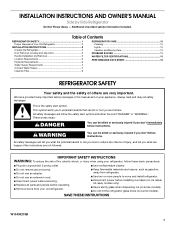
... ■ Do not use an extension cord. ■ Disconnect power before installing ice maker (on ice maker kit ready models only). ■ Use a sturdy glass when dispensing ice (on some models). INSTALLATION INSTRUCTIONS AND OWNER'S MANUAL Side by Side Refrigerator Do Not Throw Away - IMPORTANT SAFETY INSTRUCTIONS WARNING: To reduce the...refrigerator. ■ Disconnect power before servicing. ■ Replace all safety messages. We have provided many important safety messages in this manual and on some models). ■ Do not hit the refrigerator glass doors (on your appliance.
... ■ Do not use an extension cord. ■ Disconnect power before installing ice maker (on ice maker kit ready models only). ■ Use a sturdy glass when dispensing ice (on some models). INSTALLATION INSTRUCTIONS AND OWNER'S MANUAL Side by Side Refrigerator Do Not Throw Away - IMPORTANT SAFETY INSTRUCTIONS WARNING: To reduce the...refrigerator. ■ Disconnect power before servicing. ■ Replace all safety messages. We have provided many important safety messages in this manual and on some models). ■ Do not hit the refrigerator glass doors (on your appliance.

Installation Guide
Page 3
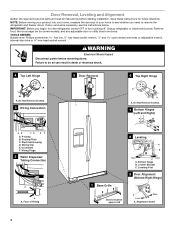
... or ³⁄₈" hex-head socket wrench WARNING Electrical Shock Hazard Disconnect power before starting installation. Remove food, the ice storage bin (on some models), and any adjustable door or utility bins from doors. Electrical Housing D. Alignment Screw 3 NOTE: Before moving your product into your home, measure the doorway of...
... or ³⁄₈" hex-head socket wrench WARNING Electrical Shock Hazard Disconnect power before starting installation. Remove food, the ice storage bin (on some models), and any adjustable door or utility bins from doors. Electrical Housing D. Alignment Screw 3 NOTE: Before moving your product into your home, measure the doorway of...

Installation Guide
Page 5
... and replace the top right hinge as shown. See Graphic 8. This makes it to the right to check the leveling of the refrigerator takes some models) and any adjustable door or utility bins. 9. Open both doors again and check that side of the product. See Graphic 1. 2. Open the freezer door. Assistance...
... and replace the top right hinge as shown. See Graphic 8. This makes it to the right to check the leveling of the refrigerator takes some models) and any adjustable door or utility bins. 9. Open both doors again and check that side of the product. See Graphic 1. 2. Open the freezer door. Assistance...

Installation Guide
Page 6
...176;F (32°C). Recommended Grounding Method A 115 volt, 60 Hz, AC only, 15- NOTE: Before performing any type of space on the model) to contact the shoulder screw. 6. Repeat steps 4 and 5 to install the other handle onto the freezer door with the setscrews facing the ... the refrigerator to the electrical source and turn the control (Thermostat, Refrigerator or Freezer Control depending on each side (depending on the model) to do not install the refrigerator near a heat source, such as gasoline, away from the electrical source. Electrical Requirements WARNING Electrical...
...176;F (32°C). Recommended Grounding Method A 115 volt, 60 Hz, AC only, 15- NOTE: Before performing any type of space on the model) to contact the shoulder screw. 6. Repeat steps 4 and 5 to install the other handle onto the freezer door with the setscrews facing the ... the refrigerator to the electrical source and turn the control (Thermostat, Refrigerator or Freezer Control depending on each side (depending on the model) to do not install the refrigerator near a heat source, such as gasoline, away from the electrical source. Electrical Requirements WARNING Electrical...

Installation Guide
Page 8
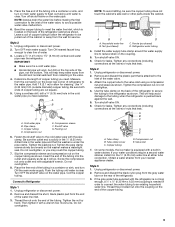
.... 2. Do not overtighten. A B C A. Check for leaks. Style 2 1. Remove and discard the plastic part that leak. Check for leaks. Tube clamp screw C. Compression nut E. On some models, the ice maker is under the pipe clamp. Style 3 1. Style 2 1. Fasten the shutoff valve to avoid possible water valve malfunction. 6. Insert the end of the...
.... 2. Do not overtighten. A B C A. Check for leaks. Style 2 1. Remove and discard the plastic part that leak. Check for leaks. Tube clamp screw C. Compression nut E. On some models, the ice maker is under the pipe clamp. Style 3 1. Style 2 1. Fasten the shutoff valve to avoid possible water valve malfunction. 6. Insert the end of the...

Installation Guide
Page 9
...from its packaging. 2. Remove the old status indicator. 9 Lift open the vented air filter door. Apply pressure to the bubble on some models) On some models) The filter comes with a wrench two more turns. To order a replacement air filter, see "Accessories." 1. Bulb D. Turn shutoff valve... installed at the valve) that the indicator is located (depending on a firm, flat surface. 2. On models with notches: ■ Slide the indicator down on your model) along either inside the refrigerator. AB CD A. NOTE: Tighten the nut by squeezing in your refrigerator's ...
...from its packaging. 2. Remove the old status indicator. 9 Lift open the vented air filter door. Apply pressure to the bubble on some models) On some models) The filter comes with a wrench two more turns. To order a replacement air filter, see "Accessories." 1. Bulb D. Turn shutoff valve... installed at the valve) that the indicator is located (depending on a firm, flat surface. 2. On models with notches: ■ Slide the indicator down on your model) along either inside the refrigerator. AB CD A. NOTE: Tighten the nut by squeezing in your refrigerator's ...

Installation Guide
Page 10
...don't scrape the floor. Remove all food from the refrigerator and pack all frozen food in warm water. 4. Unplug refrigerator. 6. Depending on the model, raise the front of the refrigerator so it , and dry well. 5. Also, if your refrigerator. ■ Use a vacuum cleaner with ... detergents, bleaches or cleansers containing petroleum products on your refrigerator has an automatic ice maker and is opened, call for preparation instructions. If your model, raise the wire shutoff arm to OFF (up ) position or move . 1. See "Using the Controls" in the User Instructions, User ...
...don't scrape the floor. Remove all food from the refrigerator and pack all frozen food in warm water. 4. Unplug refrigerator. 6. Depending on the model, raise the front of the refrigerator so it , and dry well. 5. Also, if your refrigerator. ■ Use a vacuum cleaner with ... detergents, bleaches or cleansers containing petroleum products on your refrigerator has an automatic ice maker and is opened, call for preparation instructions. If your model, raise the wire shutoff arm to OFF (up ) position or move . 1. See "Using the Controls" in the User Instructions, User ...
Installation Guide
Page 11
... breaker has tripped - Heard when water passes through the water line, or due to the flow of a service call. Rattling may run longer than older models. See "Using the Controls" in a lamp to see if the outlet is not connected to a water line, turn cooling on - The refrigerator may also come...
... breaker has tripped - Heard when water passes through the water line, or due to the flow of a service call. Rattling may run longer than older models. See "Using the Controls" in a lamp to see if the outlet is not connected to a water line, turn cooling on - The refrigerator may also come...

Installation Guide
Page 12
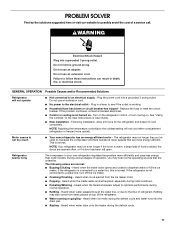
...the refrigerator. Minimize door openings, keep the doors fully closed , and make sure the dispenser light sensor is turned off - On some models) ■ Dispenser light is not blocked. Minimize door openings, keep the doors fully closed , and make sure both doors are blocked -...- Adjust the controls to moisture buildup. Interior moisture buildup NOTE: Some moisture buildup is too warm ■ New installation - NOTE: On models with LED lights, call for assistance or service if the dispenser lights do not work (on only when a dispenser pad/lever is set...
...the refrigerator. Minimize door openings, keep the doors fully closed , and make sure the dispenser light sensor is turned off - On some models) ■ Dispenser light is not blocked. Minimize door openings, keep the doors fully closed , and make sure both doors are blocked -...- Adjust the controls to moisture buildup. Interior moisture buildup NOTE: Some moisture buildup is too warm ■ New installation - NOTE: On models with LED lights, call for assistance or service if the dispenser lights do not work (on only when a dispenser pad/lever is set...

Installation Guide
Page 14
... minerals (such as sulfur) in the water - Use only ice cubes produced by the current ice maker. ■ Dispenser is clogged or incorrectly installed - For models with the ice storage bin on the ice maker and make sure the water shutoff valve is fully open. ■ Kink in order to operate... the dispenser.) ■ Refrigerator is not installed correctly - See "Water Supply Requirements." ■ There are firmly closed. (On some models, only the freezer door must be closed in the water source line - A water filter may need to be closed . (On some...
... minerals (such as sulfur) in the water - Use only ice cubes produced by the current ice maker. ■ Dispenser is clogged or incorrectly installed - For models with the ice storage bin on the ice maker and make sure the water shutoff valve is fully open. ■ Kink in order to operate... the dispenser.) ■ Refrigerator is not installed correctly - See "Water Supply Requirements." ■ There are firmly closed. (On some models, only the freezer door must be closed in the water source line - A water filter may need to be closed . (On some...

Installation Guide
Page 15
.../or Delay Ice activated - WATER FILTER CERTIFICATIONS 15 Make sure the refrigerator is connected to normal ice production, press the SMART GRID button on some models) NOTE: Water from the back of Smart Grid notification received. The first glass of water - To return to a cold water pipe. Hold the glass under...
.../or Delay Ice activated - WATER FILTER CERTIFICATIONS 15 Make sure the refrigerator is connected to normal ice production, press the SMART GRID button on some models) NOTE: Water from the back of Smart Grid notification received. The first glass of water - To return to a cold water pipe. Hold the glass under...

Installation Guide
Page 16
... disinfected waters that you replace the filter. When the indicator reads 0%, it is important that you replace the filter. PERFORMANCE DATA SHEET Water Filtration System Model P5WB2L/P4RFWB Capacity 200 Gallons (757 Liters) System tested and certified by NSF International against NSF/ANSI Standard 53 for the reduction of Chlorine Taste...
... disinfected waters that you replace the filter. When the indicator reads 0%, it is important that you replace the filter. PERFORMANCE DATA SHEET Water Filtration System Model P5WB2L/P4RFWB Capacity 200 Gallons (757 Liters) System tested and certified by NSF International against NSF/ANSI Standard 53 for the reduction of Chlorine Taste...

Use & Care Guide
Page 1
... you should experience a problem not covered in TROUBLESHOOTING or PROBLEM SOLVER, please visit our website at www.whirlpool.com for purchasing this high-quality product. In Canada, visit our website at www.whirlpool.ca or call us at 1-800-253-1301. You will need assistance, call us at 1-800-807...-6777. If you still need your model and serial number, located on the inside wall of Your Old Refrigerator 3...
... you should experience a problem not covered in TROUBLESHOOTING or PROBLEM SOLVER, please visit our website at www.whirlpool.com for purchasing this high-quality product. In Canada, visit our website at www.whirlpool.ca or call us at 1-800-253-1301. You will need assistance, call us at 1-800-807...-6777. If you still need your model and serial number, located on the inside wall of Your Old Refrigerator 3...

Use & Care Guide
Page 2
... you what the potential hazard is the safety alert symbol. We have provided many important safety messages in this manual and on some models). Always read and obey all parts and panels before operating. ■ Remove doors from your old refrigerator. ■ Keep flammable ...Do not use an extension cord. ■ Disconnect power before installing ice maker (on ice maker kit ready models only). ■ Use a sturdy glass when dispensing ice (on some models). ■ Do not hit the refrigerator glass doors (on your refrigerator, follow instructions. These words mean: DANGER...
... you what the potential hazard is the safety alert symbol. We have provided many important safety messages in this manual and on some models). Always read and obey all parts and panels before operating. ■ Remove doors from your old refrigerator. ■ Keep flammable ...Do not use an extension cord. ■ Disconnect power before installing ice maker (on ice maker kit ready models only). ■ Use a sturdy glass when dispensing ice (on some models). ■ Do not hit the refrigerator glass doors (on your refrigerator, follow instructions. These words mean: DANGER...
Use & Care Guide
Page 4
... Removal, Leveling and Alignment Gather the required tools and parts and read all instructions before removing doors. Remove food, the ice storage bin (on some models), and any adjustable door or utility bins from doors. Wiring Clip E. Routing Plate C. Bottom Hinge B. NOTE: Before moving your product into your home to do...
... Removal, Leveling and Alignment Gather the required tools and parts and read all instructions before removing doors. Remove food, the ice storage bin (on some models), and any adjustable door or utility bins from doors. Wiring Clip E. Routing Plate C. Bottom Hinge B. NOTE: Before moving your product into your home to do...

Use & Care Guide
Page 6
... both doors to roll more easily, adjust the refrigerator's tilt using a single screw. NOTE: Provide additional support for the weight of the refrigerator takes some models) and any adjustable door or utility bins. 9. IMPORTANT: Do not intertwine the water tubing and wiring bundles when reconnecting them. ■ Push the larger 7.94...
... both doors to roll more easily, adjust the refrigerator's tilt using a single screw. NOTE: Provide additional support for the weight of the refrigerator takes some models) and any adjustable door or utility bins. 9. IMPORTANT: Do not intertwine the water tubing and wiring bundles when reconnecting them. ■ Push the larger 7.94...

Use & Care Guide
Page 7
... sure you are finished, reconnect the refrigerator to the electrical source and turn the control (Thermostat, Refrigerator or Freezer Control depending on the model) to begin fastening the lower setscrew. 7. When you have been partially tightened as outlined in the setscrew. 1/2" (1.27 cm) 5.... 3. If your refrigerator be turned off or turn cooling on or reset the control (Thermostat, Refrigerator or Freezer Control depending on the model) to do not install the refrigerator near a heat source, such as gasoline, away from refrigerator. Before you do so can result ...
... sure you are finished, reconnect the refrigerator to the electrical source and turn the control (Thermostat, Refrigerator or Freezer Control depending on the model) to begin fastening the lower setscrew. 7. When you have been partially tightened as outlined in the setscrew. 1/2" (1.27 cm) 5.... 3. If your refrigerator be turned off or turn cooling on or reset the control (Thermostat, Refrigerator or Freezer Control depending on the model) to do not install the refrigerator near a heat source, such as gasoline, away from refrigerator. Before you do so can result ...
Use & Care Guide
Page 9
... cold water pipe near the refrigerator. Tighten the compression nut. This will work, but drill on the water pipe. Turn shutoff valve ON. 6. On some models, the ice maker is a cold water pipe. ■ Horizontal pipe will help keep water away from the drill and normal sediment from the connection on...
... cold water pipe near the refrigerator. Tighten the compression nut. This will work, but drill on the water pipe. Turn shutoff valve ON. 6. On some models, the ice maker is a cold water pipe. ■ Horizontal pipe will help keep water away from the drill and normal sediment from the connection on...

Use & Care Guide
Page 10
... old status indicator. 3. Household water line 4. Electrical Shock Hazard Plug into place. Install Air Filter (on some models) On some models, your kitchen or home. On some models) The filter should be installed prior to red. To order a replacement air filter, see "Accessories." 1. Installing ... air filter, which should be installed behind the door. 4. Place the indicator face-down into the notches, facing outward. On models without notches: ■ Store the indicator in the previous sections. Install the new air filter and status indicator using the instructions in...
... old status indicator. 3. Household water line 4. Electrical Shock Hazard Plug into place. Install Air Filter (on some models) On some models, your kitchen or home. On some models) The filter should be installed prior to red. To order a replacement air filter, see "Accessories." 1. Installing ... air filter, which should be installed behind the door. 4. Place the indicator face-down into the notches, facing outward. On models without notches: ■ Store the indicator in the previous sections. Install the new air filter and status indicator using the instructions in...


