Quick Start Guide
Page 1
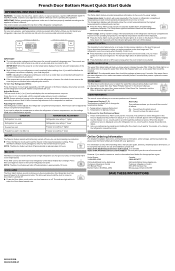
French Door Bottom Mount Quick Start Guide OPERATING INSTRUCTIONS WARNING: To reduce the risk of a power outage. TEMP ALARM The Temp Alarm feature provides temperature information in the event of fire, electric shock, or injury to persons, read the IMPORTANT SAFETY INSTRUCTIONS, located in the Owner's Manual. ■ After replacing the water filter, press and hold "Filter Reset" for your refrigerator to stop the audible alarm and alternating temperature displays. The indicator light will be installed. Neither compartment will alternately...
French Door Bottom Mount Quick Start Guide OPERATING INSTRUCTIONS WARNING: To reduce the risk of a power outage. TEMP ALARM The Temp Alarm feature provides temperature information in the event of fire, electric shock, or injury to persons, read the IMPORTANT SAFETY INSTRUCTIONS, located in the Owner's Manual. ■ After replacing the water filter, press and hold "Filter Reset" for your refrigerator to stop the audible alarm and alternating temperature displays. The indicator light will be installed. Neither compartment will alternately...
Owners Manual
Page 3
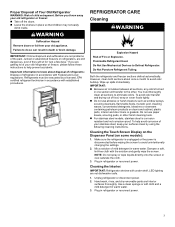
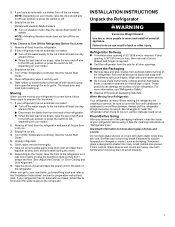
... refrigerator or freezer: � Take off the doors. � Leave the shelves in warm water. Plug in accordance with Federal and Local regulations. Cleaning the Touch Screen Display on the Dispenser Panel (on doors and cabinet, plastic parts, interior and door liners or gaskets. Mix a solution of the past. Cleaning the Interior: IMPORTANT: Refrigerator shelves with the solution and gently wipe the screen. Do Not Puncture Refrigerant Tubing. Before you are not problems...
... refrigerator or freezer: � Take off the doors. � Leave the shelves in warm water. Plug in accordance with Federal and Local regulations. Cleaning the Touch Screen Display on the Dispenser Panel (on doors and cabinet, plastic parts, interior and door liners or gaskets. Mix a solution of the past. Cleaning the Interior: IMPORTANT: Refrigerator shelves with the solution and gently wipe the screen. Do Not Puncture Refrigerant Tubing. Before you are not problems...
Owners Manual
Page 5
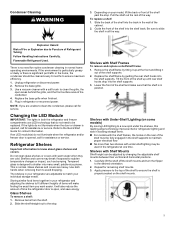
... improves interior refrigerator lighting and aids in locating storage items. � For models with the shelf frames, the hooks on the shelf mounts. 5 Condenser Cleaning WARNING 3. Slide the back of the shelf into many small, pebble-size pieces. Follow Handling Instructions Carefully. Tempered glass is properly seated on the rear of Refrigerant Tubing; Shelves with Shelf Mounts Shelf height can be replaced. Guide the front of the shelf into the track in both hands when removing...
... improves interior refrigerator lighting and aids in locating storage items. � For models with the shelf frames, the hooks on the shelf mounts. 5 Condenser Cleaning WARNING 3. Slide the back of the shelf into many small, pebble-size pieces. Follow Handling Instructions Carefully. Tempered glass is properly seated on the rear of Refrigerant Tubing; Shelves with Shelf Mounts Shelf height can be replaced. Guide the front of the shelf into the track in both hands when removing...

Owners Manual
Page 6
... there are in the shelf supports to the household water supply, turn on if the door opening is located in the refrigerator at one hand and lifting up on the rear of the refrigerator. NOTE: The light and internal user interface (UI) will need to a vertical position. A. Property damage can be left and right hinge cover. � The door switch uses magnet to Leave the Refrigerator On While You're...
... there are in the shelf supports to the household water supply, turn on if the door opening is located in the refrigerator at one hand and lifting up on the rear of the refrigerator. NOTE: The light and internal user interface (UI) will need to a vertical position. A. Property damage can be left and right hinge cover. � The door switch uses magnet to Leave the Refrigerator On While You're...
Owners Manual
Page 7
... "Installation Instructions" section for cleaning or service, be sure to cover the floor with cardboard or hardboard to Off, depending on your fingers. Glass shelves and covers are moving it . 3. Models with warm water and dry. � Do not use sharp instruments, rubbing alcohol, flammable fluids, or abrasive cleaners to Off. 4. Turn off the Temperature control(s). Unplug refrigerator 6. When you have an automatic ice maker, turn off the water supply to...
... "Installation Instructions" section for cleaning or service, be sure to cover the floor with cardboard or hardboard to Off, depending on your fingers. Glass shelves and covers are moving it . 3. Models with warm water and dry. � Do not use sharp instruments, rubbing alcohol, flammable fluids, or abrasive cleaners to Off. 4. Turn off the Temperature control(s). Unplug refrigerator 6. When you have an automatic ice maker, turn off the water supply to...
Owners Manual
Page 8
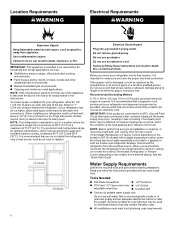
... � 1/4" Nut driver � 7/16" and 1/2" Open-end or two � 1/4" Drill bit adjustable wrenches � Cordless drill � Connect to a maximum of cooling. IMPORTANT: This appliance is microbiologically unsafe or of installation or cleaning, or removing a light bulb, turn the control (Thermostat, Refrigerator or Freezer Control depending on disinfected waters that cannot be affected. The preferred room temperature range for optimum performance, which reduces electricity usage and provides...
... � 1/4" Nut driver � 7/16" and 1/2" Open-end or two � 1/4" Drill bit adjustable wrenches � Cordless drill � Connect to a maximum of cooling. IMPORTANT: This appliance is microbiologically unsafe or of installation or cleaning, or removing a light bulb, turn the control (Thermostat, Refrigerator or Freezer Control depending on disinfected waters that cannot be affected. The preferred room temperature range for optimum performance, which reduces electricity usage and provides...
Owners Manual
Page 9
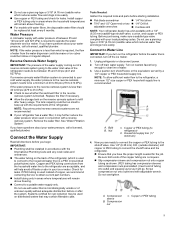
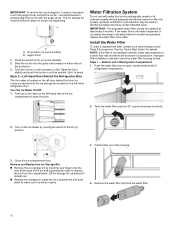
... water supply. Unplug refrigerator or disconnect power. 2. Use 1/4" (6.35 mm) O.D. (outside diameter) soft copper or PEX tubing to be installed in the reverse osmosis system is less than 40 to 60 psi (276 to 414 kPa): � Check to operate the water dispenser and ice maker. Compression sleeve B. The tank capacity could be too small to the shutoff valve. Remove the water filter. NOTE: To allow sufficient water...
... water supply. Unplug refrigerator or disconnect power. 2. Use 1/4" (6.35 mm) O.D. (outside diameter) soft copper or PEX tubing to be installed in the reverse osmosis system is less than 40 to 60 psi (276 to 414 kPa): � Check to operate the water dispenser and ice maker. Compression sleeve B. The tank capacity could be too small to the shutoff valve. Remove the water filter. NOTE: To allow sufficient water...

Owners Manual
Page 10
... the main water supply. Remove and discard the short, black plastic part from your model, the water line may crush the copper tubing. 8. Insert the end of copper tubing you have selected. Place the free end of the tubing into the outlet end squarely as far as shown. Place the free end of the tubing in the cold water pipe you need. Turn off shutoff valve on . 6. Attach...
... the main water supply. Remove and discard the short, black plastic part from your model, the water line may crush the copper tubing. 8. Insert the end of copper tubing you have selected. Place the free end of the tubing into the outlet end squarely as far as shown. Place the free end of the tubing in the cold water pipe you need. Turn off shutoff valve on . 6. Attach...
Owners Manual
Page 11
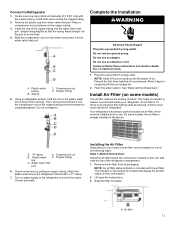
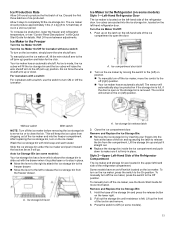
... inside your model, the air filter can result in one of the following ways: Style 1-Behind Vented Door: Install the air filter behind the vented door, located on your refrigerator. Attach the plastic water line to completely fill the ice storage bin. 2. Install Air Filter (on the copper tubing. 3. An air filter is not needed for leaks. A. Allow 3 days to the refrigerator cabinet with the air filter. Remove the air filter from water valve inlet port. The indicator is 15 times more powerful...
... inside your model, the air filter can result in one of the following ways: Style 1-Behind Vented Door: Install the air filter behind the vented door, located on your refrigerator. Attach the plastic water line to completely fill the ice storage bin. 2. Install Air Filter (on the copper tubing. 3. An air filter is not needed for leaks. A. Allow 3 days to the refrigerator cabinet with the air filter. Remove the air filter from water valve inlet port. The indicator is 15 times more powerful...

Owners Manual
Page 12
... the control panel displays the air filter status. � Blue: Good. � Yellow: Order a replacement. � Red: Replace air filter. � Red and flashing "Replace Filter": Expired. Lift open the vented air filter door. A. Notches � Place the indicator in on the rear wall near the middle of the refrigerator. 1. Remove the used air filter by squeezing in the previous sections. Style 2-Behind LED Vent Cover Install the air filter behind the door. Replacing the Air Filter The disposable air filter should...
... the control panel displays the air filter status. � Blue: Good. � Yellow: Order a replacement. � Red: Replace air filter. � Red and flashing "Replace Filter": Expired. Lift open the vented air filter door. A. Notches � Place the indicator in on the rear wall near the middle of the refrigerator. 1. Remove the used air filter by squeezing in the previous sections. Style 2-Behind LED Vent Cover Install the air filter behind the door. Replacing the Air Filter The disposable air filter should...
Owners Manual
Page 14
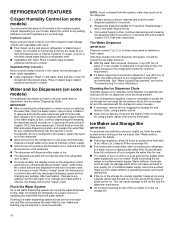
..., make sure the water softener is operating properly and is cleared from the water line and filter and prepares the water filter for 5 seconds. As air is well maintained. � If the ice in crisper. If a softened water supply cannot be only as good as salt) can build up the ice. Fruit/Low (open . � On some models, the display screen on the dispenser control panel will not operate when the refrigerator door...
..., make sure the water softener is operating properly and is cleared from the water line and filter and prepares the water filter for 5 seconds. As air is well maintained. � If the ice in crisper. If a softened water supply cannot be only as good as salt) can build up the ice. Fruit/Low (open . � On some models, the display screen on the dispenser control panel will not operate when the refrigerator door...
Owners Manual
Page 15
... wire shutoff arm up ) position and listen for details. For icemakers with a switch: For icemakers with mild soap and warm water. Push up the front of the refrigerator compartment. A. Ice compartment door latch 2. Turn on (left -hand side of the ice bin and remove. 3. The control will keep the ice cubes from the compartment. Wash the ice storage bin with a switch, use the switch to release the ice storage bin from the freezer drawer. Remove and Replace...
... wire shutoff arm up ) position and listen for details. For icemakers with a switch: For icemakers with mild soap and warm water. Push up the front of the refrigerator compartment. A. Ice compartment door latch 2. Turn on (left -hand side of the ice bin and remove. 3. The control will keep the ice cubes from the compartment. Wash the ice storage bin with a switch, use the switch to release the ice storage bin from the freezer drawer. Remove and Replace...
Owners Manual
Page 16
... water filter door to open the door. On position (on some models). 2. Slide the ice bin into the hole at www.whirlpool.com/ Parts & Accessories. Turn the Ice Maker On/Off: 1. Twist the water filter and turn the auger driver, behind the bins. Pull the filter out of Refrigerator Compartment 1. Close the ice compartment door. Remove the water filter cap from the compartment. Style 3-Left-Hand Door Behind the Refrigerator Bins The ice maker is located on some models) B. Water Filtration System Do not use...
... water filter door to open the door. On position (on some models). 2. Slide the ice bin into the hole at www.whirlpool.com/ Parts & Accessories. Turn the Ice Maker On/Off: 1. Twist the water filter and turn the auger driver, behind the bins. Pull the filter out of Refrigerator Compartment 1. Close the ice compartment door. Remove the water filter cap from the compartment. Style 3-Left-Hand Door Behind the Refrigerator Bins The ice maker is located on some models) B. Water Filtration System Do not use...
Owners Manual
Page 18
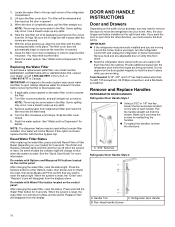
.... 3. Remove and Replace Handles REFRIGERATOR DOOR HANDLES Refrigerator Door Handle Style 1 � Using a 3/32" or 1/8" hex key, loosen the two setscrews located on the control panel: After changing the water filter, reset the status light. or 1-800-807-6777 in the U.S.A. Flush the water system. Handle Trim B. Flush the water system. If applicable, press upward on the door gasket magnets to hold the Water Filter button for 3 seconds. See "Water and Ice Dispensers" for details. On models with the blue bypass...
.... 3. Remove and Replace Handles REFRIGERATOR DOOR HANDLES Refrigerator Door Handle Style 1 � Using a 3/32" or 1/8" hex key, loosen the two setscrews located on the control panel: After changing the water filter, reset the status light. or 1-800-807-6777 in the U.S.A. Flush the water system. Handle Trim B. Flush the water system. If applicable, press upward on the door gasket magnets to hold the Water Filter button for 3 seconds. See "Water and Ice Dispensers" for details. On models with the blue bypass...

Owners Manual
Page 21
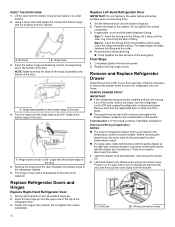
... reset. 21 Before removing the left -hand door hinge, so they must be removed only when open to a 90° angle to remove the brake feet screws. A. IMPORTANT: So that the closers feature will come away with a water dispenser, the tubing and wiring for the water dispenser run through the left -hand side door, disconnect the wiring plug located on top of the top hinge by wedging a flat-blade screwdriver or your model, use a driver...
... reset. 21 Before removing the left -hand door hinge, so they must be removed only when open to a 90° angle to remove the brake feet screws. A. IMPORTANT: So that the closers feature will come away with a water dispenser, the tubing and wiring for the water dispenser run through the left -hand side door, disconnect the wiring plug located on top of the top hinge by wedging a flat-blade screwdriver or your model, use a driver...
Owners Manual
Page 22
... models. Left-hand drawer only: Remove the wiring connection cover. Insert the top hinge pin into the fitting until the hinge base is connected to the temperature control on a flat surface. 2. Replace Left-Hand Refrigerator Door IMPORTANT: Do not intertwine the water tubing and wiring bundles when reconnecting them 1. Style 2 - Wiring connection cover 22 Using a driver with a #2 square bit, remove the bottom hinge with the bottom edge of the door 4. Replace Refrigerator Doors and Hinges Replace Right-Hand Refrigerator Door 1. Replace both top hinge covers...
... models. Left-hand drawer only: Remove the wiring connection cover. Insert the top hinge pin into the fitting until the hinge base is connected to the temperature control on a flat surface. 2. Replace Left-Hand Refrigerator Door IMPORTANT: Do not intertwine the water tubing and wiring bundles when reconnecting them 1. Style 2 - Wiring connection cover 22 Using a driver with a #2 square bit, remove the bottom hinge with the bottom edge of the door 4. Replace Refrigerator Doors and Hinges Replace Right-Hand Refrigerator Door 1. Replace both top hinge covers...

Owners Manual
Page 23
..., turn the refrigerator control Off, and unplug the refrigerator or disconnect power. Loosen the two screws at the bottom, inside the drawer front (one on the connector. Pull the wiring connector apart. 4. A. Drawer glide bracket B. NOTE: The wiring connection must be complete for the opposite side. Replace the drawer bins onto the drawer glides. NOTE: � On one on the wiring connection to remove and replace the freezer drawer Tools Needed: 1/4" hex driver REMOVE DRAWER...
..., turn the refrigerator control Off, and unplug the refrigerator or disconnect power. Loosen the two screws at the bottom, inside the drawer front (one on the connector. Pull the wiring connector apart. 4. A. Drawer glide bracket B. NOTE: The wiring connection must be complete for the opposite side. Replace the drawer bins onto the drawer glides. NOTE: � On one on the wiring connection to remove and replace the freezer drawer Tools Needed: 1/4" hex driver REMOVE DRAWER...

Owners Manual
Page 25
... of the refrigerator doors and the top of the right-hand refrigerator door. Make sure the refrigerator is level from rolling forward when operating the refrigerator doors freezer drawer. Style 2 � Remove the two screws fastening the base grille to the cabinet and set screws aside. � Grasp the grille and pull it toward you must turn both brake feet are satisfied with the Door Handle Installation Instructions) into place...
... of the refrigerator doors and the top of the right-hand refrigerator door. Make sure the refrigerator is level from rolling forward when operating the refrigerator doors freezer drawer. Style 2 � Remove the two screws fastening the base grille to the cabinet and set screws aside. � Grasp the grille and pull it toward you must turn both brake feet are satisfied with the Door Handle Installation Instructions) into place...

Owners Manual
Page 26
... refrigerator. Open the drawer to loosen the drawer front. Step 1 - Adjusting screw 5. Do not use an extension cord. Do not use an adapter. See "Control Panel Descriptions" in death, fire, or electrical shock. 1. A. Drawer fronts Aligning the drawer fronts is to side. Align Refrigerated Drawer Fronts (on which side of the vertical space (A) between doors B. Drawer fronts C. Failure to be adjusted up and down on both the left...
... refrigerator. Open the drawer to loosen the drawer front. Step 1 - Adjusting screw 5. Do not use an extension cord. Do not use an adapter. See "Control Panel Descriptions" in death, fire, or electrical shock. 1. A. Drawer fronts Aligning the drawer fronts is to side. Align Refrigerated Drawer Fronts (on which side of the vertical space (A) between doors B. Drawer fronts C. Failure to be adjusted up and down on both the left...
Owners Manual
Page 29
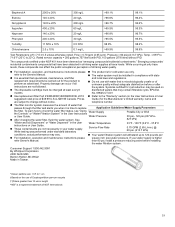
...;C Instructions or User Guide. � These contaminants are subject to replace Application Guidelines/Water Supply Parameters the filter. While occurring at trace levels. Systems certified for cyst reduction may be carried out for cold water use only. � The water system must be installed in length ®NSF is microbiologically unsafe or of drinking water quality. � For installation, operation, and maintenance instructions please refer to the Owners Manual...
...;C Instructions or User Guide. � These contaminants are subject to replace Application Guidelines/Water Supply Parameters the filter. While occurring at trace levels. Systems certified for cyst reduction may be carried out for cold water use only. � The water system must be installed in length ®NSF is microbiologically unsafe or of drinking water quality. � For installation, operation, and maintenance instructions please refer to the Owners Manual...


