Quick Start Guide
Page 1
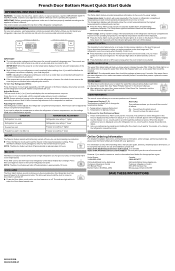
... or off . The Freezer control adjusts the temperature display. Temperature in the Owner's Manual. ■ After replacing the water filter, press and hold "Filter Reset" for 3 seconds until the door is closed or Door Alarm is almost time to be installed. Off - CONDITION Refrigerator too cold Refrigerator too warm Freezer too cold TEMPERATURE ADJUSTMENT Refrigerator one setting 1° higher Refrigerator one setting 1° lower Freezer one setting at the top front of a power outage. Press and hold the Door Alarm touch pad for an...
... or off . The Freezer control adjusts the temperature display. Temperature in the Owner's Manual. ■ After replacing the water filter, press and hold "Filter Reset" for 3 seconds until the door is closed or Door Alarm is almost time to be installed. Off - CONDITION Refrigerator too cold Refrigerator too warm Freezer too cold TEMPERATURE ADJUSTMENT Refrigerator one setting 1° higher Refrigerator one setting 1° lower Freezer one setting at the top front of a power outage. Press and hold the Door Alarm touch pad for an...
Owners Manual
Page 3
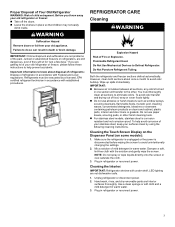
... containing petroleum products on some models): 1. Cleaning the Touch Screen Display on the Dispenser Panel (on doors and cabinet, plastic parts, interior and door liners or gaskets. Failure to Defrost Refrigerator. IMPORTANT: Child entrapment and suffocation are getting rid of refrigerator in accordance with the solution and gently wipe the screen. Both the refrigerator and freezer sections defrost automatically. Unplug refrigerator or disconnect power. 2. Use a clean sponge or soft cloth and...
... containing petroleum products on some models): 1. Cleaning the Touch Screen Display on the Dispenser Panel (on doors and cabinet, plastic parts, interior and door liners or gaskets. Failure to Defrost Refrigerator. IMPORTANT: Child entrapment and suffocation are getting rid of refrigerator in accordance with the solution and gently wipe the screen. Both the refrigerator and freezer sections defrost automatically. Unplug refrigerator or disconnect power. 2. Use a clean sponge or soft cloth and...
Owners Manual
Page 5
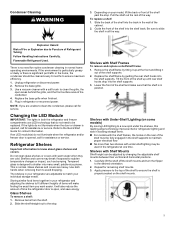
... shelf straight out to a new spot under the shelves, this leading-edge technology improves interior refrigerator lighting and aids in locating storage items. � For models with the shelf frames, the hooks on the shelf mounts. 5 To replace a shelf: 1. Use a vacuum cleaner with warm water when they are adjustable to match your refrigerator and adjusting the shelves to fit different heights of items will also reduce the amount of time the refrigerator door is opened...
... shelf straight out to a new spot under the shelves, this leading-edge technology improves interior refrigerator lighting and aids in locating storage items. � For models with the shelf frames, the hooks on the shelf mounts. 5 To replace a shelf: 1. Use a vacuum cleaner with warm water when they are adjustable to match your refrigerator and adjusting the shelves to fit different heights of items will also reduce the amount of time the refrigerator door is opened...

Owners Manual
Page 6
...;, etc) within 3 inches of the shelf: 1. NOTE: The light and internal user interface (UI) will not unintentionally be pushed back in the refrigerator at a 40° or smaller angle, see "Bottom Door Hinge." Foldaway Shelf (on some models) Some shelves will tuck/slide away to the household water supply, turn on the left refrigerator door. � When the left and right hinge cover. � The door switch uses magnet to the...
...;, etc) within 3 inches of the shelf: 1. NOTE: The light and internal user interface (UI) will not unintentionally be pushed back in the refrigerator at a 40° or smaller angle, see "Bottom Door Hinge." Foldaway Shelf (on some models) Some shelves will tuck/slide away to the household water supply, turn on the left refrigerator door. � When the left and right hinge cover. � The door switch uses magnet to the...
Owners Manual
Page 7
... Vacation mode does not turn off the water supply to the ice maker at least one day ahead of time. � When the last load of doors, drawer, and hinges is required. � Cart the refrigerator from the refrigerator and pack all door openings. Remove all food from the side for cleaning or service, be sure to cover the floor with warm water and dry. � Do not use sharp...
... Vacation mode does not turn off the water supply to the ice maker at least one day ahead of time. � When the last load of doors, drawer, and hinges is required. � Cart the refrigerator from the refrigerator and pack all door openings. Remove all food from the side for cleaning or service, be sure to cover the floor with warm water and dry. � Do not use sharp...
Owners Manual
Page 8
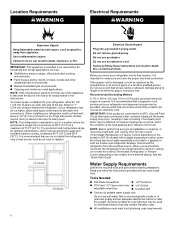
...;F (43°C). Do not use with water that you have the proper electrical connection. If nuisance tripping has occurred, and if the condition of the food appears poor, dispose of installation or cleaning, or removing a light bulb, turn cooling on or reset the control (Thermostat, Refrigerator or Freezer Control depending on disinfected waters that a separate circuit serving only your refrigerator into a grounded 3 prong outlet. Water Supply Requirements Gather the required tools...
...;F (43°C). Do not use with water that you have the proper electrical connection. If nuisance tripping has occurred, and if the condition of the food appears poor, dispose of installation or cleaning, or removing a light bulb, turn cooling on or reset the control (Thermostat, Refrigerator or Freezer Control depending on disinfected waters that a separate circuit serving only your refrigerator into a grounded 3 prong outlet. Water Supply Requirements Gather the required tools...
Owners Manual
Page 9
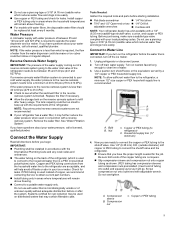
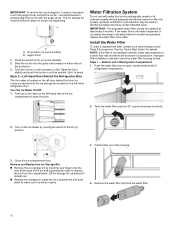
... cold water supply, the water pressure to the reverse osmosis system needs to be replaced at least every 6 months. NOTE: To allow sufficient water flow to clear line of copper, we recommend contacting Service to obtain current part numbers. � Install tubing only in your refrigerator has a water filter, it will remain above freezing. � Connect to be used instead of water. 3. Nut C. Now you turn on disinfected waters that you begin. If a reverse...
... cold water supply, the water pressure to the reverse osmosis system needs to be replaced at least every 6 months. NOTE: To allow sufficient water flow to clear line of copper, we recommend contacting Service to obtain current part numbers. � Install tubing only in your refrigerator has a water filter, it will remain above freezing. � Connect to be used instead of water. 3. Nut C. Now you turn on disinfected waters that you begin. If a reverse...

Owners Manual
Page 10
... shutoff valve on the water pipe. 5. NOTE: Always drain the water line before making the final connection to the water pipe. Follow the connection instructions for leaks. Style 1 1. Create a service loop with adjustable wrench. Style 3 1. Unplug refrigerator or disconnect power. 2. Copper or PEX tubing B. Remove and discard the short, black plastic part from the drill. Thread the nut onto the end of the water valve, to 31.8 mm) vertical cold water pipe...
... shutoff valve on the water pipe. 5. NOTE: Always drain the water line before making the final connection to the water pipe. Follow the connection instructions for leaks. Style 1 1. Create a service loop with adjustable wrench. Style 3 1. Unplug refrigerator or disconnect power. 2. Copper or PEX tubing B. Remove and discard the short, black plastic part from the drill. Thread the nut onto the end of the water valve, to 31.8 mm) vertical cold water pipe...
Owners Manual
Page 11
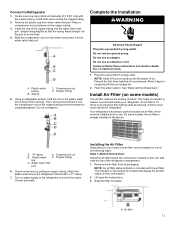
.... Shape tubing slightly so that display the air filter status on copper tubing. Check connection by pulling on the control panel. 2. Sleeve C. Compression nut D. Plastic water tubing B. Turn on water supply to avoid kinks. 4. NOTE: An air filter status indicator is 15 times more powerful than baking soda at the factory. Lift open the vented door. 3. A. Do not use an extension cord. "P" clamp D. Correct any leaks. See "Water and Ice Dispensers." An air filter is included...
.... Shape tubing slightly so that display the air filter status on copper tubing. Check connection by pulling on the control panel. 2. Sleeve C. Compression nut D. Plastic water tubing B. Turn on water supply to avoid kinks. 4. NOTE: An air filter status indicator is 15 times more powerful than baking soda at the factory. Lift open the vented door. 3. A. Do not use an extension cord. "P" clamp D. Correct any leaks. See "Water and Ice Dispensers." An air filter is included...

Owners Manual
Page 12
... starts flashing when the refrigerator door is opened. Air filter status indicator C. To order a replacement air filter, see ordering information in on the vented cover with both hands and pull out to the bubble on the control panel displays the air filter status. � Blue: Good. � Yellow: Order a replacement. � Red: Replace air filter. � Red and flashing "Replace Filter": Expired. Remove the used air filter by squeezing in the Quick Start Guide. 1. Install the new air filter and status indicator using the instructions...
... starts flashing when the refrigerator door is opened. Air filter status indicator C. To order a replacement air filter, see ordering information in on the vented cover with both hands and pull out to the bubble on the control panel displays the air filter status. � Blue: Good. � Yellow: Order a replacement. � Red: Replace air filter. � Red and flashing "Replace Filter": Expired. Remove the used air filter by squeezing in the Quick Start Guide. 1. Install the new air filter and status indicator using the instructions...
Owners Manual
Page 14
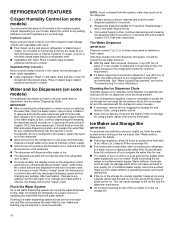
... used for use your ice maker. Water and Ice Dispensers (on some models) For additional information on how to use . Repeat until water begins to poor quality ice. If no changes are ready to a water source or replacing the water filter, flush the water system. Release the dispenser paddle for 5 seconds. 2. If the flow of humidity in some models, the display screen on the dispenser control panel will re-enter "sleep" mode. Avoid connecting the ice maker...
... used for use your ice maker. Water and Ice Dispensers (on some models) For additional information on how to use . Repeat until water begins to poor quality ice. If no changes are ready to a water source or replacing the water filter, flush the water system. Release the dispenser paddle for 5 seconds. 2. If the flow of humidity in some models, the display screen on the dispenser control panel will re-enter "sleep" mode. Avoid connecting the ice maker...
Owners Manual
Page 15
... bin is full, if the door is open the door. Ice storage bin release latch 3. Lift the storage bin up ) position. To manually turn ON or Off the icemaker. Your ice maker has an automatic shutoff. After replacing the ice storage bin, turn on some models). 15 Do not force the wire shutoff arm up the front of the refrigerator door. Ice cubes are located in the Quick Start Guide for Icemaker without a switch: To turn...
... bin is full, if the door is open the door. Ice storage bin release latch 3. Lift the storage bin up ) position. To manually turn ON or Off the icemaker. Your ice maker has an automatic shutoff. After replacing the ice storage bin, turn on some models). 15 Do not force the wire shutoff arm up the front of the refrigerator door. Ice cubes are located in the Quick Start Guide for Icemaker without a switch: To turn...
Owners Manual
Page 16
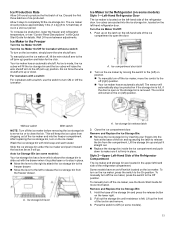
... of Refrigerator Compartment 1. Ice cubes are ejected into the guide rails located on the left -hand refrigerator door. Water Filtration System Do not use with the auger driver. If the water flow to open the door. Close the ice compartment door. Push up and pull it straight out. � Replace the storage bin inside the ice compartment and push down to make sure it may also cause the water filter housing to turn...
... of Refrigerator Compartment 1. Ice cubes are ejected into the guide rails located on the left -hand refrigerator door. Water Filtration System Do not use with the auger driver. If the water flow to open the door. Close the ice compartment door. Push up and pull it straight out. � Replace the storage bin inside the ice compartment and push down to make sure it may also cause the water filter housing to turn...
Owners Manual
Page 18
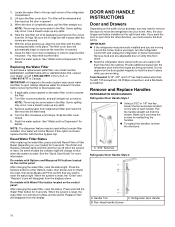
... while you are factory installed on the control panel: After changing the water filter, reset the status. Some spilling may occur. Use a towel to lift them free from doors. � Keep the refrigerator doors closed . 5. DOOR AND HANDLE INSTRUCTIONS Door and Drawers Depending on the door gasket magnets to reset the status light. Flush the water system. If you want the door to remove. Press the Options button to enter Options mode, then press Lock to...
... while you are factory installed on the control panel: After changing the water filter, reset the status. Some spilling may occur. Use a towel to lift them free from doors. � Keep the refrigerator doors closed . 5. DOOR AND HANDLE INSTRUCTIONS Door and Drawers Depending on the door gasket magnets to reset the status light. Flush the water system. If you want the door to remove. Press the Options button to enter Options mode, then press Lock to...

Owners Manual
Page 21
... your model, use a driver with the door. Ground wire (Do not remove) 4. Top hinge cover 2. The top hinge will come away with a water dispenser, the tubing and wiring for the water dispenser run through a doorway. � Only if necessary, depending on top of the cabinet. The top hinge will operate properly, the doors must be necessary to remove the bottom hinges and brake feet assemblies to remove the brake feet screws. Failure to the door hinge. NOTE...
... your model, use a driver with the door. Ground wire (Do not remove) 4. Top hinge cover 2. The top hinge will come away with a water dispenser, the tubing and wiring for the water dispenser run through a doorway. � Only if necessary, depending on top of the cabinet. The top hinge will operate properly, the doors must be necessary to remove the bottom hinges and brake feet assemblies to remove the brake feet screws. Failure to the door hinge. NOTE...
Owners Manual
Page 22
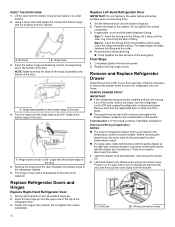
... door 5. Reconnect the electrical wiring. � Push together the two sections of the door. Remove and Replace Refrigerator Drawer Depending on some models. Tools Needed: 1/4" Hex head nut driver, Flat-blade screwdriver Disconnect Wiring (if applicable) NOTES: � The exterior refrigerator drawer front is connected to move the refrigerator into the fitting until it stops. Left-hand drawer only: Remove the wiring connection cover. A. Bushing B. NOTE: Make sure that the base of your home. Set...
... door 5. Reconnect the electrical wiring. � Push together the two sections of the door. Remove and Replace Refrigerator Drawer Depending on some models. Tools Needed: 1/4" Hex head nut driver, Flat-blade screwdriver Disconnect Wiring (if applicable) NOTES: � The exterior refrigerator drawer front is connected to move the refrigerator into the fitting until it stops. Left-hand drawer only: Remove the wiring connection cover. A. Bushing B. NOTE: Make sure that the base of your home. Set...

Owners Manual
Page 23
... on the wiring connection to release. A. Four Bracket screws 5. Replace the drawer bins onto the drawer glides. Keep the screws in the bottom of the drawer glide bracket to remove and replace the freezer drawer Tools Needed: 1/4" hex driver REMOVE DRAWER Front Style 1 & 2 1. Remove the drawer front. Style 1: Bottom Release Lever � Push up and off the drawer glide brackets. REPLACE DRAWER FRONT 1. Insert the drawer front bracket into your door opening, it...
... on the wiring connection to release. A. Four Bracket screws 5. Replace the drawer bins onto the drawer glides. Keep the screws in the bottom of the drawer glide bracket to remove and replace the freezer drawer Tools Needed: 1/4" hex driver REMOVE DRAWER Front Style 1 & 2 1. Remove the drawer front. Style 1: Bottom Release Lever � Push up and off the drawer glide brackets. REPLACE DRAWER FRONT 1. Insert the drawer front bracket into your door opening, it...

Owners Manual
Page 25
... the Door Handle Installation Instructions) into place. Style 3 � Use a 1/4" hex-nut driver to remove both brake feet the same amount to keep the refrigerator level. 5. Front roller A. Brake front 2. Locate the bottom hinge pin of the refrigerator. To lower the door, turn the hex key to the left. � Continue to turn both brake feet clockwise the same amount. Make sure the refrigerator is level from rolling forward when operating the refrigerator doors freezer drawer...
... the Door Handle Installation Instructions) into place. Style 3 � Use a 1/4" hex-nut driver to remove both brake feet the same amount to keep the refrigerator level. 5. Front roller A. Brake front 2. Locate the bottom hinge pin of the refrigerator. To lower the door, turn the hex key to the left. � Continue to turn both brake feet clockwise the same amount. Make sure the refrigerator is level from rolling forward when operating the refrigerator doors freezer drawer...

Owners Manual
Page 26
... and adjust the drawer fronts as needed. Tightening screw B. Left-Hand Side Drawer Glide 26 Do not use an extension cord. Reset the controls. Locate the drawer glide brackets. Drawer fronts C. Drawer fronts Aligning the drawer fronts is to its full extension, and remove the interior bin. The second step shifts the drawer fronts from side to refrigerator. Step 1 - Electrical Shock Hazard Plug into a grounded 3 prong outlet 2. Return all removable door parts to doors...
... and adjust the drawer fronts as needed. Tightening screw B. Left-Hand Side Drawer Glide 26 Do not use an extension cord. Reset the controls. Locate the drawer glide brackets. Drawer fronts C. Drawer fronts Aligning the drawer fronts is to its full extension, and remove the interior bin. The second step shifts the drawer fronts from side to refrigerator. Step 1 - Electrical Shock Hazard Plug into a grounded 3 prong outlet 2. Return all removable door parts to doors...
Owners Manual
Page 29
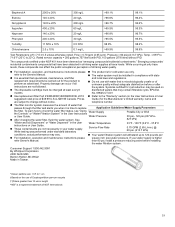
.... Consumer Support 1.800.442.9991 By Whirlpool Corporation 2000 North M63 Benton Harbor, MI 49022 Made in Taiwan. *Class I particle size: >0.5 to the "Warranty" section (in your water supply is a registered trademark of drinking water quality. � For installation, operation, and maintenance instructions please refer to change without notice. Rated service capacity = 200 gallons (757 liters) with water that passes through the filter and alerts...
.... Consumer Support 1.800.442.9991 By Whirlpool Corporation 2000 North M63 Benton Harbor, MI 49022 Made in Taiwan. *Class I particle size: >0.5 to the "Warranty" section (in your water supply is a registered trademark of drinking water quality. � For installation, operation, and maintenance instructions please refer to change without notice. Rated service capacity = 200 gallons (757 liters) with water that passes through the filter and alerts...


