Use & Care Guide
Page 2
...is inspected thoroughly to the Whirlpool Brand family of Your Old Refrigerator 3 PARTS AND FEATURES 4 What's New Behind the Doors 4 INSTALLATION INSTRUCTIONS 5 Unpack the Refrigerator 5 - The Water Dispenser 22 - The Dispenser Lock 24 Ice Maker and Ice Storage Bin 24 - Ice Maker in perfect condition. Drawer ...Refrigerator Door 7 - Connect to Water Line 11 - Follow the Installation and Use and Care Instructions in the Refrigerator 24 - Ice Maker in this guide and your purchase and welcome to ensure that it is working properly and is in the Freezer 25 REFRIGERATOR ...
...is inspected thoroughly to the Whirlpool Brand family of Your Old Refrigerator 3 PARTS AND FEATURES 4 What's New Behind the Doors 4 INSTALLATION INSTRUCTIONS 5 Unpack the Refrigerator 5 - The Water Dispenser 22 - The Dispenser Lock 24 Ice Maker and Ice Storage Bin 24 - Ice Maker in perfect condition. Drawer ...Refrigerator Door 7 - Connect to Water Line 11 - Follow the Installation and Use and Care Instructions in the Refrigerator 24 - Ice Maker in this guide and your purchase and welcome to ensure that it is working properly and is in the Freezer 25 REFRIGERATOR ...
Use & Care Guide
Page 3
... to reduce the chance of injury, and tell you how to move and install refrigerator. ■ Disconnect power before installing ice maker (on ice maker kit ready models only). ■ Use a sturdy glass when dispensing ice (on some models). ■ Do not hit the refrigerator glass doors (on your appliance. IMPORTANT: Child entrapment and suffocation...
... to reduce the chance of injury, and tell you how to move and install refrigerator. ■ Disconnect power before installing ice maker (on ice maker kit ready models only). ■ Use a sturdy glass when dispensing ice (on some models). ■ Do not hit the refrigerator glass doors (on your appliance. IMPORTANT: Child entrapment and suffocation...
Use & Care Guide
Page 4
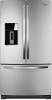
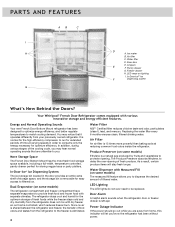
PARTS AND FEATURES AB C I . Water filter D. Door bins E. Your Whirlpool® French Door Refrigerator comes equipped with Measured Fill (on lighting I H G D A. Dual Evaporator (on some models) Ethylene is controlled, which reduces freezer burn... powerful than baking soda at varying speeds in the door provides an entire extra shelf of food odors and tastes from your previously owned refrigerator. Ice maker B. Crispers E F. Energy and Normal Operating Sounds Your new French Door Bottom Mount refrigerator has been designed to optimize energy efficiency, and better...
PARTS AND FEATURES AB C I . Water filter D. Door bins E. Your Whirlpool® French Door Refrigerator comes equipped with Measured Fill (on lighting I H G D A. Dual Evaporator (on some models) Ethylene is controlled, which reduces freezer burn... powerful than baking soda at varying speeds in the door provides an entire extra shelf of food odors and tastes from your previously owned refrigerator. Ice maker B. Crispers E F. Energy and Normal Operating Sounds Your new French Door Bottom Mount refrigerator has been designed to optimize energy efficiency, and better...
Use & Care Guide
Page 5
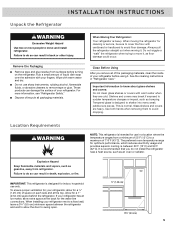
... for use only. If your refrigerator next to swing open. ¹⁄₂" (1.25 cm) 3³⁄₄" (9.5 cm) 5 When installing your refrigerator has an ice maker, allow extra space at the top. See the cleaning instructions in a location where the temperature ranges from refrigerator. IMPORTANT: This refrigerator is heavy. INSTALLATION INSTRUCTIONS...
... for use only. If your refrigerator next to swing open. ¹⁄₂" (1.25 cm) 3³⁄₄" (9.5 cm) 5 When installing your refrigerator has an ice maker, allow extra space at the top. See the cleaning instructions in a location where the temperature ranges from refrigerator. IMPORTANT: This refrigerator is heavy. INSTALLATION INSTRUCTIONS...
Use & Care Guide
Page 10
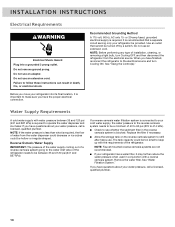
...provided. See "Water Filtration System." Before you move your refrigerator into a grounded 3 prong outlet. It is important to operate the water dispenser and ice maker. NOTE: Before performing any type of 40 to 60 psi (276 to 414 kPa). ■ Check to follow these instructions can result in ...to be too small to the electrical source and turn Cooling OFF, and then disconnect the refrigerator from the water dispenser could decrease or ice cubes could be between 35 and 120 psi (241 and 827 kPa) is required. or 20-amp fused, grounded electrical supply is ...
...provided. See "Water Filtration System." Before you move your refrigerator into a grounded 3 prong outlet. It is important to operate the water dispenser and ice maker. NOTE: Before performing any type of 40 to 60 psi (276 to 414 kPa). ■ Check to follow these instructions can result in ...to be too small to the electrical source and turn Cooling OFF, and then disconnect the refrigerator from the water dispenser could decrease or ice cubes could be between 35 and 120 psi (241 and 827 kPa) is required. or 20-amp fused, grounded electrical supply is ...
Use & Care Guide
Page 11
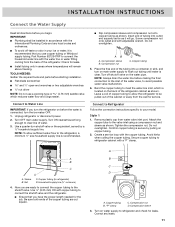
...blade screwdriver and ¹⁄₂" open-end wrenches or two adjustable wrenches nut driver NOTE: Do not use copper tubing or Whirlpool supply tubing, Part Number 8212547RP to connect the household water line with the International Plumbing Code and any leaks. 11 Turn OFF main... as shown. INSTALLATION INSTRUCTIONS Connect the Water Supply Read all directions before you turn the refrigerator on before the water is connected, turn the ice maker OFF. 1. Do not overtighten. Sleeve B. Use ¹⁄₄" (6.35 mm) OD soft copper tubing to connect the shutoff valve and...
...blade screwdriver and ¹⁄₂" open-end wrenches or two adjustable wrenches nut driver NOTE: Do not use copper tubing or Whirlpool supply tubing, Part Number 8212547RP to connect the household water line with the International Plumbing Code and any leaks. 11 Turn OFF main... as shown. INSTALLATION INSTRUCTIONS Connect the Water Supply Read all directions before you turn the refrigerator on before the water is connected, turn the ice maker OFF. 1. Do not overtighten. Sleeve B. Use ¹⁄₄" (6.35 mm) OD soft copper tubing to connect the shutoff valve and...
Use & Care Guide
Page 12
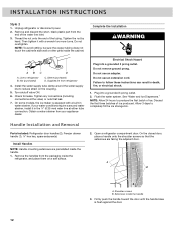
... 3 days to produce the first batch of the water line inlet. 3. Tighten the nut by hand. Supplied line from the end of ice. Obtain a water strainer from the packaging inside the handle 3. Handle Installation and Removal Parts Included: Refrigerator door handles (2), Freezer drawer handle ...2. Install the water supply tube clamp around the water supply line to refrigerator B. Turn shutoff valve ON. 6. On some models, the ice maker is flush against the door. 12 Do not use an adapter. Failure to follow these instructions can result in water strainer. Discard the...
... 3 days to produce the first batch of the water line inlet. 3. Tighten the nut by hand. Supplied line from the end of ice. Obtain a water strainer from the packaging inside the handle 3. Handle Installation and Removal Parts Included: Refrigerator door handles (2), Freezer drawer handle ...2. Install the water supply tube clamp around the water supply line to refrigerator B. Turn shutoff valve ON. 6. On some models, the ice maker is flush against the door. 12 Do not use an adapter. Failure to follow these instructions can result in water strainer. Discard the...
Use & Care Guide
Page 16
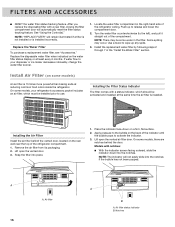
... on the rear wall near the top of the refrigerator ceiling. Notches NOTE: There may occur. Some spilling may be some models, your dispenser or ice maker decreases noticeably, change the water filter sooner. 1. Use a towel to activate the indicator. 3. Place the indicator face-down into the notches. Models with a new filter...
... on the rear wall near the top of the refrigerator ceiling. Notches NOTE: There may occur. Some spilling may be some models, your dispenser or ice maker decreases noticeably, change the water filter sooner. 1. Use a towel to activate the indicator. 3. Place the indicator face-down into the notches. Models with a new filter...
Use & Care Guide
Page 22
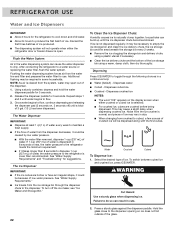
..., a few ounces of the glass. 22 Dispenses crushed ice NOTES: ■ The word "ICE" appears on , 5 seconds off the ice maker, see "Ice Maker and Storage Bin." Select the desired type of ice. Press a sturdy glass against the dispenser paddle. Repeat steps 1 and 2 until the ice dispenser chute becomes blocked. Ice particles can build up until water begins to...
..., a few ounces of the glass. 22 Dispenses crushed ice NOTES: ■ The word "ICE" appears on , 5 seconds off the ice maker, see "Ice Maker and Storage Bin." Select the desired type of ice. Press a sturdy glass against the dispenser paddle. Repeat steps 1 and 2 until the ice dispenser chute becomes blocked. Ice particles can build up until water begins to...
Use & Care Guide
Page 24
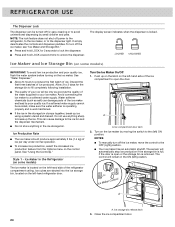
... bin clumps together, break up on the latch on the ice maker by small children and pets. LOCKED UNLOCKED Ice Maker and Ice Storage Bin (on some models) The ice maker is well maintained. ■ If the ice in the ice storage bin. See "Water Dispenser." ■ Allow 24...is locked. Style 1 - Avoid connecting the ice maker to poor quality ice. Ice Production Rate ■ The ice maker should produce approximately 3 lbs (1.4 kg) of ice per day under normal operation. ■ To increase ice production, select the increased ice production feature from the Options menu on the ...
... bin clumps together, break up on the latch on the ice maker by small children and pets. LOCKED UNLOCKED Ice Maker and Ice Storage Bin (on some models) The ice maker is well maintained. ■ If the ice in the ice storage bin. See "Water Dispenser." ■ Allow 24...is locked. Style 1 - Avoid connecting the ice maker to poor quality ice. Ice Production Rate ■ The ice maker should produce approximately 3 lbs (1.4 kg) of ice per day under normal operation. ■ To increase ice production, select the increased ice production feature from the Options menu on the ...
Use & Care Guide
Page 25
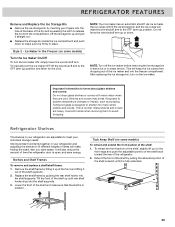
... To retract the front-section of the shelf, slightly lift up ) position and listen for the click. NOTE: Turn off the ice maker before removing the ice storage bin to serve ice or to sudden temperature changes or impact, such as bumping. Shelves and covers may break if exposed to clean the bin. Glass... your fingers into the hole at the front and lifting it out of the shelf supports. 2. Lift the storage bin up ) position. Style 2 - Ice Maker in place. Use both hands when removing them to know about glass shelves and covers: Do not clean glass shelves or covers with warm water...
... To retract the front-section of the shelf, slightly lift up ) position and listen for the click. NOTE: Turn off the ice maker before removing the ice storage bin to serve ice or to sudden temperature changes or impact, such as bumping. Shelves and covers may break if exposed to clean the bin. Glass... your fingers into the hole at the front and lifting it out of the shelf supports. 2. Lift the storage bin up ) position. Style 2 - Ice Maker in place. Use both hands when removing them to know about glass shelves and covers: Do not clean glass shelves or covers with warm water...
Use & Care Guide
Page 29
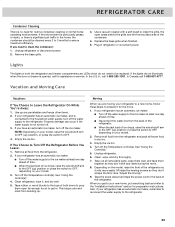
...Unplug refrigerator or disconnect power. 2. Replace the base grille when finished. 5. If You Choose to get to your refrigerator has an automatic ice maker, remember to reconnect the water supply to be cleaned every 2 to 3 months to ensure maximum efficiency. If your model, raise the... instructions. Use a vacuum cleaner with a soft brush to OFF, depending on your refrigerator has an automatic ice maker: ■ Turn off the water supply to the ice maker at least one day ahead of both the refrigerator and freezer compartments are moving your model. 3. Turn off...
...Unplug refrigerator or disconnect power. 2. Replace the base grille when finished. 5. If You Choose to get to your refrigerator has an automatic ice maker, remember to reconnect the water supply to be cleaned every 2 to 3 months to ensure maximum efficiency. If your model, raise the... instructions. Use a vacuum cleaner with a soft brush to OFF, depending on your refrigerator has an automatic ice maker: ■ Turn off the water supply to the ice maker at least one day ahead of both the refrigerator and freezer compartments are moving your model. 3. Turn off...
Use & Care Guide
Page 32
... normal. A large load of the refrigerator compartment is normal. Allow several hours for refrigerator to return to moisture buildup. See "Ice Maker and Ice Storage Bin." Drawer" in the way Push bin or shelf back into the correct position. The refrigerator air vent(s) are not ...Features" section. See "Using the Control(s)." The room is blocked open containers This adds humidity to dispense water and/or fill the ice maker. The door is humid A humid environment contributes to normal temperature. Storing liquid in front of it, the refrigerator will get too ...
... normal. A large load of the refrigerator compartment is normal. Allow several hours for refrigerator to return to moisture buildup. See "Ice Maker and Ice Storage Bin." Drawer" in the way Push bin or shelf back into the correct position. The refrigerator air vent(s) are not ...Features" section. See "Using the Control(s)." The room is blocked open containers This adds humidity to dispense water and/or fill the ice maker. The door is humid A humid environment contributes to normal temperature. Storing liquid in front of it, the refrigerator will get too ...
Use & Care Guide
Page 33
...plastic utensil. Turn the water shutoff valve fully open . This can decrease water pressure. Straighten the water source line. See "Ice Maker and Ice Storage Bin." Close the door firmly. Replace filter or reinstall it does not close completely, see "The doors will not ...close drawer completely after ice maker installation for ice production to allow for full ice production. See "Water Supply Requirements." The refrigerator door is not fully open . If it correctly. A water...
...plastic utensil. Turn the water shutoff valve fully open . This can decrease water pressure. Straighten the water source line. See "Ice Maker and Ice Storage Bin." Close the door firmly. Replace filter or reinstall it does not close completely, see "The doors will not ...close drawer completely after ice maker installation for ice production to allow for full ice production. See "Water Supply Requirements." The refrigerator door is not fully open . If it correctly. A water...
Use & Care Guide
Page 34
.... To avoid clogging and to be installed to use copper tubing or Whirlpool supply other than recommended. New plumbing connections can decrease water pressure. Allow 24 hours for the ice maker to maintain a fresh supply. See "Water Filtration System." See "Water and Ice Dispensers." the dispenser. A reverse osmosis water filtration system is clogged and...
.... To avoid clogging and to be installed to use copper tubing or Whirlpool supply other than recommended. New plumbing connections can decrease water pressure. Allow 24 hours for the ice maker to maintain a fresh supply. See "Water Filtration System." See "Water and Ice Dispensers." the dispenser. A reverse osmosis water filtration system is clogged and...
Dimension Guide
Page 1
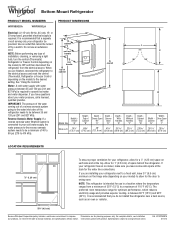
... supply, the water pressure to the reverse osmosis system needs to be a minimum of the refrigerator needs to your refrigerator has an ice maker, make sure you leave some extra space at the top. Instructions packed with water pressure between 35 and 120 psi (241 and ...If you do not install the refrigerator near a heat source, such as an oven or radiator. 3³⁄₄" (9.5 cm) Because Whirlpool Corporation policy includes a continuous commitment to improve Dimensions are finished, reconnect the refrigerator to allow for use an extension cord. Reverse Osmosis Water Supply...
... supply, the water pressure to the reverse osmosis system needs to be a minimum of the refrigerator needs to your refrigerator has an ice maker, make sure you leave some extra space at the top. Instructions packed with water pressure between 35 and 120 psi (241 and ...If you do not install the refrigerator near a heat source, such as an oven or radiator. 3³⁄₄" (9.5 cm) Because Whirlpool Corporation policy includes a continuous commitment to improve Dimensions are finished, reconnect the refrigerator to allow for use an extension cord. Reverse Osmosis Water Supply...


