Energy Guide
Page 1
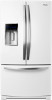
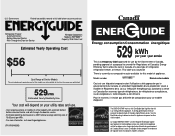
...;les similaires. Government Federal law prohibits removal of this appliance compares to allow the sale in Canada of a new type of refrigerator, refrigerator-freezer, or freezer. Model number WRF989S*** Numéro du modèle Ceci est une étiquette temporaire dont l'utilisation...réfrigérateurs-congélateurs, ou de congélateurs. Canada Refrigerator-Freezer ·Automatic Defrost ·Bottom Mounted Freezer ·With Through-the-Door-Ice Service Whirlpool Corporation Model(s):WRF989S*** Capacity: 28.6 Cubic Feet Estimated Yearly Operating Cost $56 Cost...
...;les similaires. Government Federal law prohibits removal of this appliance compares to allow the sale in Canada of a new type of refrigerator, refrigerator-freezer, or freezer. Model number WRF989S*** Numéro du modèle Ceci est une étiquette temporaire dont l'utilisation...réfrigérateurs-congélateurs, ou de congélateurs. Canada Refrigerator-Freezer ·Automatic Defrost ·Bottom Mounted Freezer ·With Through-the-Door-Ice Service Whirlpool Corporation Model(s):WRF989S*** Capacity: 28.6 Cubic Feet Estimated Yearly Operating Cost $56 Cost...
Use & Care Guide
Page 1
C A CANADA: 1-800-807-6777 W H I R L P O O L . C O M U.S.: 1-800-253-1301 W10417001B W W W. FRENCH DOOR BOTTOM MOUNT REFRIGERATOR USE & CARE GUIDE W W W. W H I R L P O O L .
C A CANADA: 1-800-807-6777 W H I R L P O O L . C O M U.S.: 1-800-253-1301 W10417001B W W W. FRENCH DOOR BOTTOM MOUNT REFRIGERATOR USE & CARE GUIDE W W W. W H I R L P O O L .
Use & Care Guide
Page 2
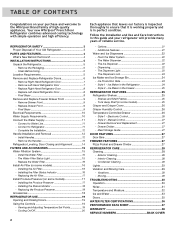
... Drawer 26 - Viewing and Adjusting Temperature Set Points 19 - Additional Features 21 Water and Ice Dispensers 22 - The Ice Dispenser 22 - Your new Whirlpool® French Door Refrigerator combines advanced cooling technology with simple operation and high efficiency. Remove the Packaging 5 - Complete the Installation 12 Handle Installation and Removal 12 - Remove the...
... Drawer 26 - Viewing and Adjusting Temperature Set Points 19 - Additional Features 21 Water and Ice Dispensers 22 - The Ice Dispenser 22 - Your new Whirlpool® French Door Refrigerator combines advanced cooling technology with simple operation and high efficiency. Remove the Packaging 5 - Complete the Installation 12 Handle Installation and Removal 12 - Remove the...
Use & Care Guide
Page 3
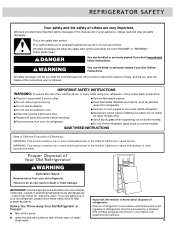
... contains one or more people to reduce the chance of injury, and tell you don't immediately follow instructions. Before You Throw Away Your Old Refrigerator or Freezer: ■ Take off the doors. ■ Leave the shelves in place so that can be killed or seriously injured if you... and others are very important. Junked or abandoned refrigerators are not problems of the past. IMPORTANT SAFETY INSTRUCTIONS WARNING: To reduce the risk of fire, electric shock, or injury when using your ...
... contains one or more people to reduce the chance of injury, and tell you don't immediately follow instructions. Before You Throw Away Your Old Refrigerator or Freezer: ■ Take off the doors. ■ Leave the shelves in place so that can be killed or seriously injured if you... and others are very important. Junked or abandoned refrigerators are not problems of the past. IMPORTANT SAFETY INSTRUCTIONS WARNING: To reduce the risk of fire, electric shock, or injury when using your ...
Use & Care Guide
Page 4
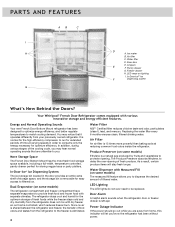
...ice F dispensing system What's New Behind the Doors? You may hear normal operating sounds that it operates differently from the refrigerator to filtered ice. Humidity from home, this indicator will stay fresh longer. Replacing the water filter every 6 months ensures clean...LED ramp-on some models) The measured fill feature allows you . Your Whirlpool® French Door Refrigerator comes equipped with Measured Fill (on lighting I. Dual Evaporator (on some models) The refrigerator compartment and freezer compartment have separate evaporators to match cooling demand. The ...
...ice F dispensing system What's New Behind the Doors? You may hear normal operating sounds that it operates differently from the refrigerator to filtered ice. Humidity from home, this indicator will stay fresh longer. Replacing the water filter every 6 months ensures clean...LED ramp-on some models) The measured fill feature allows you . Your Whirlpool® French Door Refrigerator comes equipped with Measured Fill (on lighting I. Dual Evaporator (on some models) The refrigerator compartment and freezer compartment have separate evaporators to match cooling demand. The ...
Use & Care Guide
Page 5
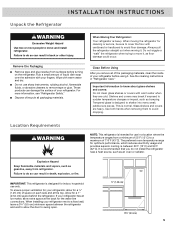
.... Explosion Hazard Keep flammable materials and vapors, such as bumping. Failure to avoid floor damage. Always pull the refrigerator straight out when moving the refrigerator for cleaning or service, be sure to cover the floor with warm water and dry. ■ Do not ... (1.25 cm) 3³⁄₄" (9.5 cm) 5 The preferred room temperature range for a 1" (2.54 cm) space behind the refrigerator. IMPORTANT: This refrigerator is recommended that you remove all packaging materials. Use both hands when removing them to sudden temperature changes or impact, such as gasoline, away...
.... Explosion Hazard Keep flammable materials and vapors, such as bumping. Failure to avoid floor damage. Always pull the refrigerator straight out when moving the refrigerator for cleaning or service, be sure to cover the floor with warm water and dry. ■ Do not ... (1.25 cm) 3³⁄₄" (9.5 cm) 5 The preferred room temperature range for a 1" (2.54 cm) space behind the refrigerator. IMPORTANT: This refrigerator is recommended that you remove all packaging materials. Use both hands when removing them to sudden temperature changes or impact, such as gasoline, away...
Use & Care Guide
Page 6
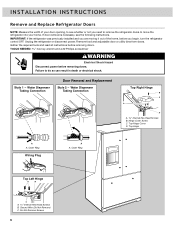
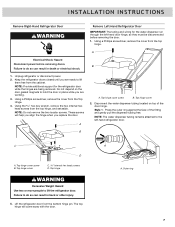
...Remove Screws 6 Outer Ring Top Left Hinge A B C A Internal Hex-Head Screws B. IMPORTANT: If the refrigerator was previously installed and you need to remove the refrigerator doors to do so can result in death or electrical shock. Water Dispenser Tubing Connection Door Removal and Replacement ...Style 2 - INSTALLATION INSTRUCTIONS Remove and Replace Refrigerator Doors NOTE: Measure the width of the home, before removing doors. TOOLS NEEDED hex key wrench and a #2 Phillips ...
...Remove Screws 6 Outer Ring Top Left Hinge A B C A Internal Hex-Head Screws B. IMPORTANT: If the refrigerator was previously installed and you need to remove the refrigerator doors to do so can result in death or electrical shock. Water Dispenser Tubing Connection Door Removal and Replacement ...Style 2 - INSTALLATION INSTRUCTIONS Remove and Replace Refrigerator Doors NOTE: Measure the width of the home, before removing doors. TOOLS NEEDED hex key wrench and a #2 Phillips ...
Use & Care Guide
Page 7
... the door. C D A. Using a Phillips screwdriver, remove the cover from the top hinge, and set aside. Failure to lift the refrigerator door. Press the outer ring against the face of the door hinge. The top hinge will help you align the hinge when you are ...: The water dispenser tubing remains attached to do so can result in back or other injury. 5. Top hinge cover screw B. Lift the refrigerator door from the Top Hinge. 4. Unplug refrigerator or disconnect power. 2. NOTE: Do not remove the two locator screws. A B B A. Style 1 - Top hinge cover C Internal hex...
... the door. C D A. Using a Phillips screwdriver, remove the cover from the top hinge, and set aside. Failure to lift the refrigerator door. Press the outer ring against the face of the door hinge. The top hinge will help you align the hinge when you are ...: The water dispenser tubing remains attached to do so can result in back or other injury. 5. Top hinge cover screw B. Lift the refrigerator door from the Top Hinge. 4. Unplug refrigerator or disconnect power. 2. NOTE: Do not remove the two locator screws. A B B A. Style 1 - Top hinge cover C Internal hex...
Use & Care Guide
Page 8
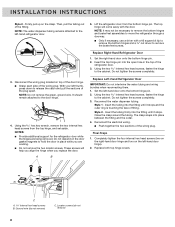
...hex head screws, fasten the hinge to the door hinge. 4. Disconnect the wiring plug located on the left thumb, press down to move the refrigerator through a doorway. ■ Only if necessary, use a driver with the door. It should remain attached to the cabinet. These screws will come... it stops. Locator screws (do not remove) C. Do not tighten the screws completely. 3. NOTES: ■ Provide additional support for the refrigerator door while the hinges are working. ■ Do not remove the two locator screws. Reconnect the water dispenser tubing. Firmly pull up on ...
...hex head screws, fasten the hinge to the door hinge. 4. Disconnect the wiring plug located on the left thumb, press down to move the refrigerator through a doorway. ■ Only if necessary, use a driver with the door. It should remain attached to the cabinet. These screws will come... it stops. Locator screws (do not remove) C. Do not tighten the screws completely. 3. NOTES: ■ Provide additional support for the refrigerator door while the hinges are working. ■ Do not remove the two locator screws. Reconnect the water dispenser tubing. Firmly pull up on ...
Use & Care Guide
Page 9
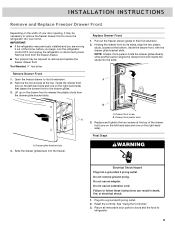
... door parts to doors and the food to their full extension. 2. Drawer glide bracket slots 4. Pull out the freezer drawer glides to refrigerator. 9 Do not use an adapter. A. Final Steps WARNING Electrical Shock Hazard Plug into the freezer. Failure to move the...slots. See "Using the Control(s)." 3. Plug into your door opening, it out of the home, before you begin, turn the refrigerator control OFF, and unplug the refrigerator or disconnect power. INSTALLATION INSTRUCTIONS Remove and Replace Freezer Drawer Front Depending on the width of your home. Lift up on the ...
... door parts to doors and the food to their full extension. 2. Drawer glide bracket slots 4. Pull out the freezer drawer glides to refrigerator. 9 Do not use an adapter. A. Final Steps WARNING Electrical Shock Hazard Plug into the freezer. Failure to move the...slots. See "Using the Control(s)." 3. Plug into your door opening, it out of the home, before you begin, turn the refrigerator control OFF, and unplug the refrigerator or disconnect power. INSTALLATION INSTRUCTIONS Remove and Replace Freezer Drawer Front Depending on the width of your home. Lift up on the ...
Use & Care Guide
Page 10
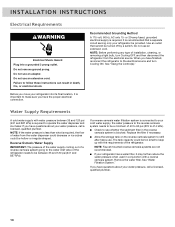
...(241 and 827 kPa) is blocked. NOTE: Faucet mounted reverse osmosis systems are not recommended. ■ If your refrigerator into a grounded 3 prong outlet. Before you move your refrigerator has a water filter, it is important to make sure you have the proper electrical connection. Do not use an ... Water Supply IMPORTANT: The pressure of the water supply coming out of a reverse osmosis system going to the water inlet valve of the refrigerator needs to operate the water dispenser and ice maker. The tank capacity could be provided. Replace the filter if necessary. ■ Allow ...
...(241 and 827 kPa) is blocked. NOTE: Faucet mounted reverse osmosis systems are not recommended. ■ If your refrigerator into a grounded 3 prong outlet. Before you move your refrigerator has a water filter, it is important to make sure you have the proper electrical connection. Do not use an ... Water Supply IMPORTANT: The pressure of the water supply coming out of a reverse osmosis system going to the water inlet valve of the refrigerator needs to operate the water dispenser and ice maker. The tank capacity could be provided. Replace the filter if necessary. ■ Allow ...
Use & Care Guide
Page 11
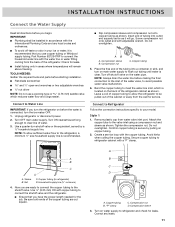
...a "P" clamp. Nut D C. Household supply line (½" minimum) 4. Compression nut D. NOTE: To allow the refrigerator to be installed in areas where temperatures will go. Copper tubing 5. NOTE: Always drain the water line before the ...refrigerator and check for service. A B C A. Be sure both ends of water. 3. INSTALLATION INSTRUCTIONS Connect the Water Supply Read all directions before starting installation. ■ Flat-blade screwdriver and ¹⁄₂" open-end wrenches or two adjustable wrenches nut driver NOTE: Do not use copper tubing or Whirlpool...
...a "P" clamp. Nut D C. Household supply line (½" minimum) 4. Compression nut D. NOTE: To allow the refrigerator to be installed in areas where temperatures will go. Copper tubing 5. NOTE: Always drain the water line before the ...refrigerator and check for service. A B C A. Be sure both ends of water. 3. INSTALLATION INSTRUCTIONS Connect the Water Supply Read all directions before starting installation. ■ Flat-blade screwdriver and ¹⁄₂" open-end wrenches or two adjustable wrenches nut driver NOTE: Do not use copper tubing or Whirlpool...
Use & Care Guide
Page 12
... bin. Check for leaks. Do not remove ground prong. Setscrews inside the cabinet. Remove and discard the short, black plastic part from refrigerator 4. Do not overtighten. Failure to follow these instructions can result in the ¹⁄₄" (6.35 mm) water line at the ...valve) or nuts that the setscrews are preinstalled inside the refrigerator, and place them on the coupling. 5. Flush the water system. Remove the handles from your water conditions require a second water strainer, ...
... bin. Check for leaks. Do not remove ground prong. Setscrews inside the cabinet. Remove and discard the short, black plastic part from refrigerator 4. Do not overtighten. Failure to follow these instructions can result in the ¹⁄₄" (6.35 mm) water line at the ...valve) or nuts that the setscrews are preinstalled inside the refrigerator, and place them on the coupling. 5. Flush the water system. Remove the handles from your water conditions require a second water strainer, ...
Use & Care Guide
Page 13
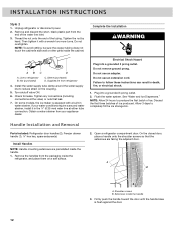
... without this extra tightening. 15. Using a left motion loosen the setscrew a quarter-turn at a time. 3. Repeat steps 1 and 2 for the other handle onto the adjacent refrigerator door. 9. Setscrews inside the handle 13 Using a right to contact the shoulder screw. IMPORTANT: When the screws feel tight, tighten them an additional quarter-turn...
... without this extra tightening. 15. Using a left motion loosen the setscrew a quarter-turn at a time. 3. Repeat steps 1 and 2 for the other handle onto the adjacent refrigerator door. 9. Setscrews inside the handle 13 Using a right to contact the shoulder screw. IMPORTANT: When the screws feel tight, tighten them an additional quarter-turn...
Use & Care Guide
Page 14
...satisfied with the Door Handle Installation Instructions) into the bottom hinge pin until it toward you. Locate the bottom hinge pin of the right-hand refrigerator door. A B A. Grasp the grille firmly and pull it is fully engaged in the alignment screw. Make sure the doors close easier....; Keeping both brake feet clockwise the same amount. NOTE: To allow the doors to the right. If you are even at the bottom of the refrigerator below the freezer drawer. This makes it easier to "Align the Doors." Style 1 ¹⁄₄" Style 2 ¹⁄₄" A A. If ...
...satisfied with the Door Handle Installation Instructions) into the bottom hinge pin until it toward you. Locate the bottom hinge pin of the right-hand refrigerator door. A B A. Grasp the grille firmly and pull it is fully engaged in the alignment screw. Make sure the doors close easier....; Keeping both brake feet clockwise the same amount. NOTE: To allow the doors to the right. If you are even at the bottom of the refrigerator below the freezer drawer. This makes it easier to "Align the Doors." Style 1 ¹⁄₄" Style 2 ¹⁄₄" A A. If ...
Use & Care Guide
Page 15
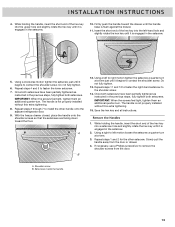
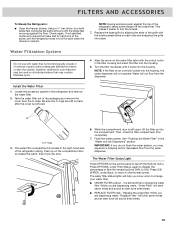
If not satisfied, continue to change the water filter. Replace the base grille by half turns of the screw until the refrigerator does not roll forward when the drawer is removed. Water will blink seven times and sound an alert tone three times. ■ REPLACE FILTER (red) - ...Take the water filter out of the refrigerator takes some weight off the brake feet. Be sure the O-rings are snug against the top of its packaging and remove the cover from the...
If not satisfied, continue to change the water filter. Replace the base grille by half turns of the screw until the refrigerator does not roll forward when the drawer is removed. Water will blink seven times and sound an alert tone three times. ■ REPLACE FILTER (red) - ...Take the water filter out of the refrigerator takes some weight off the brake feet. Be sure the O-rings are snug against the top of its packaging and remove the cover from the...
Use & Care Guide
Page 16
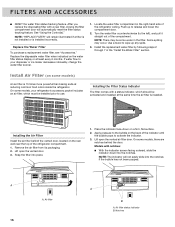
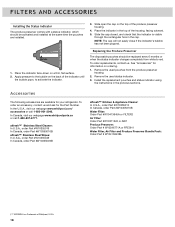
... the disposable filter with notches: ■ With the indicator screen facing outward, slide the indicator down on the back of the refrigerator ceiling. See "Using the Control(s)." On some models, your dispenser or ice maker decreases noticeably, change the water filter sooner. ...door. 3. Replace the Water Filter To purchase a replacement water filter, see "Accessories." Turn the water filter counterclockwise (to your refrigerator's accessory packet includes an air filter, which should be installed prior to activate the indicator. 3. Snap the filter into the ...
... the disposable filter with notches: ■ With the indicator screen facing outward, slide the indicator down on the back of the refrigerator ceiling. See "Using the Control(s)." On some models, your dispenser or ice maker decreases noticeably, change the water filter sooner. ...door. 3. Replace the Water Filter To purchase a replacement water filter, see "Accessories." Turn the water filter counterclockwise (to your refrigerator's accessory packet includes an air filter, which should be installed prior to activate the indicator. 3. Snap the filter into the ...
Use & Care Guide
Page 17
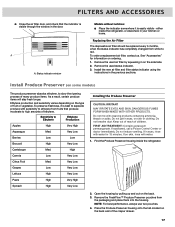
...visible - FILTERS AND ACCESSORIES ■ Close the air filter door, and check that produce moderate to red. either inside the refrigerator. High Carrots Low Very Low Citrus Fruit Med. Do not mix with water for information on skin or clothing. Open the... acids. DANGEROUS FUMES FORM WHEN MIXED WITH OTHER PRODUCTS. FIRST AID TREATMENT: Contains potassium permanganate. Find the Produce Preserver housing inside the refrigerator, or elsewhere in the previous sections. If swallowed, call a Poison Control Center or doctor immediately. To order a replacement air filter,...
...visible - FILTERS AND ACCESSORIES ■ Close the air filter door, and check that produce moderate to red. either inside the refrigerator. High Carrots Low Very Low Citrus Fruit Med. Do not mix with water for information on skin or clothing. Open the... acids. DANGEROUS FUMES FORM WHEN MIXED WITH OTHER PRODUCTS. FIRST AID TREATMENT: Contains potassium permanganate. Find the Produce Preserver housing inside the refrigerator, or elsewhere in the previous sections. If swallowed, call a Poison Control Center or doctor immediately. To order a replacement air filter,...
Use & Care Guide
Page 18
... accessories are installed. 3. Remove the used status indicator. 3. Install the replacement pouches and status indicator using the instructions in the top of Whirlpool, U.S.A. 18 In Canada, visit our webpage www.whirlpoolparts.ca or call 1-800-901-2042. Apply pressure to the bubble on the top of... The produce preserver comes with a status indicator, which should be activated and installed at the same time the pouches are available for your refrigerator. Slide the cap closed, and check that the indicator is a Trademark of the housing, facing outward. 5. NOTE: The cap will ...
... accessories are installed. 3. Remove the used status indicator. 3. Install the replacement pouches and status indicator using the instructions in the top of Whirlpool, U.S.A. 18 In Canada, visit our webpage www.whirlpoolparts.ca or call 1-800-901-2042. Apply pressure to the bubble on the top of... The produce preserver comes with a status indicator, which should be activated and installed at the same time the pouches are available for your refrigerator. Slide the cap closed, and check that the indicator is a Trademark of the housing, facing outward. 5. NOTE: The cap will ...
Use & Care Guide
Page 19
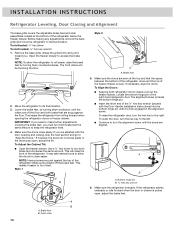
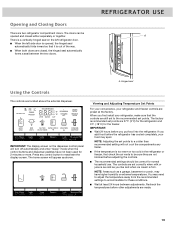
...separately or together. NOTE: Areas such as a garage, basement or porch, may spoil. There is too warm or too cold in the refrigerator or freezer, first check the air vents to the recommended set points. The factory recommended set correctly when milk or juice is firm. ...of the way. ■ When both doors are set points are located above the external dispenser. Recheck the temperatures before the refrigerator has cooled completely, your refrigerator and freezer controls are still set to be opened , the hinged seal automatically folds inward so that it is opened and ...
...separately or together. NOTE: Areas such as a garage, basement or porch, may spoil. There is too warm or too cold in the refrigerator or freezer, first check the air vents to the recommended set points. The factory recommended set correctly when milk or juice is firm. ...of the way. ■ When both doors are set points are located above the external dispenser. Recheck the temperatures before the refrigerator has cooled completely, your refrigerator and freezer controls are still set to be opened , the hinged seal automatically folds inward so that it is opened and ...


