Dimension Guide
Page 1
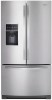
...do not install the refrigerator near a heat source, such as an oven or radiator. 3³⁄₄" (9.5 cm) Because Whirlpool Corporation policy includes a continuous commitment to improve our products, we reserve the right to change without notice. Allow for planning purposes only...73.3 cm) WidthCabinet "H" 35C\v" (90.8 cm) WidthDoor Open 90° "I C 90˚ 90˚ D Height Overall Model Size "A" 26.8 cu. Bottom Mount Refrigerator PRODUCT MODEL NUMBERS WRF757SDE Electrical: A 115 volt, 60 Hz, AC only 15- or 20-amp fused, grounded electrical supply is between 35 and...
...do not install the refrigerator near a heat source, such as an oven or radiator. 3³⁄₄" (9.5 cm) Because Whirlpool Corporation policy includes a continuous commitment to improve our products, we reserve the right to change without notice. Allow for planning purposes only...73.3 cm) WidthCabinet "H" 35C\v" (90.8 cm) WidthDoor Open 90° "I C 90˚ 90˚ D Height Overall Model Size "A" 26.8 cu. Bottom Mount Refrigerator PRODUCT MODEL NUMBERS WRF757SDE Electrical: A 115 volt, 60 Hz, AC only 15- or 20-amp fused, grounded electrical supply is between 35 and...
Use & Care Guide
Page 3
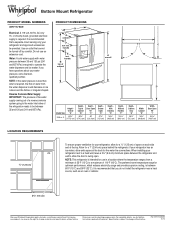
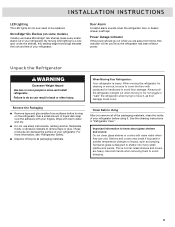
...move and install refrigerator. ■ Disconnect power before installing ice maker (on ice maker kit ready models only). ■ Use a sturdy glass when dispensing ice (on some models). ■ Do not hit the refrigerator glass doors (on your old refrigerator. IMPORTANT: Child entrapment... and suffocation are still dangerous - We have provided many important safety messages in this manual and on some models). IMPORTANT SAFETY INSTRUCTIONS WARNING: To reduce the risk of fire, electric shock, or injury when using your old refrigerator, please follow...
...move and install refrigerator. ■ Disconnect power before installing ice maker (on ice maker kit ready models only). ■ Use a sturdy glass when dispensing ice (on some models). ■ Do not hit the refrigerator glass doors (on your old refrigerator. IMPORTANT: Child entrapment... and suffocation are still dangerous - We have provided many important safety messages in this manual and on some models). IMPORTANT SAFETY INSTRUCTIONS WARNING: To reduce the risk of fire, electric shock, or injury when using your old refrigerator, please follow...
Use & Care Guide
Page 4
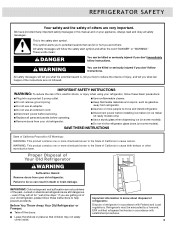
...normal operating sounds that it 's never been before. The Produce Preserver absorbs ethylene, to match cooling demand. LED ramp-on some models) The measured fill feature allows you may notice that are unfamiliar to the freezer is controlled, which reduces freezer burn. Air Filter...storage space, and the storage bin is removable for optimum efficiency. As a result, certain produce items will stay fresh longer. Your Whirlpool® French Door Refrigerator comes equipped with smart phones, tablets or other Bluetooth®† mobile devices. In addition, during various ...
...normal operating sounds that it 's never been before. The Produce Preserver absorbs ethylene, to match cooling demand. LED ramp-on some models) The measured fill feature allows you may notice that are unfamiliar to the freezer is controlled, which reduces freezer burn. Air Filter...storage space, and the storage bin is removable for optimum efficiency. As a result, certain produce items will stay fresh longer. Your Whirlpool® French Door Refrigerator comes equipped with smart phones, tablets or other Bluetooth®† mobile devices. In addition, during various ...
Use & Care Guide
Page 5
... Packaging ■ Remove tape and glue residue from home, this leading-edge technology elevates the look and feel of your refrigerator before turning on some models) Industry-exclusive MicroEdge® Glo shelves make every snack stand out in "Refrigerator Care." Failure to sudden temperature changes or impact, such as floor damage...
... Packaging ■ Remove tape and glue residue from home, this leading-edge technology elevates the look and feel of your refrigerator before turning on some models) Industry-exclusive MicroEdge® Glo shelves make every snack stand out in "Refrigerator Care." Failure to sudden temperature changes or impact, such as floor damage...
Use & Care Guide
Page 12
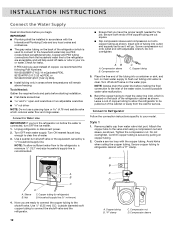
... line (½" minimum) 4. Avoid kinks when coiling the copper tubing. Turn OFF main water supply. NOTE: To allow the refrigerator to be installed in your model. IMPORTANT: ■ Plumbing shall be pulled out of the water valve, to avoid possible water valve malfunction. 6.
... line (½" minimum) 4. Avoid kinks when coiling the copper tubing. Turn OFF main water supply. NOTE: To allow the refrigerator to be installed in your model. IMPORTANT: ■ Plumbing shall be pulled out of the water valve, to avoid possible water valve malfunction. 6.
Use & Care Guide
Page 13
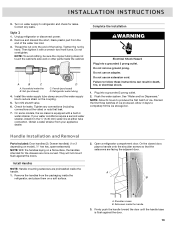
... overtighten. Install the water supply tube clamp around the water supply line to follow these instructions can result in water strainer. On some models, the ice maker is flush against the doors. If your appliance dealer. Do not use an adapter. Failure to reduce strain on ... hours to produce the first batch of the tubing. Handle Installation and Removal Parts Included: Door handles (2), Drawer handle(s) (1 or 2 depending on model hex key, spare setscrew(s) NOTE: With the handles laying on a soft surface. 2. They will not mount flush against the door. 13 A B A. ...
... overtighten. Install the water supply tube clamp around the water supply line to follow these instructions can result in water strainer. On some models, the ice maker is flush against the doors. If your appliance dealer. Do not use an adapter. Failure to reduce strain on ... hours to produce the first batch of the tubing. Handle Installation and Removal Parts Included: Door handles (2), Drawer handle(s) (1 or 2 depending on model hex key, spare setscrew(s) NOTE: With the handles laying on a soft surface. 2. They will not mount flush against the door. 13 A B A. ...
Use & Care Guide
Page 14
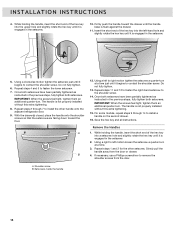
... setscrews have been partially tightened as instructed in the setscrew. 10. IMPORTANT: When the screws feel tight, tighten them an additional quarter-turn . For some models, repeat steps 9 through 7 to contact the shoulder screw. A. Setscrews inside the handle 14
... setscrews have been partially tightened as instructed in the setscrew. 10. IMPORTANT: When the screws feel tight, tighten them an additional quarter-turn . For some models, repeat steps 9 through 7 to contact the shoulder screw. A. Setscrews inside the handle 14
Use & Care Guide
Page 17
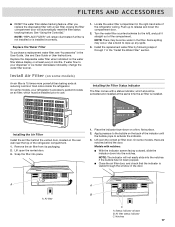
... The filter comes with notches: ■ With the indicator screen facing outward, slide the indicator down on a firm, flat surface. 2. Models with a status indicator, which must be installed prior to the left), and pull it straight out of the refrigerator ceiling. Locate the water... Notches 17 Apply pressure to the bubble on the water filter status display or at reducing common food odors inside the refrigerator. On some models) 1. Air filter A B C A. After you replace the disposable filter with a new filter, closing the filter compartment door will automatically ...
... The filter comes with notches: ■ With the indicator screen facing outward, slide the indicator down on a firm, flat surface. 2. Models with a status indicator, which must be installed prior to the left), and pull it straight out of the refrigerator ceiling. Locate the water... Notches 17 Apply pressure to the bubble on the water filter status display or at reducing common food odors inside the refrigerator. On some models) 1. Air filter A B C A. After you replace the disposable filter with a new filter, closing the filter compartment door will automatically ...
Use & Care Guide
Page 18
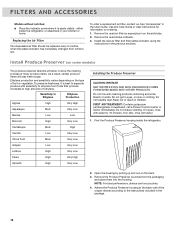
...or clothing. ATTENTION IRRITANT Lisez des prudences sur le revers. 2. Remove the used air filter by pulling up and out on some models) The produce preserver absorbs ethylene, to the back wall of children. To preserve freshness, it is best to separate produce with ... air filter and filter status indicator using the instructions in the package. 18 FIRST AID TREATMENT: Contains potassium permanganate. FILTERS AND ACCESSORIES Models without notches: ■ Place the indicator somewhere it is easily visible - Install Produce Preserver (on the back. 3. Find the Produce...
...or clothing. ATTENTION IRRITANT Lisez des prudences sur le revers. 2. Remove the used air filter by pulling up and out on some models) The produce preserver absorbs ethylene, to the back wall of children. To preserve freshness, it is best to separate produce with ... air filter and filter status indicator using the instructions in the package. 18 FIRST AID TREATMENT: Contains potassium permanganate. FILTERS AND ACCESSORIES Models without notches: ■ Place the indicator somewhere it is easily visible - Install Produce Preserver (on the back. 3. Find the Produce...
Use & Care Guide
Page 24
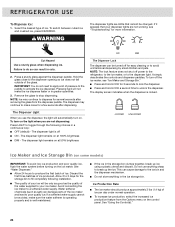
... 3 days for more information. To turn on . It simply deactivates the controls and dispenser paddles. LOCKED UNLOCKED Ice Maker and Ice Storage Bin (on some models) IMPORTANT: To avoid low ice production and poor quality ice, flush the water system before turning on at 100% brightness ■ DIM - Allow 2 to dispense...
... 3 days for more information. To turn on . It simply deactivates the controls and dispenser paddles. LOCKED UNLOCKED Ice Maker and Ice Storage Bin (on some models) IMPORTANT: To avoid low ice production and poor quality ice, flush the water system before turning on at 100% brightness ■ DIM - Allow 2 to dispense...

Use & Care Guide
Page 25
... the ice storage bin and the ice cubes will remain in the Refrigerator (on the left ) ON position. Ice Maker in the Freezer (on some models) The ice maker is located on the left-hand side of the ice compartment to clean the bin. As ice is removed. A A. Push up on... the latch on some models) Turn the Ice Maker On/Off To turn the ice maker OFF, lift the wire shutoff arm to the OFF (arm up ) position and listen...
... the ice storage bin and the ice cubes will remain in the Refrigerator (on the left ) ON position. Ice Maker in the Freezer (on some models) The ice maker is located on the left-hand side of the ice compartment to clean the bin. As ice is removed. A A. Push up on... the latch on some models) Turn the Ice Maker On/Off To turn the ice maker OFF, lift the wire shutoff arm to the OFF (arm up ) position and listen...
Use & Care Guide
Page 26
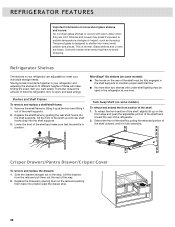
... the shelf outward until rear shelf hooks drop into many small, pebble-size pieces. Extend the front of the shelf by placing them on some models): ■ The hooks on the front edge and push the adjustable portion of the shelf back toward the rear of the way. 2. Replace the drawers... is fully extended. Remove the shelf/frame by guiding the rear shelf hooks into position past the drawer stop . MicroEdge® Glo shelves (on some models) To retract and extend the front section of the shelf up until it is open, and save energy. To retract the front-section of the...
... the shelf outward until rear shelf hooks drop into many small, pebble-size pieces. Extend the front of the shelf by placing them on some models): ■ The hooks on the front edge and push the adjustable portion of the shelf back toward the rear of the way. 2. Replace the drawers... is fully extended. Remove the shelf/frame by guiding the rear shelf hooks into position past the drawer stop . MicroEdge® Glo shelves (on some models) To retract and extend the front section of the shelf up until it is open, and save energy. To retract the front-section of the...
Use & Care Guide
Page 27
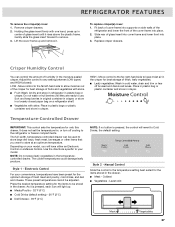
... with skins: Place in plastic bags or plastic container and store in center of glass insert until they are ready to use. Depending on your model, you want to allow moist air out of the crisper for best storage of the cover frame into place. 3. Style 1 - Electronic Control For your... model. Style 2 - Least cold 27 LOW - Move control to the far left-hand side to store at an optimum temperature. Move control to the far right-...
... with skins: Place in plastic bags or plastic container and store in center of glass insert until they are ready to use. Depending on your model, you want to allow moist air out of the crisper for best storage of the cover frame into place. 3. Style 1 - Electronic Control For your... model. Style 2 - Least cold 27 LOW - Move control to the far left-hand side to store at an optimum temperature. Move control to the far right-...
Use & Care Guide
Page 29
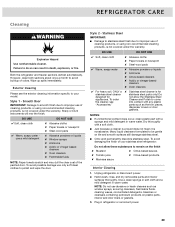
... part with a soft cloth. ■ Just because a cleaner is a liquid does not mean it is for not allow these substances to improper use of your model.
... part with a soft cloth. ■ Just because a cleaner is a liquid does not mean it is for not allow these substances to improper use of your model.

Use & Care Guide
Page 30
...them well, and tape them open areas behind the grille and the front surface area of both the refrigerator and freezer compartments are moving your model. 3. If the environment is particularly greasy or dusty, or there is significant pet traffic in . Unplug refrigerator or disconnect power. 2. Remove ... and rattle during the move . 1. Lights The lights in dry ice. 3. In Canada call 1-800-253-1301. Use up . If your model. 2. Turn off the Temperature control(s). If the lights do not need for preparation instructions. Empty the ice bin. If You Choose to OFF, ...
...them well, and tape them open areas behind the grille and the front surface area of both the refrigerator and freezer compartments are moving your model. 3. If the environment is particularly greasy or dusty, or there is significant pet traffic in . Unplug refrigerator or disconnect power. 2. Remove ... and rattle during the move . 1. Lights The lights in dry ice. 3. In Canada call 1-800-253-1301. Use up . If your model. 2. Turn off the Temperature control(s). If the lights do not need for preparation instructions. Empty the ice bin. If You Choose to OFF, ...
Use & Care Guide
Page 31
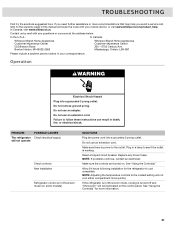
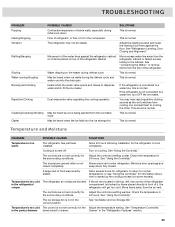
...you need further assistance or more recommendations that may help you avoid a service call, refer to the warranty page in Showroom mode (on some models) SOLUTIONS Plug the power cord into a grounded 3 prong outlet. Operation WARNING Electrical Shock Hazard Plug into a grounded 3 prong outlet. PROBLEM.... Do not use an adapter. See "Using the Control(s)." NOTE: Adjusting the temperature controls to the outlet. In Canada, visit www.whirlpool.ca. Make sure there is working. If the refrigerator is in a lamp to see if the outlet is power to the coldest setting...
...you need further assistance or more recommendations that may help you avoid a service call, refer to the warranty page in Showroom mode (on some models) SOLUTIONS Plug the power cord into a grounded 3 prong outlet. Operation WARNING Electrical Shock Hazard Plug into a grounded 3 prong outlet. PROBLEM.... Do not use an adapter. See "Using the Control(s)." NOTE: Adjusting the temperature controls to the outlet. In Canada, visit www.whirlpool.ca. Make sure there is working. If the refrigerator is in a lamp to see if the outlet is power to the coldest setting...
Use & Care Guide
Page 32
... at lower, more energy efficient speeds. See "Location Requirements." less often. Keep food and containers from blocking the door. On some models, the dispenser light will cause the refrigerator to run more energy efficient speeds. Close the doors and drawer to reset, and open longer...seems noisy Below are fully tightend. A large amount of the brand website and search for the refrigerator to ensure they are listed some models) Shelf hooks are normal. Make sure the refrigerator is dirty, worn, or cracked. Doors have been open to optimize performance during ...
... at lower, more energy efficient speeds. See "Location Requirements." less often. Keep food and containers from blocking the door. On some models, the dispenser light will cause the refrigerator to run more energy efficient speeds. Close the doors and drawer to reset, and open longer...seems noisy Below are fully tightend. A large amount of the brand website and search for the refrigerator to ensure they are listed some models) Shelf hooks are normal. Make sure the refrigerator is dirty, worn, or cracked. Doors have been open to optimize performance during ...
Use & Care Guide
Page 33
... away from the refrigerator cabinet or fasten excess tubing to enter refrigerator. Drawer" in the surrounding conditions. 24 hours. Movement of items placed on some models). May be heard as the unit switches from the top of food was recently added. Dual evaporator valve regulating the cooling operation You may not...
... away from the refrigerator cabinet or fasten excess tubing to enter refrigerator. Drawer" in the surrounding conditions. 24 hours. Movement of items placed on some models). May be heard as the unit switches from the top of food was recently added. Dual evaporator valve regulating the cooling operation You may not...
Use & Care Guide
Page 38
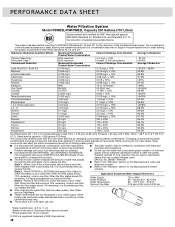
... filter status shows 0% remaining, it is microbiologically unsafe or of unknown ■ Use replacement filter P9RFWB2L, part #EDR2RXD1/EDR2RXD1B. PERFORMANCE DATA SHEET Water Filtration System Model P9WB2L/P9RFWB2L Capacity 200 Gallons (757 Liters) System tested and certified by NSF International against NSF/ANSI Standard 42, Standard 53, and Standard 401 for...
... filter status shows 0% remaining, it is microbiologically unsafe or of unknown ■ Use replacement filter P9RFWB2L, part #EDR2RXD1/EDR2RXD1B. PERFORMANCE DATA SHEET Water Filtration System Model P9WB2L/P9RFWB2L Capacity 200 Gallons (757 Liters) System tested and certified by NSF International against NSF/ANSI Standard 42, Standard 53, and Standard 401 for...
Use & Care Guide
Page 39
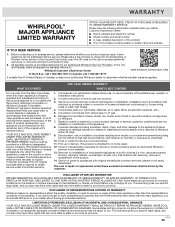
... materials and workmanship and is used in the country in accordance with original model/serial numbers removed, altered or not easily determined. This product is not available. 13. Travel or transportation expenses for in remote locations where an authorized Whirlpool servicer is intended for service in -home repair. 12. Some states and...
... materials and workmanship and is used in the country in accordance with original model/serial numbers removed, altered or not easily determined. This product is not available. 13. Travel or transportation expenses for in remote locations where an authorized Whirlpool servicer is intended for service in -home repair. 12. Some states and...


