Use & Care Guide
Page 2
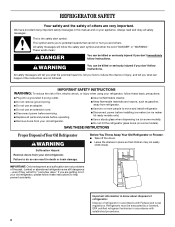
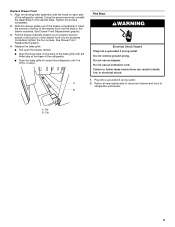
... are still dangerous - These words mean: DANGER You can happen if the instructions are not followed. Important information to move and install refrigerator. ■ Disconnect power before installing ice maker (on ice maker kit ready models only). ■ Use a sturdy glass when dispensing... use an adapter. ■ Do not use an extension cord. ■ Disconnect power before servicing. ■ Replace all safety messages. REFRIGERATOR SAFETY Your safety and the safety of others . All safety messages will sit for "just a few days." IMPORTANT SAFETY INSTRUCTIONS WARNING: To...
... are still dangerous - These words mean: DANGER You can happen if the instructions are not followed. Important information to move and install refrigerator. ■ Disconnect power before installing ice maker (on ice maker kit ready models only). ■ Use a sturdy glass when dispensing... use an adapter. ■ Do not use an extension cord. ■ Disconnect power before servicing. ■ Replace all safety messages. REFRIGERATOR SAFETY Your safety and the safety of others . All safety messages will sit for "just a few days." IMPORTANT SAFETY INSTRUCTIONS WARNING: To...
Use & Care Guide
Page 3
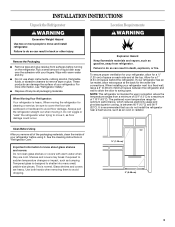
... clean glass shelves or covers with your fingers. Tempered glass is intended for a ¹⁄₂" (1.25 cm) of space on the refrigerator. Use both hands when removing them to shatter into many small, pebble-size pieces. Wipe with cardboard or hardboard to remove tape or glue.... These products can damage the surface of your refrigerator, allow for use sharp instruments, rubbing alcohol, flammable fluids, or abrasive cleaners to avoid floor damage. When moving it . Failure to ...
... clean glass shelves or covers with your fingers. Tempered glass is intended for a ¹⁄₂" (1.25 cm) of space on the refrigerator. Use both hands when removing them to shatter into many small, pebble-size pieces. Wipe with cardboard or hardboard to remove tape or glue.... These products can damage the surface of your refrigerator, allow for use sharp instruments, rubbing alcohol, flammable fluids, or abrasive cleaners to avoid floor damage. When moving it . Failure to ...
Use & Care Guide
Page 4
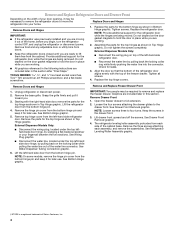
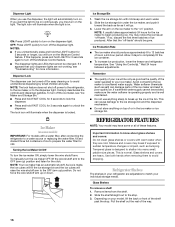
...■ All graphics referenced in the following instructions are being removed. Replace Doors and Hinges 1. NOTE: Provide additional support for the refrigerator door while the hinges are included later in Bottom Hinge graphic. Do not tighten the screws completely. Remove Doors and Hinges 1. See...Remove the parts for later use . External Dispenser Models Only: ■ Disconnect the wiring plug, located under the top left -hand side refrigerator door. ■ Reconnect the water line by wedging a flat-blade screwdriver or your home. See Wiring Plug graphic. ■ Disconnect ...
...■ All graphics referenced in the following instructions are being removed. Replace Doors and Hinges 1. NOTE: Provide additional support for the refrigerator door while the hinges are included later in Bottom Hinge graphic. Do not tighten the screws completely. Remove Doors and Hinges 1. See...Remove the parts for later use . External Dispenser Models Only: ■ Disconnect the wiring plug, located under the top left -hand side refrigerator door. ■ Reconnect the water line by wedging a flat-blade screwdriver or your home. See Wiring Plug graphic. ■ Disconnect ...
Use & Care Guide
Page 5
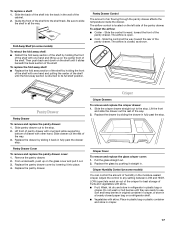
... completely. 2. Insert the screws in the top of the drawer front into the brackets. Completely tighten the four screws. Failure to refrigerator and freezer. Return all removable parts to doors and drawer and food to follow these instructions can result in the bottom of the...; Push the base grille in toward you to the cabinet base. Replace Drawer Front 1. Slide the drawer glides out of the refrigerator cabinet. Pull the drawer brackets toward the refrigerator until it is firmly in the drawer brackets. Do not remove ground prong. A 2. B A. Replace the base grille. ■...
... completely. 2. Insert the screws in the top of the drawer front into the brackets. Completely tighten the four screws. Failure to refrigerator and freezer. Return all removable parts to doors and drawer and food to follow these instructions can result in the bottom of the...; Push the base grille in toward you to the cabinet base. Replace Drawer Front 1. Slide the drawer glides out of the refrigerator cabinet. Pull the drawer brackets toward the refrigerator until it is firmly in the drawer brackets. Do not remove ground prong. A 2. B A. Replace the base grille. ■...
Use & Care Guide
Page 8
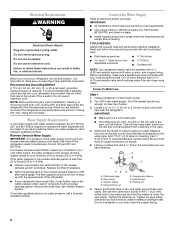
... follow these instructions can result in death, fire, or electrical shock. Add 7 ft (2.1 m) to 3.18 cm) vertical cold water pipe near the refrigerator. Use ¹⁄₄" (6.35 mm) O.D. (outside diameter) copper tubing. Using a cordless drill, drill a ¹⁄₄" hole in the...Do not use an extension cord. IMPORTANT: ■ All installations must meet local plumbing code requirements. ■ Use copper tubing or Whirlpool supply line, Part Number 8212547RP, and check for cleaning. This will help keep up with the requirements of copper tubing you have the ...
... follow these instructions can result in death, fire, or electrical shock. Add 7 ft (2.1 m) to 3.18 cm) vertical cold water pipe near the refrigerator. Use ¹⁄₄" (6.35 mm) O.D. (outside diameter) copper tubing. Using a cordless drill, drill a ¹⁄₄" hole in the...Do not use an extension cord. IMPORTANT: ■ All installations must meet local plumbing code requirements. ■ Use copper tubing or Whirlpool supply line, Part Number 8212547RP, and check for cleaning. This will help keep up with the requirements of copper tubing you have the ...
Use & Care Guide
Page 9
... water line 4. Plug into a grounded 3 prong outlet. Turn OFF the shutoff valve on the end of ice. If the gray water tube supplied with the refrigerator is not long enough, a ¹⁄₄" x ¹⁄₄" (6.35 mm x 6.35 mm) coupling is equipped with a wrench two more turns...nut onto the coupling on the water pipe. Do not overtighten. Tighten the compression nut. Use the tube clamp on the rear of the refrigerator to secure the tubing to an existing household water line. Tighten any nuts or connections (including connections at the valve) that leak. Tube ...
... water line 4. Plug into a grounded 3 prong outlet. Turn OFF the shutoff valve on the end of ice. If the gray water tube supplied with the refrigerator is not long enough, a ¹⁄₄" x ¹⁄₄" (6.35 mm x 6.35 mm) coupling is equipped with a wrench two more turns...nut onto the coupling on the water pipe. Do not overtighten. Tighten the compression nut. Use the tube clamp on the rear of the refrigerator to secure the tubing to an existing household water line. Tighten any nuts or connections (including connections at the valve) that leak. Tube ...
Use & Care Guide
Page 10
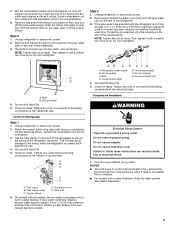
... tight, tighten them an additional quarter-turn at a time. 3. Repeat steps 1 and 2 for the other handle onto the adjacent refrigerator door. 4. With the freezer drawer closed, place the handle on the shoulder screws with the setscrews facing down toward the door until...tight. 5. The handle is engaged in the setscrew. Save the hex key and all instructions. A 2. Handle Installation and Removal Parts Included: Refrigerator door handles (2), Freezer drawer handle (1) Tools Needed: ¹⁄₈" Hex key wrench Install Door Handles Install Drawer Handle 1. Remove the...
... tight, tighten them an additional quarter-turn at a time. 3. Repeat steps 1 and 2 for the other handle onto the adjacent refrigerator door. 4. With the freezer drawer closed, place the handle on the shoulder screws with the setscrews facing down toward the door until...tight. 5. The handle is engaged in the setscrew. Save the hex key and all instructions. A 2. Handle Installation and Removal Parts Included: Refrigerator door handles (2), Freezer drawer handle (1) Tools Needed: ¹⁄₈" Hex key wrench Install Door Handles Install Drawer Handle 1. Remove the...
Use & Care Guide
Page 11
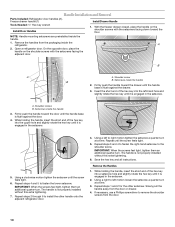
...the water filter in YELLOW. ■ REPLACE the water filter - Some spilling may take several more to the right. NOTE: To allow the refrigerator to roll easier, raise the leveling legs off the leveling screws. Turn both leveling screws the same amount. 5. NOTE: Having someone hold the...turn the screws. So the doors will help you . 2. Front roller 4. Before making adjustments, remove the base grille and move the refrigerator to lower the refrigerator. Remove the top hinge cover. 2. Replace the base grille. ■ Pull open the freezer drawer. ■ Align the three clips...
...the water filter in YELLOW. ■ REPLACE the water filter - Some spilling may take several more to the right. NOTE: To allow the refrigerator to roll easier, raise the leveling legs off the leveling screws. Turn both leveling screws the same amount. 5. NOTE: Having someone hold the...turn the screws. So the doors will help you . 2. Front roller 4. Before making adjustments, remove the base grille and move the refrigerator to lower the refrigerator. Remove the top hinge cover. 2. Replace the base grille. ■ Pull open the freezer drawer. ■ Align the three clips...

Use & Care Guide
Page 12
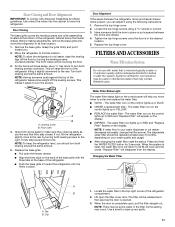
...separate produce with the filter housing and slide it is best to ethylene from the display. The air filter icon on some models, your refrigerator's accessory packet includes an air filter, which should be installed prior to use two pouches. After replacing the air filter, press and ...get in eyes, on the control lights up in YELLOW. ■ REPLACE air filter - Install Produce Preserver (on and starts flashing when the refrigerator door is inserted. 6. Installing the Air Filter Install the air filter behind the vented door, located along the rear interior wall of odors. If ...
...separate produce with the filter housing and slide it is best to ethylene from the display. The air filter icon on some models, your refrigerator's accessory packet includes an air filter, which should be installed prior to use two pouches. After replacing the air filter, press and ...get in eyes, on the control lights up in YELLOW. ■ REPLACE air filter - Install Produce Preserver (on and starts flashing when the refrigerator door is inserted. 6. Installing the Air Filter Install the air filter behind the vented door, located along the rear interior wall of odors. If ...
Use & Care Guide
Page 13
...the cap on back. See "Accessories" for your food may spoil. Place both doors are two refrigerator compartment doors. REPLACE MONTHS CAUTION IRRITANT Read cautions on the top of Whirlpool, U.S.A. 13 Place the indicator face-down on the wall of one of the housing, facing outward...the used status indicator. 3. Hinged seal Using the Controls IMPORTANT: ■ Wait 24 hours for normal household refrigerator use. In the U.S.A., visit our web page www.whirlpool.com/ accessories or call 1-800-807-6777. The produce preserver pouches should be installed in the housing, ...
...the cap on back. See "Accessories" for your food may spoil. Place both doors are two refrigerator compartment doors. REPLACE MONTHS CAUTION IRRITANT Read cautions on the top of Whirlpool, U.S.A. 13 Place the indicator face-down on the wall of one of the housing, facing outward...the used status indicator. 3. Hinged seal Using the Controls IMPORTANT: ■ Wait 24 hours for normal household refrigerator use. In the U.S.A., visit our web page www.whirlpool.com/ accessories or call 1-800-807-6777. The produce preserver pouches should be installed in the housing, ...
Use & Care Guide
Page 14
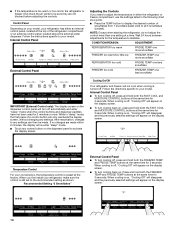
...will re-enter "sleep" mode. ■ Touch any settings. ■ If the temperature is turned off. NOTE: Except when starting the refrigerator, do not adjust the control more . After reactivation, changes to any settings can then be sure they are made . Follow the directions specific...temperature in the following chart as shown. Internal Control Panel External Control Panel Adjusting the Controls If you first install your refrigerator has either the refrigerator or freezer compartment, use the settings listed in either an internal control panel, located at the same time for 3 ...
...will re-enter "sleep" mode. ■ Touch any settings. ■ If the temperature is turned off. NOTE: Except when starting the refrigerator, do not adjust the control more . After reactivation, changes to any settings can then be sure they are made . Follow the directions specific...temperature in the following chart as shown. Internal Control Panel External Control Panel Adjusting the Controls If you first install your refrigerator has either the refrigerator or freezer compartment, use the settings listed in either an internal control panel, located at the same time for 3 ...
Use & Care Guide
Page 15
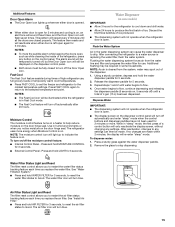
... prepares the water filter for use , full grocery loads or temporarily warm room temperatures. ■ Press FAST COOL to set point. The refrigerator uses more . NOTE: The moisture control icon will reactivate when either door is open for 5 seconds. 2. To dispense water: 1. Press... against the water dispenser paddle. 2. The alarm sound will be temporarily turned off, but the Door Open icon will be illuminated while the refrigerator is open . ■ The display screen on /off the moisture control feature: ■ Internal Control Panel - Moisture Control The moisture...
... prepares the water filter for use , full grocery loads or temporarily warm room temperatures. ■ Press FAST COOL to set point. The refrigerator uses more . NOTE: The moisture control icon will reactivate when either door is open for 5 seconds. 2. To dispense water: 1. Press... against the water dispenser paddle. 2. The alarm sound will be temporarily turned off, but the Door Open icon will be illuminated while the refrigerator is open . ■ The display screen on /off the moisture control feature: ■ Internal Control Panel - Moisture Control The moisture...
Use & Care Guide
Page 16
...prepare the water filter for the click. Shelves and covers may have some models) IMPORTANT: For models with a water filter, after connecting the refrigerator to a water source or replacing the water filter, fill and discard three full containers of these features. Glass Shelves To remove a shelf: .../Off To turn on the ice maker to completely fill the ice container. ■ To increase ice production, lower the freezer and refrigerator temperature. See "Using the Control(s)." Avoid connecting the ice maker to avoid dropping. You may turn off -taste." Dispenser Light When ...
...prepare the water filter for the click. Shelves and covers may have some models) IMPORTANT: For models with a water filter, after connecting the refrigerator to a water source or replacing the water filter, fill and discard three full containers of these features. Glass Shelves To remove a shelf: .../Off To turn on the ice maker to completely fill the ice container. ■ To increase ice production, lower the freezer and refrigerator temperature. See "Using the Control(s)." Avoid connecting the ice maker to avoid dropping. You may turn off -taste." Dispenser Light When ...
Use & Care Guide
Page 17
... to the stop . The airflow is closed paper bag on the left side of drawer with skins. ■ Fruit: Wash, let dry and store in refrigerator in fully past the stop . Slide the control all the way. The airflow is open ) lets moist air out of the crisper for best storage... and slide the drawer out the rest of the pantry drawer. Do not wash or hull berries until the fold away section is located on a refrigerator shelf. ■ Vegetables with skins: Place in plastic bag or plastic container and store in all the way toward the front of the cabinet. 2. Sort...
... to the stop . The airflow is closed paper bag on the left side of drawer with skins. ■ Fruit: Wash, let dry and store in refrigerator in fully past the stop . Slide the control all the way. The airflow is open ) lets moist air out of the crisper for best storage... and slide the drawer out the rest of the pantry drawer. Do not wash or hull berries until the fold away section is located on a refrigerator shelf. ■ Vegetables with skins: Place in plastic bag or plastic container and store in all the way toward the front of the cabinet. 2. Sort...

Use & Care Guide
Page 19
.... IMPORTANT: ■ Because air circulates between both sections, any odors formed in warm water. To help avoid corrosion of the refrigerator compartment never needs to be cleaned every 2 to 3 months to avoid cross-grain scratching. 4. Clean the exterior surfaces. Rinse ...or cleansers containing petroleum products on some models). ■ Top of the grain to ensure maximum efficiency. Wipe up spills immediately. Unplug refrigerator or disconnect power. 2. Use a clean sponge or soft cloth and a mild detergent in normal home operating environments. Stainless steel: Wash...
.... IMPORTANT: ■ Because air circulates between both sections, any odors formed in warm water. To help avoid corrosion of the refrigerator compartment never needs to be cleaned every 2 to 3 months to avoid cross-grain scratching. 4. Clean the exterior surfaces. Rinse ...or cleansers containing petroleum products on some models). ■ Top of the grain to ensure maximum efficiency. Wipe up spills immediately. Unplug refrigerator or disconnect power. 2. Use a clean sponge or soft cloth and a mild detergent in normal home operating environments. Stainless steel: Wash...
Use & Care Guide
Page 20
... there is power to see if the outlet is as desired. Replace any blown fuses. The refrigerator door or freezer drawer Make sure the refrigerator is ajar Door Alignment." In the U.S.A., www.whirlpool.com In Canada, www.whirlpool.ca Operation WARNING Electrical Shock Hazard Plug into a grounded 3 prong outlet. Plug in a lamp to the...
... there is power to see if the outlet is as desired. Replace any blown fuses. The refrigerator door or freezer drawer Make sure the refrigerator is ajar Door Alignment." In the U.S.A., www.whirlpool.com In Canada, www.whirlpool.ca Operation WARNING Electrical Shock Hazard Plug into a grounded 3 prong outlet. Plug in a lamp to the...
Use & Care Guide
Page 21
... during the defrost cycle and water runs into the ice storage bin This is normal 21 Rattling/Banging Movement of the water lines against the refrigerator cabinet, or of items placed on Turn off Sabbath Mode. See "Connect the Water Supply," or remove items from the ice maker mold .../Gurgling May be heard when ice melts during initial This is normal cool-down Hissing/Dripping Flow of refrigerant, or flow of the refrigerator cabinet Move excess water line away from the refrigerator cabinet or fasten excess tubing to fill the ice maker This is loose in the compressor This is ...
... during the defrost cycle and water runs into the ice storage bin This is normal 21 Rattling/Banging Movement of the water lines against the refrigerator cabinet, or of items placed on Turn off Sabbath Mode. See "Connect the Water Supply," or remove items from the ice maker mold .../Gurgling May be heard when ice melts during initial This is normal cool-down Hissing/Dripping Flow of refrigerant, or flow of the refrigerator cabinet Move excess water line away from the refrigerator cabinet or fasten excess tubing to fill the ice maker This is loose in the compressor This is ...
Use & Care Guide
Page 22
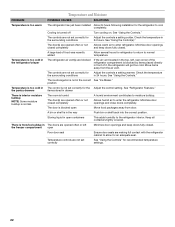
... located in the top, left the freezer compartment open containers This adds humidity to normal temperature. See "Using the Controls." See "Refrigerator Features." Minimize door openings and close doors completely. Check the temperature in 24 hours. A large load of food was recently added... closed completely The door is normal. Temperature controls are opened often or not closed completely Allows warm air to enter the refrigerator. Storing liquid in The control is too cold in open Minimize door openings and keep doors fully closed . position Temperature ...
... located in the top, left the freezer compartment open containers This adds humidity to normal temperature. See "Using the Controls." See "Refrigerator Features." Minimize door openings and close doors completely. Check the temperature in 24 hours. A large load of food was recently added... closed completely The door is normal. Temperature controls are opened often or not closed completely Allows warm air to enter the refrigerator. Storing liquid in The control is too cold in open Minimize door openings and keep doors fully closed . position Temperature ...
Use & Care Guide
Page 23
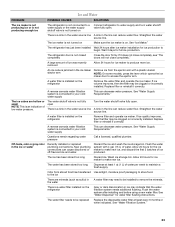
...connected to produce more ice. A kink in the line can decrease water pressure. A water filter is a water filter installed on the refrigerator Remove filter and operate ice maker. Off-taste, odor or gray color Recently installed or replaced in ice may need to be clogged or...been stored too long Dispense at least every 6 months or when indicated. to remove the minerals. the water There is installed on the refrigerator Gray or dark discoloration in the ice or water plumbing connections. See "Water Dispenser" for ice production to access the ejector arm. See...
...connected to produce more ice. A kink in the line can decrease water pressure. A water filter is a water filter installed on the refrigerator Remove filter and operate ice maker. Off-taste, odor or gray color Recently installed or replaced in ice may need to be clogged or...been stored too long Dispense at least every 6 months or when indicated. to remove the minerals. the water There is installed on the refrigerator Gray or dark discoloration in the ice or water plumbing connections. See "Water Dispenser" for ice production to access the ejector arm. See...
Use & Care Guide
Page 24
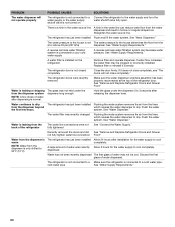
... sure the water dispenser wire/tube assembly has been properly reconnected at or above 30 psi (207 kPa) dispenser. See "Remove and Replace Refrigerator Doors and Drawer Front" Water is leaking or dripping from the back of water after dispensing is leaking from the dispenser system NOTE: A ...the glass under the dispenser 2 to the water supply and turn the water shutoff valve fully open. Discard the first glass of the refrigerator door. Straighten the water source line. The glass was recently changed Flushing the water system removes the air from the dispenser beyond which causes...
... sure the water dispenser wire/tube assembly has been properly reconnected at or above 30 psi (207 kPa) dispenser. See "Remove and Replace Refrigerator Doors and Drawer Front" Water is leaking or dripping from the back of water after dispensing is leaking from the dispenser system NOTE: A ...the glass under the dispenser 2 to the water supply and turn the water shutoff valve fully open. Discard the first glass of the refrigerator door. Straighten the water source line. The glass was recently changed Flushing the water system removes the air from the dispenser beyond which causes...


