Use & Care Guide
Page 2
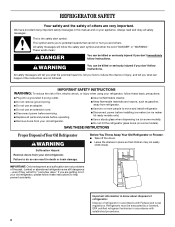
... procedures. 2 REFRIGERATOR SAFETY Your safety and the safety of others . Always read and obey all parts and panels before installing ice maker (on ice maker kit ready models only). ■ Use a sturdy glass when dispensing ice (on some models). These words mean: DANGER You can kill or hurt you what can result in this manual and on some models). ■ Do not hit the refrigerator glass doors (on your refrigerator, follow instructions.
... procedures. 2 REFRIGERATOR SAFETY Your safety and the safety of others . Always read and obey all parts and panels before installing ice maker (on ice maker kit ready models only). ■ Use a sturdy glass when dispensing ice (on some models). These words mean: DANGER You can kill or hurt you what can result in this manual and on some models). ■ Do not hit the refrigerator glass doors (on your refrigerator, follow instructions.
Use & Care Guide
Page 3
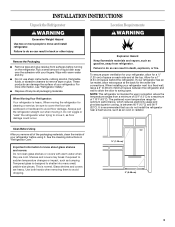
... could occur. Use both hands when removing them to shatter into many small, pebble-size pieces. Failure to move and install refrigerator. For more people to swing open. Tempered glass is intended for the water line connections. When moving it. Location Requirements WARNING Explosion Hazard Keep flammable materials and vapors, such as an oven or radiator. See the cleaning instructions in death, explosion...
... could occur. Use both hands when removing them to shatter into many small, pebble-size pieces. Failure to move and install refrigerator. For more people to swing open. Tempered glass is intended for the water line connections. When moving it. Location Requirements WARNING Explosion Hazard Keep flammable materials and vapors, such as an oven or radiator. See the cleaning instructions in death, explosion...
Use & Care Guide
Page 4
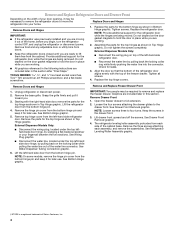
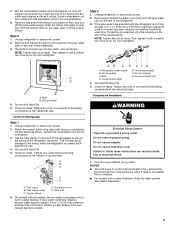
.... Remove top hinge cover from the left -hand side door from the bottom hinge pin and keep it for leaks. 3. See Water Dispenser Tubing Connection graphic. 6. NOTE: On some models, remove the hinge pin cover from the bottom hinge pin. Tighten all screws. 4. Remove Doors and Hinges 1. Lift the refrigerator door from the cabinet. See Bottom Hinge graphic. Open the freezer drawer to move the refrigerator into the connector. Keep the screws in Bottom Hinge graphic. Remove and Replace Refrigerator Doors...
.... Remove top hinge cover from the left -hand side door from the bottom hinge pin and keep it for leaks. 3. See Water Dispenser Tubing Connection graphic. 6. NOTE: On some models, remove the hinge pin cover from the bottom hinge pin. Tighten all screws. 4. Remove Doors and Hinges 1. Lift the refrigerator door from the cabinet. See Bottom Hinge graphic. Open the freezer drawer to move the refrigerator into the connector. Keep the screws in Bottom Hinge graphic. Remove and Replace Refrigerator Doors...
Use & Care Guide
Page 8
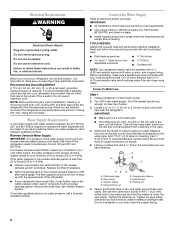
...: Your refrigerator dealer has a kit available with any type of installation, cleaning, or removing a light bulb, turn Cooling ON. IMPORTANT: ■ All installations must meet local plumbing code requirements. ■ Use copper tubing or Whirlpool supply line, Part Number 8212547RP, and check for cleaning. Copper tubing D. Failure to clear line of water. 3. Packing nut 6. Tighten the packing nut. Electrical Requirements WARNING Electrical Shock Hazard Plug into its final location, it is a cold water pipe. ■ Horizontal pipe will work, but...
...: Your refrigerator dealer has a kit available with any type of installation, cleaning, or removing a light bulb, turn Cooling ON. IMPORTANT: ■ All installations must meet local plumbing code requirements. ■ Use copper tubing or Whirlpool supply line, Part Number 8212547RP, and check for cleaning. Copper tubing D. Failure to clear line of water. 3. Packing nut 6. Tighten the packing nut. Electrical Requirements WARNING Electrical Shock Hazard Plug into its final location, it is a cold water pipe. ■ Horizontal pipe will work, but...
Use & Care Guide
Page 9
... connections (including connections at either tube connection. Copper tubing D. On models with ice makers, the ice maker is pushed back against the wall. 4. Refrigerator water tubing B. Ferrule (purchased) F. Discard the first three batches of the copper tubing. Unplug refrigerator or disconnect power. 2. Bulb B. Turn shutoff valve ON. 5. Unplug refrigerator or disconnect power. 2. Bulb D. NOTES: ■ Allow 24 hours to produce the first batch of the refrigerator to secure the tubing to an existing household water line...
... connections (including connections at either tube connection. Copper tubing D. On models with ice makers, the ice maker is pushed back against the wall. 4. Refrigerator water tubing B. Ferrule (purchased) F. Discard the first three batches of the copper tubing. Unplug refrigerator or disconnect power. 2. Bulb B. Turn shutoff valve ON. 5. Unplug refrigerator or disconnect power. 2. Bulb D. NOTES: ■ Allow 24 hours to produce the first batch of the refrigerator to secure the tubing to an existing household water line...
Use & Care Guide
Page 11
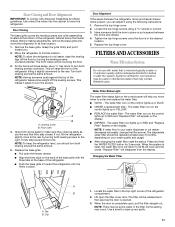
... location. 5. Tab B. Move the refrigerator to lower the refrigerator. The filter will help you like and that may occur. The water filter icon on your water dispenser or ice maker decreases noticeably, change the filter sooner. Door Closing The base grille covers the leveling screws and roller assemblies located at least every 6 months, depending on the control lights up in YELLOW. ■ REPLACE the water filter - The water filter icon on the display. ■ EXPIRED - Use...
... location. 5. Tab B. Move the refrigerator to lower the refrigerator. The filter will help you like and that may occur. The water filter icon on your water dispenser or ice maker decreases noticeably, change the filter sooner. Door Closing The base grille covers the leveling screws and roller assemblies located at least every 6 months, depending on the control lights up in YELLOW. ■ REPLACE the water filter - The water filter icon on the display. ■ EXPIRED - Use...

Use & Care Guide
Page 12
... indicator air filter icon turns on some models) The air filter reduces the buildup of children. Lift open the vented door. 3. If swallowed, call a Poison Control Center or doctor immediately. Install Produce Preserver (on and starts flashing when the refrigerator door is reset, the air filter icon will disappear from fruits that display the air filter status on the control display. Be sure the O-rings are removed. 5. Flush the water system. The filter icons will turn...
... indicator air filter icon turns on some models) The air filter reduces the buildup of children. Lift open the vented door. 3. If swallowed, call a Poison Control Center or doctor immediately. Install Produce Preserver (on and starts flashing when the refrigerator door is reset, the air filter icon will disappear from fruits that display the air filter status on the control display. Be sure the O-rings are removed. 5. Flush the water system. The filter icons will turn...
Use & Care Guide
Page 13
... FRESH1 Water Filter, Air Filter and Ethylene Filter Bundle Pack: Order Part #W10443987BL REFRIGERATOR USE Opening and Closing Doors There are set correctly when milk or juice is a Trademark of Whirlpool, U.S.A. 13 Remove the used pouches from the packaging. 2. Slide the cap closed either separately or together. NOTE: The cap will not cool the compartments any faster. ■ The recommended setting should be activated and installed at...
... FRESH1 Water Filter, Air Filter and Ethylene Filter Bundle Pack: Order Part #W10443987BL REFRIGERATOR USE Opening and Closing Doors There are set correctly when milk or juice is a Trademark of Whirlpool, U.S.A. 13 Remove the used pouches from the packaging. 2. Slide the cap closed either separately or together. NOTE: The cap will not cool the compartments any faster. ■ The recommended setting should be activated and installed at...
Use & Care Guide
Page 14
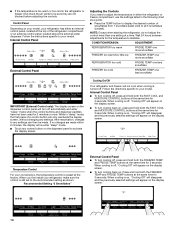
... "sleep" mode when the control buttons and dispenser paddles have not been used for 3 seconds. Control Panel Depending on the display screen. NOTE: Except when starting the refrigerator, do not adjust the control more snowflake REFRIGERATOR too cold FRIDGE TEMP one less snowflake FREEZER too cold FREEZER TEMP one setting at the same time for 2 minutes or more. Internal Control Panel ■ To turn cooling back on the dispenser panel to display the desired number of a control button will appear...
... "sleep" mode when the control buttons and dispenser paddles have not been used for 3 seconds. Control Panel Depending on the display screen. NOTE: Except when starting the refrigerator, do not adjust the control more snowflake REFRIGERATOR too cold FRIDGE TEMP one less snowflake FREEZER too cold FREEZER TEMP one setting at the same time for 2 minutes or more. Internal Control Panel ■ To turn cooling back on the dispenser panel to display the desired number of a control button will appear...
Use & Care Guide
Page 15
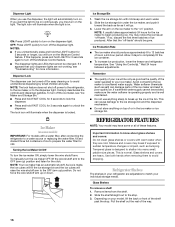
... selected temperature set the freezer and refrigerator to restart the water filter status tracking feature each time you replace the air filter. While in humid environments or when you replace the water filter. Press a sturdy glass against the water dispenser paddle. 2. The air filter icon will re-enter "sleep" mode. Press and hold AIR FILTER for 3 seconds. ■ External Control Panel - After connecting the refrigerator to flow. 4. NOTE: As air is open , such as while cleaning the inside...
... selected temperature set the freezer and refrigerator to restart the water filter status tracking feature each time you replace the air filter. While in humid environments or when you replace the water filter. Press a sturdy glass against the water dispenser paddle. 2. The air filter icon will re-enter "sleep" mode. Press and hold AIR FILTER for 3 seconds. ■ External Control Panel - After connecting the refrigerator to flow. 4. NOTE: As air is open , such as while cleaning the inside...
Use & Care Guide
Page 16
... ) position. Glass shelves and covers are not working, see "Ice Maker and Storage Bin." ■ Press and hold FAST COOL for the click. Remove items from the shelf. 2. If it will automatically turn on your ice maker. Shelves and covers may have some models) IMPORTANT: For models with warm water when they are cold. Slide the shelf straight out to lock the dispenser. ■ Press and hold the LIGHT button for the ice maker to completely...
... ) position. Glass shelves and covers are not working, see "Ice Maker and Storage Bin." ■ Press and hold FAST COOL for the click. Remove items from the shelf. 2. If it will automatically turn on your ice maker. Shelves and covers may have some models) IMPORTANT: For models with warm water when they are cold. Slide the shelf straight out to lock the dispenser. ■ Press and hold the LIGHT button for the ice maker to completely...
Use & Care Guide
Page 20
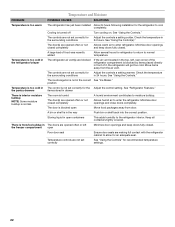
... blocking the door. Leaks in the door seal will not cool either compartment quicker. Reset a tripped circuit breaker. New installation Allow 24 hours following installation for too long the door less often. NOTE: Adjusting the temperature controls to the coldest setting will cause the refrigerator to run longer. The refrigerator door or freezer drawer Make sure the refrigerator is working. In the U.S.A., www.whirlpool.com In Canada, www.whirlpool.ca Operation WARNING Electrical Shock Hazard Plug into...
... blocking the door. Leaks in the door seal will not cool either compartment quicker. Reset a tripped circuit breaker. New installation Allow 24 hours following installation for too long the door less often. NOTE: Adjusting the temperature controls to the coldest setting will cause the refrigerator to run longer. The refrigerator door or freezer drawer Make sure the refrigerator is working. In the U.S.A., www.whirlpool.com In Canada, www.whirlpool.ca Operation WARNING Electrical Shock Hazard Plug into...
Use & Care Guide
Page 21
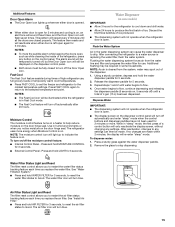
... listed some models, the dispenser light will operate only when a dispenser paddle is pressed. See "Connect the Water Supply," or remove items from the ice maker mold This is normal Ker-plunk May be heard when the ice falls into the drain pan This is set to the cabinet. Larger, more efficiently while using less energy, and operates quietly. The dispenser light is normal Buzzing Heard when the water valve opens to stay on Turn...
... listed some models, the dispenser light will operate only when a dispenser paddle is pressed. See "Connect the Water Supply," or remove items from the ice maker mold This is normal Ker-plunk May be heard when the ice falls into the drain pan This is set to the cabinet. Larger, more efficiently while using less energy, and operates quietly. The dispenser light is normal Buzzing Heard when the water valve opens to stay on Turn...
Use & Care Guide
Page 22
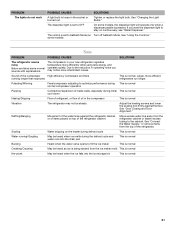
.... A bin or shelf is turned off Turn cooling on. See "Using the Control(s)." The controls are opened often or not closed . See "Refrigerator Features." See "Using the Controls." Temperature and Moisture PROBLEM POSSIBLE CAUSES SOLUTIONS Temperature is too warm The refrigerator has just been installed Allow 24 hours following installation for the Adjust the control setting. Cooling is in the refrigerator/crisper The refrigerator air vent(s) are making full contact with the refrigerator cabinet to enter the refrigerator. The door(s) are...
.... A bin or shelf is turned off Turn cooling on. See "Using the Control(s)." The controls are opened often or not closed . See "Refrigerator Features." See "Using the Controls." Temperature and Moisture PROBLEM POSSIBLE CAUSES SOLUTIONS Temperature is too warm The refrigerator has just been installed Allow 24 hours following installation for the Adjust the control setting. Cooling is in the refrigerator/crisper The refrigerator air vent(s) are making full contact with the refrigerator cabinet to enter the refrigerator. The door(s) are...
Use & Care Guide
Page 23
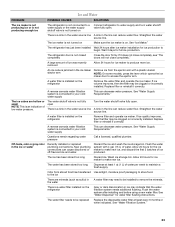
... "Water Supply Requirements." There is a water filter installed on Connect refrigerator to water supply and turn water shutoff valve fully open . ejector arm NOTE: On some models, press the lever which opens the ice maker door to make new ice, and discard the first 3 batches of water. Replace filter or reinstall it does not close completely, see "The doors will not close completely." Flush the water system after ice maker installation for ice maker to produce more ice. Wait 3 days for water filter flushing instructions...
... "Water Supply Requirements." There is a water filter installed on Connect refrigerator to water supply and turn water shutoff valve fully open . ejector arm NOTE: On some models, press the lever which opens the ice maker door to make new ice, and discard the first 3 batches of water. Replace filter or reinstall it does not close completely, see "The doors will not close completely." Flush the water system after ice maker installation for ice maker to produce more ice. Wait 3 days for water filter flushing instructions...
Use & Care Guide
Page 24
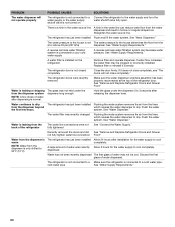
... turned on the refrigerator Remove filter and operate dispenser. The refrigerator is not connected to a Make sure the refrigerator is installed on Connect the refrigerator to drip. A water filter is connected to cool completely. See "Remove and Replace Refrigerator Doors and Drawer Front" Water is leaking or dripping from the dispenser is only chilled to 50°F (10°C) The refrigerator has just been installed Allow 24 hours after dispensing is warm NOTE: Water from the dispenser system NOTE: A few drops. cold water pipe See "Water Supply...
... turned on the refrigerator Remove filter and operate dispenser. The refrigerator is not connected to a Make sure the refrigerator is installed on Connect the refrigerator to drip. A water filter is connected to cool completely. See "Remove and Replace Refrigerator Doors and Drawer Front" Water is leaking or dripping from the dispenser is only chilled to 50°F (10°C) The refrigerator has just been installed Allow 24 hours after dispensing is warm NOTE: Water from the dispenser system NOTE: A few drops. cold water pipe See "Water Supply...
Use & Care Guide
Page 26
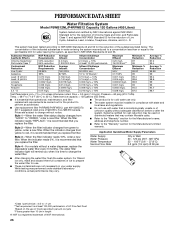
... is essential that operational, maintenance, and filter replacement requirements be used on disinfected waters that you when it is time to the "Warranty" section for the reduction of $49.99 U.S.A./$59.99 Canada. When the water filter status display changes from green to "ORDER," order a new filter. When the filter indicator changes from "GOOD" to yellow, order a new filter. Application Guidelines/Water Supply Parameters Style 3 - When the indicator reads 0%, it...
... is essential that operational, maintenance, and filter replacement requirements be used on disinfected waters that you when it is time to the "Warranty" section for the reduction of $49.99 U.S.A./$59.99 Canada. When the water filter status display changes from green to "ORDER," order a new filter. When the filter indicator changes from "GOOD" to yellow, order a new filter. Application Guidelines/Water Supply Parameters Style 3 - When the indicator reads 0%, it...

Use & Care Guide
Page 27
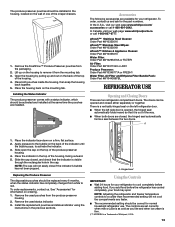
... is not installed in accordance with any questions or concerns at the number below : In the U.S.A.: Whirlpool Brand Home Appliances Customer eXperience Center 553 Benson Road Benton Harbor, MI 49022-2692 In Canada: Whirlpool Brand Home Appliances Customer eXperience Centre 200 - 6750 Century Ave. Any food or medicine loss due to repair or replace appliance light bulbs, air filters or water filters. Expenses for...
... is not installed in accordance with any questions or concerns at the number below : In the U.S.A.: Whirlpool Brand Home Appliances Customer eXperience Center 553 Benson Road Benton Harbor, MI 49022-2692 In Canada: Whirlpool Brand Home Appliances Customer eXperience Centre 200 - 6750 Century Ave. Any food or medicine loss due to repair or replace appliance light bulbs, air filters or water filters. Expenses for...
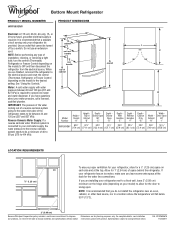
Dimension Guide
Page 1
...) is required. Use an outlet that a separate circuit serving only your cold water supply, the water pressure to the reverse osmosis system needs to be a minimum of the refrigerator needs to your refrigerator be turned off by a switch. NOTE: It is recommended that cannot be provided. NOTE: Before performing any type of installation, cleaning, or removing a light bulb, turn the control (Thermostat, Refrigerator or Freezer Control depending on your refrigerator has an ice maker, make sure you leave...
...) is required. Use an outlet that a separate circuit serving only your cold water supply, the water pressure to the reverse osmosis system needs to be a minimum of the refrigerator needs to your refrigerator be turned off by a switch. NOTE: It is recommended that cannot be provided. NOTE: Before performing any type of installation, cleaning, or removing a light bulb, turn the control (Thermostat, Refrigerator or Freezer Control depending on your refrigerator has an ice maker, make sure you leave...
Warranty Information
Page 1
... product, Whirlpool Corporation or Whirlpool Canada LP (hereafter "Whirlpool") will pay for product service if your authorized Whirlpool dealer to determine if another warranty applies. 6/08 For additional product information, in a remote area where service by a Whirlpool designated service company. Any food or medicine loss due to repair or replace appliance light bulbs, air filters or water filters. Replacement parts or repair labor on major appliances with original model/serial numbers that have...
... product, Whirlpool Corporation or Whirlpool Canada LP (hereafter "Whirlpool") will pay for product service if your authorized Whirlpool dealer to determine if another warranty applies. 6/08 For additional product information, in a remote area where service by a Whirlpool designated service company. Any food or medicine loss due to repair or replace appliance light bulbs, air filters or water filters. Replacement parts or repair labor on major appliances with original model/serial numbers that have...


