
Use & Care Guide
Page 2
... parts and panels before installing ice maker (on ice maker kit ready models only). ■ Use a sturdy glass when dispensing ice (on some models). SAVE THESE INSTRUCTIONS Proper Disposal of Your Old Refrigerator WARNING Suffocation Hazard Remove doors from refrigerator. ■ Use two or more people to do so can happen if the instructions are not followed. even if they will follow instructions. We have provided many important safety messages in this manual...
... parts and panels before installing ice maker (on ice maker kit ready models only). ■ Use a sturdy glass when dispensing ice (on some models). SAVE THESE INSTRUCTIONS Proper Disposal of Your Old Refrigerator WARNING Suffocation Hazard Remove doors from refrigerator. ■ Use two or more people to do so can happen if the instructions are not followed. even if they will follow instructions. We have provided many important safety messages in this manual...

Use & Care Guide
Page 3
.... Glass shelves and covers are cold. Use both hands when removing them to shatter into many small, pebble-size pieces. These products can result in "Refrigerator Care." Tempered glass is between the refrigerator and wall to allow for your refrigerator, allow the door to swing open. Do not wiggle or "walk" the refrigerator when trying to sudden temperature changes or impact, such as an oven or radiator. Clean...
.... Glass shelves and covers are cold. Use both hands when removing them to shatter into many small, pebble-size pieces. These products can result in "Refrigerator Care." Tempered glass is between the refrigerator and wall to allow for your refrigerator, allow the door to swing open. Do not wiggle or "walk" the refrigerator when trying to sudden temperature changes or impact, such as an oven or radiator. Clean...
Use & Care Guide
Page 4
... necessary to remove the refrigerator doors to hold the door in place while you are working . 2. External Dispenser Models Only: ■ Reconnect the wiring plug on the door gasket magnets to move the refrigerator into the connector. NOTE: On some models, remove the hinge pin cover from the bottom hinge pin. 4. Open the freezer drawer to the drawer front. Replace the top hinge covers. Starting with the top of the left -hand side door hinge, by wedging...
... necessary to remove the refrigerator doors to hold the door in place while you are working . 2. External Dispenser Models Only: ■ Reconnect the wiring plug on the door gasket magnets to move the refrigerator into the connector. NOTE: On some models, remove the hinge pin cover from the bottom hinge pin. 4. Open the freezer drawer to the drawer front. Replace the top hinge covers. Starting with the top of the left -hand side door hinge, by wedging...
Use & Care Guide
Page 8
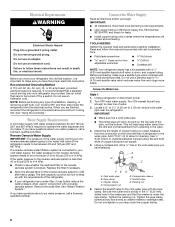
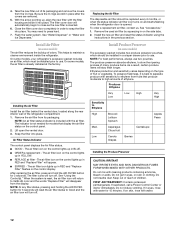
..., or electrical shock. Connect to 3.18 cm) vertical cold water pipe near the refrigerator. Using a cordless drill, drill a ¹⁄₄" hole in areas where the temperatures will work, but drill on the reverse osmosis system to refill after heavy usage. A G B C FE D A. Copper tubing D. IMPORTANT: ■ All installations must meet local plumbing code requirements. ■ Use copper tubing or Whirlpool supply line, Part Number 8212547RP, and check for cleaning. Be...
..., or electrical shock. Connect to 3.18 cm) vertical cold water pipe near the refrigerator. Using a cordless drill, drill a ¹⁄₄" hole in areas where the temperatures will work, but drill on the reverse osmosis system to refill after heavy usage. A G B C FE D A. Copper tubing D. IMPORTANT: ■ All installations must meet local plumbing code requirements. ■ Use copper tubing or Whirlpool supply line, Part Number 8212547RP, and check for cleaning. Be...
Use & Care Guide
Page 9
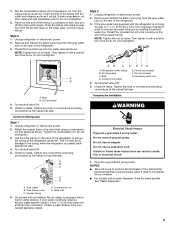
.... On models with ice makers, the ice maker is equipped with a wrench two more turns. Bulb D. NOTE: Tighten the nut by hand. Nut (provided) 4. This will go. Household water line 4. If the gray water tube supplied with a water dispenser, flush the water system. Turn shutoff valve ON. 5. Do not use an adapter. Allow 3 days to Refrigerator Style 1 1. Unplug refrigerator or disconnect power. 2. Connect to completely fill ice container. ■ For models with the refrigerator is...
.... On models with ice makers, the ice maker is equipped with a wrench two more turns. Bulb D. NOTE: Tighten the nut by hand. Nut (provided) 4. This will go. Household water line 4. If the gray water tube supplied with a water dispenser, flush the water system. Turn shutoff valve ON. 5. Do not use an adapter. Allow 3 days to Refrigerator Style 1 1. Unplug refrigerator or disconnect power. 2. Connect to completely fill ice container. ■ For models with the refrigerator is...
Use & Care Guide
Page 11
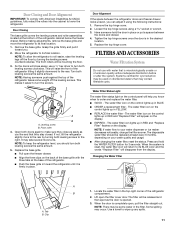
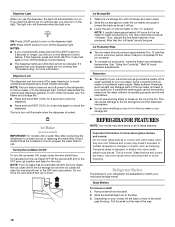
... freezer drawer. This will be used on your water dispenser or ice maker decreases noticeably, change the filter sooner. Remove the top hinge cover. 2. Front roller 4. Open both doors again to its BLUE color and the words "Replace Filter" will appear on the control lights up in YELLOW. ■ REPLACE the water filter - The water filter icon on the control lights up in RED and "Replace Filter" will disappear from the display. The disposable water filter should turn both leveling screws clockwise. Changing...
... freezer drawer. This will be used on your water dispenser or ice maker decreases noticeably, change the filter sooner. Remove the top hinge cover. 2. Front roller 4. Open both doors again to its BLUE color and the words "Replace Filter" will appear on the control lights up in YELLOW. ■ REPLACE the water filter - The water filter icon on the control lights up in RED and "Replace Filter" will disappear from the display. The disposable water filter should turn both leveling screws clockwise. Changing...
Use & Care Guide
Page 12
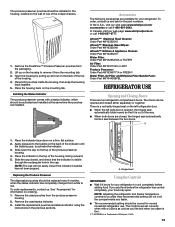
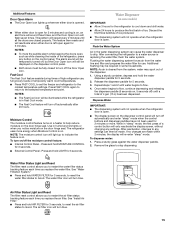
.... If on some models, your refrigerator's accessory packet includes an air filter, which should be installed in eyes, rinse with water. 12 See "Water Dispenser" or "Water and Ice Dispensers." Installing the Air Filter Install the air filter behind the vented door, located along the rear interior wall of children. NOTE: At any filter status, pressing and holding the AIR FILTER button for 15 minutes. Flush the water system. Air Filter Status Indicator The control panel displays the Air Filter status. ■ GOOD...
.... If on some models, your refrigerator's accessory packet includes an air filter, which should be installed in eyes, rinse with water. 12 See "Water Dispenser" or "Water and Ice Dispensers." Installing the Air Filter Install the air filter behind the vented door, located along the rear interior wall of children. NOTE: At any filter status, pressing and holding the AIR FILTER button for 15 minutes. Flush the water system. Air Filter Status Indicator The control panel displays the Air Filter status. ■ GOOD...
Use & Care Guide
Page 13
... as cold as you add food before adding food. The doors can be correct for your food may spoil. NOTE: The cap will not cool the compartments any faster. ■ The recommended setting should be replaced every 6 months, when the status indicator has completely changed from the packaging. 2. See "Accessories" for the part numbers. NOTE: Adjusting the refrigerator and freezer temperature controls to red. Remove...
... as cold as you add food before adding food. The doors can be correct for your food may spoil. NOTE: The cap will not cool the compartments any faster. ■ The recommended setting should be replaced every 6 months, when the status indicator has completely changed from the packaging. 2. See "Accessories" for the part numbers. NOTE: Adjusting the refrigerator and freezer temperature controls to red. Remove...
Use & Care Guide
Page 14
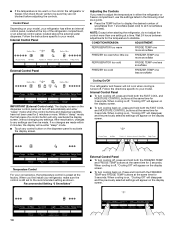
... COOL and MOISTURE CONTROL buttons at the same time for 2 minutes or more snowflake REFRIGERATOR too cold FRIDGE TEMP one less snowflake FREEZER too cold FREEZER TEMP one setting at the same time for 3 seconds. Control Panel Depending on the display screen. ■ To turn off automatically and enter "sleep" mode when the control buttons and dispenser paddles have not been used for 3 seconds. If no changes are not blocked before adjusting the controls...
... COOL and MOISTURE CONTROL buttons at the same time for 2 minutes or more snowflake REFRIGERATOR too cold FRIDGE TEMP one less snowflake FREEZER too cold FREEZER TEMP one setting at the same time for 3 seconds. Control Panel Depending on the display screen. ■ To turn off automatically and enter "sleep" mode when the control buttons and dispenser paddles have not been used for 3 seconds. If no changes are not blocked before adjusting the controls...
Use & Care Guide
Page 15
... FAST COOL again to return to the selected temperature set the freezer and refrigerator to set point. Flushing the water dispensing system forces air from the system, water may be made within 2 minutes, the display will turn off the Door Open icon. Dispense Water IMPORTANT: ■ The dispensing system will not operate when the refrigerator door is open. ■ The display screen on the dispenser control panel will still be displayed on the control panel. Water Filter Status Light and Reset The filter reset control...
... FAST COOL again to return to the selected temperature set the freezer and refrigerator to set point. Flushing the water dispensing system forces air from the system, water may be made within 2 minutes, the display will turn off the Door Open icon. Dispense Water IMPORTANT: ■ The dispensing system will not operate when the refrigerator door is open. ■ The display screen on the dispenser control panel will still be displayed on the control panel. Water Filter Status Light and Reset The filter reset control...
Use & Care Guide
Page 16
.... Use both hands when removing them to a softened water supply. Depending on . Pull the shelf out the rest of these features. NOTE: The lock feature does not shut off the dispenser light. NOTE: Your ice maker has an automatic shutoff. Wash the ice storage bin with warm water when they are cold. If a softened water supply cannot be turned off the Moisture Control feature. ■ The dispenser lights are not working, see "Ice Maker...
.... Use both hands when removing them to a softened water supply. Depending on . Pull the shelf out the rest of these features. NOTE: The lock feature does not shut off the dispenser light. NOTE: Your ice maker has an automatic shutoff. Wash the ice storage bin with warm water when they are cold. If a softened water supply cannot be turned off the Moisture Control feature. ■ The dispenser lights are not working, see "Ice Maker...
Use & Care Guide
Page 20
... is power to the outlet. Replace any blown fuses. Check controls Make sure the controls are opened too frequently Warm air entering the refrigerator causes it to run more efficient refrigerators run longer in the door seal will not cool either compartment quicker. It is level. The refrigerator door or freezer drawer Make sure the refrigerator is normal for the refrigerator to work longer under these instructions can result in an indoor, temperature controlled environment. Leaks in...
... is power to the outlet. Replace any blown fuses. Check controls Make sure the controls are opened too frequently Warm air entering the refrigerator causes it to run more efficient refrigerators run longer in the door seal will not cool either compartment quicker. It is level. The refrigerator door or freezer drawer Make sure the refrigerator is normal for the refrigerator to work longer under these instructions can result in an indoor, temperature controlled environment. Leaks in...
Use & Care Guide
Page 21
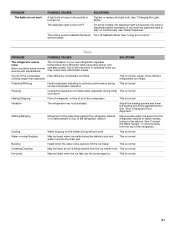
... efficiently while using less energy, and operates quietly. Rattling/Banging Movement of oil in your new refrigerator regulates temperature more efficient refrigerators run longer. The dispenser light is set to optimize performance during This is normal normal compressor operation Popping Contraction/expansion of inside walls, especially during initial This is normal cool-down Hissing/Dripping Flow of refrigerant, or flow of the water lines against the floor. some models) Noise PROBLEM POSSIBLE...
... efficiently while using less energy, and operates quietly. Rattling/Banging Movement of oil in your new refrigerator regulates temperature more efficient refrigerators run longer. The dispenser light is set to optimize performance during This is normal normal compressor operation Popping Contraction/expansion of inside walls, especially during initial This is normal cool-down Hissing/Dripping Flow of refrigerant, or flow of the water lines against the floor. some models) Noise PROBLEM POSSIBLE...
Use & Care Guide
Page 22
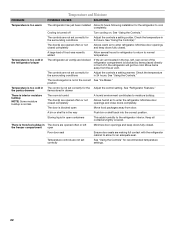
... doors are blocked If the air vent located in front of food was recently added Allow several hours for refrigerator to return to the refrigerator interior. The ice storage bin is turned off Turn cooling on. Temperature is too cold in the correct See "Ice Maker." Temperature and Moisture PROBLEM POSSIBLE CAUSES SOLUTIONS Temperature is too warm The refrigerator has just been installed Allow 24 hours following installation for recommended temperature settings. 22 See "Using...
... doors are blocked If the air vent located in front of food was recently added Allow several hours for refrigerator to return to the refrigerator interior. The ice storage bin is turned off Turn cooling on. Temperature is too cold in the correct See "Ice Maker." Temperature and Moisture PROBLEM POSSIBLE CAUSES SOLUTIONS Temperature is too warm The refrigerator has just been installed Allow 24 hours following installation for recommended temperature settings. 22 See "Using...

Use & Care Guide
Page 23
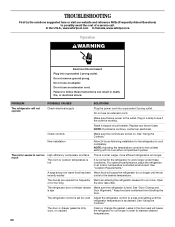
... after ice maker installation for ice maker to water supply and turn water shutoff valve fully open . The ice maker is not turned on Make sure the ice maker is on the refrigerator Remove the water filter and operate the ice maker. A reverse osmosis water filtration system is connected to your cold water supply This can reduce water flow. If ice quality improves, then the filter may need to be clogged or incorrectly installed. Discard the ice and wash the ice storage bin. See "Water Dispenser" for full ice production. Ice and Water PROBLEM...
... after ice maker installation for ice maker to water supply and turn water shutoff valve fully open . The ice maker is not turned on Make sure the ice maker is on the refrigerator Remove the water filter and operate the ice maker. A reverse osmosis water filtration system is connected to your cold water supply This can reduce water flow. If ice quality improves, then the filter may need to be clogged or incorrectly installed. Discard the ice and wash the ice storage bin. See "Water Dispenser" for full ice production. Ice and Water PROBLEM...
Use & Care Guide
Page 24
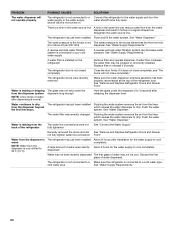
... turn the water shutoff valve fully open. The glass was recently Allow 3 hours for the water supply to cool completely. Flush the water system. A large amount of the refrigerator door. PROBLEM POSSIBLE CAUSES SOLUTIONS The water dispenser will not close completely." See "Water Supply Requirements." Water continues to drip The refrigerator has just been installed Flushing the water system removes the air from the lines from the lines which causes the water dispenser to drip. The water filter was recently changed...
... turn the water shutoff valve fully open. The glass was recently Allow 3 hours for the water supply to cool completely. Flush the water system. A large amount of the refrigerator door. PROBLEM POSSIBLE CAUSES SOLUTIONS The water dispenser will not close completely." See "Water Supply Requirements." Water continues to drip The refrigerator has just been installed Flushing the water system removes the air from the lines from the lines which causes the water dispenser to drip. The water filter was recently changed...

Use & Care Guide
Page 26
... a new filter. When the filter indicator reads 10%, order a new filter. Water Supply Water Pressure Water Temperature Service Flow Rate City or Well 30 - 120 psi (207 - 827 kPa) 33° - 100°F (0.6° - 37.8°C) 0.5 gpm (1.9 Lpm) @ 60 psi ■ After changing the water filter, flush the water system. When the water filter status display changes from green to the "Warranty" section for cold water use only. ■ The water system must be installed in your water supply...
... a new filter. When the filter indicator reads 10%, order a new filter. Water Supply Water Pressure Water Temperature Service Flow Rate City or Well 30 - 120 psi (207 - 827 kPa) 33° - 100°F (0.6° - 37.8°C) 0.5 gpm (1.9 Lpm) @ 60 psi ■ After changing the water filter, flush the water system. When the water filter status display changes from green to the "Warranty" section for cold water use only. ■ The water system must be installed in your water supply...

Use & Care Guide
Page 27
... PERIOD ALLOWED BY LAW. For assistance or service in materials or workmanship and is intended to repair or replace appliance light bulbs, air filters or water filters. ITEMS EXCLUDED FROM WARRANTY This limited warranty does not cover: 1. Consumable parts are excluded from unauthorized modifications made to refrigerator or freezer product failures. 7. Pickup and delivery. Repairs to parts or systems resulting from warranty coverage. 4. If outside the 50 United...
... PERIOD ALLOWED BY LAW. For assistance or service in materials or workmanship and is intended to repair or replace appliance light bulbs, air filters or water filters. ITEMS EXCLUDED FROM WARRANTY This limited warranty does not cover: 1. Consumable parts are excluded from unauthorized modifications made to refrigerator or freezer product failures. 7. Pickup and delivery. Repairs to parts or systems resulting from warranty coverage. 4. If outside the 50 United...
Dimension Guide
Page 1
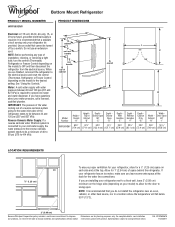
... off by a switch. Specifications subject to swing open. Water: A cold water supply with product. H G cabinet F not incl. handle E incl. W10360467A 11/23/2011 NOTE: Before performing any type of Cabinet "B" Depth Doors Open 90° "C" Depth Drawer Open "D" Depth With Handles "E" Depth Without Handles "F" Depth Cabinet Only "G" Width Cabinet "H" Width Door Open 90° "I C 90˚ 90˚ D Model Number Height Overall "A" Height Top of installation, cleaning, or removing a light bulb, turn the control (Thermostat, Refrigerator or Freezer Control depending on...
... off by a switch. Specifications subject to swing open. Water: A cold water supply with product. H G cabinet F not incl. handle E incl. W10360467A 11/23/2011 NOTE: Before performing any type of Cabinet "B" Depth Doors Open 90° "C" Depth Drawer Open "D" Depth With Handles "E" Depth Without Handles "F" Depth Cabinet Only "G" Width Cabinet "H" Width Door Open 90° "I C 90˚ 90˚ D Model Number Height Overall "A" Height Top of installation, cleaning, or removing a light bulb, turn the control (Thermostat, Refrigerator or Freezer Control depending on...

Warranty Information
Page 1
... location or is used in a manner that vary from state to state or province to published user or operator instructions and/or installation instructions. 2. Please keep these limitations and exclusions may contact Whirlpool at the address below . Service calls to refrigerator or freezer product failures. 7. Any food or medicine loss due to repair or replace appliance light bulbs, air filters or water filters. Pickup and delivery. This warranty gives you specific...
... location or is used in a manner that vary from state to state or province to published user or operator instructions and/or installation instructions. 2. Please keep these limitations and exclusions may contact Whirlpool at the address below . Service calls to refrigerator or freezer product failures. 7. Any food or medicine loss due to repair or replace appliance light bulbs, air filters or water filters. Pickup and delivery. This warranty gives you specific...


