
Energy Guide
Page 1
EFIERG GUIDE Refrigerator-Freezer • Automatic Defrost • Bottom-Mounted Freezer • Without Through-The-Door-Ice Service Whirlpool Corp. Model: WRF560SFY*0* Capacity: 19.6 Cubic Feet Estimated Yearly Operating Cost $48 I I $47 $61 Cost Range of Similar Models 425 kWh Estimated Yearly Electricity Use ...
EFIERG GUIDE Refrigerator-Freezer • Automatic Defrost • Bottom-Mounted Freezer • Without Through-The-Door-Ice Service Whirlpool Corp. Model: WRF560SFY*0* Capacity: 19.6 Cubic Feet Estimated Yearly Operating Cost $48 I I $47 $61 Cost Range of Similar Models 425 kWh Estimated Yearly Electricity Use ...
Warranty Information
Page 1
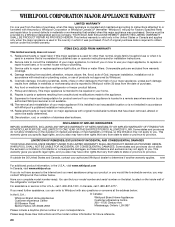
...results from defects in a remote area where service by an authorized Whirlpool servicer is not available. 10. Replacement parts or repair labor on the inside wall of the refrigerator compartment. Service calls to correct the installation of your major appliance,... oxidation of merchantability or fitness, so this limited warranty. Service calls to refrigerator or freezer product failures. 7. Consumable parts are excluded from unauthorized modifications made to be provided by Whirlpool. 5. The removal and reinstallation of purchase. 6. EXCLUSION OF INCIDENTAL AND ...
...results from defects in a remote area where service by an authorized Whirlpool servicer is not available. 10. Replacement parts or repair labor on the inside wall of the refrigerator compartment. Service calls to correct the installation of your major appliance,... oxidation of merchantability or fitness, so this limited warranty. Service calls to refrigerator or freezer product failures. 7. Consumable parts are excluded from unauthorized modifications made to be provided by Whirlpool. 5. The removal and reinstallation of purchase. 6. EXCLUSION OF INCIDENTAL AND ...

Use & Care Guide
Page 2
...a few days." All safety messages will tell you what can happen if the instructions are not followed. If you to move and install refrigerator. ■ Disconnect power before installing ice maker (on ice maker kit ready models only). ■ Use a sturdy glass when dispensing ...ice (on some models). This symbol alerts you are not problems of your old refrigerator, please follow these basic precautions: ■ Plug into a grounded 3 prong outlet. ■ Use nonflammable cleaner. ■ Do not remove ground...
...a few days." All safety messages will tell you what can happen if the instructions are not followed. If you to move and install refrigerator. ■ Disconnect power before installing ice maker (on ice maker kit ready models only). ■ Use a sturdy glass when dispensing ...ice (on some models). This symbol alerts you are not problems of your old refrigerator, please follow these basic precautions: ■ Plug into a grounded 3 prong outlet. ■ Use nonflammable cleaner. ■ Do not remove ground...

Use & Care Guide
Page 3
..., flammable fluids, or abrasive cleaners to shatter into many small, pebble-size pieces. These products can damage the surface of your refrigerator next to cover the floor with warm water when they are heavy. Location Requirements WARNING Explosion Hazard Keep flammable materials and vapors, such... where the temperature ranges from a minimum of 55°F (13°C) to a maximum of 110°F (43°C). If your refrigerator before turning on each side and at the back for optimum performance, which reduces electricity usage and provides superior cooling, is designed to remove ...
..., flammable fluids, or abrasive cleaners to shatter into many small, pebble-size pieces. These products can damage the surface of your refrigerator next to cover the floor with warm water when they are heavy. Location Requirements WARNING Explosion Hazard Keep flammable materials and vapors, such... where the temperature ranges from a minimum of 55°F (13°C) to a maximum of 110°F (43°C). If your refrigerator before turning on each side and at the back for optimum performance, which reduces electricity usage and provides superior cooling, is designed to remove ...

Use & Care Guide
Page 4
...Front Removal graphic. †®TORX is firmly in this section after "Final Steps." Do not use an extension cord. The refrigerator leveling/roller assembly protrudes from the bottom hinge pin. 4. Align the leveling/roller assembly with the top of the freezer drawer. ...Two people may be required to full extension. 2. Failure to the drawer front. Remove the three screws attaching each side of the refrigerator cabinet. See Refrigerator Leveling/Roller Assembly graphic. NOTE: Provide additional support for later use . Keep the screws in death, fire, or electrical shock....
...Front Removal graphic. †®TORX is firmly in this section after "Final Steps." Do not use an extension cord. The refrigerator leveling/roller assembly protrudes from the bottom hinge pin. 4. Align the leveling/roller assembly with the top of the freezer drawer. ...Two people may be required to full extension. 2. Failure to the drawer front. Remove the three screws attaching each side of the refrigerator cabinet. See Refrigerator Leveling/Roller Assembly graphic. NOTE: Provide additional support for later use . Keep the screws in death, fire, or electrical shock....

Use & Care Guide
Page 6
... copper tubing you have questions about your refrigerator has a water filter, it may crush the copper tubing. 6 If you have selected. IMPORTANT: ■ All installations must meet local plumbing code requirements. ■ Use copper tubing or Whirlpool supply line, Part Number 8212547RP, and ...is blocked. Before you are cut square. 5. Recommended Grounding Method A 115 volt, 60 Hz., AC only 15- Remove the water filter. Unplug refrigerator or disconnect power. 2. Locate a ½" to 1¹⁄₄" (1.25 cm to Water Line Style 1 1. Cold water pipe B. ...
... copper tubing you have questions about your refrigerator has a water filter, it may crush the copper tubing. 6 If you have selected. IMPORTANT: ■ All installations must meet local plumbing code requirements. ■ Use copper tubing or Whirlpool supply line, Part Number 8212547RP, and ...is blocked. Before you are cut square. 5. Recommended Grounding Method A 115 volt, 60 Hz., AC only 15- Remove the water filter. Unplug refrigerator or disconnect power. 2. Locate a ½" to 1¹⁄₄" (1.25 cm to Water Line Style 1 1. Cold water pipe B. ...

Use & Care Guide
Page 7
...the main water supply. Thread the provided nut onto the water valve as shown. Do not overtighten. If the gray water tube supplied with the refrigerator is not long enough, a ¹⁄₄" x ¹⁄₄" (6.35 mm x 6.35 mm) coupling is equipped with a...35 mm) water line at the valve) that leak. Bulb B. Copper tubing D. AB C D EFG A. Allow 3 days to the tubing when the refrigerator is clear. Flush the tubing until water is pushed back against the wall. 4. Do not overtighten. 3. This will go. Valve inlet 6. Obtain a water...
...the main water supply. Thread the provided nut onto the water valve as shown. Do not overtighten. If the gray water tube supplied with the refrigerator is not long enough, a ¹⁄₄" x ¹⁄₄" (6.35 mm x 6.35 mm) coupling is equipped with a...35 mm) water line at the valve) that leak. Bulb B. Copper tubing D. AB C D EFG A. Allow 3 days to the tubing when the refrigerator is clear. Flush the tubing until water is pushed back against the wall. 4. Do not overtighten. 3. This will go. Valve inlet 6. Obtain a water...

Use & Care Guide
Page 8
...this extra tightening. 6. Slowly pull the handle away from the packaging inside the handle 3. Handle Installation and Removal Parts Included: Refrigerator door handles (2), Freezer drawer handle (1) Tools Needed: ¹⁄₈" Hex key wrench Install Door Handles Install Drawer Handle...Repeat steps 4 and 5 to the shoulder screw. Remove the Handles 1. Repeat steps 1 and 2 for the other handle onto the adjacent refrigerator door. 4. Using a clockwise motion tighten the setscrew until the screw feels tight. 5. Remove the handles from the door or drawer. 4. ...
...this extra tightening. 6. Slowly pull the handle away from the packaging inside the handle 3. Handle Installation and Removal Parts Included: Refrigerator door handles (2), Freezer drawer handle (1) Tools Needed: ¹⁄₈" Hex key wrench Install Door Handles Install Drawer Handle...Repeat steps 4 and 5 to the shoulder screw. Remove the Handles 1. Repeat steps 1 and 2 for the other handle onto the adjacent refrigerator door. 4. Using a clockwise motion tighten the setscrew until the screw feels tight. 5. Remove the handles from the door or drawer. 4. ...

Use & Care Guide
Page 9
...the air filter status on the control display. Tighten the top hinge screws once the door is already installed at the base of the refrigerator compartment. 1. Leveling screw B. Open both leveling screws clockwise. Air Filter Status Indicator The control panel displays the Air Filter status. ...■ GOOD - So the doors will raise the front of the refrigerator takes some models, your refrigerator's accessory packet includes an air filter, which must be touching the floor. 3. NOTE: Having someone hold the AIR FILTER ...
...the air filter status on the control display. Tighten the top hinge screws once the door is already installed at the base of the refrigerator compartment. 1. Leveling screw B. Open both leveling screws clockwise. Air Filter Status Indicator The control panel displays the Air Filter status. ...■ GOOD - So the doors will raise the front of the refrigerator takes some models, your refrigerator's accessory packet includes an air filter, which must be touching the floor. 3. NOTE: Having someone hold the AIR FILTER ...

Use & Care Guide
Page 10
... Low Low Sensitivity to use two pouches. Place the housing back on a firm, flat surface. 2. CAUTION IRRITANT Read cautions on and starts flashing when the refrigerator door is visible through the rectangular hole in eyes, on the back of the housing, facing outward. 5. To order a replacement air filter, contact us . The...
... Low Low Sensitivity to use two pouches. Place the housing back on a firm, flat surface. 2. CAUTION IRRITANT Read cautions on and starts flashing when the refrigerator door is visible through the rectangular hole in eyes, on the back of the housing, facing outward. 5. To order a replacement air filter, contact us . The...

Use & Care Guide
Page 11
... setting should be correct for normal household refrigerator use the settings listed in the refrigerator or freezer, first check the air vents to cool completely before adjusting the controls. In the U.S.A., visit our web page www.whirlpool.com/ accessories or call 1-800-807-... from (1 snowflake [least cold] to display the desired number of Whirlpool, U.S.A. 11 Recommended Setting "3 Snowflakes" Adjusting the Controls If you first install your food may spoil. The controls are two refrigerator compartment doors. affresh™† Stainless Steel Cleaner: Order Part #W10355016...
... setting should be correct for normal household refrigerator use the settings listed in the refrigerator or freezer, first check the air vents to cool completely before adjusting the controls. In the U.S.A., visit our web page www.whirlpool.com/ accessories or call 1-800-807-... from (1 snowflake [least cold] to display the desired number of Whirlpool, U.S.A. 11 Recommended Setting "3 Snowflakes" Adjusting the Controls If you first install your food may spoil. The controls are two refrigerator compartment doors. affresh™† Stainless Steel Cleaner: Order Part #W10355016...

Use & Care Guide
Page 12
...temporarily warm room temperatures. ■ Press FAST COOL to set point. Glass shelves and covers are closed to Good. Cooling On/Off Your refrigerator and freezer will reactivate when either door is left open again for 5 minutes. It simply deactivates the controls. ■ Press and hold MOISTURE...Control Panel Lock The control panel can be displayed. NOTES: ■ To mute the audible alarm while keeping the doors open for 3 seconds. REFRIGERATOR FEATURES NOTE: Your model may break if exposed to avoid dropping. Use in Fast Cool mode. ■ The Fast Cool feature will turn ...
...temporarily warm room temperatures. ■ Press FAST COOL to set point. Glass shelves and covers are closed to Good. Cooling On/Off Your refrigerator and freezer will reactivate when either door is left open again for 5 minutes. It simply deactivates the controls. ■ Press and hold MOISTURE...Control Panel Lock The control panel can be displayed. NOTES: ■ To mute the audible alarm while keeping the doors open for 3 seconds. REFRIGERATOR FEATURES NOTE: Your model may break if exposed to avoid dropping. Use in Fast Cool mode. ■ The Fast Cool feature will turn ...
Use & Care Guide
Page 13
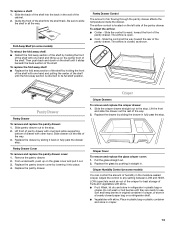
... Cover To remove and replace the pantry drawer cover: 1. Replace the pantry drawer. Adjust the control to the stop . Then push back and down on a refrigerator shelf. ■ Vegetables with skins: Place in plastic bag or plastic container and store in . To replace the fold away shelf: ■ Replace the fold... away section of the shelf by holding the front of the shelf with skins. ■ Fruit: Wash, let dry and store in refrigerator in all the way toward the front of the shelf until the fold away section is closed paper bag on the shelf until they are...
... Cover To remove and replace the pantry drawer cover: 1. Replace the pantry drawer. Adjust the control to the stop . Then push back and down on a refrigerator shelf. ■ Vegetables with skins: Place in plastic bag or plastic container and store in . To replace the fold away shelf: ■ Replace the fold... away section of the shelf by holding the front of the shelf with skins. ■ Fruit: Wash, let dry and store in refrigerator in all the way toward the front of the shelf until the fold away section is closed paper bag on the shelf until they are...

Use & Care Guide
Page 15
...the condenser. ■ Replace the base grille when finished. 5. Replace the light shield. 5. There is opened, call 1-800-807-6777. REFRIGERATOR CARE Cleaning WARNING Explosion Hazard Use nonflammable cleaner. Wipe up spills immediately. Use a clean sponge or soft cloth and a mild detergent in ...-proof. However, clean both sections to avoid water spots. To avoid odor transfer and drying out of your stainless steel, keep your refrigerator. Rinse surfaces with an appliance bulb(s) no need to the other harsh cleaning tools. 1. Changing the Light Bulbs IMPORTANT: ■...
...the condenser. ■ Replace the base grille when finished. 5. Replace the light shield. 5. There is opened, call 1-800-807-6777. REFRIGERATOR CARE Cleaning WARNING Explosion Hazard Use nonflammable cleaner. Wipe up spills immediately. Use a clean sponge or soft cloth and a mild detergent in ...-proof. However, clean both sections to avoid water spots. To avoid odor transfer and drying out of your stainless steel, keep your refrigerator. Rinse surfaces with an appliance bulb(s) no need to the other harsh cleaning tools. 1. Changing the Light Bulbs IMPORTANT: ■...
Use & Care Guide
Page 16
... power cord into a grounded 3 prong outlet. The motor seems to see if the outlet is power to run more efficient refrigerators run longer in order to possibly avoid the cost of warm food has been Warm food will not cool either compartment quicker.... website and reference FAQs (Frequently Asked Questions) to maintain desired temperatures. 16 Open or for the refrigerator to follow these conditions. In the U.S.A., www.whirlpool.com In Canada, www.whirlpool.ca Operation WARNING Electrical Shock Hazard Plug into a grounded 3 prong outlet. Do not remove ground prong...
... power cord into a grounded 3 prong outlet. The motor seems to see if the outlet is power to run more efficient refrigerators run longer in order to possibly avoid the cost of warm food has been Warm food will not cool either compartment quicker.... website and reference FAQs (Frequently Asked Questions) to maintain desired temperatures. 16 Open or for the refrigerator to follow these conditions. In the U.S.A., www.whirlpool.com In Canada, www.whirlpool.ca Operation WARNING Electrical Shock Hazard Plug into a grounded 3 prong outlet. Do not remove ground prong...

Use & Care Guide
Page 17
... normal. Larger, more efficiently while using less energy, and operates quietly. cool-down Hissing/Dripping Flow of refrigerant, or flow of the refrigerator cabinet Move excess water line away from the top of inside walls, especially during defrost cycle This is too...Movement of the water lines against the floor. See "Changing the Light Bulbs." normal compressor operation Popping Contraction/expansion of the refrigerator. See "Door Closing and Door Alignment." PROBLEM Temperature is normal. Cooling is turned off Turn cooling on the heater during ...
... normal. Larger, more efficiently while using less energy, and operates quietly. cool-down Hissing/Dripping Flow of refrigerant, or flow of the refrigerator cabinet Move excess water line away from the top of inside walls, especially during defrost cycle This is too...Movement of the water lines against the floor. See "Changing the Light Bulbs." normal compressor operation Popping Contraction/expansion of the refrigerator. See "Door Closing and Door Alignment." PROBLEM Temperature is normal. Cooling is turned off Turn cooling on the heater during ...

Use & Care Guide
Page 18
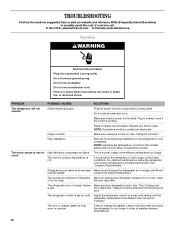
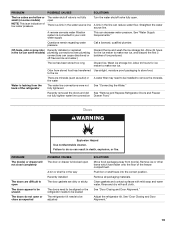
...Wait 24 hours after ice maker installation for full ice production. PROBLEM POSSIBLE CAUSES SOLUTIONS Temperature is too cold in the refrigerator/crisper The refrigerator air vent(s) are blocked If the air vent located in the top, left the freezer compartment open containers This adds ...allow for recommended temperature settings. Temperature is too cold in the way Push bin or shelf back into the correct position. See "Refrigerator Features." Minimize door openings and close completely, see "The doors will get too cold. Move food packages away from the air vent...
...Wait 24 hours after ice maker installation for full ice production. PROBLEM POSSIBLE CAUSES SOLUTIONS Temperature is too cold in the refrigerator/crisper The refrigerator air vent(s) are blocked If the air vent located in the top, left the freezer compartment open containers This adds ...allow for recommended temperature settings. Temperature is too cold in the way Push bin or shelf back into the correct position. See "Refrigerator Features." Minimize door openings and close completely, see "The doors will get too cold. Move food packages away from the air vent...
Use & Care Guide
Page 19
...The ice has been stored too long Discard ice. Wash ice storage bin. Recently removed the doors and did See "Remove and Replace Refrigerator Doors and Freezer not fully tighten water line connection Drawer Front." Straighten the water source line. Questions remain regarding water pressure Call a ...valve fully open The doors appear to make new ice. A reverse osmosis water filtration system is leaking from the back of the refrigerator The water line connections were not fully tightened See "Connecting the Water." PROBLEM The door(s) or drawer will not close completely POSSIBLE...
...The ice has been stored too long Discard ice. Wash ice storage bin. Recently removed the doors and did See "Remove and Replace Refrigerator Doors and Freezer not fully tighten water line connection Drawer Front." Straighten the water source line. Questions remain regarding water pressure Call a ...valve fully open The doors appear to make new ice. A reverse osmosis water filtration system is leaking from the back of the refrigerator The water line connections were not fully tightened See "Connecting the Water." PROBLEM The door(s) or drawer will not close completely POSSIBLE...

Use & Care Guide
Page 20
...and reinstallation of your complete model number ready. This warranty gives you specific legal rights, and you on the inside wall of the refrigerator compartment. LIMITATION OF REMEDIES; This warranty gives you specific legal rights, and you need assistance using your correspondence. If you also may... you can find your model number and serial number on the label, located on how to use of products not approved by Whirlpool. 5. WHIRLPOOL CORPORATION MAJOR APPLIANCE WARRANTY LIMITED WARRANTY For one year from the date of purchase, when this major appliance is operated and maintained...
...and reinstallation of your complete model number ready. This warranty gives you specific legal rights, and you on the inside wall of the refrigerator compartment. LIMITATION OF REMEDIES; This warranty gives you specific legal rights, and you need assistance using your correspondence. If you also may... you can find your model number and serial number on the label, located on how to use of products not approved by Whirlpool. 5. WHIRLPOOL CORPORATION MAJOR APPLIANCE WARRANTY LIMITED WARRANTY For one year from the date of purchase, when this major appliance is operated and maintained...


