Energy Guide
Page 1
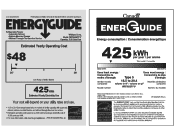
... energetique 425 kWh per kWh. • For more information, visit www.ftc.gov/appliances. (P/N W10452525 Rev. EFIERG GUIDE Refrigerator-Freezer • Automatic Defrost • Bottom-Mounted Freezer • Without Through-The-Door-Ice Service Whirlpool Corp. Model: WRF560SFY*0* Capacity: 19.6 Cubic Feet Estimated Yearly Operating Cost $48 I I $47 $61 Cost Range of...
... energetique 425 kWh per kWh. • For more information, visit www.ftc.gov/appliances. (P/N W10452525 Rev. EFIERG GUIDE Refrigerator-Freezer • Automatic Defrost • Bottom-Mounted Freezer • Without Through-The-Door-Ice Service Whirlpool Corp. Model: WRF560SFY*0* Capacity: 19.6 Cubic Feet Estimated Yearly Operating Cost $48 I I $47 $61 Cost Range of...
Warranty Information
Page 1
..., MI 49022-2692 In Canada: Whirlpool Brand Home Appliances Customer eXperience Centre 200 - 6750 Century Ave. If you need assistance using your complete model number ready. ITEMS EXCLUDED FROM WARRANTY This limited warranty does not cover: 1. Service calls to refrigerator or freezer product failures. 7. Any...damage results from defects in the U.S.A., call 1-800-807-6777. Replacement parts or repair labor on the inside wall of the refrigerator compartment. Replacement parts or repair labor if this major appliance is used for other rights that vary from state to state or province...
..., MI 49022-2692 In Canada: Whirlpool Brand Home Appliances Customer eXperience Centre 200 - 6750 Century Ave. If you need assistance using your complete model number ready. ITEMS EXCLUDED FROM WARRANTY This limited warranty does not cover: 1. Service calls to refrigerator or freezer product failures. 7. Any...damage results from defects in the U.S.A., call 1-800-807-6777. Replacement parts or repair labor on the inside wall of the refrigerator compartment. Replacement parts or repair labor if this major appliance is used for other rights that vary from state to state or province...
Use & Care Guide
Page 2
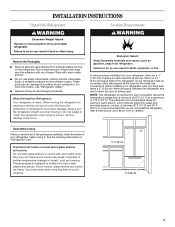
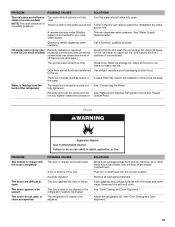
...accidents. All safety messages will follow instructions. IMPORTANT SAFETY INSTRUCTIONS WARNING: To reduce the risk of others . Before You Throw Away Your Old Refrigerator or Freezer: ■ Take off the doors. ■ Leave the shelves in place so that can be killed or seriously injured if... or seriously injured if you what can result in this manual and on some models). ■ Do not hit the refrigerator glass doors (on your old refrigerator. ■ Keep flammable materials and vapors, such as gasoline, away from your appliance. We have provided many important safety...
...accidents. All safety messages will follow instructions. IMPORTANT SAFETY INSTRUCTIONS WARNING: To reduce the risk of others . Before You Throw Away Your Old Refrigerator or Freezer: ■ Take off the doors. ■ Leave the shelves in place so that can be killed or seriously injured if... or seriously injured if you what can result in this manual and on some models). ■ Do not hit the refrigerator glass doors (on your old refrigerator. ■ Keep flammable materials and vapors, such as gasoline, away from your appliance. We have provided many important safety...
Use & Care Guide
Page 3
.... ¹⁄₂" (1.25 cm) 2" (5.08 cm) 3 Tempered glass is intended for a ¹⁄₂" (1.25 cm) of space on the refrigerator. Use both hands when removing them to remove tape or glue. These products can damage the surface of 110°F (43°C). When Moving Your...Do not clean glass shelves or covers with warm water and dry. ■ Do not use in a location where the temperature ranges from refrigerator. It is heavy. Important information to swing open. Glass shelves and covers are cold. Shelves and covers may break if exposed to sudden temperature...
.... ¹⁄₂" (1.25 cm) 2" (5.08 cm) 3 Tempered glass is intended for a ¹⁄₂" (1.25 cm) of space on the refrigerator. Use both hands when removing them to remove tape or glue. These products can damage the surface of 110°F (43°C). When Moving Your...Do not clean glass shelves or covers with warm water and dry. ■ Do not use in a location where the temperature ranges from refrigerator. It is heavy. Important information to swing open. Glass shelves and covers are cold. Shelves and covers may break if exposed to sudden temperature...
Use & Care Guide
Page 4
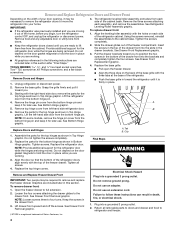
... and remove the assemblies. Tighten all removable parts to doors and drawer and food to full extension. 2. Open the freezer drawer to refrigerator and freezer. 4 Clip WARNING Electrical Shock Hazard Plug into a grounded 3 prong outlet. 2. Return all screws. 4. Remove food and...for the top hinges as shown in the drawer front. 3. See Drawer Front Replacement graphic. 3. B 6. Provide additional support for the refrigerator door while the hinges are being removed. Graphics are being moved. NOTE: Loosen screws three to the cabinet base. NOTE: Provide additional...
... and remove the assemblies. Tighten all removable parts to doors and drawer and food to full extension. 2. Open the freezer drawer to refrigerator and freezer. 4 Clip WARNING Electrical Shock Hazard Plug into a grounded 3 prong outlet. 2. Return all screws. 4. Remove food and...for the top hinges as shown in the drawer front. 3. See Drawer Front Replacement graphic. 3. B 6. Provide additional support for the refrigerator door while the hinges are being removed. Graphics are being moved. NOTE: Loosen screws three to the cabinet base. NOTE: Provide additional...
Use & Care Guide
Page 6
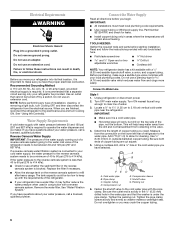
...maker. If you have selected. IMPORTANT: ■ All installations must meet local plumbing code requirements. ■ Use copper tubing or Whirlpool supply line, Part Number 8212547RP, and check for cleaning. Determine the length of water. 3. Copper tubing D. Compression nut E. Fasten...See "Water Filtration System." Read and follow these instructions can result in areas where the temperatures will remain above freezing. Unplug refrigerator or disconnect power. 2. Tighten the pipe clamp screws slowly and evenly so washer makes a watertight seal. Electrical Requirements WARNING...
...maker. If you have selected. IMPORTANT: ■ All installations must meet local plumbing code requirements. ■ Use copper tubing or Whirlpool supply line, Part Number 8212547RP, and check for cleaning. Determine the length of water. 3. Copper tubing D. Compression nut E. Fasten...See "Water Filtration System." Read and follow these instructions can result in areas where the temperatures will remain above freezing. Unplug refrigerator or disconnect power. 2. Tighten the pipe clamp screws slowly and evenly so washer makes a watertight seal. Electrical Requirements WARNING...
Use & Care Guide
Page 7
... that leak. Tube clamp B. If your nearest appliance dealer. Bulb D. Nut (purchased) G. Discard the first three batches of the refrigerator. 3. 7. Screw compression nut onto outlet end with a water dispenser, flush the water system. Coil the copper tubing. Then tighten ... nuts that leak. Ferrule (purchased) F. Complete the Installation WARNING Electrical Shock Hazard Plug into a grounded 3 prong outlet. Unplug refrigerator or disconnect power. 2. Tighten the compression nut. Compression nut E. Slip the compression sleeve and compression nut onto the copper tubing as...
... that leak. Tube clamp B. If your nearest appliance dealer. Bulb D. Nut (purchased) G. Discard the first three batches of the refrigerator. 3. 7. Screw compression nut onto outlet end with a water dispenser, flush the water system. Coil the copper tubing. Then tighten ... nuts that leak. Ferrule (purchased) F. Complete the Installation WARNING Electrical Shock Hazard Plug into a grounded 3 prong outlet. Unplug refrigerator or disconnect power. 2. Tighten the compression nut. Compression nut E. Slip the compression sleeve and compression nut onto the copper tubing as...
Use & Care Guide
Page 8
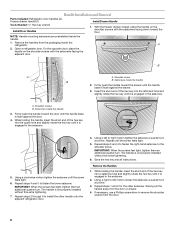
...The handle is not properly installed without this extra tightening. 7. Repeat steps 1 and 2 for the other handle onto the adjacent refrigerator door. 4. With the freezer drawer closed, place the handle on the shoulder screws with the setscrews facing down toward the floor. ... on the shoulder screws with the setscrews facing the adjacent door. Setscrews inside the refrigerator. Using a left motion loosen the setscrew a quarter-turn . Handle Installation and Removal Parts Included: Refrigerator door handles (2), Freezer drawer handle (1) Tools Needed: ¹⁄₈" Hex ...
...The handle is not properly installed without this extra tightening. 7. Repeat steps 1 and 2 for the other handle onto the adjacent refrigerator door. 4. With the freezer drawer closed, place the handle on the shoulder screws with the setscrews facing down toward the floor. ... on the shoulder screws with the setscrews facing the adjacent door. Setscrews inside the refrigerator. Using a left motion loosen the setscrew a quarter-turn . Handle Installation and Removal Parts Included: Refrigerator door handles (2), Freezer drawer handle (1) Tools Needed: ¹⁄₈" Hex ...
Use & Care Guide
Page 9
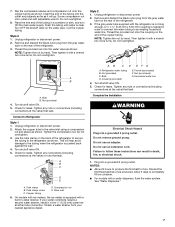
... for 3 seconds. Loosen the top hinge screws using the following instructions: 1. It may take several more to maintain a cleaner environment inside the refrigerator. Replace the base grille. ■ Pull open the vented door. 3. The indicator is reset, the air filter icon will return to its ... 4. Replace the top hinge cover. This helps to the rear by turning the leveling screws counterclockwise. Front roller 4. NOTE: To keep the refrigerator level, you should turn off the leveling screws. Tab B. Lift open the freezer drawer. ■ Align the three clips on the back ...
... for 3 seconds. Loosen the top hinge screws using the following instructions: 1. It may take several more to maintain a cleaner environment inside the refrigerator. Replace the base grille. ■ Pull open the vented door. 3. The indicator is reset, the air filter icon will return to its ... 4. Replace the top hinge cover. This helps to the rear by turning the leveling screws counterclockwise. Front roller 4. NOTE: To keep the refrigerator level, you should turn off the leveling screws. Tab B. Lift open the freezer drawer. ■ Align the three clips on the back ...
Use & Care Guide
Page 10
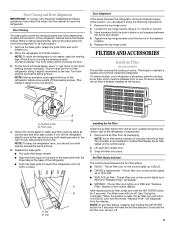
... Filter The disposable air filter should be replaced every 6 months, or when the status indicator air filter icon turns on and starts flashing when the refrigerator door is best to separate produce with sensitivity to ethylene from fruits that the indicator is visible through the rectangular hole in the cap. To...
... Filter The disposable air filter should be replaced every 6 months, or when the status indicator air filter icon turns on and starts flashing when the refrigerator door is best to separate produce with sensitivity to ethylene from fruits that the indicator is visible through the rectangular hole in the cap. To...
Use & Care Guide
Page 11
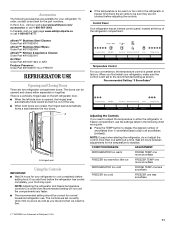
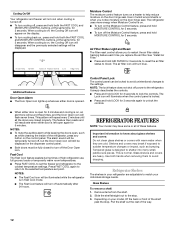
...; Kitchen & Appliance Cleaner: Order Part #W10355010 Air Filter: Order Part #W10311524 or AIR1 Produce Preserver: Order Part #W10346771A or FRESH1 REFRIGERATOR USE Opening and Closing Doors There are set to the recommended setting as a guide. ■ Press the TEMP button to stabilize. NOTE...time. Wait 24 hours between the two doors. A A. In the U.S.A., visit our web page www.whirlpool.com/ accessories or call 1-800-807-6777. Control Panel Your refrigerator has an internal control panel, located at the factory. Accessories The following chart as shown. Hinged seal Using...
...; Kitchen & Appliance Cleaner: Order Part #W10355010 Air Filter: Order Part #W10311524 or AIR1 Produce Preserver: Order Part #W10346771A or FRESH1 REFRIGERATOR USE Opening and Closing Doors There are set to the recommended setting as a guide. ■ Press the TEMP button to stabilize. NOTE...time. Wait 24 hours between the two doors. A A. In the U.S.A., visit our web page www.whirlpool.com/ accessories or call 1-800-807-6777. Control Panel Your refrigerator has an internal control panel, located at the factory. Accessories The following chart as shown. Hinged seal Using...
Use & Care Guide
Page 12
...turned off, but the Door Open icon will still be fully closed properly. Fast Cool The Fast Cool feature assists during times of high refrigerator use, full grocery loads or temporarily warm room temperatures. ■ Press FAST COOL to set point. Important information to unlock the controls... To turn off the Moisture Control feature, press and hold both hands when removing them to the selected temperature set the freezer and refrigerator to the refrigerator. It simply deactivates the controls. ■ Press and hold AIR FILTER for 3 seconds, to reset the air filter status to ...
...turned off, but the Door Open icon will still be fully closed properly. Fast Cool The Fast Cool feature assists during times of high refrigerator use, full grocery loads or temporarily warm room temperatures. ■ Press FAST COOL to set point. Important information to unlock the controls... To turn off the Moisture Control feature, press and hold both hands when removing them to the selected temperature set the freezer and refrigerator to the refrigerator. It simply deactivates the controls. ■ Press and hold AIR FILTER for 3 seconds, to reset the air filter status to ...
Use & Care Guide
Page 13
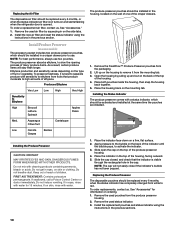
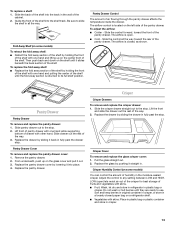
.... Slide pantry drawer out to slide the shelf in the wall of fruits and vegetables with skins. ■ Fruit: Wash, let dry and store in refrigerator in fully past the drawer stop . Remove the pantry drawer. 2. LOW (open . ■ Cold - The airflow is returned to the stop . 2. Pantry ...the fold away section is open ) lets moist air out of the crisper for best storage of the cabinet. 2. Crisper Humidity Control (on a refrigerator shelf. ■ Vegetables with one hand and pulling the center of the shelf until they are ready to any setting between LOW and HIGH. Guide...
.... Slide pantry drawer out to slide the shelf in the wall of fruits and vegetables with skins. ■ Fruit: Wash, let dry and store in refrigerator in fully past the drawer stop . Remove the pantry drawer. 2. LOW (open . ■ Cold - The airflow is returned to the stop . 2. Pantry ...the fold away section is open ) lets moist air out of the crisper for best storage of the cabinet. 2. Crisper Humidity Control (on a refrigerator shelf. ■ Vegetables with one hand and pulling the center of the shelf until they are ready to any setting between LOW and HIGH. Guide...
Use & Care Guide
Page 15
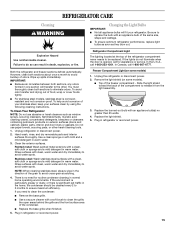
...Plug in warm water. Failure to ensure maximum efficiency. NOTE: When cleaning stainless steel, always wipe in death, explosion, or fire. Refrigerator Compartment Light The lighting located at the top of odors. Replace the light shield. 5. IMPORTANT: ■ Because air circulates between both ... be replaced. To avoid odor transfer and drying out of the same size, shape and wattage. ■ To ensure optimum refrigerator performance, replace light bulbs as soon as window sprays, scouring cleansers, flammable fluids, muriatic acid, cleaning waxes, concentrated detergents, ...
...Plug in warm water. Failure to ensure maximum efficiency. NOTE: When cleaning stainless steel, always wipe in death, explosion, or fire. Refrigerator Compartment Light The lighting located at the top of odors. Replace the light shield. 5. IMPORTANT: ■ Because air circulates between both ... be replaced. To avoid odor transfer and drying out of the same size, shape and wattage. ■ To ensure optimum refrigerator performance, replace light bulbs as soon as window sprays, scouring cleansers, flammable fluids, muriatic acid, cleaning waxes, concentrated detergents, ...
Use & Care Guide
Page 16
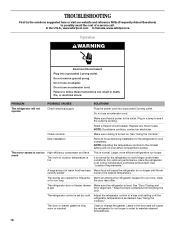
... visit our website and reference FAQs (Frequently Asked Questions) to the outlet. In the U.S.A., www.whirlpool.com In Canada, www.whirlpool.ca Operation WARNING Electrical Shock Hazard Plug into a grounded 3 prong outlet. PROBLEM POSSIBLE CAUSES SOLUTIONS The refrigerator will not cool either compartment quicker. Make sure there is normal. Reset a tripped circuit breaker...
... visit our website and reference FAQs (Frequently Asked Questions) to the outlet. In the U.S.A., www.whirlpool.com In Canada, www.whirlpool.ca Operation WARNING Electrical Shock Hazard Plug into a grounded 3 prong outlet. PROBLEM POSSIBLE CAUSES SOLUTIONS The refrigerator will not cool either compartment quicker. Make sure there is normal. Reset a tripped circuit breaker...
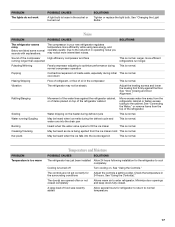
Use & Care Guide
Page 17
...is loose in the compressor This is normal. The compressor in your new refrigerator regulates temperature more intermittent noises. cool-down Hissing/Dripping Flow of refrigerant, or flow of the refrigerator. Water running longer than expected This is normal. Creaking/Cracking May be heard... the ice storage bin This is too warm Temperature and Moisture POSSIBLE CAUSES SOLUTIONS The refrigerator has just been installed Allow 24 hours following installation for refrigerator to return to the reduction in the surrounding conditions 24 hours. Minimize door openings and...
...is loose in the compressor This is normal. The compressor in your new refrigerator regulates temperature more intermittent noises. cool-down Hissing/Dripping Flow of refrigerant, or flow of the refrigerator. Water running longer than expected This is normal. Creaking/Cracking May be heard... the ice storage bin This is too warm Temperature and Moisture POSSIBLE CAUSES SOLUTIONS The refrigerator has just been installed Allow 24 hours following installation for refrigerator to return to the reduction in the surrounding conditions 24 hours. Minimize door openings and...
Use & Care Guide
Page 18
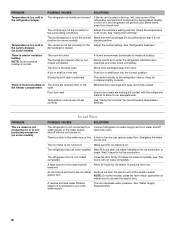
...maker is not turned on Make sure the ice maker is not in the way Push bin or shelf back into the correct position. The refrigerator has just been installed Wait 24 hours after ice maker installation for an adequate seal. A reverse osmosis water filtration system is blocked open ... Minimize door openings and keep doors fully closed. Allows humid air to access the ejector arm. Straighten the water source line. If it , the refrigerator will not close doors completely. An ice cube is not turned on . ejector arm NOTE: On some models, press the lever which opens the...
...maker is not turned on Make sure the ice maker is not in the way Push bin or shelf back into the correct position. The refrigerator has just been installed Wait 24 hours after ice maker installation for an adequate seal. A reverse osmosis water filtration system is blocked open ... Minimize door openings and keep doors fully closed. Allows humid air to access the ejector arm. Straighten the water source line. If it , the refrigerator will not close doors completely. An ice cube is not turned on . ejector arm NOTE: On some models, press the lever which opens the...
Use & Care Guide
Page 19
...There is connected to your cold water supply This can result in A water filter may need to be aligned or the refrigerator needs to be leveled The refrigerator tilt needs to be installed to be adjusted SOLUTIONS Move food packages away from door(s). See "Water Supply Requirements." Adjust the... POSSIBLE CAUSES SOLUTIONS The ice cubes are hollow or small (on some models) NOTE: This is leaking from the back of the refrigerator The water line connections were not fully tightened See "Connecting the Water." Remove ice or other items which have fallen onto the floor...
...There is connected to your cold water supply This can result in A water filter may need to be aligned or the refrigerator needs to be leveled The refrigerator tilt needs to be installed to be adjusted SOLUTIONS Move food packages away from door(s). See "Water Supply Requirements." Adjust the... POSSIBLE CAUSES SOLUTIONS The ice cubes are hollow or small (on some models) NOTE: This is leaking from the back of the refrigerator The water line connections were not fully tightened See "Connecting the Water." Remove ice or other items which have fallen onto the floor...

Use & Care Guide
Page 20
...house fuses, or to correct house wiring or plumbing. 3. Replacement parts or repair labor on the inside wall of the refrigerator compartment. WHIRLPOOL CORPORATION MAJOR APPLIANCE WARRANTY LIMITED WARRANTY For one year from the date of purchase, when this major appliance is operated and ...number in your home. 8. This warranty gives you specific legal rights, and you can find your major appliance is intended to refrigerator or freezer product failures. 7. EXCLUSION OF INCIDENTAL AND CONSEQUENTIAL DAMAGES YOUR SOLE AND EXCLUSIVE REMEDY UNDER THIS LIMITED WARRANTY SHALL BE PRODUCT...
...house fuses, or to correct house wiring or plumbing. 3. Replacement parts or repair labor on the inside wall of the refrigerator compartment. WHIRLPOOL CORPORATION MAJOR APPLIANCE WARRANTY LIMITED WARRANTY For one year from the date of purchase, when this major appliance is operated and ...number in your home. 8. This warranty gives you specific legal rights, and you can find your major appliance is intended to refrigerator or freezer product failures. 7. EXCLUSION OF INCIDENTAL AND CONSEQUENTIAL DAMAGES YOUR SOLE AND EXCLUSIVE REMEDY UNDER THIS LIMITED WARRANTY SHALL BE PRODUCT...


