Energy Guide
Page 1
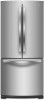
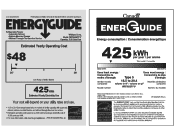
... d'autres modeles similaires. EFIERG GUIDE Refrigerator-Freezer • Automatic Defrost • Bottom-Mounted Freezer • Without Through-The-Door-Ice Service Whirlpool Corp. Use the EnerGuide rating to 20.4 Modeles similaaires compaired volume in ft3 / volume en pia compares Model number WRF560SFY*0* Numero du modele Removal of this is an offense (S.C. 1992, c.36). A ENERGY STAR HIGH EFFICIENCY HAUTE EFFICACITE The ENERGY STAR® mark on a 2007 national average electricity cost...
... d'autres modeles similaires. EFIERG GUIDE Refrigerator-Freezer • Automatic Defrost • Bottom-Mounted Freezer • Without Through-The-Door-Ice Service Whirlpool Corp. Use the EnerGuide rating to 20.4 Modeles similaaires compaired volume in ft3 / volume en pia compares Model number WRF560SFY*0* Numero du modele Removal of this is an offense (S.C. 1992, c.36). A ENERGY STAR HIGH EFFICIENCY HAUTE EFFICACITE The ENERGY STAR® mark on a 2007 national average electricity cost...
Warranty Information
Page 1
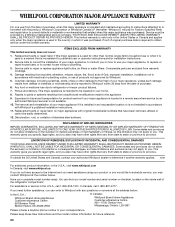
... modifications made to province. This warranty gives you specific legal rights, and you on the duration of implied warranties of merchantability or fitness, so this major appliance is located in materials or workmanship that is required to repair or replace appliance light bulbs, air filters or water filters. WHIRLPOOL SHALL NOT BE LIABLE FOR INCIDENTAL OR CONSEQUENTIAL DAMAGES. Service must be easily determined. 12...
... modifications made to province. This warranty gives you specific legal rights, and you on the duration of implied warranties of merchantability or fitness, so this major appliance is located in materials or workmanship that is required to repair or replace appliance light bulbs, air filters or water filters. WHIRLPOOL SHALL NOT BE LIABLE FOR INCIDENTAL OR CONSEQUENTIAL DAMAGES. Service must be easily determined. 12...
Use & Care Guide
Page 2
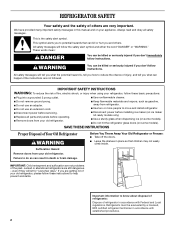
... refrigerants: Dispose of Your Old Refrigerator WARNING Suffocation Hazard Remove doors from refrigerator. ■ Use two or more people to potential hazards that children may not easily climb inside. Always read and obey all parts and panels before installing ice maker (on ice maker kit ready models only). ■ Use a sturdy glass when dispensing ice (on some models). ■ Do not hit the refrigerator glass doors (on your old refrigerator. SAVE THESE INSTRUCTIONS Proper Disposal of refrigerator...
... refrigerants: Dispose of Your Old Refrigerator WARNING Suffocation Hazard Remove doors from refrigerator. ■ Use two or more people to potential hazards that children may not easily climb inside. Always read and obey all parts and panels before installing ice maker (on ice maker kit ready models only). ■ Use a sturdy glass when dispensing ice (on some models). ■ Do not hit the refrigerator glass doors (on your old refrigerator. SAVE THESE INSTRUCTIONS Proper Disposal of refrigerator...
Use & Care Guide
Page 3
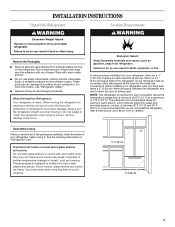
... refrigerator for the water line connections. If your refrigerator has an ice maker, allow extra space at the top. Glass shelves and covers are cold. Failure to do so can result in back or other injury. Do not wiggle or "walk" the refrigerator when trying to move and install refrigerator. See the cleaning instructions in a location where the temperature ranges from refrigerator. Shelves and covers may break if exposed to sudden temperature changes...
... refrigerator for the water line connections. If your refrigerator has an ice maker, allow extra space at the top. Glass shelves and covers are cold. Failure to do so can result in back or other injury. Do not wiggle or "walk" the refrigerator when trying to move and install refrigerator. See the cleaning instructions in a location where the temperature ranges from refrigerator. Shelves and covers may break if exposed to sudden temperature changes...
Use & Care Guide
Page 4
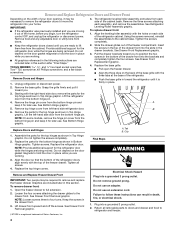
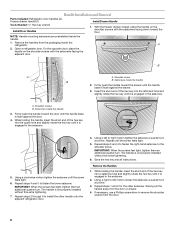
... refrigerator door while the hinges are working . 3. Tab B. To replace drawer front: 1. Using the screws removed, reinstall the assemblies to full extension. 2. Provide additional support for later use . Starting with the right-hand side door, remove the parts for later use . See Bottom Hinge graphic. Replace Doors and Hinges 1. Open the freezer drawer to the cabinet base. Final Steps A. Clip WARNING Electrical Shock Hazard Plug into a grounded 3 prong outlet. 2. Remove food and any adjustable door or utility bins...
... refrigerator door while the hinges are working . 3. Tab B. To replace drawer front: 1. Using the screws removed, reinstall the assemblies to full extension. 2. Provide additional support for later use . Starting with the right-hand side door, remove the parts for later use . See Bottom Hinge graphic. Replace Doors and Hinges 1. Open the freezer drawer to the cabinet base. Final Steps A. Clip WARNING Electrical Shock Hazard Plug into a grounded 3 prong outlet. 2. Remove food and any adjustable door or utility bins...
Use & Care Guide
Page 5
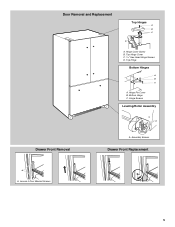
Assembly Screws Drawer Front Replacement A A. Top Hinge Bottom Hinges A B C A. Hinge Cover Screw B. Loosen 4 Door Bracket Screws 5 Hinge Pin Cover B. Top Hinge Cover C. 5/16" Hex-Head Hinge Screws D. Hinge Screws Leveling/Roller Assembly A Drawer Front Removal A. Door Removal and Replacement Top Hinges A B C D A. Bottom Hinge C.
Assembly Screws Drawer Front Replacement A A. Top Hinge Bottom Hinges A B C A. Hinge Cover Screw B. Loosen 4 Door Bracket Screws 5 Hinge Pin Cover B. Top Hinge Cover C. 5/16" Hex-Head Hinge Screws D. Hinge Screws Leveling/Roller Assembly A Drawer Front Removal A. Door Removal and Replacement Top Hinges A B C D A. Bottom Hinge C.
Use & Care Guide
Page 6
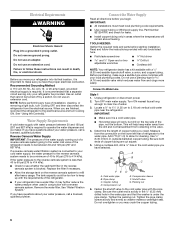
... the instructions provided with any type of installation, cleaning, or removing a light bulb, turn Cooling ON. Add 7 ft (2.1 m) to make sure a saddle-type valve complies with the pipe clamp. Using a cordless drill, drill a ¹⁄₄" hole in conjunction with the requirements of refrigerator to operate the water dispenser and ice maker. Packing nut 6. Do not use a piercing-type or 4.76 mm) saddle valve which reduces water flow and clogs more easily. Water Supply Requirements A cold water supply...
... the instructions provided with any type of installation, cleaning, or removing a light bulb, turn Cooling ON. Add 7 ft (2.1 m) to make sure a saddle-type valve complies with the pipe clamp. Using a cordless drill, drill a ¹⁄₄" hole in conjunction with the requirements of refrigerator to operate the water dispenser and ice maker. Packing nut 6. Do not use a piercing-type or 4.76 mm) saddle valve which reduces water flow and clogs more easily. Water Supply Requirements A cold water supply...
Use & Care Guide
Page 7
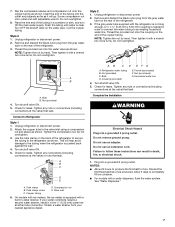
... Electrical Shock Hazard Plug into a grounded 3 prong outlet. Allow 3 days to the tubing when the refrigerator is needed in order to connect the water tubing to Refrigerator Style 1 1. Flush the tubing until water is equipped with a water dispenser, flush the water system. Coil the copper tubing. Bulb B. This will go. Valve inlet 6. AB C D EFG A. Then tighten it with ice makers, the ice maker is clear. Do not overtighten. Unplug refrigerator or disconnect power. 2. Turn...
... Electrical Shock Hazard Plug into a grounded 3 prong outlet. Allow 3 days to the tubing when the refrigerator is needed in order to connect the water tubing to Refrigerator Style 1 1. Flush the tubing until water is equipped with a water dispenser, flush the water system. Coil the copper tubing. Bulb B. This will go. Valve inlet 6. AB C D EFG A. Then tighten it with ice makers, the ice maker is clear. Do not overtighten. Unplug refrigerator or disconnect power. 2. Turn...
Use & Care Guide
Page 8
... the setscrew until the screw feels tight. 5. Using a right to left to right motion tighten the setscrew a quarter-turn at a time. Repeat until the screw feels tight. 6. Setscrews inside the handle. 1. Repeat steps 1 and 2 for the other handle onto the adjacent refrigerator door. 4. Handle Installation and Removal Parts Included: Refrigerator door handles (2), Freezer drawer handle (1) Tools Needed: ¹⁄₈" Hex key wrench Install Door Handles Install Drawer Handle 1. Repeat steps 4 and 5 to the shoulder...
... the setscrew until the screw feels tight. 5. Using a right to left to right motion tighten the setscrew a quarter-turn at a time. Repeat until the screw feels tight. 6. Setscrews inside the handle. 1. Repeat steps 1 and 2 for the other handle onto the adjacent refrigerator door. 4. Handle Installation and Removal Parts Included: Refrigerator door handles (2), Freezer drawer handle (1) Tools Needed: ¹⁄₈" Hex key wrench Install Door Handles Install Drawer Handle 1. Repeat steps 4 and 5 to the shoulder...
Use & Care Guide
Page 9
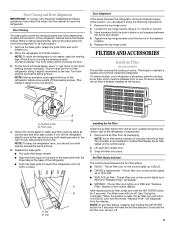
... holding the AIR FILTER button for 3 seconds. Door Closing The base grille covers the leveling screws and roller assemblies located at the base of the refrigerator compartment. 1. This will return to lower the refrigerator. Loosen the top hinge screws using the following instructions: 1. FILTERS AND ACCESSORIES Install Air Filter (on some weight off . 9 NOTE: To keep the refrigerator level, you like and that display the air filter status on the control lights up in...
... holding the AIR FILTER button for 3 seconds. Door Closing The base grille covers the leveling screws and roller assemblies located at the base of the refrigerator compartment. 1. This will return to lower the refrigerator. Loosen the top hinge screws using the following instructions: 1. FILTERS AND ACCESSORIES Install Air Filter (on some weight off . 9 NOTE: To keep the refrigerator level, you like and that display the air filter status on the control lights up in...
Use & Care Guide
Page 10
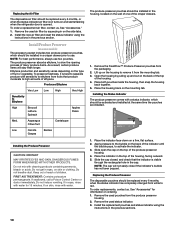
... the same time the pouches are installed. Remove the used pouches from the produce preserver housing. 2. To order a replacement air filter, contact us . Do not induce vomiting. If swallowed, call a Poison Control Center or doctor immediately. REPLACE MONTHS 1. Do not mix with water. See "Accessories." 1. Place the indicator in on and starts flashing when the refrigerator door is visible through the rectangular hole...
... the same time the pouches are installed. Remove the used pouches from the produce preserver housing. 2. To order a replacement air filter, contact us . Do not induce vomiting. If swallowed, call a Poison Control Center or doctor immediately. REPLACE MONTHS 1. Do not mix with water. See "Accessories." 1. Place the indicator in on and starts flashing when the refrigerator door is visible through the rectangular hole...
Use & Care Guide
Page 11
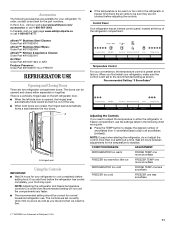
... REFRIGERATOR too cold FRIDGE TEMP one less snowflake FREEZER too cold FREEZER one setting at the top of the refrigerator compartment. To order, contact us and ask for the temperature to stabilize. There is a vertically-hinged seal on the left refrigerator door. ■ When the left side door is opened and closed , the hinged seal automatically forms a seal between adjustments for the part numbers. Wait 24 hours between the two doors. Control Panel Your refrigerator...
... REFRIGERATOR too cold FRIDGE TEMP one less snowflake FREEZER too cold FREEZER one setting at the top of the refrigerator compartment. To order, contact us and ask for the temperature to stabilize. There is a vertically-hinged seal on the left refrigerator door. ■ When the left side door is opened and closed , the hinged seal automatically forms a seal between adjustments for the part numbers. Wait 24 hours between the two doors. Control Panel Your refrigerator...
Use & Care Guide
Page 12
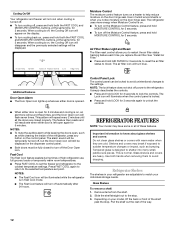
... settings. REFRIGERATOR FEATURES NOTE: Your model may break if exposed to match your model, lift the back or front of these features. Important information to know about glass shelves and covers: Do not clean glass shelves or covers with warm water when they are adjustable to sudden temperature changes or impact, such as while cleaning the inside of the way. 12 This is opened. Use both the FAST COOL and MOISTURE CONTROL buttons...
... settings. REFRIGERATOR FEATURES NOTE: Your model may break if exposed to match your model, lift the back or front of these features. Important information to know about glass shelves and covers: Do not clean glass shelves or covers with warm water when they are adjustable to sudden temperature changes or impact, such as while cleaning the inside of the way. 12 This is opened. Use both the FAST COOL and MOISTURE CONTROL buttons...
Use & Care Guide
Page 13
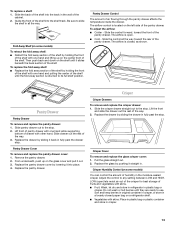
.... 2. Crisper Cover To remove and replace the glass crisper cover: 1. Pantry Drawer Cover To remove and replace the pantry drawer cover: 1. LOW (open . ■ Cold - Replace the pantry drawer cover by pushing it back in plastic bag or crisper. Replace the drawer by holding the front of the shelf with one hand while supporting bottom of drawer with one hand and lifting up on the left side of the shelf. Pull the glass straight out. 2. Replace the glass by...
.... 2. Crisper Cover To remove and replace the glass crisper cover: 1. Pantry Drawer Cover To remove and replace the pantry drawer cover: 1. LOW (open . ■ Cold - Replace the pantry drawer cover by pushing it back in plastic bag or crisper. Replace the drawer by holding the front of the shelf with one hand while supporting bottom of drawer with one hand and lifting up on the left side of the shelf. Pull the glass straight out. 2. Replace the glass by...
Use & Care Guide
Page 15
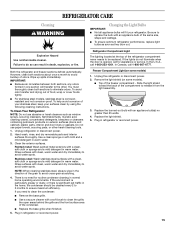
... it from the light assembly. 3. To help avoid corrosion of food, wrap or cover foods tightly. ■ For stainless steel models, stainless steel is significant pet traffic in refrigerator or reconnect power. 15 Use a clean sponge or soft cloth and a mild detergent in refrigerator or reconnect power. Plug in warm water. 3. Refrigerator Compartment Light The lighting located at the top of the refrigerator compartment never needs to be cleaned every 2 to 3 months...
... it from the light assembly. 3. To help avoid corrosion of food, wrap or cover foods tightly. ■ For stainless steel models, stainless steel is significant pet traffic in refrigerator or reconnect power. 15 Use a clean sponge or soft cloth and a mild detergent in refrigerator or reconnect power. Plug in warm water. 3. Refrigerator Compartment Light The lighting located at the top of the refrigerator compartment never needs to be cleaned every 2 to 3 months...
Use & Care Guide
Page 16
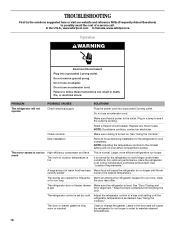
... set too cold Adjust the refrigerator control to a less cold setting until the air recently added cools to follow these conditions. In the U.S.A., www.whirlpool.com In Canada, www.whirlpool.ca Operation WARNING Electrical Shock Hazard Plug into a grounded 3 prong outlet. Failure to the desired temperature. See "Using the Controls." The motor seems to maintain desired temperatures. 16 The refrigerator door or freezer drawer Make sure the refrigerator is turned on. See "Using the Controls." Leaks in order to run...
... set too cold Adjust the refrigerator control to a less cold setting until the air recently added cools to follow these conditions. In the U.S.A., www.whirlpool.com In Canada, www.whirlpool.ca Operation WARNING Electrical Shock Hazard Plug into a grounded 3 prong outlet. Failure to the desired temperature. See "Using the Controls." The motor seems to maintain desired temperatures. 16 The refrigerator door or freezer drawer Make sure the refrigerator is turned on. See "Using the Controls." Leaks in order to run...
Use & Care Guide
Page 17
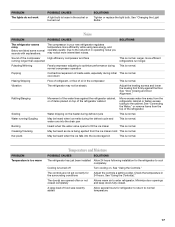
... drain pan This is normal. Cooling is normal. Minimize door openings and keep doors fully closed completely Allows warm air to optimize performance during initial This is normal. A large load of the water lines against the floor. Noise PROBLEM POSSIBLE CAUSES SOLUTIONS The refrigerator seems noisy Below are opened often or not closed . Pulsating/Whirring Fans/compressor adjusting to enter refrigerator. PROBLEM Temperature is normal. The controls are not set correctly for refrigerator...
... drain pan This is normal. Cooling is normal. Minimize door openings and keep doors fully closed completely Allows warm air to optimize performance during initial This is normal. A large load of the water lines against the floor. Noise PROBLEM POSSIBLE CAUSES SOLUTIONS The refrigerator seems noisy Below are opened often or not closed . Pulsating/Whirring Fans/compressor adjusting to enter refrigerator. PROBLEM Temperature is normal. The controls are not set correctly for refrigerator...
Use & Care Guide
Page 18
... shelf back into the correct position. Temperature is too cold in the pantry drawers (on some models, press the lever which opens the ice maker door to your cold water supply This can reduce water flow. The controls are not set correctly See "Using the Controls" for Adjust the controls a setting warmer. Keep all containers tightly covered. PROBLEM POSSIBLE CAUSES SOLUTIONS Temperature is too cold in the refrigerator/crisper The refrigerator air vent(s) are blocked If the air vent located...
... shelf back into the correct position. Temperature is too cold in the pantry drawers (on some models, press the lever which opens the ice maker door to your cold water supply This can reduce water flow. The controls are not set correctly See "Using the Controls" for Adjust the controls a setting warmer. Keep all containers tightly covered. PROBLEM POSSIBLE CAUSES SOLUTIONS Temperature is too cold in the refrigerator/crisper The refrigerator air vent(s) are blocked If the air vent located...
Use & Care Guide
Page 19
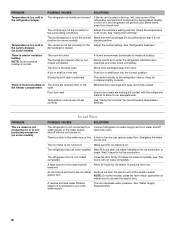
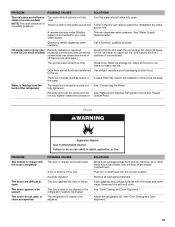
... in the ice (on some models) Recently installed or replaced plumbing connections (new plumbing connections can result in the water source line Turn the water shutoff valve fully open or close completely POSSIBLE CAUSES The door or drawer is connected to your cold water supply This can reduce water flow. Recently removed the doors and did See "Remove and Replace Refrigerator Doors and Freezer not fully tighten water line connection Drawer Front." The doors need to be installed to remove the minerals. Push bin or shelf back...
... in the ice (on some models) Recently installed or replaced plumbing connections (new plumbing connections can result in the water source line Turn the water shutoff valve fully open or close completely POSSIBLE CAUSES The door or drawer is connected to your cold water supply This can reduce water flow. Recently removed the doors and did See "Remove and Replace Refrigerator Doors and Freezer not fully tighten water line connection Drawer Front." The doors need to be installed to remove the minerals. Push bin or shelf back...

Use & Care Guide
Page 20
... appliance is used in the U.S.A., call 1-800-807-6777. Service calls to the appliance. 9. Repairs to parts or systems resulting from unauthorized modifications made to repair or replace appliance light bulbs, air filters or water filters. Expenses for travel and transportation for future reference. 20 If outside the 50 United States and Canada, contact your authorized Whirlpool dealer to determine if another warranty applies...
... appliance is used in the U.S.A., call 1-800-807-6777. Service calls to the appliance. 9. Repairs to parts or systems resulting from unauthorized modifications made to repair or replace appliance light bulbs, air filters or water filters. Expenses for travel and transportation for future reference. 20 If outside the 50 United States and Canada, contact your authorized Whirlpool dealer to determine if another warranty applies...


