Use & Care Guide
Page 2
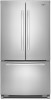
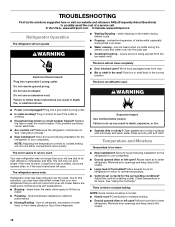
...; Do not use an extension cord. ■ Disconnect power before servicing. ■ Replace all safety messages. This symbol alerts you to move and install refrigerator. ■ Disconnect power before installing ice maker (on ice maker kit ready models only). ■ Use a sturdy glass when dispensing ice (on some ...the safety alert symbol. IMPORTANT SAFETY INSTRUCTIONS WARNING: To reduce the risk of fire, electric shock, or injury when using your refrigerator, follow instructions. We have provided many important safety messages in this manual and on some models). ■ Do not hit the...
...; Do not use an extension cord. ■ Disconnect power before servicing. ■ Replace all safety messages. This symbol alerts you to move and install refrigerator. ■ Disconnect power before installing ice maker (on ice maker kit ready models only). ■ Use a sturdy glass when dispensing ice (on some ...the safety alert symbol. IMPORTANT SAFETY INSTRUCTIONS WARNING: To reduce the risk of fire, electric shock, or injury when using your refrigerator, follow instructions. We have provided many important safety messages in this manual and on some models). ■ Do not hit the...
Use & Care Guide
Page 3
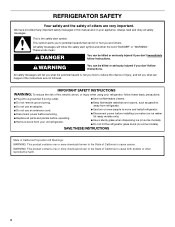
...it, as bumping. Wipe with warm water when they will sit for cleaning or service, be evacuated by a licensed, EPA certified refrigerant technician in accordance with established procedures. See the cleaning instructions in place so that children may break if exposed to do so can damage...more people to do so can result in back or other injury. IMPORTANT: Child entrapment and suffocation are getting rid of your old refrigerator, please follow these instructions to remove tape or glue. Important information to avoid floor damage. Remove the Packaging ■ Remove tape and...
...it, as bumping. Wipe with warm water when they will sit for cleaning or service, be evacuated by a licensed, EPA certified refrigerant technician in accordance with established procedures. See the cleaning instructions in place so that children may break if exposed to do so can damage...more people to do so can result in back or other injury. IMPORTANT: Child entrapment and suffocation are getting rid of your old refrigerator, please follow these instructions to remove tape or glue. Important information to avoid floor damage. Remove the Packaging ■ Remove tape and...
Use & Care Guide
Page 4
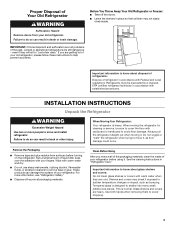
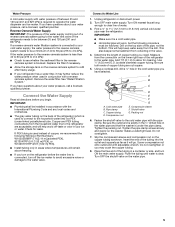
...43°C). or 20-amp fused, grounded electrical supply is recommended that a separate circuit serving only your refrigerator has an ice maker, allow for your refrigerator into a grounded 3 prong outlet. NOTE: Before performing any tools listed here. Location Requirements WARNING Electrical ... pads repeatedly until a dash (-) appears in a location where the temperature ranges from the electrical source. It is required. Disconnect the refrigerator from a minimum of 55°F (13°C) to a maximum of installation, cleaning, or removing a light bulb, turn the freezer...
...43°C). or 20-amp fused, grounded electrical supply is recommended that a separate circuit serving only your refrigerator has an ice maker, allow for your refrigerator into a grounded 3 prong outlet. NOTE: Before performing any tools listed here. Location Requirements WARNING Electrical ... pads repeatedly until a dash (-) appears in a location where the temperature ranges from the electrical source. It is required. Disconnect the refrigerator from a minimum of 55°F (13°C) to a maximum of installation, cleaning, or removing a light bulb, turn the freezer...
Use & Care Guide
Page 5
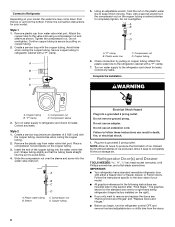
... less than 40 to 60 psi (276 to 414 kPa): ■ Check to refill after heavy usage. ■ If your refrigerator has a water filter, it will work, but the following Whirlpool Part Numbers: W10505928RP (7 ft [2.14 m] jacketed PEX), 8212547RP (5 ft [1.52 m] PEX), or W10267701RP (25 ft [7.62 ...F G E. Do not overtighten or you have questions about your cold water supply, the water pressure to the reverse osmosis system needs to the refrigerator are cut square. 5. Flush the tubing until water is blocked. If you may further reduce the water pressure when used to connect to the...
... less than 40 to 60 psi (276 to 414 kPa): ■ Check to refill after heavy usage. ■ If your refrigerator has a water filter, it will work, but the following Whirlpool Part Numbers: W10505928RP (7 ft [2.14 m] jacketed PEX), 8212547RP (5 ft [1.52 m] PEX), or W10267701RP (25 ft [7.62 ...F G E. Do not overtighten or you have questions about your cold water supply, the water pressure to the reverse osmosis system needs to the refrigerator are cut square. 5. Flush the tubing until water is blocked. If you may further reduce the water pressure when used to connect to the...
Use & Care Guide
Page 6
... plastic water line to completely tighten. Correct any leaks. Plastic water tubing C. Do not remove ground prong. Allow 3 days to refrigerator cabinet with the copper tubing. Do not overtighten. Secure copper tubing to completely fill the ice storage bin. Plastic water line C. ... a grounded 3 prong outlet. Copper tubing Electrical Shock Hazard Plug into the water valve inlet port. Do not use an adapter. Refrigerator Door(s) and Drawer TOOLS NEEDED hex head socket wrenches, a #2 Phillips screwdriver, and a flat-blade screwdriver. "P" clamp B. Correct...
... plastic water line to completely tighten. Correct any leaks. Plastic water tubing C. Do not remove ground prong. Allow 3 days to refrigerator cabinet with the copper tubing. Do not overtighten. Secure copper tubing to completely fill the ice storage bin. Plastic water line C. ... a grounded 3 prong outlet. Copper tubing Electrical Shock Hazard Plug into the water valve inlet port. Do not use an adapter. Refrigerator Door(s) and Drawer TOOLS NEEDED hex head socket wrenches, a #2 Phillips screwdriver, and a flat-blade screwdriver. "P" clamp B. Correct...
Use & Care Guide
Page 7
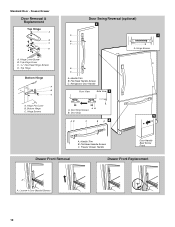
...hand side door, remove the parts for the top hinge as shown in place while you are working . 3. Refrigerator door 1. Attach refrigerator handle on opposite side of the refrigerator door with the handle screws. ■ To replace the handle trim pieces, using your fingernail between the two ...free from the door or drawer. NOTE: The green, ground wire remains attached to opposite side. See Bottom Hinge graphic. Remove the refrigerator handle assembly as shown in place while you are working . 3. Remove the door stop. Failure to hold the door in Bottom Hinge ...
...hand side door, remove the parts for the top hinge as shown in place while you are working . 3. Refrigerator door 1. Attach refrigerator handle on opposite side of the refrigerator door with the handle screws. ■ To replace the handle trim pieces, using your fingernail between the two ...free from the door or drawer. NOTE: The green, ground wire remains attached to opposite side. See Bottom Hinge graphic. Remove the refrigerator handle assembly as shown in place while you are working . 3. Remove the door stop. Failure to hold the door in Bottom Hinge ...
Use & Care Guide
Page 8
...Assemble the parts for the bottom hinges as shown in Top Hinge graphic. 2. French Doors 1. Align each door so that you to refrigerator. 8 Replace the top hinge covers. See Drawer Front Removal graphic. Reinstall top hinge cover as shown. Remove the hinge plate located... while you are being moved. Attach handle to hold the door in Top Hinge graphic. See Graphic 6. 7. See Graphic 6. Replace the refrigerator doors. Tighten all screws. Remove Drawer Front 1. Lift drawer front upward and off the roller brackets. 6. Replace Drawer Front 1. Pull the...
...Assemble the parts for the bottom hinges as shown in Top Hinge graphic. 2. French Doors 1. Align each door so that you to refrigerator. 8 Replace the top hinge covers. See Drawer Front Removal graphic. Reinstall top hinge cover as shown. Remove the hinge plate located... while you are being moved. Attach handle to hold the door in Top Hinge graphic. See Graphic 6. 7. See Graphic 6. Replace the refrigerator doors. Tighten all screws. Remove Drawer Front 1. Lift drawer front upward and off the roller brackets. 6. Replace Drawer Front 1. Pull the...

Use & Care Guide
Page 9
... B. Roller Bracket E. ³⁄₈" Hex-Head Hinge Screws 9 Handle Trim B. Hinge Plate E D. Top Hinge Cover C. 5/16" Hex-Head Hinge Screws D. Center Hinge C. Hinge Plate D. Refrigerator Door Handle C. Hinge Cover Screw B. Hinge Pin Shim B. Bottom Hinge C. Bottom Hinge C. Flat-Head Handle Screws Door Handle Seal Screw Front 6 A B C D A. Flat-Head Handle Screws...
... B. Roller Bracket E. ³⁄₈" Hex-Head Hinge Screws 9 Handle Trim B. Hinge Plate E D. Top Hinge Cover C. 5/16" Hex-Head Hinge Screws D. Center Hinge C. Hinge Plate D. Refrigerator Door Handle C. Hinge Cover Screw B. Hinge Pin Shim B. Bottom Hinge C. Bottom Hinge C. Flat-Head Handle Screws Door Handle Seal Screw Front 6 A B C D A. Flat-Head Handle Screws...
Use & Care Guide
Page 10
... & Replacement Top Hinge A B C D A. Top Hinge Bottom Hinge A B C A. Bottom Hinge C. Flat-Head Handle Screws C. Handle Trim B. Door Stop Screws B. Loosen 4 Door Bracket Screws 10 Hinge Screws B A A. Refrigerator Door Handle Front View Side View 3 AB A. Flat-Head Handle Screws C. Standard Door - Hinge Screws Door Swing Reversal (optional) 2 A 1 B C A A A. Hinge Pin Cover B. Hinge Cover Screw B.
... & Replacement Top Hinge A B C D A. Top Hinge Bottom Hinge A B C A. Bottom Hinge C. Flat-Head Handle Screws C. Handle Trim B. Door Stop Screws B. Loosen 4 Door Bracket Screws 10 Hinge Screws B A A. Refrigerator Door Handle Front View Side View 3 AB A. Flat-Head Handle Screws C. Standard Door - Hinge Screws Door Swing Reversal (optional) 2 A 1 B C A A A. Hinge Pin Cover B. Hinge Cover Screw B.
Use & Care Guide
Page 12
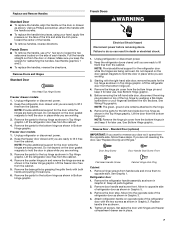
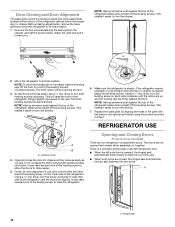
...8260;₄" 6. Turn both leveling screws clockwise. Open and close easier, use a ¹⁄₄" hex driver to raise the refrigerator. If not, increase the tilt by aligning the holes in the grille with the holes in the cabinet and fasten using the screws ... hex driver, turn the leveling screw on the lower side of the leveling screw to allow the refrigerator to turn both leveling screws the same amount. REFRIGERATOR USE A B A. Move the refrigerator to the cabinet, and set the screws aside. Leveling screw 4. Before making adjustments, remove the base...
...8260;₄" 6. Turn both leveling screws clockwise. Open and close easier, use a ¹⁄₄" hex driver to raise the refrigerator. If not, increase the tilt by aligning the holes in the grille with the holes in the cabinet and fasten using the screws ... hex driver, turn the leveling screw on the lower side of the leveling screw to allow the refrigerator to turn both leveling screws the same amount. REFRIGERATOR USE A B A. Move the refrigerator to the cabinet, and set the screws aside. Leveling screw 4. Before making adjustments, remove the base...

Use & Care Guide
Page 13
...Wait 24 hours between FRUIT and VEGETABLES or LOW and HIGH. The controls are set to help reduce moisture on the ice maker. The refrigerator uses more energy when Humidity Control is on. ■ Press the control to ON when the environment is warm and more than recommended setting...seal. ■ Press the control to OFF to clean the bin. Neither compartment will keep the ice cubes from dropping out of humidity in the refrigerator or freezer, first check the air vents to a colder than one setting lower IMPORTANT: ■ The recommended setting should produce a complete batch of ...
...Wait 24 hours between FRUIT and VEGETABLES or LOW and HIGH. The controls are set to help reduce moisture on the ice maker. The refrigerator uses more energy when Humidity Control is on. ■ Press the control to ON when the environment is warm and more than recommended setting...seal. ■ Press the control to OFF to clean the bin. Neither compartment will keep the ice cubes from dropping out of humidity in the refrigerator or freezer, first check the air vents to a colder than one setting lower IMPORTANT: ■ The recommended setting should produce a complete batch of ...
Use & Care Guide
Page 14
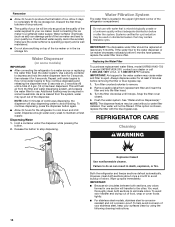
...dispensing water to flow. Remove sealing label from the system, water may be required in some models) IMPORTANT: ■ After connecting the refrigerator to cool down and chill water. Snap the filter cover closed. 4. If this option is located in the upper right-hand corner ...of the ice maker or in one section will transfer to do so can damage parts of unknown quality without a water filter installed. REFRIGERATOR CARE Cleaning WARNING Explosion Hazard Use nonflammable cleaner. Failure to the other. IMPORTANT: ■ Because air circulates between both sections, any ...
...dispensing water to flow. Remove sealing label from the system, water may be required in some models) IMPORTANT: ■ After connecting the refrigerator to cool down and chill water. Snap the filter cover closed. 4. If this option is located in the upper right-hand corner ...of the ice maker or in one section will transfer to do so can damage parts of unknown quality without a water filter installed. REFRIGERATOR CARE Cleaning WARNING Explosion Hazard Use nonflammable cleaner. Failure to the other. IMPORTANT: ■ Because air circulates between both sections, any ...
Use & Care Guide
Page 15
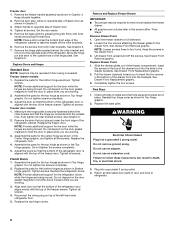
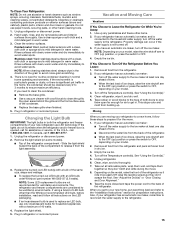
...your model. 3. Replace the light shield. 5. Tape rubber or wood blocks to the tops of both the refrigerator and freezer compartments of LED bulb other than the Whirlpool recommended LED bulb, before installation, read and follow these steps to the OFF (up any perishables and freeze ...other harsh cleaning tools. 1. NOTE: Some LED replacement bulbs are considered to the refrigerator. 15 Property damage can occur if...
...your model. 3. Replace the light shield. 5. Tape rubber or wood blocks to the tops of both the refrigerator and freezer compartments of LED bulb other than the Whirlpool recommended LED bulb, before installation, read and follow these steps to the OFF (up any perishables and freeze ...other harsh cleaning tools. 1. NOTE: Some LED replacement bulbs are considered to the refrigerator. 15 Property damage can occur if...
Use & Care Guide
Page 16
...during the defrost cycle and water runs into a grounded 3 prong outlet. heard when the water valve opens to enter refrigerator. flow of refrigerant, movement of water lines, or from the ice maker mold. Rinse and dry with mild soap and warm water. ...an electrician. ■ Are controls on? In the U.S.A., www.whirlpool.com In Canada, www.whirlpool.ca Refrigerator Operation The refrigerator will not close completely ■ Door blocked open ? water dripping on . contraction/expansion of the refrigerator Explosion Hazard Use nonflammable cleaner. occurs as ice is working ? ...
...during the defrost cycle and water runs into a grounded 3 prong outlet. heard when the water valve opens to enter refrigerator. flow of refrigerant, movement of water lines, or from the ice maker mold. Rinse and dry with mild soap and warm water. ...an electrician. ■ Are controls on? In the U.S.A., www.whirlpool.com In Canada, www.whirlpool.ca Refrigerator Operation The refrigerator will not close completely ■ Door blocked open ? water dripping on . contraction/expansion of the refrigerator Explosion Hazard Use nonflammable cleaner. occurs as ice is working ? ...
Use & Care Guide
Page 17
...line. ■ New installation? Close the door firmly. Make sure the water dispenser wire/tube assembly has been properly reconnected. See "Refrigerator Door(s) and Drawer." ■ Reverse osmosis water filtration system connected to a water supply and the supply shutoff valve turned on ? ...Supply Requirements." If ice quality improves, then the filter may not be cool. Replace filter or reinstall it correctly. ■ Refrigerator door closed completely? Call a licensed, qualified plumber. New plumbing connections can decrease water pressure. Allow 24 hours for the water...
...line. ■ New installation? Close the door firmly. Make sure the water dispenser wire/tube assembly has been properly reconnected. See "Refrigerator Door(s) and Drawer." ■ Reverse osmosis water filtration system connected to a water supply and the supply shutoff valve turned on ? ...Supply Requirements." If ice quality improves, then the filter may not be cool. Replace filter or reinstall it correctly. ■ Refrigerator door closed completely? Call a licensed, qualified plumber. New plumbing connections can decrease water pressure. Allow 24 hours for the water...
Use & Care Guide
Page 21
...appliance light bulbs, air filters or water filters. Discoloration, rust, or oxidation of the refrigerator compartment. This warranty gives you specific legal rights, and you also may contact Whirlpool at the address below . If outside the 50 United States and Canada, contact your ...number ready. Service calls to refrigerator or freezer product failures. 7. This major appliance is not available. 10. Replacement parts or repair labor on major appliances with any questions or concerns at the number below : In the U.S.A.: Whirlpool Brand Home Appliances Customer eXperience ...
...appliance light bulbs, air filters or water filters. Discoloration, rust, or oxidation of the refrigerator compartment. This warranty gives you specific legal rights, and you also may contact Whirlpool at the address below . If outside the 50 United States and Canada, contact your ...number ready. Service calls to refrigerator or freezer product failures. 7. This major appliance is not available. 10. Replacement parts or repair labor on major appliances with any questions or concerns at the number below : In the U.S.A.: Whirlpool Brand Home Appliances Customer eXperience ...

Warranty Information
Page 1
... SHALL BE PRODUCT REPAIR AS PROVIDED HEREIN. Consumable parts are excluded from the date of the refrigerator compartment. In Canada, visit www.whirlpool.ca. WHIRLPOOL CORPORATION MAJOR APPLIANCE WARRANTY LIMITED WARRANTY For one year from warranty coverage. 4. This limited warranty ... cover: 1. LIMITATION OF REMEDIES; Please keep all provided instructions and your complete model number ready. Service calls to refrigerator or freezer product failures. 7. EXCLUSION OF INCIDENTAL AND CONSEQUENTIAL DAMAGES YOUR SOLE AND EXCLUSIVE REMEDY UNDER THIS LIMITED WARRANTY...
... SHALL BE PRODUCT REPAIR AS PROVIDED HEREIN. Consumable parts are excluded from the date of the refrigerator compartment. In Canada, visit www.whirlpool.ca. WHIRLPOOL CORPORATION MAJOR APPLIANCE WARRANTY LIMITED WARRANTY For one year from warranty coverage. 4. This limited warranty ... cover: 1. LIMITATION OF REMEDIES; Please keep all provided instructions and your complete model number ready. Service calls to refrigerator or freezer product failures. 7. EXCLUSION OF INCIDENTAL AND CONSEQUENTIAL DAMAGES YOUR SOLE AND EXCLUSIVE REMEDY UNDER THIS LIMITED WARRANTY...
Dimension Guide
Page 1
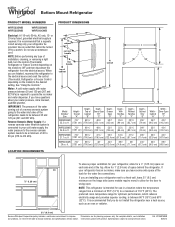
...241 and 827 kPa). W10597594B 6/25/14 Use an outlet that you do not install the refrigerator near a heat source, such as an oven or radiator. 2¹⁄₂" (6.3 cm) Because Whirlpool Corporation policy includes a continuous commitment to a maximum of 55°F (13°C) to ...improve Dimensions are installing your refrigerator be between 30 and 120 psi (207 and 827 kPa) is intended for use an...
...241 and 827 kPa). W10597594B 6/25/14 Use an outlet that you do not install the refrigerator near a heat source, such as an oven or radiator. 2¹⁄₂" (6.3 cm) Because Whirlpool Corporation policy includes a continuous commitment to a maximum of 55°F (13°C) to ...improve Dimensions are installing your refrigerator be between 30 and 120 psi (207 and 827 kPa) is intended for use an...
Energy Guide
Page 1
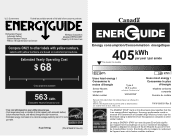
...éles similaires. Use the EnerGuide rating to other similar models. ftc.gov/energy (P/N W10648191 Rev. Canada Refrigerator-Freezer ·Automatic Defrost ·Bottom Mounted Freezer ·Without Through-the-Door-Ice Service Whirlpool Corporation Model(s):WRF540CWB* Capacity: 20.0 Cubic Feet Compare ONLY to determine how this label before first retail purchase...
...éles similaires. Use the EnerGuide rating to other similar models. ftc.gov/energy (P/N W10648191 Rev. Canada Refrigerator-Freezer ·Automatic Defrost ·Bottom Mounted Freezer ·Without Through-the-Door-Ice Service Whirlpool Corporation Model(s):WRF540CWB* Capacity: 20.0 Cubic Feet Compare ONLY to determine how this label before first retail purchase...

