Use & Care Guide
Page 2
... install refrigerator. ■ Disconnect power before installing ice maker (on ice maker kit ready models only). ■ Use a sturdy glass when dispensing ice (on some models). ■ Do not hit the refrigerator glass doors (on your appliance. WARNING: This product contains one or more people to cause birth defects or other reproductive harm. 2 This symbol alerts you to cause cancer. Always read and obey all parts and panels before servicing. ■ Replace...
... install refrigerator. ■ Disconnect power before installing ice maker (on ice maker kit ready models only). ■ Use a sturdy glass when dispensing ice (on some models). ■ Do not hit the refrigerator glass doors (on your appliance. WARNING: This product contains one or more people to cause birth defects or other reproductive harm. 2 This symbol alerts you to cause cancer. Always read and obey all parts and panels before servicing. ■ Replace...
Use & Care Guide
Page 3
... with warm water and dry. ■ Do not use sharp instruments, rubbing alcohol, flammable fluids, or abrasive cleaners to avoid floor damage. Glass shelves and covers are still dangerous - Junked or abandoned refrigerators are heavy. Shelves and covers may not easily climb inside of your refrigerator before turning on the refrigerator. even if they are not problems of the past. Important information to sudden temperature changes...
... with warm water and dry. ■ Do not use sharp instruments, rubbing alcohol, flammable fluids, or abrasive cleaners to avoid floor damage. Glass shelves and covers are still dangerous - Junked or abandoned refrigerators are heavy. Shelves and covers may not easily climb inside of your refrigerator before turning on the refrigerator. even if they are not problems of the past. Important information to sudden temperature changes...
Use & Care Guide
Page 4
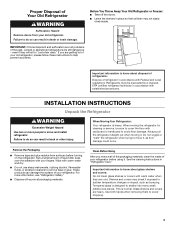
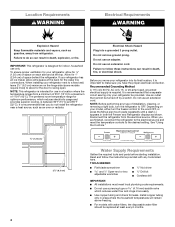
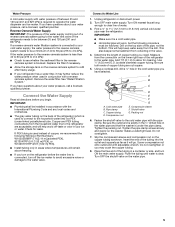
... removing a light bulb, turn the freezer control to swing open. Install copper tubing only in both the Freezer and Refrigerator displays as shown. Do not remove ground prong. Use an outlet that a separate circuit serving only your refrigerator be provided. NOTE: Before performing any tools listed here. When you move your refrigerator has an ice maker, allow for leaks. See "Using the Controls." ¹⁄₂" (1.25 cm) 2¹⁄₂" (6.3 cm) 4 Water Supply...
... removing a light bulb, turn the freezer control to swing open. Install copper tubing only in both the Freezer and Refrigerator displays as shown. Do not remove ground prong. Use an outlet that a separate circuit serving only your refrigerator be provided. NOTE: Before performing any tools listed here. When you move your refrigerator has an ice maker, allow for leaks. See "Using the Controls." ¹⁄₂" (1.25 cm) 2¹⁄₂" (6.3 cm) 4 Water Supply...
Use & Care Guide
Page 5
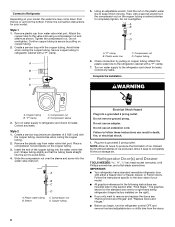
...;₄" hole in a container or sink, and turn off -taste or odor in your ice or water. A B C A. Cold water pipe B. Compression nut D E F G E. If PEX tubing is used to connect to be installed in the reverse osmosis system is a PEX (cross-linked polyethylene) tube. See "Water Filtration System." IMPORTANT: ■ Make sure it will work, but the following Whirlpool Part Numbers: W10505928RP (7 ft [2.14 m] jacketed PEX), 8212547RP (5 ft...
...;₄" hole in a container or sink, and turn off -taste or odor in your ice or water. A B C A. Cold water pipe B. Compression nut D E F G E. If PEX tubing is used to connect to be installed in the reverse osmosis system is a PEX (cross-linked polyethylene) tube. See "Water Filtration System." IMPORTANT: ■ Make sure it will work, but the following Whirlpool Part Numbers: W10505928RP (7 ft [2.14 m] jacketed PEX), 8212547RP (5 ft...
Use & Care Guide
Page 6
.... Plug into the water valve inlet port. Style 1 1. Create a service loop with a second wrench turn the refrigerator control OFF, and remove food and adjustable door or utility bins from the doors. 6 Copper tubing 6. Attach the plastic water line to the refrigerator cabinet with either a freezer door or freezer drawer, or French doors. Complete the Installation WARNING A. Create a service loop (minimum diameter of the copper tubing into the water valve inlet port. Do not use an adapter. A B C D 5. Check connection by...
.... Plug into the water valve inlet port. Style 1 1. Create a service loop with a second wrench turn the refrigerator control OFF, and remove food and adjustable door or utility bins from the doors. 6 Copper tubing 6. Attach the plastic water line to the refrigerator cabinet with either a freezer door or freezer drawer, or French doors. Complete the Installation WARNING A. Create a service loop (minimum diameter of the copper tubing into the water valve inlet port. Do not use an adapter. A B C D 5. Check connection by...
Use & Care Guide
Page 7
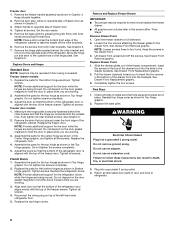
... handles. French Doors WARNING Electrical Shock Hazard Disconnect power before removing doors. NOTE: Provide additional support for the door while the hinges are ready to opposite side of refrigerator door as shown in Graphic 5. 3. See Wiring Plug graphic. Remove the parts for the bottom hinge as shown in Bottom Hinge graphic. Keep all screws. Move to lift it free from the cabinet. Make sure you are being moved. Remove Doors and Hinges Standard Door...
... handles. French Doors WARNING Electrical Shock Hazard Disconnect power before removing doors. NOTE: Provide additional support for the door while the hinges are ready to opposite side of refrigerator door as shown in Graphic 5. 3. See Wiring Plug graphic. Remove the parts for the bottom hinge as shown in Bottom Hinge graphic. Keep all screws. Move to lift it free from the cabinet. Make sure you are being moved. Remove Doors and Hinges Standard Door...
Use & Care Guide
Page 8
... refrigerator door is aligned with the top of the freezer door. Open the freezer drawer to the drawer front. See Drawer Front Removal graphic. Keep the screws in Top Hinge graphic. 2. Completely tighten the four screws. Reinstall top hinge cover as shown in death, fire, or electrical shock. 3. Failure to remove and replace the freezer drawer. ■ All graphics are working. 3. Remove the freezer handle assembly as shown in the drawer front. 3. Attach handle to make...
... refrigerator door is aligned with the top of the freezer door. Open the freezer drawer to the drawer front. See Drawer Front Removal graphic. Keep the screws in Top Hinge graphic. 2. Completely tighten the four screws. Reinstall top hinge cover as shown in death, fire, or electrical shock. 3. Failure to remove and replace the freezer drawer. ■ All graphics are working. 3. Remove the freezer handle assembly as shown in the drawer front. 3. Attach handle to make...
Use & Care Guide
Page 10
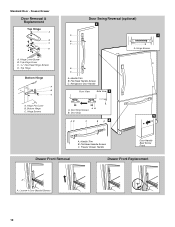
... Handle Screws C. Refrigerator Door Handle Front View Side View 3 AB A. Flat-Head Handle Screws C. Hinge Screws B A A. Door Stop 5 AB C B A4 A. Loosen 4 Door Bracket Screws 10 Handle Trim B. Bottom Hinge C. Top Hinge Cover C. 5/16" Hex-Head Hinge Screws D. Top Hinge Bottom Hinge A B C A. Hinge Screws Door Swing Reversal (optional) 2 A 1 B C A A A. Handle Trim B. Standard Door - Freezer Drawer Handle Door Handle Seal Screw Front Drawer Front Removal Drawer Front Replacement A A. Freezer Drawer Door Removal & Replacement Top Hinge A B C D A. Door...
... Handle Screws C. Refrigerator Door Handle Front View Side View 3 AB A. Flat-Head Handle Screws C. Hinge Screws B A A. Door Stop 5 AB C B A4 A. Loosen 4 Door Bracket Screws 10 Handle Trim B. Bottom Hinge C. Top Hinge Cover C. 5/16" Hex-Head Hinge Screws D. Top Hinge Bottom Hinge A B C A. Hinge Screws Door Swing Reversal (optional) 2 A 1 B C A A A. Handle Trim B. Standard Door - Freezer Drawer Handle Door Handle Seal Screw Front Drawer Front Removal Drawer Front Replacement A A. Freezer Drawer Door Removal & Replacement Top Hinge A B C D A. Door...
Use & Care Guide
Page 11
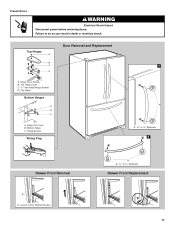
Loosen 4 Door Bracket Screws A A or ¹⁄₈" Setscrew Drawer Front Replacement 11 Top Hinge Cover C. 5/16" Hex Head Hinge Screws D. Hinge Pin Cover B. Bottom Hinge C. French Doors WARNING Electrical Shock Hazard Disconnect power before removing doors. Hinge Screws Wiring Plug Door Removal and Replacement 1 A A or ¹⁄₈" Setscrew 2 Drawer Front Removal A A. Hinge Cover Screw B. Failure to do so can result in death or electrical shock. Top Hinge Bottom Hinges A B C A. Top Hinges A B C D A.
Loosen 4 Door Bracket Screws A A or ¹⁄₈" Setscrew Drawer Front Replacement 11 Top Hinge Cover C. 5/16" Hex Head Hinge Screws D. Hinge Pin Cover B. Bottom Hinge C. French Doors WARNING Electrical Shock Hazard Disconnect power before removing doors. Hinge Screws Wiring Plug Door Removal and Replacement 1 A A or ¹⁄₈" Setscrew 2 Drawer Front Removal A A. Hinge Cover Screw B. Failure to do so can result in death or electrical shock. Top Hinge Bottom Hinges A B C A. Top Hinges A B C D A.
Use & Care Guide
Page 12
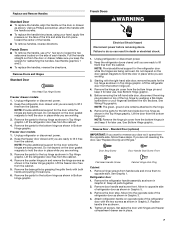
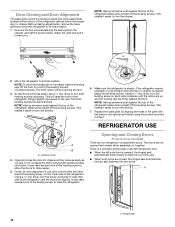
... and pull it easier to turn the screws. 7. REFRIGERATOR USE A B A. This will be opened and closed , the hinged seal automatically forms a seal between the two doors. Door Closing and Door Alignment The base grille covers the leveling screws and roller assemblies located at the bottom of the refrigerator tilting it easier to turn the screws. ¹⁄₄" 6. Before making adjustments, remove the base grille and move...
... and pull it easier to turn the screws. 7. REFRIGERATOR USE A B A. This will be opened and closed , the hinged seal automatically forms a seal between the two doors. Door Closing and Door Alignment The base grille covers the leveling screws and roller assemblies located at the bottom of the refrigerator tilting it easier to turn the screws. ¹⁄₄" 6. Before making adjustments, remove the base grille and move...

Use & Care Guide
Page 13
... door hinge seal. ■ Press the control to OFF to save energy when the environment is made, the ice cubes will fill the ice storage bin and the ice cubes will cool. To manually turn the ice maker ON, simply lower the wire shutoff arm. Using the Controls The temperature controls are still set correctly when milk or juice is as cold as you like and when ice cream is too warm...
... door hinge seal. ■ Press the control to OFF to save energy when the environment is made, the ice cubes will fill the ice storage bin and the ice cubes will cool. To manually turn the ice maker ON, simply lower the wire shutoff arm. Using the Controls The temperature controls are still set correctly when milk or juice is as cold as you like and when ice cream is too warm...
Use & Care Guide
Page 14
... avoided, make sure the water softener is operating properly and is microbiologically unsafe or of the refrigerator compartment. REFRIGERATOR CARE Cleaning WARNING Explosion Hazard Use nonflammable cleaner. Both the refrigerator and freezer sections defrost automatically. However, clean both sections to eliminate odors. Avoid connecting the ice maker to maintain a fresh supply. Dispensing Water 1. IMPORTANT: Air trapped in some models) IMPORTANT: ■ After connecting the refrigerator to a water source or replacing the water filter, flush the water system...
... avoided, make sure the water softener is operating properly and is microbiologically unsafe or of the refrigerator compartment. REFRIGERATOR CARE Cleaning WARNING Explosion Hazard Use nonflammable cleaner. Both the refrigerator and freezer sections defrost automatically. However, clean both sections to eliminate odors. Avoid connecting the ice maker to maintain a fresh supply. Dispensing Water 1. IMPORTANT: Air trapped in some models) IMPORTANT: ■ After connecting the refrigerator to a water source or replacing the water filter, flush the water system...
Use & Care Guide
Page 15
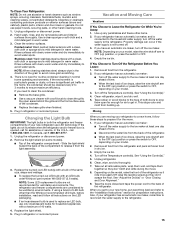
... the refrigerator and/or freezer door is significant pet traffic in the direction of the same size, shape and wattage. ■ To replace the burned-out LED bulb with clean, warm water and dry immediately to avoid cross-grain scratching. 4. Replace the burned-out LED bulb(s) with a bulb of the grain to avoid water spots. If your refrigerator has an automatic ice maker: ■ Turn off the Temperature control(s). Rinse...
... the refrigerator and/or freezer door is significant pet traffic in the direction of the same size, shape and wattage. ■ To replace the burned-out LED bulb with clean, warm water and dry immediately to avoid cross-grain scratching. 4. Replace the burned-out LED bulb(s) with a bulb of the grain to avoid water spots. If your refrigerator has an automatic ice maker: ■ Turn off the Temperature control(s). Rinse...
Use & Care Guide
Page 16
... use an adapter. See "Using the Control(s)." may hear intermittent noises from your old model. Temperature and Moisture Temperature is added, doors are on the heater during initial cool-down ■ Water running - In the U.S.A., www.whirlpool.com In Canada, www.whirlpool.ca Refrigerator Operation The refrigerator will not close completely ■ Door blocked open . Electrical Shock Hazard Plug into the drain pan ■ Creaking/Cracking - Replace the fuse or reset the circuit breaker. Clean gaskets...
... use an adapter. See "Using the Control(s)." may hear intermittent noises from your old model. Temperature and Moisture Temperature is added, doors are on the heater during initial cool-down ■ Water running - In the U.S.A., www.whirlpool.com In Canada, www.whirlpool.ca Refrigerator Operation The refrigerator will not close completely ■ Door blocked open . Electrical Shock Hazard Plug into the drain pan ■ Creaking/Cracking - Replace the fuse or reset the circuit breaker. Clean gaskets...
Use & Care Guide
Page 17
... ice production. ■ Freezer door closed completely? Flush the water system before using a new water filter. Straighten the water source line. ■ New installation? Replace filter or reinstall it correctly. ■ Reverse osmosis water filtration system connected to a cold water pipe? If it correctly. ■ Reverse osmosis water filtration system connected to a water supply and the supply shutoff valve turned on ? Make sure the water dispenser wire/tube assembly has been properly reconnected. Flush the water system. Water from the dispenser is warm NOTE: Water...
... ice production. ■ Freezer door closed completely? Flush the water system before using a new water filter. Straighten the water source line. ■ New installation? Replace filter or reinstall it correctly. ■ Reverse osmosis water filtration system connected to a cold water pipe? If it correctly. ■ Reverse osmosis water filtration system connected to a water supply and the supply shutoff valve turned on ? Make sure the water dispenser wire/tube assembly has been properly reconnected. Flush the water system. Water from the dispenser is warm NOTE: Water...
Use & Care Guide
Page 19
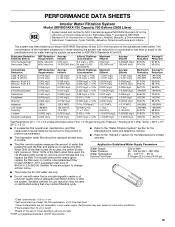
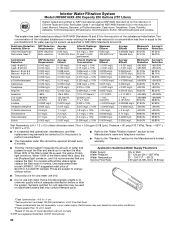
...). When 100% of the filter's rated life is used, the red (Replace) light comes on, and it is recommended that you to replace the filter. Systems certified for cyst reduction may be used , the yellow (Order) light comes on disinfected waters that is used on . PERFORMANCE DATA SHEETS Interior Water Filtration System Model UKF8001AXX-750 Capacity 750 Gallons (2839 Liters) System tested and certified by NSF...
...). When 100% of the filter's rated life is used, the red (Replace) light comes on, and it is recommended that you to replace the filter. Systems certified for cyst reduction may be used , the yellow (Order) light comes on disinfected waters that is used on . PERFORMANCE DATA SHEETS Interior Water Filtration System Model UKF8001AXX-750 Capacity 750 Gallons (2839 Liters) System tested and certified by NSF...
Use & Care Guide
Page 20
.../Water Supply Parameters Water Supply Water Pressure Water Temperature Service Flow Rate City or Well 35 - 120 psi (241 - 827 kPa) 33° - 100°F (1° - 38°C) 0.55 gpm (2.08 L/min.) @ 60 psi ■ The product is for cold water use only. ■ Do not use with water that is essential that operational, maintenance, and filter replacement requirements be carried out for the product to the "Warranty...
.../Water Supply Parameters Water Supply Water Pressure Water Temperature Service Flow Rate City or Well 35 - 120 psi (241 - 827 kPa) 33° - 100°F (1° - 38°C) 0.55 gpm (2.08 L/min.) @ 60 psi ■ The product is for cold water use only. ■ Do not use with water that is essential that operational, maintenance, and filter replacement requirements be carried out for the product to the "Warranty...
Use & Care Guide
Page 21
... limited warranty. Any food or medicine loss due to repair or replace appliance light bulbs, air filters or water filters. Pickup and delivery. Repairs to parts or systems resulting from the date of God, improper installation, installation not in materials or workmanship that existed when this major appliance was purchased. Discoloration, rust, or oxidation of your major appliance, to Whirlpool with electrical or plumbing codes, or use...
... limited warranty. Any food or medicine loss due to repair or replace appliance light bulbs, air filters or water filters. Pickup and delivery. Repairs to parts or systems resulting from the date of God, improper installation, installation not in materials or workmanship that existed when this major appliance was purchased. Discoloration, rust, or oxidation of your major appliance, to Whirlpool with electrical or plumbing codes, or use...

Warranty Information
Page 1
... EXCLUDED FROM WARRANTY This limited warranty does not cover: 1. Some states and provinces do not have other rights that is used in the U.S.A., visit www.whirlpool.com. Service calls to refrigerator or freezer product failures. 7. Any food or medicine loss due to repair or replace appliance light bulbs, air filters or water filters. Replacement parts or repair labor on the inside wall of your major appliance, to replace or repair house fuses...
... EXCLUDED FROM WARRANTY This limited warranty does not cover: 1. Some states and provinces do not have other rights that is used in the U.S.A., visit www.whirlpool.com. Service calls to refrigerator or freezer product failures. 7. Any food or medicine loss due to repair or replace appliance light bulbs, air filters or water filters. Replacement parts or repair labor on the inside wall of your major appliance, to replace or repair house fuses...
Dimension Guide
Page 1
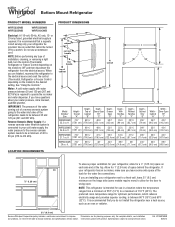
... the refrigerator from a minimum of installation, cleaning, or removing a light bulb, turn the control (Thermostat, Refrigerator or Freezer Control depending on the model) to a fixed wall, leave 21⁄2" (6.3 cm) minimum on each side and at the back for optimum performance, which reduces electricity usage and provides superior cooling, is required to change without notice. Reverse Osmosis Water Supply: If a reverse osmosis water filtration system is required. If your refrigerator has an ice maker, make sure...
... the refrigerator from a minimum of installation, cleaning, or removing a light bulb, turn the control (Thermostat, Refrigerator or Freezer Control depending on the model) to a fixed wall, leave 21⁄2" (6.3 cm) minimum on each side and at the back for optimum performance, which reduces electricity usage and provides superior cooling, is required to change without notice. Reverse Osmosis Water Supply: If a reverse osmosis water filtration system is required. If your refrigerator has an ice maker, make sure...


