Use & Care Guide
Page 4
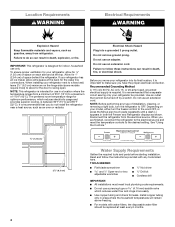
... of space on each side and at the top. The preferred room temperature range for optimum performance, which reduces water flow and clogs more ) to allow for leaks. Before you have the proper electrical connection. Disconnect the refrigerator from refrigerator. See "Using the Controls." ¹...;⁄₂" (1.25 cm) 2¹⁄₂" (6.3 cm) 4 Water Supply Requirements Gather the required tools and parts before...
... of space on each side and at the top. The preferred room temperature range for optimum performance, which reduces water flow and clogs more ) to allow for leaks. Before you have the proper electrical connection. Disconnect the refrigerator from refrigerator. See "Using the Controls." ¹...;⁄₂" (1.25 cm) 2¹⁄₂" (6.3 cm) 4 Water Supply Requirements Gather the required tools and parts before...
Use & Care Guide
Page 5
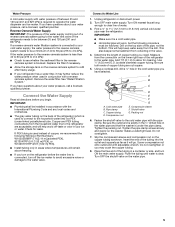
... the storage tank on the back of between 35 and 120 psi (241 and 827 kPa). If PEX tubing is a cold water pipe. ■ Horizontal pipe will work, but the following Whirlpool Part Numbers: W10505928RP (7 ft [2.14 m] jacketed PEX), 8212547RP (5 ft [1.52 m] PEX), or W10267701RP (25 ft [7.62 m] PEX..., it will remain above freezing. ■ If you have questions about your ice or water. Find a ¹⁄₂" to 1¹⁄₄" (12.7 mm to allow for leaks. Using a cordless drill, drill a ¹⁄₄" hole in a container or sink, and turn on the top side ...
... the storage tank on the back of between 35 and 120 psi (241 and 827 kPa). If PEX tubing is a cold water pipe. ■ Horizontal pipe will work, but the following Whirlpool Part Numbers: W10505928RP (7 ft [2.14 m] jacketed PEX), 8212547RP (5 ft [1.52 m] PEX), or W10267701RP (25 ft [7.62 m] PEX..., it will remain above freezing. ■ If you have questions about your ice or water. Find a ¹⁄₂" to 1¹⁄₄" (12.7 mm to allow for leaks. Using a cordless drill, drill a ¹⁄₄" hole in a container or sink, and turn on the top side ...
Use & Care Guide
Page 6
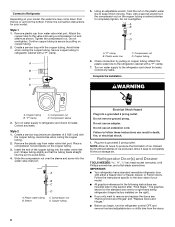
...clamp. A B C D A. Copper tubing 6. Place a compression nut and sleeve on water supply to the refrigerator and check for leaks. Discard the first three batches of ice. Remove plastic cap from water valve inlet port. Do not overtighten. Secure copper tubing to refrigerator cabinet with a second wrench... door or utility bins from the doors. 6 Copper tubing B. Compression sleeve 3. Correct any leaks. Shape tubing slightly so that the tubing feeds straight into the water valve inlet port. Failure to follow these instructions can result in this section after "Final Steps...
...clamp. A B C D A. Copper tubing 6. Place a compression nut and sleeve on water supply to the refrigerator and check for leaks. Discard the first three batches of ice. Remove plastic cap from water valve inlet port. Do not overtighten. Secure copper tubing to refrigerator cabinet with a second wrench... door or utility bins from the doors. 6 Copper tubing B. Compression sleeve 3. Correct any leaks. Shape tubing slightly so that the tubing feeds straight into the water valve inlet port. Failure to follow these instructions can result in this section after "Final Steps...
Use & Care Guide
Page 17
... operate properly ■ Refrigerator connected to a cold water pipe? The water dispenser will not close the freezer compartment door. Water is leaking from the dispenser is in the water source line? Flush the water system. Remove filter and operate ice maker. A water filter may not be clogged or incorrectly installed. Water from the dispenser is an indication of...
... operate properly ■ Refrigerator connected to a cold water pipe? The water dispenser will not close the freezer compartment door. Water is leaking from the dispenser is in the water source line? Flush the water system. Remove filter and operate ice maker. A water filter may not be clogged or incorrectly installed. Water from the dispenser is an indication of...


