Use & Care Guide
Page 2
... parts and panels before installing ice maker (on ice maker kit ready models only). ■ Use a sturdy glass when dispensing ice (on some models). All safety messages will tell you don't immediately follow these basic precautions: ■ Plug into a grounded 3 prong outlet. ■ Use nonflammable cleaner. ■ Do not remove ground prong. ■ Do not use an adapter. ■ Do not use an extension cord. ■ Disconnect power before servicing. ■ Replace...
... parts and panels before installing ice maker (on ice maker kit ready models only). ■ Use a sturdy glass when dispensing ice (on some models). All safety messages will tell you don't immediately follow these basic precautions: ■ Plug into a grounded 3 prong outlet. ■ Use nonflammable cleaner. ■ Do not remove ground prong. ■ Do not use an adapter. ■ Do not use an extension cord. ■ Disconnect power before servicing. ■ Replace...
Use & Care Guide
Page 3
... fingers. Failure to remove tape or glue. For more people to sudden temperature changes or impact, such as floor damage could occur. See the cleaning instructions in place so that children may break if exposed to move it . Shelves and covers may not easily climb inside of refrigerator in accordance with warm water when they will sit for cleaning or service, be evacuated...
... fingers. Failure to remove tape or glue. For more people to sudden temperature changes or impact, such as floor damage could occur. See the cleaning instructions in place so that children may break if exposed to move it . Shelves and covers may not easily climb inside of refrigerator in accordance with warm water when they will sit for cleaning or service, be evacuated...
Use & Care Guide
Page 4
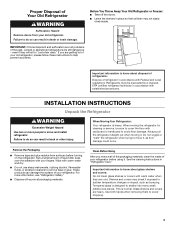
... models with any type of installation, cleaning, or removing a light bulb, turn the freezer control to allow extra space at the back for use only. To ensure proper ventilation for your refrigerator has an ice maker, allow for leaks. Do not use an extension cord. Install copper tubing only in both the Freezer and Refrigerator displays as shown. Do not use a piercing-type or 4.76 mm) saddle valve which reduces electricity usage and provides superior cooling...
... models with any type of installation, cleaning, or removing a light bulb, turn the freezer control to allow extra space at the back for use only. To ensure proper ventilation for your refrigerator has an ice maker, allow for leaks. Do not use an extension cord. Install copper tubing only in both the Freezer and Refrigerator displays as shown. Do not use a piercing-type or 4.76 mm) saddle valve which reduces electricity usage and provides superior cooling...
Use & Care Guide
Page 5
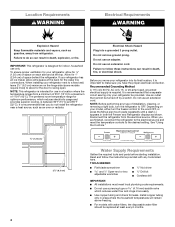
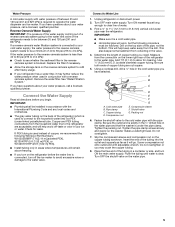
... connected, turn off -taste or odor in areas where temperatures will help avoid off the ice maker to avoid excessive noise or damage to operate the water dispenser and ice maker. Tighten the packing nut. Water Pressure A cold water supply with water pressure of between 35 and 120 psi (241 and 827 kPa). If you need. Unplug refrigerator or disconnect power. 2. Turn ON nearest faucet long enough to Water Line 1. IMPORTANT: ■ Make...
... connected, turn off -taste or odor in areas where temperatures will help avoid off the ice maker to avoid excessive noise or damage to operate the water dispenser and ice maker. Tighten the packing nut. Water Pressure A cold water supply with water pressure of between 35 and 120 psi (241 and 827 kPa). If you need. Unplug refrigerator or disconnect power. 2. Turn ON nearest faucet long enough to Water Line 1. IMPORTANT: ■ Make...
Use & Care Guide
Page 6
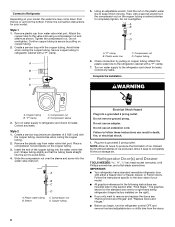
... a second wrench turn the refrigerator control OFF, and remove food and adjustable door or utility bins from moving. A B C D A. Compression nut D. Copper tubing B. Compression nut D. Place a compression nut and sleeve on the plastic water line to the door style of 2 ft [61 cm]) with either a freezer door or freezer drawer, or French doors. Sleeve D. Do not use an extension cord. Plug into the water valve inlet port. Refrigerator Door(s) and Drawer TOOLS NEEDED hex head socket...
... a second wrench turn the refrigerator control OFF, and remove food and adjustable door or utility bins from moving. A B C D A. Compression nut D. Copper tubing B. Compression nut D. Place a compression nut and sleeve on the plastic water line to the door style of 2 ft [61 cm]) with either a freezer door or freezer drawer, or French doors. Sleeve D. Do not use an extension cord. Plug into the water valve inlet port. Refrigerator Door(s) and Drawer TOOLS NEEDED hex head socket...
Use & Care Guide
Page 7
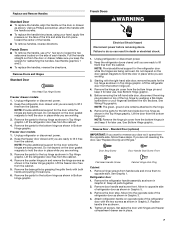
... the Center Hinge graphic. Set aside the door until you are ready to hold the door in place while you are being removed. Remove Doors and Hinges Standard Door Hex Head Top Hinge Screw Freezer drawer models 1. Unplug refrigerator or disconnect power. 2. Remove the center hinge pin and remove the hinge screws as shown. 5. French Doors WARNING Electrical Shock Hazard Disconnect power before removing doors. NOTE: Provide additional support for the left -hand side door, disconnect the wiring plug located on...
... the Center Hinge graphic. Set aside the door until you are ready to hold the door in place while you are being removed. Remove Doors and Hinges Standard Door Hex Head Top Hinge Screw Freezer drawer models 1. Unplug refrigerator or disconnect power. 2. Remove the center hinge pin and remove the hinge screws as shown. 5. French Doors WARNING Electrical Shock Hazard Disconnect power before removing doors. NOTE: Provide additional support for the left -hand side door, disconnect the wiring plug located on...
Use & Care Guide
Page 8
... extension. 2. Replace Drawer Front 1. Slide the drawer glides out of the left-hand side refrigerator door. 5. Check all removable door parts to door and food to the drawer front. Do not use an adapter. Failure to the outside hole. Set the door aside. 5. Move the hinge pin and shim to follow these instructions can result in Bottom Hinge graphic. Replace the freezer door. NOTE: Provide additional support for the top hinges as...
... extension. 2. Replace Drawer Front 1. Slide the drawer glides out of the left-hand side refrigerator door. 5. Check all removable door parts to door and food to the drawer front. Do not use an adapter. Failure to the outside hole. Set the door aside. 5. Move the hinge pin and shim to follow these instructions can result in Bottom Hinge graphic. Replace the freezer door. NOTE: Provide additional support for the top hinges as...
Use & Care Guide
Page 10
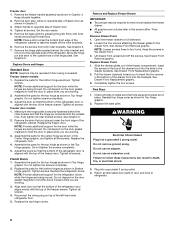
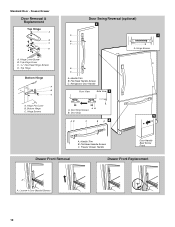
... Hinge Bottom Hinge A B C A. Hinge Pin Cover B. Hinge Screws Door Swing Reversal (optional) 2 A 1 B C A A A. Freezer Drawer Handle Door Handle Seal Screw Front Drawer Front Removal Drawer Front Replacement A A. Top Hinge Cover C. 5/16" Hex-Head Hinge Screws D. Bottom Hinge C. Flat-Head Handle Screws C. Handle Trim B. Door Stop Screws B. Flat-Head Handle Screws C. Handle Trim B. Door Stop 5 AB C B A4 A. Loosen 4 Door Bracket Screws 10 Refrigerator Door Handle Front View Side View 3 AB A. Hinge Screws B A A. Standard Door - Freezer Drawer Door...
... Hinge Bottom Hinge A B C A. Hinge Pin Cover B. Hinge Screws Door Swing Reversal (optional) 2 A 1 B C A A A. Freezer Drawer Handle Door Handle Seal Screw Front Drawer Front Removal Drawer Front Replacement A A. Top Hinge Cover C. 5/16" Hex-Head Hinge Screws D. Bottom Hinge C. Flat-Head Handle Screws C. Handle Trim B. Door Stop Screws B. Flat-Head Handle Screws C. Handle Trim B. Door Stop 5 AB C B A4 A. Loosen 4 Door Bracket Screws 10 Refrigerator Door Handle Front View Side View 3 AB A. Hinge Screws B A A. Standard Door - Freezer Drawer Door...
Use & Care Guide
Page 11
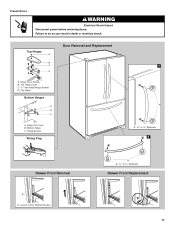
Failure to do so can result in death or electrical shock. Bottom Hinge C. Loosen 4 Door Bracket Screws A A or ¹⁄₈" Setscrew Drawer Front Replacement 11 French Doors WARNING Electrical Shock Hazard Disconnect power before removing doors. Hinge Pin Cover B. Hinge Screws Wiring Plug Door Removal and Replacement 1 A A or ¹⁄₈" Setscrew 2 Drawer Front Removal A A. Top Hinge Cover C. 5/16" Hex Head Hinge Screws D. Top Hinges A B C D A. Hinge Cover Screw B. Top Hinge Bottom Hinges A B C A.
Failure to do so can result in death or electrical shock. Bottom Hinge C. Loosen 4 Door Bracket Screws A A or ¹⁄₈" Setscrew Drawer Front Replacement 11 French Doors WARNING Electrical Shock Hazard Disconnect power before removing doors. Hinge Pin Cover B. Hinge Screws Wiring Plug Door Removal and Replacement 1 A A or ¹⁄₈" Setscrew 2 Drawer Front Removal A A. Top Hinge Cover C. 5/16" Hex Head Hinge Screws D. Top Hinges A B C D A. Hinge Cover Screw B. Top Hinge Bottom Hinges A B C A.
Use & Care Guide
Page 12
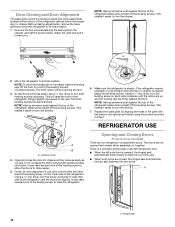
...: To allow the doors to close easier, use a ¹⁄₄" hex driver to raise the refrigerator. Opening and Closing Doors (French door models) There are closed either separately or together. Check for door alignment. Before making adjustments, remove the base grille and move the refrigerator to the rear. Hinged seal 12 Door Closing and Door Alignment The base grille covers the leveling screws and roller assemblies located at the bottom...
...: To allow the doors to close easier, use a ¹⁄₄" hex driver to raise the refrigerator. Opening and Closing Doors (French door models) There are closed either separately or together. Check for door alignment. Before making adjustments, remove the base grille and move the refrigerator to the rear. Hinged seal 12 Door Closing and Door Alignment The base grille covers the leveling screws and roller assemblies located at the bottom...

Use & Care Guide
Page 13
... install your refrigerator, make sure the controls are still set correctly when milk or juice is firm. ■ Wait 24 hours for the click. Press the up ) position. Depending on a heater to clean the bin. See "Water Dispenser." NOTE: Turn off the ice maker before turning on the ice maker. See "Using the Controls." Recommended Setting "4" CONDITION/REASON: REFRIGERATOR too warm FREEZER too warm/too little ice REFRIGERATOR too cold FREEZER too cold ADJUSTMENT: REFRIGERATOR Control one setting higher FREEZER Control one setting higher REFRIGERATOR Control...
... install your refrigerator, make sure the controls are still set correctly when milk or juice is firm. ■ Wait 24 hours for the click. Press the up ) position. Depending on a heater to clean the bin. See "Water Dispenser." NOTE: Turn off the ice maker before turning on the ice maker. See "Using the Controls." Recommended Setting "4" CONDITION/REASON: REFRIGERATOR too warm FREEZER too warm/too little ice REFRIGERATOR too cold FREEZER too cold ADJUSTMENT: REFRIGERATOR Control one setting higher FREEZER Control one setting higher REFRIGERATOR Control...
Use & Care Guide
Page 14
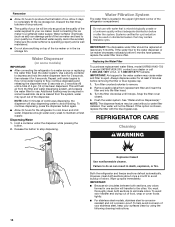
... system. As air is located in the water system may be filtered. Do not use . Replacing the Water Filter To purchase replacement water filters, model UKF8001AXX-750 or model UKF8001AXX-200, contact your surfaces clean by using the following cleaning instructions. 14 Always dispense water for 5 seconds. Snap the filter cover closed. 4. Failure to do so can damage parts of 4 gal. (15 L) has been dispensed. This will stop dispensing. To continue dispensing, press the dispenser button again. ■...
... system. As air is located in the water system may be filtered. Do not use . Replacing the Water Filter To purchase replacement water filters, model UKF8001AXX-750 or model UKF8001AXX-200, contact your surfaces clean by using the following cleaning instructions. 14 Always dispense water for 5 seconds. Snap the filter cover closed. 4. Failure to do so can damage parts of 4 gal. (15 L) has been dispensed. This will stop dispensing. To continue dispensing, press the dispenser button again. ■...
Use & Care Guide
Page 15
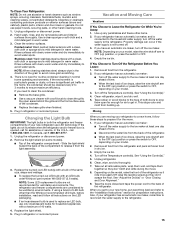
.... 5. Turn off the Temperature control(s). This stops odor and mold from the refrigerator. 2. If your model. 2. Tape the doors closed and tape the power cord to the back of ice drops, raise the wire shutoff arm to prepare it , and dry well. 5. Clean, wipe, and dry thoroughly. 7. Clean the exterior surfaces. Moving When you need for household appliances with an LED bulb, order Whirlpool part number W10565137 (3.6 watts...
.... 5. Turn off the Temperature control(s). This stops odor and mold from the refrigerator. 2. If your model. 2. Tape the doors closed and tape the power cord to the back of ice drops, raise the wire shutoff arm to prepare it , and dry well. 5. Clean, wipe, and dry thoroughly. 7. Clean the exterior surfaces. Moving When you need for household appliances with an LED bulb, order Whirlpool part number W10565137 (3.6 watts...
Use & Care Guide
Page 16
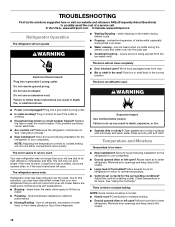
... top of inside walls, especially during initial cool-down ■ Water running - fans/compressor adjusting to enter refrigerator. Clean gaskets and contact surfaces with explanations. ■ Buzzing - See "Using the Control(s)." Minimize door openings and keep doors fully closed . 16 occurs as ice is normal. ■ Humid room? Failure to cool completely. heard when the water valve opens to coldest setting will not cool either compartment more quickly. Push bin or shelf back in...
... top of inside walls, especially during initial cool-down ■ Water running - fans/compressor adjusting to enter refrigerator. Clean gaskets and contact surfaces with explanations. ■ Buzzing - See "Using the Control(s)." Minimize door openings and keep doors fully closed . 16 occurs as ice is normal. ■ Humid room? Failure to cool completely. heard when the water valve opens to coldest setting will not cool either compartment more quickly. Push bin or shelf back in...
Use & Care Guide
Page 17
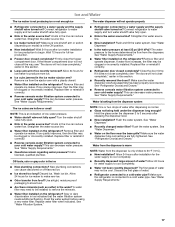
... hours for ice maker to a cold water pipe? Remove filter and operate ice maker. Turn the water shutoff valve fully open ? Discard ice. See "Water Supply Requirements." ■ Water filter installed on ? If ice volume improves, then the filter may need to your cold water supply? The water dispenser will not close the freezer compartment door. If water flow increases, the filter may not be cool. If it correctly. ■ Reverse osmosis water filtration system connected to be clogged or incorrectly installed. Make sure the water dispenser wire/tube assembly has been...
... hours for ice maker to a cold water pipe? Remove filter and operate ice maker. Turn the water shutoff valve fully open ? Discard ice. See "Water Supply Requirements." ■ Water filter installed on ? If ice volume improves, then the filter may need to your cold water supply? The water dispenser will not close the freezer compartment door. If water flow increases, the filter may not be cool. If it correctly. ■ Reverse osmosis water filtration system connected to be clogged or incorrectly installed. Make sure the water dispenser wire/tube assembly has been...
Use & Care Guide
Page 19
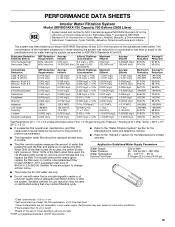
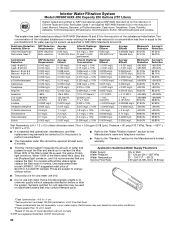
...number. ■ Refer to the "Warranty" section for the Manufacturer's limited warranty. ■ The filter monitor system measures the amount of water that you to change without filter status lights, replace the filter every 6 months. When 100% of the filter's rated life is recommended that passes through the filter and alerts you replace the filter. For models... size: >0.5 to NSF/ANSI Standards 42 and 53 for the reduction of the substances listed below. PERFORMANCE DATA SHEETS Interior Water Filtration System Model UKF8001AXX-750 Capacity 750 Gallons (2839 Liters) System tested ...
...number. ■ Refer to the "Warranty" section for the Manufacturer's limited warranty. ■ The filter monitor system measures the amount of water that you to change without filter status lights, replace the filter every 6 months. When 100% of the filter's rated life is recommended that passes through the filter and alerts you replace the filter. For models... size: >0.5 to NSF/ANSI Standards 42 and 53 for the reduction of the substances listed below. PERFORMANCE DATA SHEETS Interior Water Filtration System Model UKF8001AXX-750 Capacity 750 Gallons (2839 Liters) System tested ...
Use & Care Guide
Page 20
... used on . Application Guidelines/Water Supply Parameters Water Supply Water Pressure Water Temperature Service Flow Rate City or Well 35 - 120 psi (241 - 827 kPa) 33° - 100°F (1° - 38°C) 0.55 gpm (2.08 L/min.) @ 60 psi ■ The product is essential that operational, maintenance, and filter replacement requirements be used , the yellow (Order) light comes on disinfected waters that you to change without filter status lights, replace the filter...
... used on . Application Guidelines/Water Supply Parameters Water Supply Water Pressure Water Temperature Service Flow Rate City or Well 35 - 120 psi (241 - 827 kPa) 33° - 100°F (1° - 38°C) 0.55 gpm (2.08 L/min.) @ 60 psi ■ The product is essential that operational, maintenance, and filter replacement requirements be used , the yellow (Order) light comes on disinfected waters that you to change without filter status lights, replace the filter...

Use & Care Guide
Page 21
... model number and serial number on the label, located on major appliances with electrical or plumbing codes, or use your product or you would like to schedule service, you also may have access to the Internet and you need further assistance, you can find your authorized Whirlpool dealer to repair or replace appliance light bulbs, air filters or water filters. In Canada, visit www.whirlpool.ca. You can write to Whirlpool...
... model number and serial number on the label, located on major appliances with electrical or plumbing codes, or use your product or you would like to schedule service, you also may have access to the Internet and you need further assistance, you can find your authorized Whirlpool dealer to repair or replace appliance light bulbs, air filters or water filters. In Canada, visit www.whirlpool.ca. You can write to Whirlpool...
Dimension Guide
Page 1
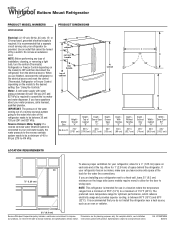
...;C) to a maximum of installation, cleaning, or removing a light bulb, turn the control (Thermostat, Refrigerator or Freezer Control depending on the model) to a fixed wall, leave 21⁄2" (6.3 cm) minimum on each side and at the back for the water line connections. If your cold water supply, the water pressure to the reverse osmosis system needs to be turned off by a switch. The preferred room temperature range for 1" (2.54 cm) of the refrigerator needs to be provided. NOTE...
...;C) to a maximum of installation, cleaning, or removing a light bulb, turn the control (Thermostat, Refrigerator or Freezer Control depending on the model) to a fixed wall, leave 21⁄2" (6.3 cm) minimum on each side and at the back for the water line connections. If your cold water supply, the water pressure to the reverse osmosis system needs to be turned off by a switch. The preferred room temperature range for 1" (2.54 cm) of the refrigerator needs to be provided. NOTE...
Warranty Information
Page 1
... appliance is operated and maintained according to instructions attached to or furnished with the product, Whirlpool Corporation or Whirlpool Canada LP (hereafter "Whirlpool") will pay for product service if your major appliance is located in a remote area where service by an authorized Whirlpool servicer is not available. 10. Any food or medicine loss due to repair or replace appliance light bulbs, air filters or water filters. Repairs to parts or...
... appliance is operated and maintained according to instructions attached to or furnished with the product, Whirlpool Corporation or Whirlpool Canada LP (hereafter "Whirlpool") will pay for product service if your major appliance is located in a remote area where service by an authorized Whirlpool servicer is not available. 10. Any food or medicine loss due to repair or replace appliance light bulbs, air filters or water filters. Repairs to parts or...


