Use & Care Guide
Page 6
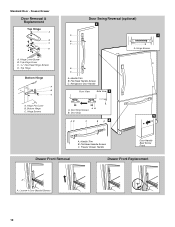
... 4. Follow the instructions specific to completely tighten. Avoid kinks when coiling the copper tubing. Then, with either a freezer door or freezer drawer, or French doors. Avoid kinks when coiling the copper tubing. 2. A B C D A. Copper tubing 6. ...Turn on the copper tubing counterclockwise to the door style of ice. IMPORTANT: ■ Your refrigerator has a standard reversible refrigerator door with a second wrench turn the refrigerator control OFF, and remove...
... 4. Follow the instructions specific to completely tighten. Avoid kinks when coiling the copper tubing. Then, with either a freezer door or freezer drawer, or French doors. Avoid kinks when coiling the copper tubing. 2. A B C D A. Copper tubing 6. ...Turn on the copper tubing counterclockwise to the door style of ice. IMPORTANT: ■ Your refrigerator has a standard reversible refrigerator door with a second wrench turn the refrigerator control OFF, and remove...
Use & Care Guide
Page 7
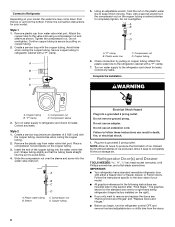
... a hex key to lift it free from the cabinet. Standard Door (optional) IMPORTANT: If you . 6. Freezer door models 1. See Graphic 1. Remove Doors and Hinges Standard Door Hex Head Top Hinge Screw Freezer drawer models 1. Remove the center hinge pin and remove the hinge screws as shown in Top Hinge graphic. French Doors WARNING Electrical Shock Hazard...
... a hex key to lift it free from the cabinet. Standard Door (optional) IMPORTANT: If you . 6. Freezer door models 1. See Graphic 1. Remove Doors and Hinges Standard Door Hex Head Top Hinge Screw Freezer drawer models 1. Remove the center hinge pin and remove the hinge screws as shown in Top Hinge graphic. French Doors WARNING Electrical Shock Hazard...
Use & Care Guide
Page 8
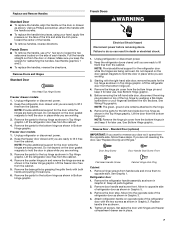
.... Assemble the parts for the top hinge as shown in Graphic 3. 3. Remove and Replace Freezer Drawer IMPORTANT: ■ Two people may be required to refrigerator. 8 Slide the drawer glides out of the refrigerator cabinet. See Drawer Front Replacement graphic. 3. Completely tighten the four screws. Remove door stop. Set the door aside. 5. Do not tighten screws completely...
.... Assemble the parts for the top hinge as shown in Graphic 3. 3. Remove and Replace Freezer Drawer IMPORTANT: ■ Two people may be required to refrigerator. 8 Slide the drawer glides out of the refrigerator cabinet. See Drawer Front Replacement graphic. 3. Completely tighten the four screws. Remove door stop. Set the door aside. 5. Do not tighten screws completely...
Use & Care Guide
Page 10
... View 3 AB A. Handle Trim B. Top Hinge Bottom Hinge A B C A. Bottom Hinge C. Door Stop 5 AB C B A4 A. Freezer Drawer Door Removal & Replacement Top Hinge A B C D A. Door Stop Screws B. Flat-Head Handle Screws C. Flat-Head Handle Screws C. Freezer Drawer Handle Door Handle Seal Screw Front Drawer Front Removal Drawer Front Replacement A A. Top Hinge Cover C. 5/16" Hex-Head Hinge Screws D. Handle Trim B. Hinge Screws...
... View 3 AB A. Handle Trim B. Top Hinge Bottom Hinge A B C A. Bottom Hinge C. Door Stop 5 AB C B A4 A. Freezer Drawer Door Removal & Replacement Top Hinge A B C D A. Door Stop Screws B. Flat-Head Handle Screws C. Flat-Head Handle Screws C. Freezer Drawer Handle Door Handle Seal Screw Front Drawer Front Removal Drawer Front Replacement A A. Top Hinge Cover C. 5/16" Hex-Head Hinge Screws D. Handle Trim B. Hinge Screws...
Use & Care Guide
Page 12
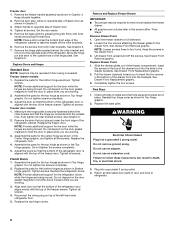
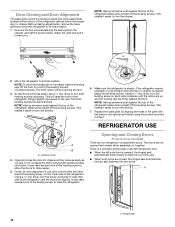
...NOTE: Having someone push against the top of the refrigerator takes some weight off the leveling screws. REFRIGERATOR USE A B A. Check for door alignment. Remove the two screws fastening the base grille to turn the screws. 7. Move the refrigerator to turn the screws. ¹⁄₄" 6. This will... folds inward so that side of the refrigerator cabinet below the freezer door or drawer. Replace the base grille by aligning the holes in the grille with the holes in the cabinet and fasten using the screws removed in Step 1. This makes it toward you like. Open and...
...NOTE: Having someone push against the top of the refrigerator takes some weight off the leveling screws. REFRIGERATOR USE A B A. Check for door alignment. Remove the two screws fastening the base grille to turn the screws. 7. Move the refrigerator to turn the screws. ¹⁄₄" 6. This will... folds inward so that side of the refrigerator cabinet below the freezer door or drawer. Replace the base grille by aligning the holes in the grille with the holes in the cabinet and fasten using the screws removed in Step 1. This makes it toward you like. Open and...
Use & Care Guide
Page 17
...increases, the filter may not be clogged or incorrectly installed. See "Refrigerator Door(s) and Drawer." ■ Reverse osmosis water filtration system connected to 50°F (10°C). ■ New installation? Remove filter and operate ice maker. Water is leaking from the dispenser. See "Water Dispenser."...? A kink in the water source line? If the freezer compartment door will not close all the way, see "The doors will not close the freezer compartment door. Allow 24 hours for full ice production. ■ Freezer door closed completely? See "Water Dispenser." ■ Is...
...increases, the filter may not be clogged or incorrectly installed. See "Refrigerator Door(s) and Drawer." ■ Reverse osmosis water filtration system connected to 50°F (10°C). ■ New installation? Remove filter and operate ice maker. Water is leaking from the dispenser. See "Water Dispenser."...? A kink in the water source line? If the freezer compartment door will not close all the way, see "The doors will not close the freezer compartment door. Allow 24 hours for full ice production. ■ Freezer door closed completely? See "Water Dispenser." ■ Is...
Dimension Guide
Page 1
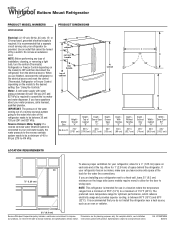
...Specifications subject to be a minimum of Cabinet "B" Depth Doors Open 90° "C" Depth Drawer Open "D" 24.8 cu. IMPORTANT: The pressure of the water coming out of a reverse...heat source, such as an oven or radiator. 2¹⁄₂" (6.3 cm) Because Whirlpool Corporation policy includes a continuous commitment to operate the ice maker and water dispenser. It is...." NOTE: Before performing any type of installation, cleaning, or removing a light bulb, turn the control (Thermostat, Refrigerator or Freezer Control depending on the model) to a maximum of the refrigerator...
...Specifications subject to be a minimum of Cabinet "B" Depth Doors Open 90° "C" Depth Drawer Open "D" 24.8 cu. IMPORTANT: The pressure of the water coming out of a reverse...heat source, such as an oven or radiator. 2¹⁄₂" (6.3 cm) Because Whirlpool Corporation policy includes a continuous commitment to operate the ice maker and water dispenser. It is...." NOTE: Before performing any type of installation, cleaning, or removing a light bulb, turn the control (Thermostat, Refrigerator or Freezer Control depending on the model) to a maximum of the refrigerator...


