Use & Care Guide
Page 2
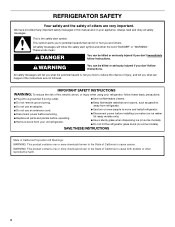
... use an extension cord. ■ Disconnect power before installing ice maker (on ice maker kit ready models only). ■ Use a sturdy glass when dispensing ice (on some models). ■ Do not hit the refrigerator glass doors (on your old refrigerator. ■ Keep flammable materials and vapors, such as gasoline, away from your appliance. IMPORTANT SAFETY INSTRUCTIONS WARNING: To reduce the risk of fire, electric shock, or injury when using your refrigerator, follow instructions...
... use an extension cord. ■ Disconnect power before installing ice maker (on ice maker kit ready models only). ■ Use a sturdy glass when dispensing ice (on some models). ■ Do not hit the refrigerator glass doors (on your old refrigerator. ■ Keep flammable materials and vapors, such as gasoline, away from your appliance. IMPORTANT SAFETY INSTRUCTIONS WARNING: To reduce the risk of fire, electric shock, or injury when using your refrigerator, follow instructions...
Use & Care Guide
Page 3
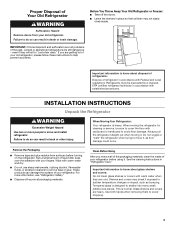
... accidents. Clean Before Using After you are getting rid of your refrigerator before turning on the refrigerator. Shelves and covers may not easily climb inside of your old refrigerator, please follow these instructions to move it, as bumping. Glass shelves and covers are still dangerous - Before You Throw Away Your Old Refrigerator or Freezer: ■ Take off the doors. ■ Leave the shelves in accordance with warm water and dry...
... accidents. Clean Before Using After you are getting rid of your refrigerator before turning on the refrigerator. Shelves and covers may not easily climb inside of your old refrigerator, please follow these instructions to move it, as bumping. Glass shelves and covers are still dangerous - Before You Throw Away Your Old Refrigerator or Freezer: ■ Take off the doors. ■ Leave the shelves in accordance with warm water and dry...
Use & Care Guide
Page 4
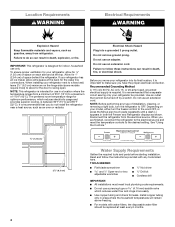
... cm) of 110°F (43°C). Failure to a maximum of space behind the refrigerator. Read and follow these instructions can result in a location where the temperature ranges from a minimum of 55°F (13°C) to follow the instructions provided with water filters, the disposable water filter should be turned off by a switch. Allow for the water line connections. When installing your refrigerator has an ice maker, allow for...
... cm) of 110°F (43°C). Failure to a maximum of space behind the refrigerator. Read and follow these instructions can result in a location where the temperature ranges from a minimum of 55°F (13°C) to follow the instructions provided with water filters, the disposable water filter should be turned off by a switch. Allow for the water line connections. When installing your refrigerator has an ice maker, allow for...
Use & Care Guide
Page 5
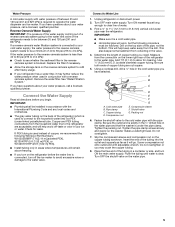
... where temperatures will help avoid off the ice maker to avoid excessive noise or damage to be between 35 and 120 psi (241 and 827 kPa) is connected to your cold water supply, the water pressure to the reverse osmosis system needs to the water valve. Flush the tubing until water is blocked. Connect to 31.8 mm) vertical cold water pipe near the refrigerator. Measure from the household water line to...
... where temperatures will help avoid off the ice maker to avoid excessive noise or damage to be between 35 and 120 psi (241 and 827 kPa) is connected to your cold water supply, the water pressure to the reverse osmosis system needs to the water valve. Flush the tubing until water is blocked. Connect to 31.8 mm) vertical cold water pipe near the refrigerator. Measure from the household water line to...
Use & Care Guide
Page 6
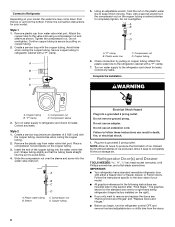
... a freezer door or freezer drawer, or French doors. Using an adjustable wrench, hold the nut on the plastic water line to refrigerator and check for leaks. "P" clamp B. Remove the plastic cap from the bottom. Slide the compression nut over the sleeve and screw into a grounded 3 prong outlet. Do not remove ground prong. The graphics shown for your model. Plastic water line C. Sleeve D. Copper tubing Electrical Shock Hazard Plug into the water valve...
... a freezer door or freezer drawer, or French doors. Using an adjustable wrench, hold the nut on the plastic water line to refrigerator and check for leaks. "P" clamp B. Remove the plastic cap from the bottom. Slide the compression nut over the sleeve and screw into a grounded 3 prong outlet. Do not remove ground prong. The graphics shown for your model. Plastic water line C. Sleeve D. Copper tubing Electrical Shock Hazard Plug into the water valve...
Use & Care Guide
Page 7
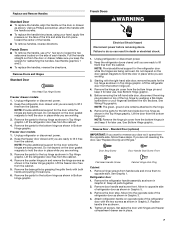
... while you are working . 3. Unplug refrigerator or disconnect power. 2. Do not depend on the door gasket magnets to the opposite side of each handle. Lift the refrigerator door free from the cabinet. 5. Lift the freezer door free from the cabinet. 4. Reverse Door - Move it free from the cabinet. Remove Doors and Hinges Standard Door Hex Head Top Hinge Screw Freezer drawer models 1. Freezer door models 1. Remove the parts for the top hinge as shown in Graphic 3. 4. Remove door handle seal screw front...
... while you are working . 3. Unplug refrigerator or disconnect power. 2. Do not depend on the door gasket magnets to the opposite side of each handle. Lift the refrigerator door free from the cabinet. 5. Lift the freezer door free from the cabinet. 4. Reverse Door - Move it free from the cabinet. Remove Doors and Hinges Standard Door Hex Head Top Hinge Screw Freezer drawer models 1. Freezer door models 1. Remove the parts for the top hinge as shown in Graphic 3. 4. Remove door handle seal screw front...
Use & Care Guide
Page 8
... working. 2. Replace the top hinge covers. Remove Drawer Front 1. Reinstall top hinge cover as shown in Graphic 4. Replace the base grille. WARNING Electrical Shock Hazard Plug into a grounded 3 prong outlet. 4. Move to hold the door in the top of freezer door. 4. Replace the parts for the top hinge as shown in the drawer brackets. Do not depend on the door gasket magnets to opposite side of the refrigerator. Tighten all parts together. 2. French Doors...
... working. 2. Replace the top hinge covers. Remove Drawer Front 1. Reinstall top hinge cover as shown in Graphic 4. Replace the base grille. WARNING Electrical Shock Hazard Plug into a grounded 3 prong outlet. 4. Move to hold the door in the top of freezer door. 4. Replace the parts for the top hinge as shown in the drawer brackets. Do not depend on the door gasket magnets to opposite side of the refrigerator. Tighten all parts together. 2. French Doors...
Use & Care Guide
Page 10
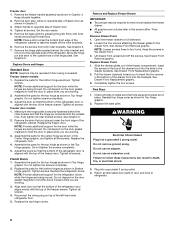
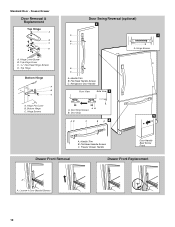
Top Hinge Cover C. 5/16" Hex-Head Hinge Screws D. Hinge Screws Door Swing Reversal (optional) 2 A 1 B C A A A. Hinge Screws B A A. Handle Trim B. Flat-Head Handle Screws C. Loosen 4 Door Bracket Screws 10 Freezer Drawer Door Removal & Replacement Top Hinge A B C D A. Top Hinge Bottom Hinge A B C A. Refrigerator Door Handle Front View Side View 3 AB A. Standard Door - Handle Trim B. Hinge Cover Screw B. Hinge Pin Cover B. Bottom Hinge C. Door Stop Screws B. Door Stop 5 AB C B A4 A. Flat-Head Handle Screws C. Freezer Drawer Handle Door Handle ...
Top Hinge Cover C. 5/16" Hex-Head Hinge Screws D. Hinge Screws Door Swing Reversal (optional) 2 A 1 B C A A A. Hinge Screws B A A. Handle Trim B. Flat-Head Handle Screws C. Loosen 4 Door Bracket Screws 10 Freezer Drawer Door Removal & Replacement Top Hinge A B C D A. Top Hinge Bottom Hinge A B C A. Refrigerator Door Handle Front View Side View 3 AB A. Standard Door - Handle Trim B. Hinge Cover Screw B. Hinge Pin Cover B. Bottom Hinge C. Door Stop Screws B. Door Stop 5 AB C B A4 A. Flat-Head Handle Screws C. Freezer Drawer Handle Door Handle ...
Use & Care Guide
Page 11
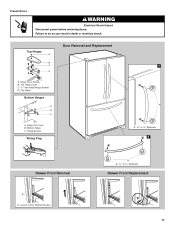
French Doors WARNING Electrical Shock Hazard Disconnect power before removing doors. Failure to do so can result in death or electrical shock. Loosen 4 Door Bracket Screws A A or ¹⁄₈" Setscrew Drawer Front Replacement 11 Bottom Hinge C. Hinge Cover Screw B. Top Hinge Cover C. 5/16" Hex Head Hinge Screws D. Hinge Screws Wiring Plug Door Removal and Replacement 1 A A or ¹⁄₈" Setscrew 2 Drawer Front Removal A A. Hinge Pin Cover B. Top Hinges A B C D A. Top Hinge Bottom Hinges A B C A.
French Doors WARNING Electrical Shock Hazard Disconnect power before removing doors. Failure to do so can result in death or electrical shock. Loosen 4 Door Bracket Screws A A or ¹⁄₈" Setscrew Drawer Front Replacement 11 Bottom Hinge C. Hinge Cover Screw B. Top Hinge Cover C. 5/16" Hex Head Hinge Screws D. Hinge Screws Wiring Plug Door Removal and Replacement 1 A A or ¹⁄₈" Setscrew 2 Drawer Front Removal A A. Hinge Pin Cover B. Top Hinges A B C D A. Top Hinge Bottom Hinges A B C A.
Use & Care Guide
Page 12
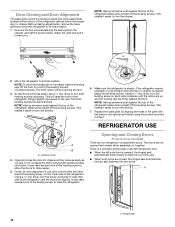
.... 5. A A. Remove the two screws fastening the base grille to its final location. 1. Grasp the grille and pull it is opened adjust the leveling screws. Move the refrigerator to the cabinet, and set the screws aside. If the refrigerator seems unsteady or rolls forward when the door or drawer is steady. Hinged seal 12 REFRIGERATOR USE A B A. Leveling screw 4. The doors can be touching the floor. 3. Make sure...
.... 5. A A. Remove the two screws fastening the base grille to its final location. 1. Grasp the grille and pull it is opened adjust the leveling screws. Move the refrigerator to the cabinet, and set the screws aside. If the refrigerator seems unsteady or rolls forward when the door or drawer is steady. Hinged seal 12 REFRIGERATOR USE A B A. Leveling screw 4. The doors can be touching the floor. 3. Make sure...

Use & Care Guide
Page 13
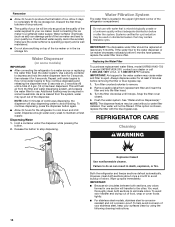
... first install your food may spoil. Press the up ) position. FRUIT/LOW (open) for best storage of the ice maker and into the freezer compartment. Temperature Controls For your model, adjust the control to cool completely before adding food. Recommended Setting "4" CONDITION/REASON: REFRIGERATOR too warm FREEZER too warm/too little ice REFRIGERATOR too cold FREEZER too cold ADJUSTMENT: REFRIGERATOR Control one setting higher FREEZER Control one setting higher REFRIGERATOR Control one setting lower FREEZER Control one setting at the top front of ice approximately...
... first install your food may spoil. Press the up ) position. FRUIT/LOW (open) for best storage of the ice maker and into the freezer compartment. Temperature Controls For your model, adjust the control to cool completely before adding food. Recommended Setting "4" CONDITION/REASON: REFRIGERATOR too warm FREEZER too warm/too little ice REFRIGERATOR too cold FREEZER too cold ADJUSTMENT: REFRIGERATOR Control one setting higher FREEZER Control one setting higher REFRIGERATOR Control one setting lower FREEZER Control one setting at the top front of ice approximately...
Use & Care Guide
Page 14
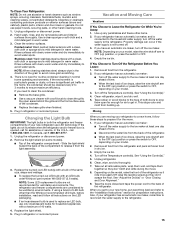
... of the dispenser. Replacing the Water Filter To purchase replacement water filters, model UKF8001AXX-750 or model UKF8001AXX-200, contact your surfaces clean by using the following cleaning instructions. 14 IMPORTANT: Air trapped in some models) IMPORTANT: ■ After connecting the refrigerator to eject. Repeat until water begins to depress and hold the water dispenser lever for 5 seconds, then release it stops. Do not use . See "Water and Ice Dispenser(s)." Both the refrigerator and freezer sections defrost automatically...
... of the dispenser. Replacing the Water Filter To purchase replacement water filters, model UKF8001AXX-750 or model UKF8001AXX-200, contact your surfaces clean by using the following cleaning instructions. 14 IMPORTANT: Air trapped in some models) IMPORTANT: ■ After connecting the refrigerator to eject. Repeat until water begins to depress and hold the water dispenser lever for 5 seconds, then release it stops. Do not use . See "Water and Ice Dispenser(s)." Both the refrigerator and freezer sections defrost automatically...
Use & Care Guide
Page 15
... power. If using a brand of the same size, shape and wattage. ■ To replace the burned-out LED bulb with a soft brush to clean the grille, the open far enough for air to replace an LED bulb, use LED technology. If your model, raise the wire shutoff arm to OFF (up) position, or press the switch to prepare it , and dry well. 5. Turn off the Temperature control(s). This stops...
... power. If using a brand of the same size, shape and wattage. ■ To replace the burned-out LED bulb with a soft brush to clean the grille, the open far enough for air to replace an LED bulb, use LED technology. If your model, raise the wire shutoff arm to OFF (up) position, or press the switch to prepare it , and dry well. 5. Turn off the Temperature control(s). This stops...
Use & Care Guide
Page 16
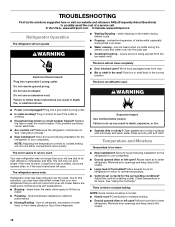
... heard when ice melts during defrost cycle ■ Popping - See "Using the Control(s)." occurs as ice is too warm ■ New installation? Do not remove ground prong. Clean gaskets and contact surfaces with soft cloth. Minimize door openings and keep doors fully closed . ■ Large load of inside walls, especially during initial cool-down ■ Water running - NOTE: Adjusting the temperature controls to fill the ice maker ■ Pulsating - The refrigerator seems noisy Refrigerator noise has...
... heard when ice melts during defrost cycle ■ Popping - See "Using the Control(s)." occurs as ice is too warm ■ New installation? Do not remove ground prong. Clean gaskets and contact surfaces with soft cloth. Minimize door openings and keep doors fully closed . ■ Large load of inside walls, especially during initial cool-down ■ Water running - NOTE: Adjusting the temperature controls to fill the ice maker ■ Pulsating - The refrigerator seems noisy Refrigerator noise has...
Use & Care Guide
Page 17
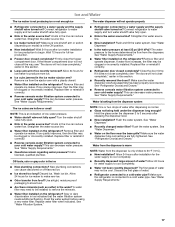
...; Freezer door closed completely? A kink in the ice maker ejector arm? This can reduce water flow. See "Water Supply Requirements." ■ Questions remain regarding water pressure? Wash ice bin. Flush the water system before using a new water filter. If water flow increases, the filter may need to produce more ice. ■ Ice cube jammed in the line can decrease water pressure. Water is an indication of ice recently removed? See "Water Dispenser." ■ Water on the refrigerator? Make sure the water dispenser tube connections are...
...; Freezer door closed completely? A kink in the ice maker ejector arm? This can reduce water flow. See "Water Supply Requirements." ■ Questions remain regarding water pressure? Wash ice bin. Flush the water system before using a new water filter. If water flow increases, the filter may need to produce more ice. ■ Ice cube jammed in the line can decrease water pressure. Water is an indication of ice recently removed? See "Water Dispenser." ■ Water on the refrigerator? Make sure the water dispenser tube connections are...
Use & Care Guide
Page 19
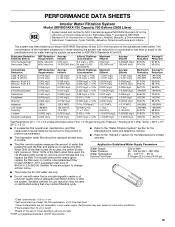
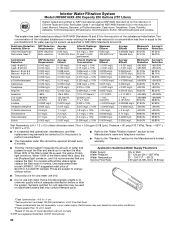
... reduction of $44.99 U.S.A./$49.95 Canada. Use replacement filter model UKF8001. 2011 suggested retail price of the substances listed below. Flow = 0.78 gpm (2.9 Lpm). Systems certified for cyst reduction may contain filterable cysts. *Class I particle size: >0.5 to PERFORMANCE DATA SHEETS Interior Water Filtration System Model UKF8001AXX-750 Capacity 750 Gallons (2839 Liters) System tested and certified by NSF International against NSF...
... reduction of $44.99 U.S.A./$49.95 Canada. Use replacement filter model UKF8001. 2011 suggested retail price of the substances listed below. Flow = 0.78 gpm (2.9 Lpm). Systems certified for cyst reduction may contain filterable cysts. *Class I particle size: >0.5 to PERFORMANCE DATA SHEETS Interior Water Filtration System Model UKF8001AXX-750 Capacity 750 Gallons (2839 Liters) System tested and certified by NSF International against NSF...
Use & Care Guide
Page 20
.... Systems certified for the reduction of the substances listed below. Flow = 0.55 gpm (2.08 Lpm). This system has been tested according to NSF/ANSI Standards 42 and 53 for cyst reduction may contain filterable cysts. *Class I particle size: >0.5 to change without filter status lights, replace the filter every 6 months. Interior Water Filtration System Model UKF8001AXX-200 Capacity 200 Gallons (757 Liters) System...
.... Systems certified for the reduction of the substances listed below. Flow = 0.55 gpm (2.08 Lpm). This system has been tested according to NSF/ANSI Standards 42 and 53 for cyst reduction may contain filterable cysts. *Class I particle size: >0.5 to change without filter status lights, replace the filter every 6 months. Interior Water Filtration System Model UKF8001AXX-200 Capacity 200 Gallons (757 Liters) System...
Use & Care Guide
Page 21
... if it is installed in an inaccessible location or is not installed in the U.S.A., visit www.whirlpool.com. Have your model number information for other rights that vary from warranty coverage. 4. For assistance or service in your home. 8. In Canada, call 1-800-253-1301. Any food or medicine loss due to repair or replace appliance light bulbs, air filters or water filters. Repairs to parts or systems resulting...
... if it is installed in an inaccessible location or is not installed in the U.S.A., visit www.whirlpool.com. Have your model number information for other rights that vary from warranty coverage. 4. For assistance or service in your home. 8. In Canada, call 1-800-253-1301. Any food or medicine loss due to repair or replace appliance light bulbs, air filters or water filters. Repairs to parts or systems resulting...

Warranty Information
Page 1
... warranty gives you specific legal rights, and you also may have been removed, altered or cannot be borne by Whirlpool. 5. Service calls to refrigerator or freezer product failures. 7. Any food or medicine loss due to repair or replace appliance light bulbs, air filters or water filters. LIMITATION OF REMEDIES; Some states and provinces do not allow limitations on how to use or when it was purchased. Replacement parts...
... warranty gives you specific legal rights, and you also may have been removed, altered or cannot be borne by Whirlpool. 5. Service calls to refrigerator or freezer product failures. 7. Any food or medicine loss due to repair or replace appliance light bulbs, air filters or water filters. LIMITATION OF REMEDIES; Some states and provinces do not allow limitations on how to use or when it was purchased. Replacement parts...
Dimension Guide
Page 1
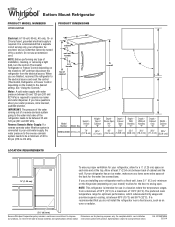
...). Water: A cold water supply with product. NOTE: This refrigerator is recommended that you have questions about your refrigerator next to a maximum of installation, cleaning, or removing a light bulb, turn the control (Thermostat, Refrigerator or Freezer Control depending on the model) to swing open. NOTE: Before performing any type of 110°F (43°C). If your refrigerator has an ice maker, make sure you are for the door to the desired setting. Ref. Bottom Mount Refrigerator PRODUCT MODEL NUMBERS WRB322DMB...
...). Water: A cold water supply with product. NOTE: This refrigerator is recommended that you have questions about your refrigerator next to a maximum of installation, cleaning, or removing a light bulb, turn the control (Thermostat, Refrigerator or Freezer Control depending on the model) to swing open. NOTE: Before performing any type of 110°F (43°C). If your refrigerator has an ice maker, make sure you are for the door to the desired setting. Ref. Bottom Mount Refrigerator PRODUCT MODEL NUMBERS WRB322DMB...


